操作系统一般都会内置一种Emoji字体,MacOS/iOS内置的是Apple Color Emoji字体,Windows内置的是Segoe UI Emoji字体,Android内置的是Noto Color Emoji字体。这也是同一个Emoji再不同的设备上长得不一样的原因,除此之外,很多应用也会自带Emoji字体,比如WhatsApp、Twitter和Facebook
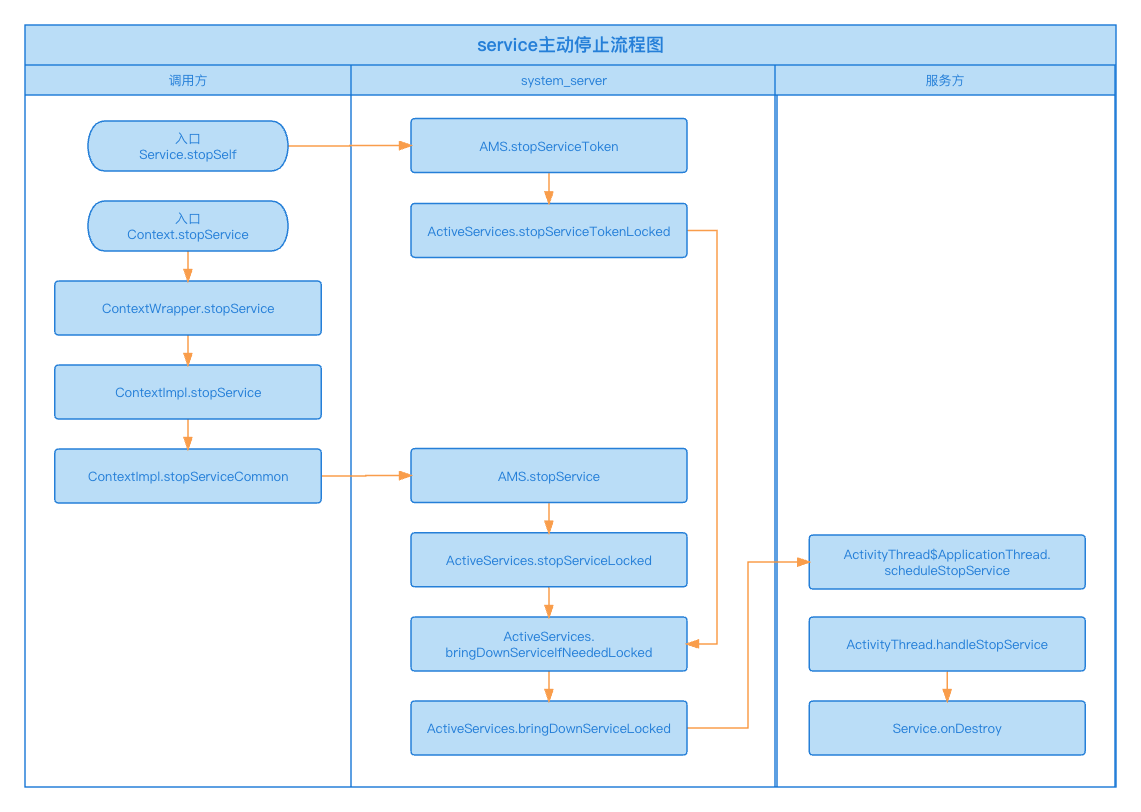
//frameworks/base/services/core/java/com/android/server/am/ActiveServices.java booleanstopServiceTokenLocked(ComponentName className, IBinder token, int startId){ //通过className查找相应的ServiceRecord //在Service启动过程中调用的retrieveServiceLocked方法会查找Service,创建ServiceRecord //并将其添加到Map中,findServiceLocked方法只需要从这个Map中去获取即可 ServiceRecord r = findServiceLocked(className, token, UserHandle.getCallingUserId()); if (r != null) { if (startId >= 0) { // Asked to only stop if done with all work. Note that // to avoid leaks, we will take this as dropping all // start items up to and including this one. //查找startId所对应的已分发的启动项 ServiceRecord.StartItem si = r.findDeliveredStart(startId, false, false); //从已分发启动请求列表中移除 if (si != null) { while (r.deliveredStarts.size() > 0) { ServiceRecord.StartItem cur = r.deliveredStarts.remove(0); cur.removeUriPermissionsLocked(); if (cur == si) { break; } } }
//如果传入的启动ID不是Service最后一次启动的ID,则不能停止服务 //ps:每次启动Service,startId都会递增,初始值为1 if (r.getLastStartId() != startId) { returnfalse; } }
// Check to see if the service had been started as foreground, but being // brought down before actually showing a notification. That is not allowed. //如果此Service是以前台服务的形式启动,并且当前还尚未成为前台服务 if (r.fgRequired) { r.fgRequired = false; r.fgWaiting = false; ... //记录 //将前台服务的超时回调取消 mAm.mHandler.removeMessages( ActivityManagerService.SERVICE_FOREGROUND_TIMEOUT_MSG, r); //这种情况直接令App崩溃,杀死应用 if (r.app != null) { Message msg = mAm.mHandler.obtainMessage( ActivityManagerService.SERVICE_FOREGROUND_CRASH_MSG); msg.obj = r.app; msg.getData().putCharSequence( ActivityManagerService.SERVICE_RECORD_KEY, r.toString()); mAm.mHandler.sendMessage(msg); } }
//从缓存中移除ServiceRecord final ServiceMap smap = getServiceMapLocked(r.userId); ServiceRecord found = smap.mServicesByInstanceName.remove(r.instanceName);
// Note when this method is called by bringUpServiceLocked(), the service is not found // in mServicesByInstanceName and found will be null. if (found != null && found != r) { // This is not actually the service we think is running... this should not happen, // but if it does, fail hard. //如果找到的服务不是我们目前停止的服务,应该是一个不可能的情况 //碰到这种情况,将ServiceRecord重新放回去并抛出异常 smap.mServicesByInstanceName.put(r.instanceName, found); thrownew IllegalStateException("Bringing down " + r + " but actually running " + found); } //清除ServiceRecord smap.mServicesByIntent.remove(r.intent); r.totalRestartCount = 0; //取消之前的Service重启任务(如果有) unscheduleServiceRestartLocked(r, 0, true);
// Also make sure it is not on the pending list. //从待启动Service列表中移除 for (int i=mPendingServices.size()-1; i>=0; i--) { if (mPendingServices.get(i) == r) { mPendingServices.remove(i); } }
//frameworks/base/services/core/java/com/android/server/am/ActiveServices.java intstopServiceLocked(IApplicationThread caller, Intent service, String resolvedType, int userId){ final ProcessRecord callerApp = mAm.getRecordForAppLocked(caller); if (caller != null && callerApp == null) { thrownew SecurityException( "Unable to find app for caller " + caller + " (pid=" + Binder.getCallingPid() + ") when stopping service " + service); }
// If this service is active, make sure it is stopped. //查找相应的Service,其中入参createIfNeeded为false,所以如果从缓存中找不到ServiceRecord的话则会直接返回null ServiceLookupResult r = retrieveServiceLocked(service, null, resolvedType, null, Binder.getCallingPid(), Binder.getCallingUid(), userId, false, false, false, false); if (r != null) { if (r.record != null) { finallong origId = Binder.clearCallingIdentity(); try { //接着处理停止服务 stopServiceLocked(r.record); } finally { Binder.restoreCallingIdentity(origId); } return1; } return -1; }
return0; }
privatevoidstopServiceLocked(ServiceRecord service){ if (service.delayed) { // If service isn't actually running, but is being held in the // delayed list, then we need to keep it started but note that it // should be stopped once no longer delayed. service.delayedStop = true; return; } ... //统计信息记录
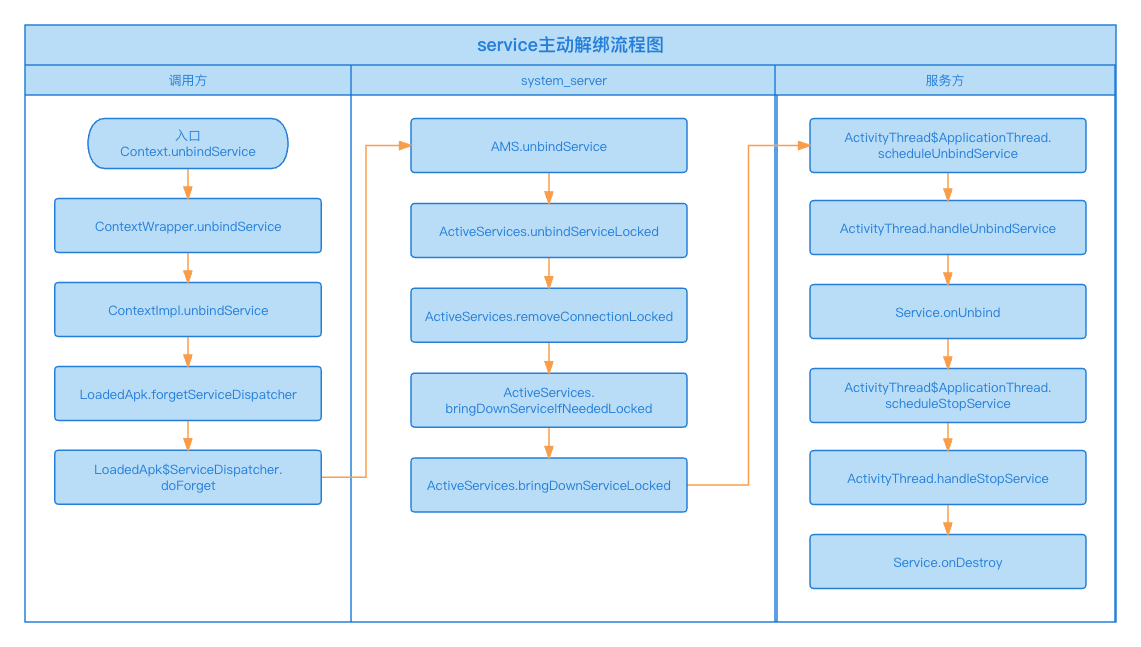
finallong origId = Binder.clearCallingIdentity(); try { //遍历连接 while (clist.size() > 0) { ConnectionRecord r = clist.get(0); //移除连接 removeConnectionLocked(r, null, null); //removeConnectionLocked方法会将此ConnectionRecord从连接列表中移除 //如果此ConnectionRecord仍然存在的话,是一个严重的错误,这里再移除一次 if (clist.size() > 0 && clist.get(0) == r) { // In case it didn't get removed above, do it now. Slog.wtf(TAG, "Connection " + r + " not removed for binder " + binder); clist.remove(0); }
if (r.binding.service.app != null) { if (r.binding.service.app.whitelistManager) { updateWhitelistManagerLocked(r.binding.service.app); } // This could have made the service less important. if ((r.flags&Context.BIND_TREAT_LIKE_ACTIVITY) != 0) { r.binding.service.app.treatLikeActivity = true; mAm.updateLruProcessLocked(r.binding.service.app, r.binding.service.app.hasClientActivities() || r.binding.service.app.treatLikeActivity, null); } } }
//如果调用方App没有其他连接和Service绑定 //则将整个AppBindRecord移除 if (b.connections.size() == 0) { b.intent.apps.remove(b.client); }
if (!c.serviceDead) { //如果服务端进程存活并且没有其他连接绑定了,同时服务还处在绑定关系中(尚未回调过Service.onUnbind) if (s.app != null && s.app.thread != null && b.intent.apps.size() == 0 && b.intent.hasBound) { try { bumpServiceExecutingLocked(s, false, "unbind"); if (b.client != s.app && (c.flags&Context.BIND_WAIVE_PRIORITY) == 0 && s.app.setProcState <= ActivityManager.PROCESS_STATE_HEAVY_WEIGHT) { // If this service's process is not already in the cached list, // then update it in the LRU list here because this may be causing // it to go down there and we want it to start out near the top. mAm.updateLruProcessLocked(s.app, false, null); } mAm.updateOomAdjLocked(s.app, true, OomAdjuster.OOM_ADJ_REASON_UNBIND_SERVICE); //标记为未绑定 b.intent.hasBound = false; // Assume the client doesn't want to know about a rebind; // we will deal with that later if it asks for one. b.intent.doRebind = false; //回到App进程,调度执行Service的unbind操作 s.app.thread.scheduleUnbindService(s, b.intent.intent.getIntent()); } catch (Exception e) { serviceProcessGoneLocked(s); } }
// If unbound while waiting to start and there is no connection left in this service, // remove the pending service if (s.getConnections().isEmpty()) { mPendingServices.remove(s); }
//frameworks/base/services/core/java/com/android/server/am/ServiceRecord.java public AppBindRecord retrieveAppBindingLocked(Intent intent, ProcessRecord app){ Intent.FilterComparison filter = new Intent.FilterComparison(intent); IntentBindRecord i = bindings.get(filter); if (i == null) { i = new IntentBindRecord(this, filter); bindings.put(filter, i); } AppBindRecord a = i.apps.get(app); if (a != null) { return a; } a = new AppBindRecord(this, i, app); i.apps.put(app, a); return a; }
// Are we in the process of launching? //不要停止正在启动中的Service if (mPendingServices.contains(r)) { return; }
//继续停止服务 bringDownServiceLocked(r); }
privatefinalbooleanisServiceNeededLocked(ServiceRecord r, boolean knowConn, boolean hasConn){ // Are we still explicitly being asked to run? //Service之前是否通过startService启动过并且未stop if (r.startRequested) { returntrue; }
// Is someone still bound to us keeping us running? //这里我们传入的是true //因为我们之前已经做了检查,知道了是否还有其他auto-create的连接 if (!knowConn) { hasConn = r.hasAutoCreateConnections(); } //如果还有其他auto-create的连接 //则此服务还被需要 if (hasConn) { returntrue; }
//frameworks/base/services/core/java/com/android/server/am/ActiveServices.java privatefinalvoidbringDownServiceLocked(ServiceRecord r){ //断开所有连接 ArrayMap<IBinder, ArrayList<ConnectionRecord>> connections = r.getConnections(); for (int conni = connections.size() - 1; conni >= 0; conni--) { ArrayList<ConnectionRecord> c = connections.valueAt(conni); for (int i=0; i<c.size(); i++) { ConnectionRecord cr = c.get(i); // There is still a connection to the service that is // being brought down. Mark it as dead. //将服务标记为死亡 cr.serviceDead = true; cr.stopAssociation(); //回调ServiceConnection各种方法 //通知client服务断开连接以及死亡 cr.conn.connected(r.name, null, true); } }
// Tell the service that it has been unbound. //通知Service解除绑定 if (r.app != null && r.app.thread != null) { boolean needOomAdj = false; //遍历所有连接,解除绑定 for (int i = r.bindings.size() - 1; i >= 0; i--) { IntentBindRecord ibr = r.bindings.valueAt(i); //如果还处在绑定关系中(尚未回调过Service.onUnbind) if (ibr.hasBound) { try { //记录Service执行操作并设置超时回调 //前台服务超时时间为20s,后台服务超时时间为200s bumpServiceExecutingLocked(r, false, "bring down unbind"); needOomAdj = true; //标记为未绑定 ibr.hasBound = false; ibr.requested = false; //回到App进程,调度执行Service的unbind操作 r.app.thread.scheduleUnbindService(r, ibr.intent.getIntent()); } catch (Exception e) { needOomAdj = false; serviceProcessGoneLocked(r); break; } } } //更新服务端进程优先级 if (needOomAdj) { mAm.updateOomAdjLocked(r.app, true, OomAdjuster.OOM_ADJ_REASON_UNBIND_SERVICE); } } ... //和上文相同 }
synchronized (this) { //被标记为遗忘则不处理任何事情 //调用unbindService就会将这个标志设为true if (mForgotten) { // We unbound before receiving the connection; ignore // any connection received. return; } old = mActiveConnections.get(name); //如果旧的连接信息中的IBinder对象和本次调用传入的IBinder对象是同一个对象 if (old != null && old.binder == service) { // Huh, already have this one. Oh well! return; }
if (service != null) { // A new service is being connected... set it all up. //建立一个新的连接信息 info = new ConnectionInfo(); info.binder = service; info.deathMonitor = new DeathMonitor(name, service); try { //注册Binder死亡通知 service.linkToDeath(info.deathMonitor, 0); //保存本次连接信息 mActiveConnections.put(name, info); } catch (RemoteException e) { // This service was dead before we got it... just // don't do anything with it. //服务已死亡,移除连接信息 mActiveConnections.remove(name); return; } } else { // The named service is being disconnected... clean up. mActiveConnections.remove(name); }
//移除Binder死亡通知 if (old != null) { old.binder.unlinkToDeath(old.deathMonitor, 0); } }
// If there was an old service, it is now disconnected. //回调ServiceConnection.onServiceDisconnected //通知client之前的连接已被断开 if (old != null) { mConnection.onServiceDisconnected(name); } //如果Service死亡需要回调ServiceConnection.onBindingDied通知client服务死亡 if (dead) { mConnection.onBindingDied(name); } // If there is a new viable service, it is now connected. if (service != null) { //回调ServiceConnection.onServiceConnected方法 //告知client已建立连接 mConnection.onServiceConnected(name, service); } else { // The binding machinery worked, but the remote returned null from onBind(). //当Service.onBind方法返回null,或者Service停止时 //回调ServiceConnection.onNullBinding方法 mConnection.onNullBinding(name); } }
//frameworks/base/services/core/java/com/android/server/am/ActiveServices.java voidunbindFinishedLocked(ServiceRecord r, Intent intent, boolean doRebind){ finallong origId = Binder.clearCallingIdentity(); try { if (r != null) { Intent.FilterComparison filter = new Intent.FilterComparison(intent); IntentBindRecord b = r.bindings.get(filter);
boolean inDestroying = mDestroyingServices.contains(r); if (b != null) { //服务unbind的前提就是IntentBindRecord.apps.size == 0 if (b.apps.size() > 0 && !inDestroying) { ... } else { // Note to tell the service the next time there is // a new client. //将doRebind标记置为true,下一次再次建立连接时 //服务会回调Service.onRebind方法 b.doRebind = true; } }
//frameworks/base/services/core/java/com/android/server/am/ActiveServices.java intbindServiceLocked(IApplicationThread caller, IBinder token, Intent service, String resolvedType, final IServiceConnection connection, int flags, String instanceName, String callingPackage, finalint userId) throws TransactionTooLargeException { ... if (s.app != null && b.intent.received) { // Service is already running, so we can immediately // publish the connection. //如果服务之前就已经在运行,即Service.onBind方法已经被执行,返回的IBinder对象也已经被保存 //调用LoadedApk$ServiceDispatcher$InnerConnection.connected方法 //回调ServiceConnection.onServiceConnected方法 c.conn.connected(s.name, b.intent.binder, false);
// If this is the first app connected back to this binding, // and the service had previously asked to be told when // rebound, then do so. //当服务解绑,调用到Service.onUnbind方法时返回true,此时doRebind变量就会被赋值为true //此时,当再次建立连接时,服务会回调Service.onRebind方法 if (b.intent.apps.size() == 1 && b.intent.doRebind) { requestServiceBindingLocked(s, b.intent, callerFg, true); } } elseif (!b.intent.requested) { //如果服务是因这次绑定而创建的 //请求执行Service.onBind方法,获取返回的IBinder对象 //发布Service,回调ServiceConnection.onServiceConnected方法 requestServiceBindingLocked(s, b.intent, callerFg, false); } ... }
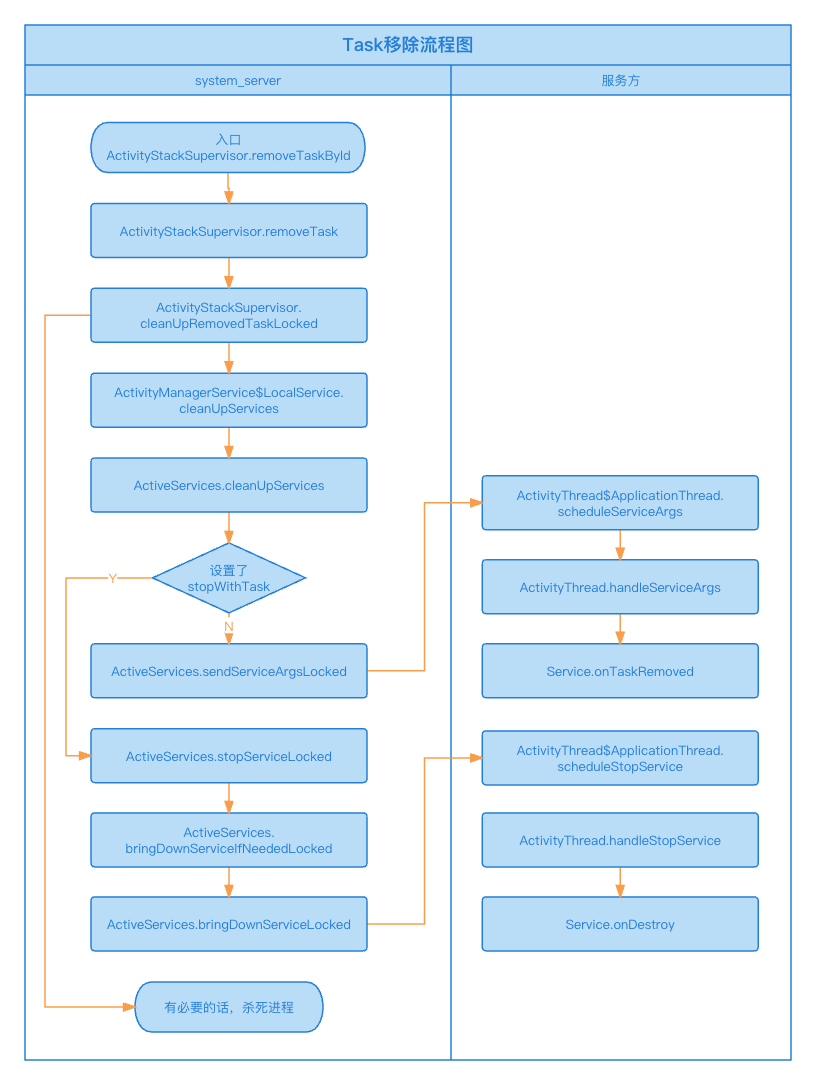
// Find any running services associated with this app and stop if needed. //清理和此Task有关联的服务 final Message msg = PooledLambda.obtainMessage(ActivityManagerInternal::cleanUpServices, mService.mAmInternal, task.mUserId, component, new Intent(task.getBaseIntent())); mService.mH.sendMessage(msg);
//如果不需要杀死进程,到这里就为止了 if (!killProcess) { return; }
// Determine if the process(es) for this task should be killed. final String pkg = component.getPackageName(); ArrayList<Object> procsToKill = new ArrayList<>(); ArrayMap<String, SparseArray<WindowProcessController>> pmap = mService.mProcessNames.getMap(); //遍历App进程,确定要杀死的进程 for (int i = 0; i < pmap.size(); i++) { SparseArray<WindowProcessController> uids = pmap.valueAt(i); for (int j = 0; j < uids.size(); j++) { WindowProcessController proc = uids.valueAt(j); //不要杀死其他用户下的进程 if (proc.mUserId != task.mUserId) { // Don't kill process for a different user. continue; } //不要杀死首页进程 //HomeProcess指的是含有分类为android.intent.category.HOME的进程 //也就是能成为首页Launcher的进程 if (proc == mService.mHomeProcess) { // Don't kill the home process along with tasks from the same package. continue; } //不要杀死和这个Task无关的进程 if (!proc.mPkgList.contains(pkg)) { // Don't kill process that is not associated with this task. continue; }
//如果这个进程有Activity在不同的Task里,并且这个Task也在最近任务里 //或者有Activity还没有被停止,则不要杀死进程 if (!proc.shouldKillProcessForRemovedTask(task)) { // Don't kill process(es) that has an activity in a different task that is also // in recents, or has an activity not stopped. return; }
//有前台服务的话不要杀死进程 if (proc.hasForegroundServices()) { // Don't kill process(es) with foreground service. return; }
// Add process to kill list. procsToKill.add(proc); } }
// Kill the running processes. Post on handle since we don't want to hold the service lock // while calling into AM. //杀死进程 final Message m = PooledLambda.obtainMessage( ActivityManagerInternal::killProcessesForRemovedTask, mService.mAmInternal, procsToKill); mService.mH.sendMessage(m); }
//frameworks/base/services/core/java/com/android/server/am/ActiveServices.java voidcleanUpServices(int userId, ComponentName component, Intent baseIntent){ ArrayList<ServiceRecord> services = new ArrayList<>(); //获得此用户下所有的活动Service ArrayMap<ComponentName, ServiceRecord> alls = getServicesLocked(userId); //筛选出此Task下的所有活动Service for (int i = alls.size() - 1; i >= 0; i--) { ServiceRecord sr = alls.valueAt(i); if (sr.packageName.equals(component.getPackageName())) { services.add(sr); } }
// Take care of any running services associated with the app. for (int i = services.size() - 1; i >= 0; i--) { ServiceRecord sr = services.get(i); if (sr.startRequested) { if ((sr.serviceInfo.flags&ServiceInfo.FLAG_STOP_WITH_TASK) != 0) { //如果在manifest里设置了stopWithTask,那么会直接停止Service stopServiceLocked(sr); } else { //如果没有设置stopWithTask的话,则会回调Service.onTaskRemoved方法 sr.pendingStarts.add(new ServiceRecord.StartItem(sr, true, sr.getLastStartId(), baseIntent, null, 0)); if (sr.app != null && sr.app.thread != null) { // We always run in the foreground, since this is called as // part of the "remove task" UI operation. try { sendServiceArgsLocked(sr, true, false); } catch (TransactionTooLargeException e) { // Ignore, keep going. } } } } } }
//frameworks/base/core/java/android/app/ActivityThread.java privatevoidhandleServiceArgs(ServiceArgsData data){ Service s = mServices.get(data.token); if (s != null) { try { ... int res; if (!data.taskRemoved) { //正常情况调用 res = s.onStartCommand(data.args, data.flags, data.startId); } else { //用户关闭Task栈时调用 s.onTaskRemoved(data.args); res = Service.START_TASK_REMOVED_COMPLETE; }
//frameworks/base/services/core/java/com/android/server/am/ActiveServices.java voidserviceDoneExecutingLocked(ServiceRecord r, int type, int startId, int res){ boolean inDestroying = mDestroyingServices.contains(r); if (r != null) { if (type == ActivityThread.SERVICE_DONE_EXECUTING_START) { // This is a call from a service start... take care of // book-keeping. r.callStart = true; switch (res) { case Service.START_STICKY_COMPATIBILITY: case Service.START_STICKY: { // We are done with the associated start arguments. r.findDeliveredStart(startId, false, true); // Don't stop if killed. r.stopIfKilled = false; break; } case Service.START_NOT_STICKY: { // We are done with the associated start arguments. r.findDeliveredStart(startId, false, true); if (r.getLastStartId() == startId) { // There is no more work, and this service // doesn't want to hang around if killed. r.stopIfKilled = true; } break; } case Service.START_REDELIVER_INTENT: { // We'll keep this item until they explicitly // call stop for it, but keep track of the fact // that it was delivered. ServiceRecord.StartItem si = r.findDeliveredStart(startId, false, false); if (si != null) { si.deliveryCount = 0; si.doneExecutingCount++; // Don't stop if killed. r.stopIfKilled = true; } break; } case Service.START_TASK_REMOVED_COMPLETE: { // Special processing for onTaskRemoved(). Don't // impact normal onStartCommand() processing. r.findDeliveredStart(startId, true, true); break; } default: thrownew IllegalArgumentException( "Unknown service start result: " + res); } if (res == Service.START_STICKY_COMPATIBILITY) { r.callStart = false; } } elseif (type == ActivityThread.SERVICE_DONE_EXECUTING_STOP) { ... } ... } else { ... } }
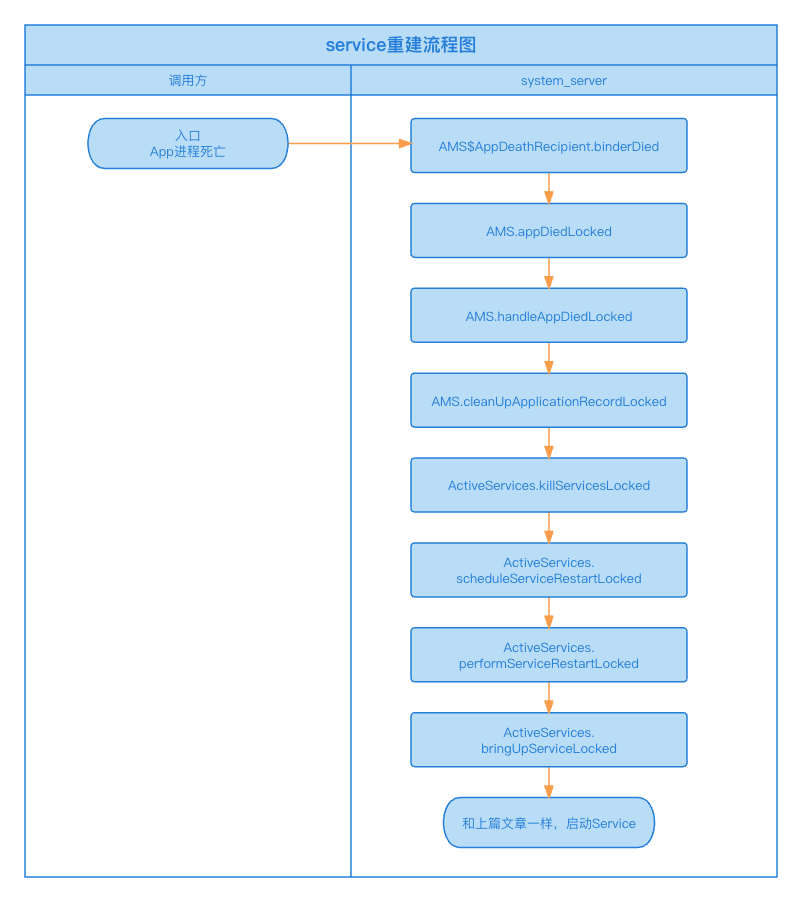
//frameworks/base/services/core/java/com/android/server/am/ActivityManagerService.java privatefinalclassAppDeathRecipientimplementsIBinder.DeathRecipient{ final ProcessRecord mApp; finalint mPid; final IApplicationThread mAppThread;
//frameworks/base/services/core/java/com/android/server/am/ActivityManagerService.java finalvoidappDiedLocked(ProcessRecord app, int pid, IApplicationThread thread, boolean fromBinderDied, String reason){ // First check if this ProcessRecord is actually active for the pid. //检查pid所属ProcessRecord是否与传入ProcessRecord相符 synchronized (mPidsSelfLocked) { ProcessRecord curProc = mPidsSelfLocked.get(pid); if (curProc != app) { return; } }
... //记录电池统计信息
//如果App进程尚未死亡的话,杀死进程 if (!app.killed) { if (!fromBinderDied) { killProcessQuiet(pid); mProcessList.noteAppKill(app, ApplicationExitInfo.REASON_OTHER, ApplicationExitInfo.SUBREASON_UNKNOWN, reason); } ProcessList.killProcessGroup(app.uid, pid); app.killed = true; }
// Clean up already done if the process has been re-started. if (app.pid == pid && app.thread != null && app.thread.asBinder() == thread.asBinder()) { //一般情况下非自动化测试,先置为true boolean doLowMem = app.getActiveInstrumentation() == null; boolean doOomAdj = doLowMem; if (!app.killedByAm) { //不通过AMS杀死的进程,一般就是被 Low Memory Killer (LMK) 杀死的 ... //报告信息 //被LMK杀死,说明系统内存不足 mAllowLowerMemLevel = true; } else { //通过AMS杀死的进程 // Note that we always want to do oom adj to update our state with the // new number of procs. mAllowLowerMemLevel = false; //正常情况下非内存不足 doLowMem = false; } ... //事件记录 //继续处理App进程死亡 handleAppDiedLocked(app, false, true);
//调整进程优先级 if (doOomAdj) { updateOomAdjLocked(OomAdjuster.OOM_ADJ_REASON_PROCESS_END); } //当因为内存不足而杀死App进程时 //调用App层各处的的onLowMemory方法,释放内存 if (doLowMem) { doLowMemReportIfNeededLocked(app); } } elseif (app.pid != pid) { //新进程已启动 // A new process has already been started. ... //报告记录信息 } ... }
finalvoidkillServicesLocked(ProcessRecord app, boolean allowRestart){ // Clean up any connections this application has to other services. //清理所有连接 for (int i = app.connections.size() - 1; i >= 0; i--) { ConnectionRecord r = app.connections.valueAt(i); removeConnectionLocked(r, app, null); } updateServiceConnectionActivitiesLocked(app); app.connections.clear();
app.whitelistManager = false;
// Clear app state from services. //遍历所有正在运行中的服务 for (int i = app.numberOfRunningServices() - 1; i >= 0; i--) { ServiceRecord sr = app.getRunningServiceAt(i); synchronized (sr.stats.getBatteryStats()) { sr.stats.stopLaunchedLocked(); } if (sr.app != app && sr.app != null && !sr.app.isPersistent()) { //记录服务已停止 sr.app.stopService(sr); //更新绑定的客户端uids sr.app.updateBoundClientUids(); } sr.setProcess(null); sr.isolatedProc = null; sr.executeNesting = 0; sr.forceClearTracker(); if (mDestroyingServices.remove(sr)) { if (DEBUG_SERVICE) Slog.v(TAG_SERVICE, "killServices remove destroying " + sr); }
finalint numClients = sr.bindings.size(); for (int bindingi=numClients-1; bindingi>=0; bindingi--) { IntentBindRecord b = sr.bindings.valueAt(bindingi); //释放对服务Binder的引用 b.binder = null; //重置 b.requested = b.received = b.hasBound = false; // If this binding is coming from a cached process and is asking to keep // the service created, then we'll kill the cached process as well -- we // don't want to be thrashing around restarting processes that are only // there to be cached. ... //遍历客户端进程(实际上没做任何事) } }
// Now do remaining service cleanup. for (int i = app.numberOfRunningServices() - 1; i >= 0; i--) { ServiceRecord sr = app.getRunningServiceAt(i);
// Unless the process is persistent, this process record is going away, // so make sure the service is cleaned out of it. //非持久化进程 if (!app.isPersistent()) { //记录服务已停止 app.stopService(sr); //更新绑定的客户端uids app.updateBoundClientUids(); }
// Sanity check: if the service listed for the app is not one // we actually are maintaining, just let it drop. //一致性检查 final ServiceRecord curRec = smap.mServicesByInstanceName.get(sr.instanceName); if (curRec != sr) { if (curRec != null) { Slog.wtf(TAG, "Service " + sr + " in process " + app + " not same as in map: " + curRec); } continue; }
// Any services running in the application may need to be placed // back in the pending list. //允许重启,但Service崩溃的次数超出重试上限(默认为16),并且它不是系统应用 if (allowRestart && sr.crashCount >= mAm.mConstants.BOUND_SERVICE_MAX_CRASH_RETRY && (sr.serviceInfo.applicationInfo.flags &ApplicationInfo.FLAG_PERSISTENT) == 0) { ... //记录 //停止服务 bringDownServiceLocked(sr); } elseif (!allowRestart || !mAm.mUserController.isUserRunning(sr.userId, 0)) { //不允许重启或者服务进程所在用户不在运行,停止服务 bringDownServiceLocked(sr); } else { //尝试调度重启服务 finalboolean scheduled = scheduleServiceRestartLocked(sr, true/* allowCancel */);
// Should the service remain running? Note that in the // extreme case of so many attempts to deliver a command // that it failed we also will stop it here. if (!scheduled) { //未调度重启 //停止服务 bringDownServiceLocked(sr); } elseif (sr.canStopIfKilled(false/* isStartCanceled */)) { // Update to stopped state because the explicit start is gone. The service is // scheduled to restart for other reason (e.g. connections) so we don't bring // down it. //将服务的启动状态更新为停止 sr.startRequested = false; ... //记录 } } }
//不允许重启的话 if (!allowRestart) { //停止所有服务 app.stopAllServices(); //清理绑定的客户端uids app.clearBoundClientUids();
// Make sure there are no more restarting services for this process. //确保这个进程不再会重启服务,清理所有待重启待启动的服务 for (int i=mRestartingServices.size()-1; i>=0; i--) { ServiceRecord r = mRestartingServices.get(i); if (r.processName.equals(app.processName) && r.serviceInfo.applicationInfo.uid == app.info.uid) { mRestartingServices.remove(i); clearRestartingIfNeededLocked(r); } } for (int i=mPendingServices.size()-1; i>=0; i--) { ServiceRecord r = mPendingServices.get(i); if (r.processName.equals(app.processName) && r.serviceInfo.applicationInfo.uid == app.info.uid) { mPendingServices.remove(i); } } }
// Make sure we have no more records on the stopping list. //清理所有停止中的服务 int i = mDestroyingServices.size(); while (i > 0) { i--; ServiceRecord sr = mDestroyingServices.get(i); if (sr.app == app) { sr.forceClearTracker(); mDestroyingServices.remove(i); } }
//一致性检查 ServiceMap smap = getServiceMapLocked(r.userId); if (smap.mServicesByInstanceName.get(r.instanceName) != r) { ServiceRecord cur = smap.mServicesByInstanceName.get(r.instanceName); Slog.wtf(TAG, "Attempting to schedule restart of " + r + " when found in map: " + cur); returnfalse; }
finallong now = SystemClock.uptimeMillis();
final String reason; if ((r.serviceInfo.applicationInfo.flags &ApplicationInfo.FLAG_PERSISTENT) == 0) { //对于非系统应用 //服务至少要过多长时间才能重启,默认1000ms long minDuration = mAm.mConstants.SERVICE_RESTART_DURATION; //服务被杀死重启后需要运行多长时间,默认60s long resetTime = mAm.mConstants.SERVICE_RESET_RUN_DURATION; boolean canceled = false;
// Any delivered but not yet finished starts should be put back // on the pending list. //对应着返回值为START_REDELIVER_INTENT的情况 finalint N = r.deliveredStarts.size(); if (N > 0) { for (int i=N-1; i>=0; i--) { ServiceRecord.StartItem si = r.deliveredStarts.get(i); si.removeUriPermissionsLocked(); if (si.intent == null) { // We'll generate this again if needed. } elseif (!allowCancel || (si.deliveryCount < ServiceRecord.MAX_DELIVERY_COUNT && si.doneExecutingCount < ServiceRecord.MAX_DONE_EXECUTING_COUNT)) { //如果该启动项的失败次数小于最大容忍次数 //MAX_DELIVERY_COUNT默认为3 //MAX_DONE_EXECUTING_COUNT默认为6 r.pendingStarts.add(0, si); //这种情况下延时是现在距离启动时间的两倍 long dur = SystemClock.uptimeMillis() - si.deliveredTime; dur *= 2; if (minDuration < dur) minDuration = dur; if (resetTime < dur) resetTime = dur; } else { //如果该启动项的失败次数大于等于最大容忍次数 canceled = true; } } r.deliveredStarts.clear(); }
r.totalRestartCount++; if (r.restartDelay == 0) { //第一次重启的情况 r.restartCount++; r.restartDelay = minDuration; } elseif (r.crashCount > 1) { //Service所在进程在Service运行过程中发生崩溃导致重启的话 //重启延时为 30min * (崩溃次数 - 1) r.restartDelay = mAm.mConstants.BOUND_SERVICE_CRASH_RESTART_DURATION * (r.crashCount - 1); } else { //非第一次重启的情况 // If it has been a "reasonably long time" since the service // was started, then reset our restart duration back to // the beginning, so we don't infinitely increase the duration // on a service that just occasionally gets killed (which is // a normal case, due to process being killed to reclaim memory). if (now > (r.restartTime+resetTime)) { //如果服务重启后运行达到了一定时间,则重启延时为 r.restartCount = 1; r.restartDelay = minDuration; } else { //如果服务重启后运行没有达到一定时间(短时间内又要重启) //则增长重启延时,默认因子为4 r.restartDelay *= mAm.mConstants.SERVICE_RESTART_DURATION_FACTOR; if (r.restartDelay < minDuration) { r.restartDelay = minDuration; } } }
//确定重启时间 r.nextRestartTime = now + r.restartDelay;
// Make sure that we don't end up restarting a bunch of services // all at the same time. //确保不会在同一时间启动大量服务 boolean repeat; do { repeat = false; finallong restartTimeBetween = mAm.mConstants.SERVICE_MIN_RESTART_TIME_BETWEEN; for (int i=mRestartingServices.size()-1; i>=0; i--) { ServiceRecord r2 = mRestartingServices.get(i); if (r2 != r && r.nextRestartTime >= (r2.nextRestartTime-restartTimeBetween) && r.nextRestartTime < (r2.nextRestartTime+restartTimeBetween)) { r.nextRestartTime = r2.nextRestartTime + restartTimeBetween; r.restartDelay = r.nextRestartTime - now; repeat = true; break; } } } while (repeat);
} else { //对于系统进程,立马重启 // Persistent processes are immediately restarted, so there is no // reason to hold of on restarting their services. r.totalRestartCount++; r.restartCount = 0; r.restartDelay = 0; r.nextRestartTime = now; reason = "persistent"; }
//frameworks/base/services/core/java/com/android/server/am/ActiveServices.java finalvoidperformServiceRestartLocked(ServiceRecord r){ if (!mRestartingServices.contains(r)) { return; } if (!isServiceNeededLocked(r, false, false)) { // Paranoia: is this service actually needed? In theory a service that is not // needed should never remain on the restart list. In practice... well, there // have been bugs where this happens, and bad things happen because the process // ends up just being cached, so quickly killed, then restarted again and again. // Let's not let that happen. Slog.wtf(TAG, "Restarting service that is not needed: " + r); return; } try { //参考上一篇文章,Service启动流程 bringUpServiceLocked(r, r.intent.getIntent().getFlags(), r.createdFromFg, true, false); } catch (TransactionTooLargeException e) { // Ignore, it's been logged and nothing upstack cares. } }
//试图用一个不存在的用户启动Service if (!mAm.mUserController.exists(r.userId)) { Slog.w(TAG, "Trying to start service with non-existent user! " + r.userId); returnnull; }
// If we're starting indirectly (e.g. from PendingIntent), figure out whether // we're launching into an app in a background state. This keys off of the same // idleness state tracking as e.g. O+ background service start policy. //Service所在应用未启动或处在后台 finalboolean bgLaunch = !mAm.isUidActiveLocked(r.appInfo.uid);
// If the app has strict background restrictions, we treat any bg service // start analogously to the legacy-app forced-restrictions case, regardless // of its target SDK version. //检查Service所在应用后台启动限制 boolean forcedStandby = false; if (bgLaunch && appRestrictedAnyInBackground(r.appInfo.uid, r.packageName)) { forcedStandby = true; }
// If this is a direct-to-foreground start, make sure it is allowed as per the app op. boolean forceSilentAbort = false; if (fgRequired) { //作为前台服务启动 //权限检查 finalint mode = mAm.getAppOpsManager().checkOpNoThrow( AppOpsManager.OP_START_FOREGROUND, r.appInfo.uid, r.packageName); switch (mode) { //默认和允许都可以作为前台服务启动 case AppOpsManager.MODE_ALLOWED: case AppOpsManager.MODE_DEFAULT: // All okay. break; //不允许的话,回退到作为普通后台服务启动 case AppOpsManager.MODE_IGNORED: // Not allowed, fall back to normal start service, failing siliently // if background check restricts that. Slog.w(TAG, "startForegroundService not allowed due to app op: service " + service + " to " + r.shortInstanceName + " from pid=" + callingPid + " uid=" + callingUid + " pkg=" + callingPackage); fgRequired = false; forceSilentAbort = true; break; //错误的话直接返回,由上层抛出SecurityException异常 default: returnnew ComponentName("!!", "foreground not allowed as per app op"); } }
// If this isn't a direct-to-foreground start, check our ability to kick off an // arbitrary service //如果不是从前台启动 //startRequested表示Service是否由startService方式所启动,fgRequired表示作为前台服务启动 if (forcedStandby || (!r.startRequested && !fgRequired)) { // Before going further -- if this app is not allowed to start services in the // background, then at this point we aren't going to let it period. //服务是否允许在后台启动 finalint allowed = mAm.getAppStartModeLocked(r.appInfo.uid, r.packageName, r.appInfo.targetSdkVersion, callingPid, false, false, forcedStandby); //如果不允许,则无法启动服务 if (allowed != ActivityManager.APP_START_MODE_NORMAL) { //静默的停止启动 if (allowed == ActivityManager.APP_START_MODE_DELAYED || forceSilentAbort) { // In this case we are silently disabling the app, to disrupt as // little as possible existing apps. returnnull; } if (forcedStandby) { // This is an O+ app, but we might be here because the user has placed // it under strict background restrictions. Don't punish the app if it's // trying to do the right thing but we're denying it for that reason. if (fgRequired) { returnnull; } } // This app knows it is in the new model where this operation is not // allowed, so tell it what has happened. //明确的告知不允许启动,上层抛出异常 UidRecord uidRec = mAm.mProcessList.getUidRecordLocked(r.appInfo.uid); returnnew ComponentName("?", "app is in background uid " + uidRec); } }
// At this point we've applied allowed-to-start policy based on whether this was // an ordinary startService() or a startForegroundService(). Now, only require that // the app follow through on the startForegroundService() -> startForeground() // contract if it actually targets O+. //对于targetSdk 26以下(Android 8.0以下)的应用来说,不需要作为前台服务启动 if (r.appInfo.targetSdkVersion < Build.VERSION_CODES.O && fgRequired) { fgRequired = false; }
// If permissions need a review before any of the app components can run, // we do not start the service and launch a review activity if the calling app // is in the foreground passing it a pending intent to start the service when // review is completed.
// XXX This is not dealing with fgRequired! //如果待启动的Service需要相应权限,则需要用户手动确认权限后,再进行启动 if (!requestStartTargetPermissionsReviewIfNeededLocked(r, callingPackage, callingFeatureId, callingUid, service, callerFg, userId)) { returnnull; }
//取消之前的Service重启任务(如果有) if (unscheduleServiceRestartLocked(r, callingUid, false)) { if (DEBUG_SERVICE) Slog.v(TAG_SERVICE, "START SERVICE WHILE RESTART PENDING: " + r); } r.lastActivity = SystemClock.uptimeMillis(); //表示Service是否由startService方式所启动的 r.startRequested = true; r.delayedStop = false; //是否作为前台服务启动 r.fgRequired = fgRequired; //构造启动参数 r.pendingStarts.add(new ServiceRecord.StartItem(r, false, r.makeNextStartId(), service, neededGrants, callingUid));
//作为前台服务启动 if (fgRequired) { // We are now effectively running a foreground service. ... //使用ServiceState记录 ... //通过AppOpsService监控 }
final ServiceMap smap = getServiceMapLocked(r.userId); boolean addToStarting = false; //对于后台启动的非前台服务,需要判断其是否需要延迟启动 if (!callerFg && !fgRequired && r.app == null && mAm.mUserController.hasStartedUserState(r.userId)) { //获取Service所处进程信息 ProcessRecord proc = mAm.getProcessRecordLocked(r.processName, r.appInfo.uid, false); //没有对应进程或进程状态级别低于 [进程在后台运行Receiver] if (proc == null || proc.getCurProcState() > ActivityManager.PROCESS_STATE_RECEIVER) { // If this is not coming from a foreground caller, then we may want // to delay the start if there are already other background services // that are starting. This is to avoid process start spam when lots // of applications are all handling things like connectivity broadcasts. // We only do this for cached processes, because otherwise an application // can have assumptions about calling startService() for a service to run // in its own process, and for that process to not be killed before the // service is started. This is especially the case for receivers, which // may start a service in onReceive() to do some additional work and have // initialized some global state as part of that. //对于之前已经设置为延迟启动的服务,直接返回 if (r.delayed) { // This service is already scheduled for a delayed start; just leave // it still waiting. return r.name; } //如果当前正在后台启动的Service数大于等于允许同时在后台启动的最大服务数 //将这个Service设置为延迟启动 if (smap.mStartingBackground.size() >= mMaxStartingBackground) { // Something else is starting, delay! smap.mDelayedStartList.add(r); r.delayed = true; return r.name; } //添加到正在启动服务列表中 addToStarting = true; } elseif (proc.getCurProcState() >= ActivityManager.PROCESS_STATE_SERVICE) { //进程状态为 [正在运行Service的后台进程] 或 [正在运行Receiver的后台进程] 时 // We slightly loosen when we will enqueue this new service as a background // starting service we are waiting for, to also include processes that are // currently running other services or receivers. //添加到正在启动服务列表中 addToStarting = true; } }
//如果服务正在重启中,则什么都不做,直接返回 if (!whileRestarting && mRestartingServices.contains(r)) { // If waiting for a restart, then do nothing. returnnull; }
// We are now bringing the service up, so no longer in the // restarting state. //Service马上启动,将其从重启中服务列表中移除,并清除其重启中状态 if (mRestartingServices.remove(r)) { clearRestartingIfNeededLocked(r); }
// Make sure this service is no longer considered delayed, we are starting it now. //走到这里,需要确保此服务不再被视为延迟启动,同时将其从延迟启动服务列表中移除 if (r.delayed) { getServiceMapLocked(r.userId).mDelayedStartList.remove(r); r.delayed = false; }
// Make sure that the user who owns this service is started. If not, // we don't want to allow it to run. //确保Service所在的用户已启动 if (!mAm.mUserController.hasStartedUserState(r.userId)) { //停止服务 bringDownServiceLocked(r); return msg; }
// Service is now being launched, its package can't be stopped. //Service即将启动,Service所属的App不该为stopped状态 //将App状态置为unstopped,设置休眠状态为false AppGlobals.getPackageManager().setPackageStoppedState( r.packageName, false, r.userId);
//服务所在进程是否为隔离进程,指服务是否在其自己的独立进程中运行 finalboolean isolated = (r.serviceInfo.flags&ServiceInfo.FLAG_ISOLATED_PROCESS) != 0; final String procName = r.processName; HostingRecord hostingRecord = new HostingRecord("service", r.instanceName); ProcessRecord app;
// If a dead object exception was thrown -- fall through to // restart the application. } } else { //隔离进程 // If this service runs in an isolated process, then each time // we call startProcessLocked() we will get a new isolated // process, starting another process if we are currently waiting // for a previous process to come up. To deal with this, we store // in the service any current isolated process it is running in or // waiting to have come up. //获取服务之前所在的进程 app = r.isolatedProc; //辅助zygote进程,用于创建isolated_app进程来渲染不可信的web内容,具有最为严格的安全限制 if (WebViewZygote.isMultiprocessEnabled() && r.serviceInfo.packageName.equals(WebViewZygote.getPackageName())) { hostingRecord = HostingRecord.byWebviewZygote(r.instanceName); } //应用zygote进程,与常规zygote创建的应用相比受到更多限制 if ((r.serviceInfo.flags & ServiceInfo.FLAG_USE_APP_ZYGOTE) != 0) { hostingRecord = HostingRecord.byAppZygote(r.instanceName, r.definingPackageName, r.definingUid); } }
// Not running -- get it started, and enqueue this service record // to be executed when the app comes up. //如果Service所在进程尚未启动 if (app == null && !permissionsReviewRequired) { // TODO (chriswailes): Change the Zygote policy flags based on if the launch-for-service // was initiated from a notification tap or not. //启动App进程 if ((app=mAm.startProcessLocked(procName, r.appInfo, true, intentFlags, hostingRecord, ZYGOTE_POLICY_FLAG_EMPTY, false, isolated, false)) == null) { //如果启动进程失败,停止服务 bringDownServiceLocked(r); return msg; } if (isolated) { //如果是隔离进程,将这次启动的进程记录保存下来 r.isolatedProc = app; } }
//对于要启动的前台服务,加入到临时白名单,暂时绕过省电模式 if (r.fgRequired) { mAm.tempWhitelistUidLocked(r.appInfo.uid, SERVICE_START_FOREGROUND_TIMEOUT, "fg-service-launch"); }
//将启动的服务添加到mPendingServices列表中 //如果服务进程尚未启动,进程在启动的过程中会检查此列表并启动需要启动的Service if (!mPendingServices.contains(r)) { mPendingServices.add(r); }
//Service被要求stop,停止服务 if (r.delayedStop) { // Oh and hey we've already been asked to stop! r.delayedStop = false; if (r.startRequested) { stopServiceLocked(r); } }
//frameworks/base/services/core/java/com/android/server/am/ActivityManagerService.java privatebooleanattachApplicationLocked(@NonNull IApplicationThread thread, int pid, int callingUid, long startSeq){ ... // Find any services that should be running in this process... //检查是否有Services等待启动 if (!badApp) { try { didSomething |= mServices.attachApplicationLocked(app, processName); } catch (Exception e) { badApp = true; } } ... }
// Update the app background restriction of the caller //更新Service所在App后台限制 proc.mState.setBackgroundRestricted(appRestrictedAnyInBackground( proc.uid, proc.info.packageName));
// Collect any services that are waiting for this process to come up. //启动mPendingServices列表内,该进程下的所有Service if (mPendingServices.size() > 0) { ServiceRecord sr = null; try { for (int i=0; i<mPendingServices.size(); i++) { sr = mPendingServices.get(i); if (proc != sr.isolationHostProc && (proc.uid != sr.appInfo.uid || !processName.equals(sr.processName))) { continue; }
final IApplicationThread thread = proc.getThread(); finalint pid = proc.getPid(); final UidRecord uidRecord = proc.getUidRecord(); mPendingServices.remove(i); i--; //将App添加至进程中运行的包列表中 proc.addPackage(sr.appInfo.packageName, sr.appInfo.longVersionCode, mAm.mProcessStats); //启动Service realStartServiceLocked(sr, proc, thread, pid, uidRecord, sr.createdFromFg, true); didSomething = true; //如果此Service不再需要了,则停止它 //e.g. 通过bindService启动的服务,但此时调用bindService的Activity已死亡 if (!isServiceNeededLocked(sr, false, false)) { // We were waiting for this service to start, but it is actually no // longer needed. This could happen because bringDownServiceIfNeeded // won't bring down a service that is pending... so now the pending // is done, so let's drop it. bringDownServiceLocked(sr, true); } /* Will be a no-op if nothing pending */ //更新进程优先级 mAm.updateOomAdjPendingTargetsLocked(OomAdjuster.OOM_ADJ_REASON_START_SERVICE); } } catch (RemoteException e) { throw e; } } // Also, if there are any services that are waiting to restart and // would run in this process, now is a good time to start them. It would // be weird to bring up the process but arbitrarily not let the services // run at this point just because their restart time hasn't come up. //App被杀重启机制,后续文章再详细说明 if (mRestartingServices.size() > 0) { ... } return didSomething; }
//frameworks/base/services/core/java/com/android/server/am/ActiveServices.java /** * Note the name of this method should not be confused with the started services concept. * The "start" here means bring up the instance in the client, and this method is called * from bindService() as well. */ privatefinalvoidrealStartServiceLocked(ServiceRecord r, ProcessRecord app, boolean execInFg)throws RemoteException { //IApplicationThread不存在则抛移除 //即确保ActivityThread存在 if (app.thread == null) { thrownew RemoteException(); } //为ServiceRecord设置所属进程 r.setProcess(app); r.restartTime = r.lastActivity = SystemClock.uptimeMillis();
//添加绑定到Service所在进程的UID if (newService && created) { app.addBoundClientUidsOfNewService(r); }
// If the service is in the started state, and there are no // pending arguments, then fake up one so its onStartCommand() will // be called. //如果Service已经启动,并且没有启动项,则构建一个假的启动参数供onStartCommand使用 if (r.startRequested && r.callStart && r.pendingStarts.size() == 0) { r.pendingStarts.add(new ServiceRecord.StartItem(r, false, r.makeNextStartId(), null, null, 0)); }
//走到这里,需要确保此服务不再被视为延迟启动,同时将其从延迟启动服务列表中移除 if (r.delayed) { getServiceMapLocked(r.userId).mDelayedStartList.remove(r); r.delayed = false; }
//Service被要求stop,停止服务 if (r.delayedStop) { // Oh and hey we've already been asked to stop! r.delayedStop = false; if (r.startRequested) { stopServiceLocked(r); } } }
//frameworks/base/core/java/android/app/ActivityThread.java privatevoidhandleCreateService(CreateServiceData data){ // If we are getting ready to gc after going to the background, well // we are back active so skip it. //此时不要进行GC unscheduleGcIdler();
LoadedApk packageInfo = getPackageInfoNoCheck( data.info.applicationInfo, data.compatInfo); Service service = null; try { //创建Context ContextImpl context = ContextImpl.createAppContext(this, packageInfo); //创建或获取Application(到了这里进程的初始化应该都完成了,所以是直接获取Application) Application app = packageInfo.makeApplication(false, mInstrumentation); java.lang.ClassLoader cl = packageInfo.getClassLoader(); //通过AppComponentFactory反射创建Service实例 service = packageInfo.getAppFactory() .instantiateService(cl, data.info.name, data.intent); // Service resources must be initialized with the same loaders as the application // context. //加载资源 context.getResources().addLoaders( app.getResources().getLoaders().toArray(new ResourcesLoader[0]));
ArrayList<ServiceStartArgs> args = new ArrayList<>();
//遍历待启动项 while (r.pendingStarts.size() > 0) { ServiceRecord.StartItem si = r.pendingStarts.remove(0); //如果在多个启动项中有假启动项,则跳过假启动项 //但如果这个假启动项是唯一的启动项则不要跳过它,这是为了支持onStartCommand(null)的情况 if (si.intent == null && N > 1) { // If somehow we got a dummy null intent in the middle, // then skip it. DO NOT skip a null intent when it is // the only one in the list -- this is to support the // onStartCommand(null) case. continue; } si.deliveredTime = SystemClock.uptimeMillis(); r.deliveredStarts.add(si); si.deliveryCount++; //处理Uri权限 if (si.neededGrants != null) { mAm.mUgmInternal.grantUriPermissionUncheckedFromIntent(si.neededGrants, si.getUriPermissionsLocked()); } //授权访问权限 mAm.grantImplicitAccess(r.userId, si.intent, si.callingId, UserHandle.getAppId(r.appInfo.uid) ); //记录Service执行操作并设置超时回调 //前台服务超时时间为20s,后台服务超时时间为200s bumpServiceExecutingLocked(r, execInFg, "start"); if (!oomAdjusted) { oomAdjusted = true; mAm.updateOomAdjLocked(r.app, true, OomAdjuster.OOM_ADJ_REASON_START_SERVICE); } //如果是以前台服务的方式启动的Service(startForegroundService),并且之前没有设置启动前台服务超时回调 if (r.fgRequired && !r.fgWaiting) { //如果当前服务还没成为前台服务,设置启动前台服务超时回调 //在10s内需要调用Service.startForeground成为前台服务,否则停止服务 //注:Android 11这个超时时间是10s,在后面的Android版本中这个时间有变化 if (!r.isForeground) { scheduleServiceForegroundTransitionTimeoutLocked(r); } else { r.fgRequired = false; } } int flags = 0; if (si.deliveryCount > 1) { flags |= Service.START_FLAG_RETRY; } if (si.doneExecutingCount > 0) { flags |= Service.START_FLAG_REDELIVERY; } //添加启动项 args.add(new ServiceStartArgs(si.taskRemoved, si.id, flags, si.intent)); }
//frameworks/base/core/java/android/app/ActivityThread.java privatevoidhandleServiceArgs(ServiceArgsData data){ Service s = mServices.get(data.token); if (s != null) { try { //Intent跨进程处理 if (data.args != null) { data.args.setExtrasClassLoader(s.getClassLoader()); data.args.prepareToEnterProcess(); } int res; if (!data.taskRemoved) { //正常情况调用 res = s.onStartCommand(data.args, data.flags, data.startId); } else { //用户关闭Task栈时调用 s.onTaskRemoved(data.args); res = Service.START_TASK_REMOVED_COMPLETE; }
// Refuse possible leaked file descriptors //校验Intent,不允许其携带fd if (service != null && service.hasFileDescriptors() == true) { thrownew IllegalArgumentException("File descriptors passed in Intent"); }
//校验调用方包名 if (callingPackage == null) { thrownew IllegalArgumentException("callingPackage cannot be null"); }
// Ensure that instanceName, which is caller provided, does not contain // unusual characters. if (instanceName != null) { for (int i = 0; i < instanceName.length(); ++i) { char c = instanceName.charAt(i); if (!((c >= 'a' && c <= 'z') || (c >= 'A' && c <= 'Z') || (c >= '0' && c <= '9') || c == '_' || c == '.')) { thrownew IllegalArgumentException("Illegal instanceName"); } } }
//如果调用方为系统级应用 if (isCallerSystem) { // Hacky kind of thing -- allow system stuff to tell us // what they are, so we can report this elsewhere for // others to know why certain services are running. service.setDefusable(true); clientIntent = service.getParcelableExtra(Intent.EXTRA_CLIENT_INTENT); if (clientIntent != null) { clientLabel = service.getIntExtra(Intent.EXTRA_CLIENT_LABEL, 0); if (clientLabel != 0) { // There are no useful extras in the intent, trash them. // System code calling with this stuff just needs to know // this will happen. service = service.cloneFilter(); } } }
//像对待Activity一样对待该Service //需要校验调用方应用是否具有MANAGE_ACTIVITY_STACKS权限 if ((flags&Context.BIND_TREAT_LIKE_ACTIVITY) != 0) { mAm.enforceCallingPermission(android.Manifest.permission.MANAGE_ACTIVITY_STACKS, "BIND_TREAT_LIKE_ACTIVITY"); }
//此标志仅用于系统调整IMEs(以及与顶层App密切合作的其他跨进程的用户可见组件)的调度策略,仅限系统级App使用 if ((flags & Context.BIND_SCHEDULE_LIKE_TOP_APP) != 0 && !isCallerSystem) { thrownew SecurityException("Non-system caller (pid=" + Binder.getCallingPid() + ") set BIND_SCHEDULE_LIKE_TOP_APP when binding service " + service); }
//允许绑定Service的应用程序管理白名单,仅限系统级App使用 if ((flags & Context.BIND_ALLOW_WHITELIST_MANAGEMENT) != 0 && !isCallerSystem) { thrownew SecurityException( "Non-system caller " + caller + " (pid=" + Binder.getCallingPid() + ") set BIND_ALLOW_WHITELIST_MANAGEMENT when binding service " + service); }
//允许绑定到免安装应用提供的服务,仅限系统级App使用 if ((flags & Context.BIND_ALLOW_INSTANT) != 0 && !isCallerSystem) { thrownew SecurityException( "Non-system caller " + caller + " (pid=" + Binder.getCallingPid() + ") set BIND_ALLOW_INSTANT when binding service " + service); }
//查找相应的Service ServiceLookupResult res = retrieveServiceLocked(service, instanceName, resolvedType, callingPackage, Binder.getCallingPid(), Binder.getCallingUid(), userId, true, callerFg, isBindExternal, allowInstant); if (res == null) { return0; } if (res.record == null) { return -1; } ServiceRecord s = res.record; boolean permissionsReviewRequired = false;
// If permissions need a review before any of the app components can run, // we schedule binding to the service but do not start its process, then // we launch a review activity to which is passed a callback to invoke // when done to start the bound service's process to completing the binding. //如果需要用户手动确认授权 if (mAm.getPackageManagerInternalLocked().isPermissionsReviewRequired( s.packageName, s.userId)) {
permissionsReviewRequired = true;
// Show a permission review UI only for binding from a foreground app //只有调用方进程在前台才可以显示授权弹窗 if (!callerFg) { return0; }
final ServiceRecord serviceRecord = s; final Intent serviceIntent = service;
//用户手动确认授权后执行的回调 RemoteCallback callback = new RemoteCallback( new RemoteCallback.OnResultListener() { @Override publicvoidonResult(Bundle result){ synchronized(mAm) { finallong identity = Binder.clearCallingIdentity(); try { if (!mPendingServices.contains(serviceRecord)) { return; } // If there is still a pending record, then the service // binding request is still valid, so hook them up. We // proceed only if the caller cleared the review requirement // otherwise we unbind because the user didn't approve. //二次检查权限 if (!mAm.getPackageManagerInternalLocked() .isPermissionsReviewRequired( serviceRecord.packageName, serviceRecord.userId)) { try { //拉起服务,如果服务未创建,则会创建服务并调用其onCreate方法 //如果服务已创建则什么都不会做 bringUpServiceLocked(serviceRecord, serviceIntent.getFlags(), callerFg, false, false); } catch (RemoteException e) { /* ignore - local call */ } } else { //无相应权限则解绑Service unbindServiceLocked(connection); } } finally { Binder.restoreCallingIdentity(identity); } } } });
final Intent intent = new Intent(Intent.ACTION_REVIEW_PERMISSIONS); intent.addFlags(Intent.FLAG_ACTIVITY_NEW_TASK | Intent.FLAG_ACTIVITY_MULTIPLE_TASK | Intent.FLAG_ACTIVITY_EXCLUDE_FROM_RECENTS); intent.putExtra(Intent.EXTRA_PACKAGE_NAME, s.packageName); intent.putExtra(Intent.EXTRA_REMOTE_CALLBACK, callback);
try { //取消之前的Service重启任务(如果有) if (unscheduleServiceRestartLocked(s, callerApp.info.uid, false)) { if (DEBUG_SERVICE) Slog.v(TAG_SERVICE, "BIND SERVICE WHILE RESTART PENDING: " + s); }
if ((flags&Context.BIND_AUTO_CREATE) != 0) { s.lastActivity = SystemClock.uptimeMillis(); //如果是第一次绑定的话,设置跟踪器 if (!s.hasAutoCreateConnections()) { // This is the first binding, let the tracker know. ServiceState stracker = s.getTracker(); if (stracker != null) { stracker.setBound(true, mAm.mProcessStats.getMemFactorLocked(), s.lastActivity); } } }
//绑定的服务代表受保护的系统组件,因此必须对其应用关联做限制 if ((flags & Context.BIND_RESTRICT_ASSOCIATIONS) != 0) { mAm.requireAllowedAssociationsLocked(s.appInfo.packageName); }
//建立调用方与服务方之间的关联 mAm.startAssociationLocked(callerApp.uid, callerApp.processName, callerApp.getCurProcState(), s.appInfo.uid, s.appInfo.longVersionCode, s.instanceName, s.processName); // Once the apps have become associated, if one of them is caller is ephemeral // the target app should now be able to see the calling app mAm.grantImplicitAccess(callerApp.userId, service, callerApp.uid, UserHandle.getAppId(s.appInfo.uid));
//查询App绑定信息 AppBindRecord b = s.retrieveAppBindingLocked(service, callerApp); //创建连接信息 ConnectionRecord c = new ConnectionRecord(b, activity, connection, flags, clientLabel, clientIntent, callerApp.uid, callerApp.processName, callingPackage);
//更新flag以及进程优先级 if (s.app != null) { if ((flags&Context.BIND_TREAT_LIKE_ACTIVITY) != 0) { s.app.treatLikeActivity = true; } if (s.whitelistManager) { s.app.whitelistManager = true; } // This could have made the service more important. mAm.updateLruProcessLocked(s.app, (callerApp.hasActivitiesOrRecentTasks() && s.app.hasClientActivities()) || (callerApp.getCurProcState() <= ActivityManager.PROCESS_STATE_TOP && (flags & Context.BIND_TREAT_LIKE_ACTIVITY) != 0), b.client); mAm.updateOomAdjLocked(s.app, OomAdjuster.OOM_ADJ_REASON_BIND_SERVICE); }
if (s.app != null && b.intent.received) { // Service is already running, so we can immediately // publish the connection. //如果服务之前就已经在运行,即Service.onBind方法已经被执行,返回的IBinder对象也已经被保存 //调用LoadedApk$ServiceDispatcher$InnerConnection.connected方法 //回调ServiceConnection.onServiceConnected方法 c.conn.connected(s.name, b.intent.binder, false);
// If this is the first app connected back to this binding, // and the service had previously asked to be told when // rebound, then do so. //当服务解绑,调用到Service.onUnbind方法时返回true,此时doRebind变量就会被赋值为true //此时,当再次建立连接时,服务会回调Service.onRebind方法 if (b.intent.apps.size() == 1 && b.intent.doRebind) { requestServiceBindingLocked(s, b.intent, callerFg, true); } } elseif (!b.intent.requested) { //如果服务是因这次绑定而创建的 //请求执行Service.onBind方法,获取返回的IBinder对象 //发布Service,回调ServiceConnection.onServiceConnected方法 requestServiceBindingLocked(s, b.intent, callerFg, false); }
synchronized (this) { if (mForgotten) { // We unbound before receiving the connection; ignore // any connection received. return; } old = mActiveConnections.get(name); //如果旧的连接信息中的IBinder对象和本次调用传入的IBinder对象是同一个对象 if (old != null && old.binder == service) { // Huh, already have this one. Oh well! return; }
if (service != null) { // A new service is being connected... set it all up. //建立一个新的连接信息 info = new ConnectionInfo(); info.binder = service; info.deathMonitor = new DeathMonitor(name, service); try { //注册Binder死亡通知 service.linkToDeath(info.deathMonitor, 0); //保存本次连接信息 mActiveConnections.put(name, info); } catch (RemoteException e) { // This service was dead before we got it... just // don't do anything with it. //服务已死亡,移除连接信息 mActiveConnections.remove(name); return; } } else { // The named service is being disconnected... clean up. mActiveConnections.remove(name); }
//移除Binder死亡通知 if (old != null) { old.binder.unlinkToDeath(old.deathMonitor, 0); } }
// If there was an old service, it is now disconnected. //回调ServiceConnection.onServiceDisconnected //通知client之前的连接已被断开 if (old != null) { mConnection.onServiceDisconnected(name); } //如果Service死亡需要回调ServiceConnection.onBindingDied通知client服务死亡 if (dead) { mConnection.onBindingDied(name); } // If there is a new viable service, it is now connected. if (service != null) { //回调ServiceConnection.onServiceConnected方法 //告知client已建立连接 mConnection.onServiceConnected(name, service); } else { // The binding machinery worked, but the remote returned null from onBind(). //当Service.onBind方法返回null时,回调ServiceConnection.onNullBinding方法 mConnection.onNullBinding(name); } }
publicfinal IContentProvider acquireProvider( Context c, String auth, int userId, boolean stable){ //尝试从本地缓存中获取ContentProvider对象 final IContentProvider provider = acquireExistingProvider(c, auth, userId, stable); if (provider != null) { return provider; }
// There is a possible race here. Another thread may try to acquire // the same provider at the same time. When this happens, we want to ensure // that the first one wins. // Note that we cannot hold the lock while acquiring and installing the // provider since it might take a long time to run and it could also potentially // be re-entrant in the case where the provider is in the same process. ContentProviderHolder holder = null; try { synchronized (getGetProviderLock(auth, userId)) { //使用AMS获取ContentProvider对象 holder = ActivityManager.getService().getContentProvider( getApplicationThread(), c.getOpPackageName(), auth, userId, stable); } } catch (RemoteException ex) { throw ex.rethrowFromSystemServer(); } if (holder == null) { ... returnnull; }
// Install provider will increment the reference count for us, and break // any ties in the race. //安装ContentProvider holder = installProvider(c, holder, holder.info, true/*noisy*/, holder.noReleaseNeeded, stable); return holder.provider; }
publicfinal IContentProvider acquireExistingProvider( Context c, String auth, int userId, boolean stable){ synchronized (mProviderMap) { //从缓存Map中查找 final ProviderKey key = new ProviderKey(auth, userId); final ProviderClientRecord pr = mProviderMap.get(key); if (pr == null) { returnnull; }
IContentProvider provider = pr.mProvider; IBinder jBinder = provider.asBinder(); //判断远端进程是否已被杀死 if (!jBinder.isBinderAlive()) { // The hosting process of the provider has died; we can't // use this one. //清理ContentProvider handleUnstableProviderDiedLocked(jBinder, true); returnnull; }
// Only increment the ref count if we have one. If we don't then the // provider is not reference counted and never needs to be released. ProviderRefCount prc = mProviderRefCountMap.get(jBinder); if (prc != null) { //更新引用计数 incProviderRefLocked(prc, stable); } return provider; } }
synchronized(this) { //获取调用方所在进程记录 ProcessRecord r = null; if (caller != null) { r = getRecordForAppLocked(caller); if (r == null) { thrownew SecurityException( "Unable to find app for caller " + caller + " (pid=" + Binder.getCallingPid() + ") when getting content provider " + name); } }
boolean checkCrossUser = true;
// First check if this content provider has been published... //检查需要的ContentProvider是否已被发布 cpr = mProviderMap.getProviderByName(name, userId); // If that didn't work, check if it exists for user 0 and then // verify that it's a singleton provider before using it. //如果没找到,尝试从系统用户中查找已发布的ContentProvider //并确保它是可用的单例组件,条件如下: //是用户级应用程序且组件设置了单例flag且拥有INTERACT_ACROSS_USERS权限 或 App运行在system进程中 或 组件设置了单例flag且是同一个App if (cpr == null && userId != UserHandle.USER_SYSTEM) { cpr = mProviderMap.getProviderByName(name, UserHandle.USER_SYSTEM); if (cpr != null) { cpi = cpr.info; if (isSingleton(cpi.processName, cpi.applicationInfo, cpi.name, cpi.flags) && isValidSingletonCall(r == null ? callingUid : r.uid, cpi.applicationInfo.uid)) { userId = UserHandle.USER_SYSTEM; checkCrossUser = false; } else { cpr = null; cpi = null; } } }
// Note if killedByAm is also set, this means the provider process has just been // killed by AM (in ProcessRecord.kill()), but appDiedLocked() hasn't been called // yet. So we need to call appDiedLocked() here and let it clean up. // (See the commit message on I2c4ba1e87c2d47f2013befff10c49b3dc337a9a7 to see // how to test this case.) if (cpr.proc.killed && cpr.proc.killedByAm) { Slog.wtf(TAG, cpr.proc.toString() + " was killed by AM but isn't really dead"); // Now we are going to wait for the death before starting the new process. dyingProc = cpr.proc; } } ... } ... }
// This provider has been published or is in the process // of being published... but it is also allowed to run // in the caller's process, so don't make a connection // and just let the caller instantiate its own instance. ContentProviderHolder holder = cpr.newHolder(null); // don't give caller the provider object, it needs // to make its own. holder.provider = null; return holder; }
// Don't expose providers between normal apps and instant apps try { if (AppGlobals.getPackageManager() .resolveContentProvider(name, 0/*flags*/, userId) == null) { returnnull; } } catch (RemoteException e) { }
... //权限检查
finallong origId = Binder.clearCallingIdentity();
// In this case the provider instance already exists, so we can // return it right away. //获取连接并更新引用计数 conn = incProviderCountLocked(r, cpr, token, callingUid, callingPackage, callingTag, stable); if (conn != null && (conn.stableCount+conn.unstableCount) == 1) { if (cpr.proc != null && r != null && r.setAdj <= ProcessList.PERCEPTIBLE_LOW_APP_ADJ) { // If this is a perceptible app accessing the provider, // make sure to count it as being accessed and thus // back up on the LRU list. This is good because // content providers are often expensive to start. //更新进程优先级 mProcessList.updateLruProcessLocked(cpr.proc, false, null); } }
finalint verifiedAdj = cpr.proc.verifiedAdj; //更新进程adj boolean success = updateOomAdjLocked(cpr.proc, true, OomAdjuster.OOM_ADJ_REASON_GET_PROVIDER); // XXX things have changed so updateOomAdjLocked doesn't actually tell us // if the process has been successfully adjusted. So to reduce races with // it, we will check whether the process still exists. Note that this doesn't // completely get rid of races with LMK killing the process, but should make // them much smaller. if (success && verifiedAdj != cpr.proc.setAdj && !isProcessAliveLocked(cpr.proc)) { success = false; } maybeUpdateProviderUsageStatsLocked(r, cpr.info.packageName, name); // NOTE: there is still a race here where a signal could be // pending on the process even though we managed to update its // adj level. Not sure what to do about this, but at least // the race is now smaller. if (!success) { // Uh oh... it looks like the provider's process // has been killed on us. We need to wait for a new // process to be started, and make sure its death // doesn't kill our process. Slog.wtf(TAG, "Existing provider " + cpr.name.flattenToShortString() + " is crashing; detaching " + r); //ContentProvider所在进程被杀了,更新引用计数 boolean lastRef = decProviderCountLocked(conn, cpr, token, stable); //仍有别的地方对这个ContentProvider有引用,直接返回null(需要等待进程清理干净才能重启) if (!lastRef) { // This wasn't the last ref our process had on // the provider... we will be killed during cleaning up, bail. returnnull; } // We'll just start a new process to host the content provider //将运行状态标为false,使得重新启动ContentProvider所在进程 providerRunning = false; conn = null; dyingProc = cpr.proc; } else { cpr.proc.verifiedAdj = cpr.proc.setAdj; }
synchronized(this) { ... //ContentProvider未在运行 if (!providerRunning) { //通过PMS获取ContentProvider信息 try { cpi = AppGlobals.getPackageManager(). resolveContentProvider(name, STOCK_PM_FLAGS | PackageManager.GET_URI_PERMISSION_PATTERNS, userId); } catch (RemoteException ex) { } if (cpi == null) { returnnull; } // If the provider is a singleton AND // (it's a call within the same user || the provider is a // privileged app) // Then allow connecting to the singleton provider boolean singleton = isSingleton(cpi.processName, cpi.applicationInfo, cpi.name, cpi.flags) && isValidSingletonCall(r == null ? callingUid : r.uid, cpi.applicationInfo.uid); if (singleton) { userId = UserHandle.USER_SYSTEM; } cpi.applicationInfo = getAppInfoForUser(cpi.applicationInfo, userId);
try { //获取应用信息 ApplicationInfo ai = AppGlobals.getPackageManager(). getApplicationInfo( cpi.applicationInfo.packageName, STOCK_PM_FLAGS, userId); if (ai == null) { Slog.w(TAG, "No package info for content provider " + cpi.name); returnnull; } ai = getAppInfoForUser(ai, userId); //新建ContentProvider记录 cpr = new ContentProviderRecord(this, cpi, ai, comp, singleton); } catch (RemoteException ex) { // pm is in same process, this will never happen. } finally { Binder.restoreCallingIdentity(ident); } } elseif (dyingProc == cpr.proc && dyingProc != null) { // The old stable connection's client should be killed during proc cleaning up, // so do not re-use the old ContentProviderRecord, otherwise the new clients // could get killed unexpectedly. //旧的ContentProvider进程在死亡过程中,不要复用旧的ContentProviderRecord,避免出现预期之外的问题 cpr = new ContentProviderRecord(cpr); // This is sort of "firstClass" firstClass = true; }
//如果此ContentProvider可以在调用者进程中直接运行(同一个App的同进程 或 同一个App且Provider组件支持多进程) //直接返回一个新的ContentProviderHolder让调用者进程自己启动ContentProvider if (r != null && cpr.canRunHere(r)) { // If this is a multiprocess provider, then just return its // info and allow the caller to instantiate it. Only do // this if the provider is the same user as the caller's // process, or can run as root (so can be in any process). return cpr.newHolder(null); }
// This is single process, and our app is now connecting to it. // See if we are already in the process of launching this // provider. //查找正在启动中的ContentProvider finalint N = mLaunchingProviders.size(); int i; for (i = 0; i < N; i++) { if (mLaunchingProviders.get(i) == cpr) { break; } }
// If the provider is not already being launched, then get it // started. //目标ContentProvider不在启动中 if (i >= N) { finallong origId = Binder.clearCallingIdentity();
try { // Content provider is now in use, its package can't be stopped. //将App状态置为unstopped,设置休眠状态为false try { AppGlobals.getPackageManager().setPackageStoppedState( cpr.appInfo.packageName, false, userId); } catch (RemoteException e) { } catch (IllegalArgumentException e) { Slog.w(TAG, "Failed trying to unstop package " + cpr.appInfo.packageName + ": " + e); }
// Use existing process if already started //获取目标ContentProvider所在进程记录 ProcessRecord proc = getProcessRecordLocked( cpi.processName, cpr.appInfo.uid, false); if (proc != null && proc.thread != null && !proc.killed) { //进程存活 if (!proc.pubProviders.containsKey(cpi.name)) { //将ContentProviderRecord保存到进程已发布ContentProvider列表中 proc.pubProviders.put(cpi.name, cpr); try { //调度ActivityThread直接安装ContentProvider proc.thread.scheduleInstallProvider(cpi); } catch (RemoteException e) { } } } else { //进程死亡 //启动App(App启动过程中会自动启动ContentProvider) proc = startProcessLocked(cpi.processName, cpr.appInfo, false, 0, new HostingRecord("content provider", new ComponentName(cpi.applicationInfo.packageName, cpi.name)), ZYGOTE_POLICY_FLAG_EMPTY, false, false, false); if (proc == null) { ... returnnull; } } cpr.launchingApp = proc; //将目标ContentProvider添加到启动中列表 mLaunchingProviders.add(cpr); } finally { Binder.restoreCallingIdentity(origId); } }
// Make sure the provider is published (the same provider class // may be published under multiple names). if (firstClass) { mProviderMap.putProviderByClass(comp, cpr); }
privatebooleanattachApplicationLocked(@NonNull IApplicationThread thread, int pid, int callingUid, long startSeq){ ... //normalMode一般情况下均为true List<ProviderInfo> providers = normalMode ? generateApplicationProvidersLocked(app) : null; ... }
privatefinal List<ProviderInfo> generateApplicationProvidersLocked(ProcessRecord app){ List<ProviderInfo> providers = null; try { //通过PMS获取App中同一个进程内的所有的ContentProvider组件信息 providers = AppGlobals.getPackageManager() .queryContentProviders(app.processName, app.uid, STOCK_PM_FLAGS | PackageManager.GET_URI_PERMISSION_PATTERNS | MATCH_DEBUG_TRIAGED_MISSING, /*metadastaKey=*/null) .getList(); } catch (RemoteException ex) { } int userId = app.userId; if (providers != null) { int N = providers.size(); //有必要的情况下进行Map扩容 app.pubProviders.ensureCapacity(N + app.pubProviders.size()); for (int i=0; i<N; i++) { // TODO: keep logic in sync with installEncryptionUnawareProviders ProviderInfo cpi = (ProviderInfo)providers.get(i); //对于单例ContentProvider,需要在默认用户中启动,如果不是默认用户的话则直接将其丢弃掉,不启动 boolean singleton = isSingleton(cpi.processName, cpi.applicationInfo, cpi.name, cpi.flags); if (singleton && UserHandle.getUserId(app.uid) != UserHandle.USER_SYSTEM) { // This is a singleton provider, but a user besides the // default user is asking to initialize a process it runs // in... well, no, it doesn't actually run in this process, // it runs in the process of the default user. Get rid of it. providers.remove(i); N--; i--; continue; }
ComponentName comp = new ComponentName(cpi.packageName, cpi.name); ContentProviderRecord cpr = mProviderMap.getProviderByClass(comp, userId); if (cpr == null) { //新建ContentProviderRecord并将其加入到缓存中 cpr = new ContentProviderRecord(this, cpi, app.info, comp, singleton); mProviderMap.putProviderByClass(comp, cpr); } //将ContentProviderRecord保存到进程已发布ContentProvider列表中 app.pubProviders.put(cpi.name, cpr); if (!cpi.multiprocess || !"android".equals(cpi.packageName)) { // Don't add this if it is a platform component that is marked // to run in multiple processes, because this is actually // part of the framework so doesn't make sense to track as a // separate apk in the process. //将App添加至进程中运行的包列表中 app.addPackage(cpi.applicationInfo.packageName, cpi.applicationInfo.longVersionCode, mProcessStats); } notifyPackageUse(cpi.applicationInfo.packageName, PackageManager.NOTIFY_PACKAGE_USE_CONTENT_PROVIDER); } } return providers; }
privatevoidhandleBindApplication(AppBindData data){ ... try { // If the app is being launched for full backup or restore, bring it up in // a restricted environment with the base application class. //创建Application app = data.info.makeApplication(data.restrictedBackupMode, null); ...
mInitialApplication = app;
// don't bring up providers in restricted mode; they may depend on the // app's custom Application class //在非受限模式下启动ContentProvider if (!data.restrictedBackupMode) { if (!ArrayUtils.isEmpty(data.providers)) { installContentProviders(app, data.providers); } }
...
//执行Application的onCreate方法 try { mInstrumentation.callApplicationOnCreate(app); } catch (Exception e) { ... } } finally { // If the app targets < O-MR1, or doesn't change the thread policy // during startup, clobber the policy to maintain behavior of b/36951662 if (data.appInfo.targetSdkVersion < Build.VERSION_CODES.O_MR1 || StrictMode.getThreadPolicy().equals(writesAllowedPolicy)) { StrictMode.setThreadPolicy(savedPolicy); } } ... }
synchronized (mProviderMap) { //对于外部ContentProvider来说,这里的实际类型是BinderProxy IBinder jBinder = provider.asBinder(); if (localProvider != null) { //本地启动ContentProvider的情况 ... } else { //获取远程ContentProvider的情况 ProviderRefCount prc = mProviderRefCountMap.get(jBinder); if (prc != null) { //如果ContentProvider引用已存在 // We need to transfer our new reference to the existing // ref count, releasing the old one... but only if // release is needed (that is, it is not running in the // system process). //对于远程ContentProvider来说,如果目标App为system应用(UID为ROOT_UID或SYSTEM_UID) //并且目标App不为设置(包名不为com.android.settings),则noReleaseNeeded为true if (!noReleaseNeeded) { //增加已存在的ContentProvider引用的引用计数 incProviderRefLocked(prc, stable); try { //释放传入的引用,移除ContentProviderConnection相关信息,更新引用计数 ActivityManager.getService().removeContentProvider( holder.connection, stable); } catch (RemoteException e) { //do nothing content provider object is dead any way } } } else { //创建ProviderClientRecord并将其保存到mProviderMap本地缓存中 ProviderClientRecord client = installProviderAuthoritiesLocked( provider, localProvider, holder); if (noReleaseNeeded) { //同上,目标App为system应用,不需要释放引用 //新建一个ProviderRefCount,但引用计数初始化为一个较大的数值 //这样后续无论调用方进程的ContentProvider引用计数如何变动都不会影响到AMS prc = new ProviderRefCount(holder, client, 1000, 1000); } else { //需要释放引用的情况下 //正常的新建初始化一个ProviderRefCount prc = stable ? new ProviderRefCount(holder, client, 1, 0) : new ProviderRefCount(holder, client, 0, 1); } //保存至缓存 mProviderRefCountMap.put(jBinder, prc); } retHolder = prc.holder; } } return retHolder; }
synchronized (this) { final ProcessRecord r = getRecordForAppLocked(caller); if (r == null) { thrownew SecurityException( "Unable to find app for caller " + caller + " (pid=" + Binder.getCallingPid() + ") when publishing content providers"); }
finallong origId = Binder.clearCallingIdentity();
finalint N = providers.size(); for (int i = 0; i < N; i++) { ContentProviderHolder src = providers.get(i); if (src == null || src.info == null || src.provider == null) { continue; } //App进程启动时或AMS.getContentProvider中已经将相应ContentProviderRecord添加到了pubProviders中 ContentProviderRecord dst = r.pubProviders.get(src.info.name); if (dst != null) { //保存至缓存中 ComponentName comp = new ComponentName(dst.info.packageName, dst.info.name); mProviderMap.putProviderByClass(comp, dst); String names[] = dst.info.authority.split(";"); for (int j = 0; j < names.length; j++) { mProviderMap.putProviderByName(names[j], dst); }
//ContentProvider已经启动完毕,将其从正在启动的ContentProvider列表中移除 int launchingCount = mLaunchingProviders.size(); int j; boolean wasInLaunchingProviders = false; for (j = 0; j < launchingCount; j++) { if (mLaunchingProviders.get(j) == dst) { mLaunchingProviders.remove(j); wasInLaunchingProviders = true; j--; launchingCount--; } } //移除ContentProvider启动超时监听 if (wasInLaunchingProviders) { mHandler.removeMessages(CONTENT_PROVIDER_PUBLISH_TIMEOUT_MSG, r); } // Make sure the package is associated with the process. // XXX We shouldn't need to do this, since we have added the package // when we generated the providers in generateApplicationProvidersLocked(). // But for some reason in some cases we get here with the package no longer // added... for now just patch it in to make things happy. r.addPackage(dst.info.applicationInfo.packageName, dst.info.applicationInfo.longVersionCode, mProcessStats); synchronized (dst) { dst.provider = src.provider; dst.setProcess(r); //让出锁,通知其他wait的地方 //对应着AMS.getContentProvider的第四部分:等待ContentProvider启动完成 dst.notifyAll(); } dst.mRestartCount = 0; updateOomAdjLocked(r, true, OomAdjuster.OOM_ADJ_REASON_GET_PROVIDER); maybeUpdateProviderUsageStatsLocked(r, src.info.packageName, src.info.authority); } }
privatefinalvoidincProviderRefLocked(ProviderRefCount prc, boolean stable){ if (stable) { //增加ActivityThread的stable引用计数 prc.stableCount += 1; //本进程对目标ContentProvider产生了stable引用关系 if (prc.stableCount == 1) { // We are acquiring a new stable reference on the provider. int unstableDelta; //正在移除ContentProvider引用中(释放ContentProvider后发现stable和unstable引用计数均为0) if (prc.removePending) { // We have a pending remove operation, which is holding the // last unstable reference. At this point we are converting // that unstable reference to our new stable reference. //当ActivityThread释放一个stable的ContentProvider时,如果释放完后, //发现stable和unstable引用计数均为0,则会暂时保留一个unstable引用 //所以这里需要为 -1 ,将这个unstable引用移除 unstableDelta = -1; // Cancel the removal of the provider. prc.removePending = false; // There is a race! It fails to remove the message, which // will be handled in completeRemoveProvider(). //取消移除ContentProvider引用 mH.removeMessages(H.REMOVE_PROVIDER, prc); } else { //对于正常情况,只需要增加stable引用计数,不需要动unstable引用计数 unstableDelta = 0; } try { //AMS层修改引用计数 ActivityManager.getService().refContentProvider( prc.holder.connection, 1, unstableDelta); } catch (RemoteException e) { //do nothing content provider object is dead any way } } } else { //增加ActivityThread的unstable引用计数 prc.unstableCount += 1; //本进程对目标ContentProvider产生了unstable引用关系 if (prc.unstableCount == 1) { // We are acquiring a new unstable reference on the provider. //正在移除ContentProvider引用中(释放ContentProvider后发现stable和unstable引用计数均为0) if (prc.removePending) { // Oh look, we actually have a remove pending for the // provider, which is still holding the last unstable // reference. We just need to cancel that to take new // ownership of the reference. //取消移除ContentProvider引用 prc.removePending = false; mH.removeMessages(H.REMOVE_PROVIDER, prc); } else { // First unstable ref, increment our count in the // activity manager. try { //增加AMS层的unstable引用计数 ActivityManager.getService().refContentProvider( prc.holder.connection, 0, 1); } catch (RemoteException e) { //do nothing content provider object is dead any way } } } } }
IBinder jBinder = provider.asBinder(); synchronized (mProviderMap) { ProviderRefCount prc = mProviderRefCountMap.get(jBinder); if (prc == null) { // The provider has no ref count, no release is needed. returnfalse; }
boolean lastRef = false; if (stable) { //引用计数已经为0,无法再减了 if (prc.stableCount == 0) { returnfalse; } //减少ActivityThread的stable引用计数 prc.stableCount -= 1; if (prc.stableCount == 0) { // What we do at this point depends on whether there are // any unstable refs left: if there are, we just tell the // activity manager to decrement its stable count; if there // aren't, we need to enqueue this provider to be removed, // and convert to holding a single unstable ref while // doing so. lastRef = prc.unstableCount == 0; try { //如果是最后的引用,则暂时保留一个unstable引用 ActivityManager.getService().refContentProvider( prc.holder.connection, -1, lastRef ? 1 : 0); } catch (RemoteException e) { //do nothing content provider object is dead any way } } } else { //引用计数已经为0,无法再减了 if (prc.unstableCount == 0) { returnfalse; } //减少ActivityThread的unstable引用计数 prc.unstableCount -= 1; if (prc.unstableCount == 0) { // If this is the last reference, we need to enqueue // this provider to be removed instead of telling the // activity manager to remove it at this point. lastRef = prc.stableCount == 0; //如果是最后的引用,则不进入到这里,暂时保留一个unstable引用 if (!lastRef) { try { //减少AMS引用计数 ActivityManager.getService().refContentProvider( prc.holder.connection, 0, -1); } catch (RemoteException e) { //do nothing content provider object is dead any way } } } }
if (lastRef) { if (!prc.removePending) { // Schedule the actual remove asynchronously, since we don't know the context // this will be called in. //表面此ContentProvider正在移除中 prc.removePending = true; //发送延时消息,等待一定时间后移除ContentProvider Message msg = mH.obtainMessage(H.REMOVE_PROVIDER, prc); mH.sendMessageDelayed(msg, CONTENT_PROVIDER_RETAIN_TIME); } else { Slog.w(TAG, "Duplicate remove pending of provider " + prc.holder.info.name); } } returntrue; } }
finalvoidcompleteRemoveProvider(ProviderRefCount prc){ synchronized (mProviderMap) { if (!prc.removePending) { // There was a race! Some other client managed to acquire // the provider before the removal was completed. // Abort the removal. We will do it later. return; }
// More complicated race!! Some client managed to acquire the // provider and release it before the removal was completed. // Continue the removal, and abort the next remove message. prc.removePending = false;
//移除缓存 final IBinder jBinder = prc.holder.provider.asBinder(); ProviderRefCount existingPrc = mProviderRefCountMap.get(jBinder); if (existingPrc == prc) { mProviderRefCountMap.remove(jBinder); }
booleandecProviderCountLocked(ContentProviderConnection conn, ContentProviderRecord cpr, IBinder externalProcessToken, boolean stable){ if (conn != null) { cpr = conn.provider; //减少引用计数值 if (stable) { conn.stableCount--; } else { conn.unstableCount--; } if (conn.stableCount == 0 && conn.unstableCount == 0) { //停止关联 conn.stopAssociation(); //移除连接 cpr.connections.remove(conn); conn.client.conProviders.remove(conn); if (conn.client.setProcState < PROCESS_STATE_LAST_ACTIVITY) { // The client is more important than last activity -- note the time this // is happening, so we keep the old provider process around a bit as last // activity to avoid thrashing it. if (cpr.proc != null) { cpr.proc.lastProviderTime = SystemClock.uptimeMillis(); } } //停止关联 stopAssociationLocked(conn.client.uid, conn.client.processName, cpr.uid, cpr.appInfo.longVersionCode, cpr.name, cpr.info.processName); returntrue; } returnfalse; } cpr.removeExternalProcessHandleLocked(externalProcessToken); returnfalse; }
// Remove published content providers. //清除已发布的ContentProvider for (int i = app.pubProviders.size() - 1; i >= 0; i--) { ContentProviderRecord cpr = app.pubProviders.valueAt(i); if (cpr.proc != app) { // If the hosting process record isn't really us, bail out continue; } finalboolean alwaysRemove = app.bad || !allowRestart; finalboolean inLaunching = removeDyingProviderLocked(app, cpr, alwaysRemove); if (!alwaysRemove && inLaunching && cpr.hasConnectionOrHandle()) { // We left the provider in the launching list, need to // restart it. restart = true; }
// Take care of any launching providers waiting for this process. //清除正在启动中的ContentProvider if (cleanupAppInLaunchingProvidersLocked(app, false)) { mProcessList.noteProcessDiedLocked(app); restart = true; }
// Unregister from connected content providers. //清除已连接的ContentProvider if (!app.conProviders.isEmpty()) { for (int i = app.conProviders.size() - 1; i >= 0; i--) { ContentProviderConnection conn = app.conProviders.get(i); conn.provider.connections.remove(conn); stopAssociationLocked(app.uid, app.processName, conn.provider.uid, conn.provider.appInfo.longVersionCode, conn.provider.name, conn.provider.info.processName); } app.conProviders.clear(); } ... }
privatefinalbooleanremoveDyingProviderLocked(ProcessRecord proc, ContentProviderRecord cpr, boolean always){ boolean inLaunching = mLaunchingProviders.contains(cpr); if (inLaunching && !always && ++cpr.mRestartCount > ContentProviderRecord.MAX_RETRY_COUNT) { // It's being launched but we've reached maximum attempts, force the removal always = true; }
if (!inLaunching || always) { synchronized (cpr) { cpr.launchingApp = null; cpr.notifyAll(); } finalint userId = UserHandle.getUserId(cpr.uid); // Don't remove from provider map if it doesn't match // could be a new content provider is starting //移除缓存 if (mProviderMap.getProviderByClass(cpr.name, userId) == cpr) { mProviderMap.removeProviderByClass(cpr.name, userId); } String names[] = cpr.info.authority.split(";"); for (int j = 0; j < names.length; j++) { // Don't remove from provider map if it doesn't match // could be a new content provider is starting //移除缓存 if (mProviderMap.getProviderByName(names[j], userId) == cpr) { mProviderMap.removeProviderByName(names[j], userId); } } }
for (int i = cpr.connections.size() - 1; i >= 0; i--) { ContentProviderConnection conn = cpr.connections.get(i); if (conn.waiting) { // If this connection is waiting for the provider, then we don't // need to mess with its process unless we are always removing // or for some reason the provider is not currently launching. if (inLaunching && !always) { continue; } } ProcessRecord capp = conn.client; conn.dead = true; if (conn.stableCount > 0) { if (!capp.isPersistent() && capp.thread != null && capp.pid != 0 && capp.pid != MY_PID) { //当调用方与被杀死的目标ContentProvider进程间有stable连接 //并且调用方App进程非persistent进程并且非system_server进程中的情况下 //杀死调用方进程 capp.kill("depends on provider " + cpr.name.flattenToShortString() + " in dying proc " + (proc != null ? proc.processName : "??") + " (adj " + (proc != null ? proc.setAdj : "??") + ")", ApplicationExitInfo.REASON_DEPENDENCY_DIED, ApplicationExitInfo.SUBREASON_UNKNOWN, true); } } elseif (capp.thread != null && conn.provider.provider != null) { try { //通知调用方移除ContentProvider capp.thread.unstableProviderDied(conn.provider.provider.asBinder()); } catch (RemoteException e) { } // In the protocol here, we don't expect the client to correctly // clean up this connection, we'll just remove it. //移除连接 cpr.connections.remove(i); if (conn.client.conProviders.remove(conn)) { stopAssociationLocked(capp.uid, capp.processName, cpr.uid, cpr.appInfo.longVersionCode, cpr.name, cpr.info.processName); } } }
//ImageView.invalidateDrawable publicvoidinvalidateDrawable(@NonNull Drawable dr){ if (dr == mDrawable) { if (dr != null) { // update cached drawable dimensions if they've changed finalint w = dr.getIntrinsicWidth(); finalint h = dr.getIntrinsicHeight(); if (w != mDrawableWidth || h != mDrawableHeight) { mDrawableWidth = w; mDrawableHeight = h; // updates the matrix, which is dependent on the bounds configureBounds(); } } /* we invalidate the whole view in this case because it's very * hard to know where the drawable actually is. This is made * complicated because of the offsets and transformations that * can be applied. In theory we could get the drawable's bounds * and run them through the transformation and offsets, but this * is probably not worth the effort. */ invalidate(); } else { super.invalidateDrawable(dr); } }
publicvoidscheduleDrawable(@NonNull Drawable who, @NonNull Runnable what, long when){ if (verifyDrawable(who) && what != null) { finallong delay = when - SystemClock.uptimeMillis(); if (mAttachInfo != null) { mAttachInfo.mViewRootImpl.mChoreographer.postCallbackDelayed( Choreographer.CALLBACK_ANIMATION, what, who, Choreographer.subtractFrameDelay(delay)); } else { // Postpone the runnable until we know // on which thread it needs to run. getRunQueue().postDelayed(what, delay); } } }
val requestPermissionLauncher = registerForActivityResult(RequestPermission() ) { isGranted: Boolean -> if (isGranted) { // Permission is granted. Continue the action or workflow in your // app. } else { // Explain to the user that the feature is unavailable because the // feature requires a permission that the user has denied. At the // same time, respect the user's decision. Don't link to system // settings in an effort to convince the user to change their // decision. } }
when { ContextCompat.checkSelfPermission( CONTEXT, Manifest.permission.REQUESTED_PERMISSION ) == PackageManager.PERMISSION_GRANTED -> { // You can use the API that requires the permission. } shouldShowRequestPermissionRationale(...) -> { // In an educational UI, explain to the user why your app requires this // permission for a specific feature to behave as expected, and what // features are disabled if it's declined. In this UI, include a // "cancel" or "no thanks" button that lets the user continue // using your app without granting the permission. showInContextUI(...) } else -> { // You can directly ask for the permission. // The registered ActivityResultCallback gets the result of this request. requestPermissionLauncher.launch( Manifest.permission.REQUESTED_PERMISSION) } }
java.lang.IllegalStateException: LifecycleOwner Activity is attempting to register while current state is RESUMED. LifecycleOwners must call register before they are STARTED.
if (lifecycle.getCurrentState().isAtLeast(Lifecycle.State.STARTED)) { thrownew IllegalStateException("LifecycleOwner " + lifecycleOwner + " is " + "attempting to register while current state is " + lifecycle.getCurrentState() + ". LifecycleOwners must call register before " + "they are STARTED."); }
registerKey(key); LifecycleContainer lifecycleContainer = mKeyToLifecycleContainers.get(key); if (lifecycleContainer == null) { lifecycleContainer = new LifecycleContainer(lifecycle); } LifecycleEventObserver observer = new LifecycleEventObserver() { ... }; lifecycleContainer.addObserver(observer); mKeyToLifecycleContainers.put(key, lifecycleContainer);
// Activity was launched when user tapped a link in the Autofill Save UI - Save UI must // be restored now. if (mIntent != null && mIntent.hasExtra(AutofillManager.EXTRA_RESTORE_SESSION_TOKEN)) { restoreAutofillSaveUi(); } }
publicfinalbooleanfinishActivity(IBinder token, int resultCode, Intent resultData, int finishTask){ // Refuse possible leaked file descriptors //回传的ResultIntent中不允许包含fd,防止泄漏 if (resultData != null && resultData.hasFileDescriptors()) { thrownew IllegalArgumentException("File descriptors passed in Intent"); }
final ActivityRecord r; synchronized (mGlobalLock) { //获取ActivityRecord并保证其在栈中 r = ActivityRecord.isInStackLocked(token); //为null说明已被移出ActivityStack,视作已被finish if (r == null) { returntrue; } }
// Carefully collect grants without holding lock //检查调用方(即待finish的Activity)是否能授予result所对应Activity package访问uri的权限 final NeededUriGrants resultGrants = collectGrants(resultData, r.resultTo);
synchronized (mGlobalLock) { // Sanity check in case activity was removed before entering global lock. if (!r.isInHistory()) { returntrue; }
// Keep track of the root activity of the task before we finish it final Task tr = r.getTask(); final ActivityRecord rootR = tr.getRootActivity(); // Do not allow task to finish if last task in lockTask mode. Launchable priv-apps can // finish. //LockTask模式下,如果此为最后一个Task,则不允许被销毁 //详见:https://developer.android.com/work/dpc/dedicated-devices/lock-task-mode if (getLockTaskController().activityBlockedFromFinish(r)) { returnfalse; }
// TODO: There is a dup. of this block of code in ActivityStack.navigateUpToLocked // We should consolidate. //IActivityController分发Activity状态变化 if (mController != null) { // Find the first activity that is not finishing. //寻找该Activity销毁后的下一个顶层Activity final ActivityRecord next = r.getRootTask().topRunningActivity(token, INVALID_TASK_ID); if (next != null) { // ask watcher if this is allowed boolean resumeOK = true; try { resumeOK = mController.activityResuming(next.packageName); } catch (RemoteException e) { mController = null; Watchdog.getInstance().setActivityController(null); }
if (!resumeOK) { returnfalse; } } }
// note down that the process has finished an activity and is in background activity // starts grace period //设置Activity销毁的最新时间 if (r.app != null) { r.app.setLastActivityFinishTimeIfNeeded(SystemClock.uptimeMillis()); }
finallong origId = Binder.clearCallingIdentity(); try { boolean res; finalboolean finishWithRootActivity = finishTask == Activity.FINISH_TASK_WITH_ROOT_ACTIVITY; if (finishTask == Activity.FINISH_TASK_WITH_ACTIVITY || (finishWithRootActivity && r == rootR)) { //需要同时销毁Task // If requested, remove the task that is associated to this activity only if it // was the root activity in the task. The result code and data is ignored // because we don't support returning them across task boundaries. Also, to // keep backwards compatibility we remove the task from recents when finishing // task with root activity. //移除Task mStackSupervisor.removeTask(tr, false/*killProcess*/, finishWithRootActivity, "finish-activity"); res = true; // Explicitly dismissing the activity so reset its relaunch flag. r.mRelaunchReason = RELAUNCH_REASON_NONE; } else { //不需要同时销毁Task r.finishIfPossible(resultCode, resultData, resultGrants, "app-request", true/* oomAdj */); res = r.finishing; } return res; } finally { Binder.restoreCallingIdentity(origId); } } }
/** Completely remove all activities associated with an existing task. */ voidperformClearTask(String reason){ // Broken down into to cases to avoid object create due to capturing mStack. if (getStack() == null) { forAllActivities((r) -> { if (r.finishing) return; // Task was restored from persistent storage. r.takeFromHistory(); removeChild(r); }); } else { forAllActivities((r) -> { if (r.finishing) return; // TODO: figure-out how to avoid object creation due to capture of reason variable. r.finishIfPossible(Activity.RESULT_CANCELED, null/* resultData */, null/* resultGrants */, reason, false/* oomAdj */); }); } }
/** * Finish activity if possible. If activity was resumed - we must first pause it to make the * activity below resumed. Otherwise we will try to complete the request immediately by calling * {@link #completeFinishing(String)}. * @return One of {@link FinishRequest} values: * {@link #FINISH_RESULT_REMOVED} if this activity has been removed from the history list. * {@link #FINISH_RESULT_REQUESTED} if removal process was started, but it is still in the list * and will be removed from history later. * {@link #FINISH_RESULT_CANCELLED} if activity is already finishing or in invalid state and the * request to finish it was not ignored. */ @FinishRequestintfinishIfPossible(int resultCode, Intent resultData, NeededUriGrants resultGrants, String reason, boolean oomAdj){
//防止重复销毁 if (finishing) { return FINISH_RESULT_CANCELLED; }
//此Activity不在任务栈中 if (!isInStackLocked()) { return FINISH_RESULT_CANCELLED; }
final ActivityStack stack = getRootTask(); //应该调整顶部Activity finalboolean mayAdjustTop = (isState(RESUMED) || stack.mResumedActivity == null) && stack.isFocusedStackOnDisplay(); //应该调整全局焦点 finalboolean shouldAdjustGlobalFocus = mayAdjustTop // It must be checked before {@link #makeFinishingLocked} is called, because a stack // is not visible if it only contains finishing activities. && mRootWindowContainer.isTopDisplayFocusedStack(stack);
//暂停布局工作 mAtmService.deferWindowLayout(); try { //设置当前Activity状态为finishing makeFinishingLocked(); // Make a local reference to its task since this.task could be set to null once this // activity is destroyed and detached from task. final Task task = getTask(); //获取上一个ActivityRecord ActivityRecord next = task.getActivityAbove(this); //传递FLAG_ACTIVITY_CLEAR_WHEN_TASK_RESET:重置该Task时清除此Activity if (next != null) { if ((intent.getFlags() & Intent.FLAG_ACTIVITY_CLEAR_WHEN_TASK_RESET) != 0) { // If the caller asked that this activity (and all above it) // be cleared when the task is reset, don't lose that information, // but propagate it up to the next activity. next.intent.addFlags(Intent.FLAG_ACTIVITY_CLEAR_WHEN_TASK_RESET); } }
//暂停输入事件分发 pauseKeyDispatchingLocked();
// We are finishing the top focused activity and its task has nothing to be focused so // the next focusable task should be focused. //应该调整顶部Activity,但此Task没有Activity可以被运行在顶部,将焦点转移至下一个可聚焦的Task if (mayAdjustTop && ((ActivityStack) task).topRunningActivity(true/* focusableOnly */) == null) { task.adjustFocusToNextFocusableTask("finish-top", false/* allowFocusSelf */, shouldAdjustGlobalFocus); }
//终止Task finalboolean endTask = task.getActivityBelow(this) == null && !task.isClearingToReuseTask(); finalint transit = endTask ? TRANSIT_TASK_CLOSE : TRANSIT_ACTIVITY_CLOSE; if (isState(RESUMED)) { if (endTask) { //通知Task移除已开始 mAtmService.getTaskChangeNotificationController().notifyTaskRemovalStarted( task.getTaskInfo()); } // Prepare app close transition, but don't execute just yet. It is possible that // an activity that will be made resumed in place of this one will immediately // launch another new activity. In this case current closing transition will be // combined with open transition for the new activity. //准备Activity转场动画 mDisplayContent.prepareAppTransition(transit, false);
// When finishing the activity preemptively take the snapshot before the app window // is marked as hidden and any configuration changes take place //更新Task快照 if (mAtmService.mWindowManager.mTaskSnapshotController != null) { final ArraySet<Task> tasks = Sets.newArraySet(task); mAtmService.mWindowManager.mTaskSnapshotController.snapshotTasks(tasks); mAtmService.mWindowManager.mTaskSnapshotController .addSkipClosingAppSnapshotTasks(tasks); }
// Tell window manager to prepare for this one to be removed. //设置可见性 setVisibility(false);
if (endTask) { //屏幕固定功能 mAtmService.getLockTaskController().clearLockedTask(task); // This activity was in the top focused stack and this is the last activity in // that task, give this activity a higher layer so it can stay on top before the // closing task transition be executed. //更新窗口层级 if (mayAdjustTop) { mNeedsZBoost = true; mDisplayContent.assignWindowLayers(false/* setLayoutNeeded */); } } } elseif (!isState(PAUSING)) { ... //正常不会进入此case }
/** * Sets the result for activity that started this one, clears the references to activities * started for result from this one, and clears new intents. */ privatevoidfinishActivityResults(int resultCode, Intent resultData, NeededUriGrants resultGrants){ // Send the result if needed if (resultTo != null) { if (resultTo.mUserId != mUserId) { if (resultData != null) { resultData.prepareToLeaveUser(mUserId); } } if (info.applicationInfo.uid > 0) { mAtmService.mUgmInternal.grantUriPermissionUncheckedFromIntent(resultGrants, resultTo.getUriPermissionsLocked()); } resultTo.addResultLocked(this, resultWho, requestCode, resultCode, resultData); resultTo = null; }
// Make sure this HistoryRecord is not holding on to other resources, // because clients have remote IPC references to this object so we // can't assume that will go away and want to avoid circular IPC refs. results = null; pendingResults = null; newIntents = null; setSavedState(null/* savedState */); }
//将Result结果添加到results列表中 voidaddResultLocked(ActivityRecord from, String resultWho, int requestCode, int resultCode, Intent resultData){ ActivityResult r = new ActivityResult(from, resultWho, requestCode, resultCode, resultData); if (results == null) { results = new ArrayList<ResultInfo>(); } results.add(r); }
/** * Start pausing the currently resumed activity. It is an error to call this if there * is already an activity being paused or there is no resumed activity. * * @param userLeaving True if this should result in an onUserLeaving to the current activity. * @param uiSleeping True if this is happening with the user interface going to sleep (the * screen turning off). * @param resuming The activity we are currently trying to resume or null if this is not being * called as part of resuming the top activity, so we shouldn't try to instigate * a resume here if not null. * @return Returns true if an activity now is in the PAUSING state, and we are waiting for * it to tell us when it is done. */ finalbooleanstartPausingLocked(boolean userLeaving, boolean uiSleeping, ActivityRecord resuming){ //已有Activity正在暂停中 if (mPausingActivity != null) { if (!shouldSleepActivities()) { // Avoid recursion among check for sleep and complete pause during sleeping. // Because activity will be paused immediately after resume, just let pause // be completed by the order of activity paused from clients. completePauseLocked(false, resuming); } } //上一个已resume的Activity ActivityRecord prev = mResumedActivity;
//既没有已resume的Activity,也没有正在resume的Activity //从栈顶找一个Activity恢复 if (prev == null) { if (resuming == null) { mRootWindowContainer.resumeFocusedStacksTopActivities(); } returnfalse; }
//不能暂停一个正在resume的Activity if (prev == resuming) { returnfalse; }
if (prev.attachedToProcess()) { try { //调度Pause生命周期事务 mAtmService.getLifecycleManager().scheduleTransaction(prev.app.getThread(), prev.appToken, PauseActivityItem.obtain(prev.finishing, userLeaving, prev.configChangeFlags, pauseImmediately)); } catch (Exception e) { // Ignore exception, if process died other code will cleanup. mPausingActivity = null; mLastPausedActivity = null; mLastNoHistoryActivity = null; } } else { mPausingActivity = null; mLastPausedActivity = null; mLastNoHistoryActivity = null; }
// If we are not going to sleep, we want to ensure the device is // awake until the next activity is started. //获取Wakelock,确保设备awake状态直到下一个Activity启动 if (!uiSleeping && !mAtmService.isSleepingOrShuttingDownLocked()) { mStackSupervisor.acquireLaunchWakelock(); }
if (mPausingActivity != null) { // Have the window manager pause its key dispatching until the new // activity has started. If we're pausing the activity just because // the screen is being turned off and the UI is sleeping, don't interrupt // key dispatch; the same activity will pick it up again on wakeup. if (!uiSleeping) { //暂停输入事件分发 prev.pauseKeyDispatchingLocked(); }
if (pauseImmediately) { //不会进入此case // If the caller said they don't want to wait for the pause, then complete // the pause now. completePauseLocked(false, resuming); returnfalse; } else { //设置超时监听(500ms内没有完成便视为超时) prev.schedulePauseTimeout(); returntrue; }
} else { // This activity failed to schedule the // pause, so just treat it as being paused now. //未能成功暂停此Activity,从栈顶找一个Activity恢复 if (resuming == null) { mRootWindowContainer.resumeFocusedStacksTopActivities(); } returnfalse; } }
publicvoidhandlePauseActivity(IBinder token, boolean finished, boolean userLeaving, int configChanges, PendingTransactionActions pendingActions, String reason){ ActivityClientRecord r = mActivities.get(token); if (r != null) { ... r.activity.mConfigChangeFlags |= configChanges; performPauseActivity(r, finished, reason, pendingActions);
// Make sure any pending writes are now committed. //确保所有全局任务都被处理完成 if (r.isPreHoneycomb()) { QueuedWork.waitToFinish(); } //更新标记 mSomeActivitiesChanged = true; } }
/** * Pause the activity. * @return Saved instance state for pre-Honeycomb apps if it was saved, {@code null} otherwise. */ private Bundle performPauseActivity(ActivityClientRecord r, boolean finished, String reason, PendingTransactionActions pendingActions){ ... //异常状态检查 if (finished) { r.activity.mFinished = true; }
// Pre-Honeycomb apps always save their state before pausing //是否需要保存状态信息(Android 3.0前无论是否finish都会触发保存) finalboolean shouldSaveState = !r.activity.mFinished && r.isPreHoneycomb(); if (shouldSaveState) { //回调Activity的onSaveInstanceState方法 callActivityOnSaveInstanceState(r); }
privatevoidperformPauseActivityIfNeeded(ActivityClientRecord r, String reason){ //已暂停,直接返回 if (r.paused) { // You are already paused silly... return; }
// Always reporting top resumed position loss when pausing an activity. If necessary, it // will be restored in performResumeActivity(). //报告resume状态变更 reportTopResumedActivityChanged(r, false/* onTop */, "pausing");
try { r.activity.mCalled = false; //回调Activity的onPause方法 mInstrumentation.callActivityOnPause(r.activity); if (!r.activity.mCalled) { //必须要调用super.onPause方法 thrownew SuperNotCalledException("Activity " + safeToComponentShortString(r.intent) + " did not call through to super.onPause()"); } } catch ... //设置状态 r.setState(ON_PAUSE); }
if (prev != null) { prev.setWillCloseOrEnterPip(false); //之前的状态是否为正在停止 finalboolean wasStopping = prev.isState(STOPPING); //设置状态为已暂停 prev.setState(PAUSED, "completePausedLocked"); if (prev.finishing) { //继续finish流程 prev = prev.completeFinishing("completePausedLocked"); } elseif (prev.hasProcess()) { //Configuration发生变化时可能会设置这个flag if (prev.deferRelaunchUntilPaused) { // Complete the deferred relaunch that was waiting for pause to complete. //等待暂停完成后relaunch Activity prev.relaunchActivityLocked(prev.preserveWindowOnDeferredRelaunch); } elseif (wasStopping) { // We are also stopping, the stop request must have gone soon after the pause. // We can't clobber it, because the stop confirmation will not be handled. // We don't need to schedule another stop, we only need to let it happen. //之前的状态为正在停止,将状态置回即可 prev.setState(STOPPING, "completePausedLocked"); } elseif (!prev.mVisibleRequested || shouldSleepOrShutDownActivities()) { // Clear out any deferred client hide we might currently have. prev.setDeferHidingClient(false); // If we were visible then resumeTopActivities will release resources before // stopping. //添加到stop列表中等待空闲时执行stop prev.addToStopping(true/* scheduleIdle */, false/* idleDelayed */, "completePauseLocked"); } } else { //App在pause过程中死亡 prev = null; } // It is possible the activity was freezing the screen before it was paused. // In that case go ahead and remove the freeze this activity has on the screen // since it is no longer visible. if (prev != null) { //停止屏幕冻结 prev.stopFreezingScreenLocked(true/*force*/); } //Activity暂停完毕 mPausingActivity = null; }
//恢复前一个顶层Activity if (resumeNext) { final ActivityStack topStack = mRootWindowContainer.getTopDisplayFocusedStack(); if (topStack != null && !topStack.shouldSleepOrShutDownActivities()) { mRootWindowContainer.resumeFocusedStacksTopActivities(topStack, prev, null); } else { checkReadyForSleep(); final ActivityRecord top = topStack != null ? topStack.topRunningActivity() : null; if (top == null || (prev != null && top != prev)) { // If there are no more activities available to run, do resume anyway to start // something. Also if the top activity on the stack is not the just paused // activity, we need to go ahead and resume it to ensure we complete an // in-flight app switch. mRootWindowContainer.resumeFocusedStacksTopActivities(); } } }
if (prev != null) { //恢复按键分发 prev.resumeKeyDispatchingLocked(); ... //更新统计信息 }
// Notify when the task stack has changed, but only if visibilities changed (not just // focus). Also if there is an active pinned stack - we always want to notify it about // task stack changes, because its positioning may depend on it. //通知Task状态发生变化 if (mStackSupervisor.mAppVisibilitiesChangedSinceLastPause || (getDisplayArea() != null && getDisplayArea().hasPinnedTask())) { mAtmService.getTaskChangeNotificationController().notifyTaskStackChanged(); mStackSupervisor.mAppVisibilitiesChangedSinceLastPause = false; } }
/** * Complete activity finish request that was initiated earlier. If the activity is still * pausing we will wait for it to complete its transition. If the activity that should appear in * place of this one is not visible yet - we'll wait for it first. Otherwise - activity can be * destroyed right away. * @param reason Reason for finishing the activity. * @return Flag indicating whether the activity was removed from history. */ ActivityRecord completeFinishing(String reason){ ... //状态检查
// If this activity is currently visible, and the resumed activity is not yet visible, then // hold off on finishing until the resumed one becomes visible. // The activity that we are finishing may be over the lock screen. In this case, we do not // want to consider activities that cannot be shown on the lock screen as running and should // proceed with finishing the activity if there is no valid next top running activity. // Note that if this finishing activity is floating task, we don't need to wait the // next activity resume and can destroy it directly. // TODO(b/137329632): find the next activity directly underneath this one, not just anywhere final ActivityRecord next = getDisplayArea().topRunningActivity( true/* considerKeyguardState */); // isNextNotYetVisible is to check if the next activity is invisible, or it has been // requested to be invisible but its windows haven't reported as invisible. If so, it // implied that the current finishing activity should be added into stopping list rather // than destroy immediately. finalboolean isNextNotYetVisible = next != null && (!next.nowVisible || !next.mVisibleRequested);
//如果此Activity当前可见,而要恢复的Activity还不可见,则推迟finish,直到要恢复的Activity可见为止 if (isCurrentVisible && isNextNotYetVisible) { // Add this activity to the list of stopping activities. It will be processed and // destroyed when the next activity reports idle. //添加到stop列表中等待空闲时执行stop addToStopping(false/* scheduleIdle */, false/* idleDelayed */, "completeFinishing"); //设置状态为stop中 setState(STOPPING, "completeFinishing"); } elseif (addToFinishingAndWaitForIdle()) { // We added this activity to the finishing list and something else is becoming resumed. // The activity will complete finishing when the next activity reports idle. No need to // do anything else here. //将此Activity添加到待finish列表中,等待空闲时执行finish } else { // Not waiting for the next one to become visible, and nothing else will be resumed in // place of this activity - requesting destruction right away. //立刻销毁此Activity activityRemoved = destroyIfPossible(reason); }
voidactivityIdleInternal(ActivityRecord r, boolean fromTimeout, boolean processPausingActivities, Configuration config){ ... // Atomically retrieve all of the other things to do. processStoppingAndFinishingActivities(r, processPausingActivities, "idle"); ... }
/** * Processes the activities to be stopped or destroyed. This should be called when the resumed * activities are idle or drawn. */ privatevoidprocessStoppingAndFinishingActivities(ActivityRecord launchedActivity, boolean processPausingActivities, String reason){ // Stop any activities that are scheduled to do so but have been waiting for the transition // animation to finish. ArrayList<ActivityRecord> readyToStopActivities = null; for (int i = mStoppingActivities.size() - 1; i >= 0; --i) { final ActivityRecord s = mStoppingActivities.get(i); finalboolean animating = s.isAnimating(TRANSITION | PARENTS, ANIMATION_TYPE_APP_TRANSITION | ANIMATION_TYPE_RECENTS); //不在动画中或者ATMS服务正在关闭 if (!animating || mService.mShuttingDown) { //跳过正在pause的Activitiy if (!processPausingActivities && s.isState(PAUSING)) { // Defer processing pausing activities in this iteration and reschedule // a delayed idle to reprocess it again removeIdleTimeoutForActivity(launchedActivity); scheduleIdleTimeout(launchedActivity); continue; }
if (readyToStopActivities == null) { readyToStopActivities = new ArrayList<>(); } //将准备好stop的Activitiy加入列表中 readyToStopActivities.add(s);
mStoppingActivities.remove(i); } }
finalint numReadyStops = readyToStopActivities == null ? 0 : readyToStopActivities.size(); for (int i = 0; i < numReadyStops; i++) { final ActivityRecord r = readyToStopActivities.get(i); //Activity是否在任务栈中 if (r.isInHistory()) { if (r.finishing) { // TODO(b/137329632): Wait for idle of the right activity, not just any. //被标记为finishing,尝试销毁Activity r.destroyIfPossible(reason); } else { //否则仅仅只是stop Activity r.stopIfPossible(); } } }
// Finish any activities that are scheduled to do so but have been waiting for the next one // to start. final ArrayList<ActivityRecord> finishingActivities = new ArrayList<>(mFinishingActivities); mFinishingActivities.clear(); for (int i = 0; i < numFinishingActivities; i++) { final ActivityRecord r = finishingActivities.get(i); if (r.isInHistory()) { //立刻执行Activity的销毁流程 r.destroyImmediately(true/* removeFromApp */, "finish-" + reason); } } }
/** * Destroy and cleanup the activity both on client and server if possible. If activity is the * last one left on display with home stack and there is no other running activity - delay * destroying it until the next one starts. */ booleandestroyIfPossible(String reason){ //设置状态 setState(FINISHING, "destroyIfPossible");
// Make sure the record is cleaned out of other places. //确保此Activity已从待stop列表中移除 mStackSupervisor.mStoppingActivities.remove(this);
final ActivityStack stack = getRootTask(); final TaskDisplayArea taskDisplayArea = getDisplayArea(); final ActivityRecord next = taskDisplayArea.topRunningActivity(); finalboolean isLastStackOverEmptyHome = next == null && stack.isFocusedStackOnDisplay() && taskDisplayArea.getOrCreateRootHomeTask() != null; if (isLastStackOverEmptyHome) { // Don't destroy activity immediately if this is the last activity on the display and // the display contains home stack. Although there is no next activity at the moment, // another home activity should be started later. Keep this activity alive until next // home activity is resumed. This way the user won't see a temporary black screen. //如果Home栈存在且这是当前焦点栈中最后一个Activity,则不要立即销毁它 //将此Activity添加到待finish列表中,等待空闲时执行finish addToFinishingAndWaitForIdle(); returnfalse; } //设置finishing标记(之前设过了,这里是重复设置) makeFinishingLocked();
// If the display does not have running activity, the configuration may need to be // updated for restoring original orientation of the display. //更新可见性和屏幕显示方向 if (next == null) { mRootWindowContainer.ensureVisibilityAndConfig(next, getDisplayId(), false/* markFrozenIfConfigChanged */, true/* deferResume */); } //更新恢复栈顶Activity if (activityRemoved) { mRootWindowContainer.resumeFocusedStacksTopActivities(); }
/** * Destroy the current CLIENT SIDE instance of an activity. This may be called both when * actually finishing an activity, or when performing a configuration switch where we destroy * the current client-side object but then create a new client-side object for this same * HistoryRecord. * Normally the server-side record will be removed when the client reports back after * destruction. If, however, at this point there is no client process attached, the record will * be removed immediately. * * @return {@code true} if activity was immediately removed from history, {@code false} * otherwise. */ booleandestroyImmediately(boolean removeFromApp, String reason){ //已经被销毁或正在被销毁,直接返回 if (isState(DESTROYING, DESTROYED)) { returnfalse; }
if (hasProcess()) { //清理更新工作 if (removeFromApp) { app.removeActivity(this); if (!app.hasActivities()) { mAtmService.clearHeavyWeightProcessIfEquals(app); // Update any services we are bound to that might care about whether // their client may have activities. // No longer have activities, so update LRU list and oom adj. //更新进程信息 app.updateProcessInfo(true/* updateServiceConnectionActivities */, false/* activityChange */, true/* updateOomAdj */, false/* addPendingTopUid */); } }
boolean skipDestroy = false;
try { //调度销毁生命周期事务 mAtmService.getLifecycleManager().scheduleTransaction(app.getThread(), appToken, DestroyActivityItem.obtain(finishing, configChangeFlags)); } catch (Exception e) { // We can just ignore exceptions here... if the process has crashed, our death // notification will clean things up. if (finishing) { //从历史任务中移除 removeFromHistory(reason + " exceptionInScheduleDestroy"); removedFromHistory = true; skipDestroy = true; } }
nowVisible = false;
// If the activity is finishing, we need to wait on removing it from the list to give it // a chance to do its cleanup. During that time it may make calls back with its token // so we need to be able to find it on the list and so we don't want to remove it from // the list yet. Otherwise, we can just immediately put it in the destroyed state since // we are not removing it from the list. if (finishing && !skipDestroy) { //设置状态 setState(DESTROYING, "destroyActivityLocked. finishing and not skipping destroy"); //设置销毁超时回调 mAtmService.mH.postDelayed(mDestroyTimeoutRunnable, DESTROY_TIMEOUT); } else { //设置状态 setState(DESTROYED, "destroyActivityLocked. not finishing or skipping destroy"); app = null; } } else { // Remove this record from the history. if (finishing) { //没有绑定进程,从历史任务中移除 removeFromHistory(reason + " hadNoApp"); removedFromHistory = true; } else { //没有绑定进程且不在finishing中,直接设置状态为已被销毁 setState(DESTROYED, "destroyActivityLocked. not finishing and had no app"); } }
/** * Core implementation of stopping an activity. * @param r Target activity client record. * @param info Action that will report activity stop to server. * @param saveState Flag indicating whether the activity state should be saved. * @param finalStateRequest Flag indicating if this call is handling final lifecycle state * request for a transaction. * @param reason Reason for performing this operation. */ privatevoidperformStopActivityInner(ActivityClientRecord r, StopInfo info, boolean saveState, boolean finalStateRequest /* false */, String reason){ if (r != null) { ... //异常状态处理
// One must first be paused before stopped... //如果没有被暂停则先执行pause生命周期 performPauseActivityIfNeeded(r, reason);
/** * Calls {@link Activity#onStop()} and {@link Activity#onSaveInstanceState(Bundle)}, and updates * the client record's state. * All calls to stop an activity must be done through this method to make sure that * {@link Activity#onSaveInstanceState(Bundle)} is also executed in the same call. */ privatevoidcallActivityOnStop(ActivityClientRecord r, boolean saveState, String reason){ // Before P onSaveInstanceState was called before onStop, starting with P it's // called after. Before Honeycomb state was always saved before onPause. //这里shouldSaveState为true,因为activity.mFinished早在performPauseActivity的时候就被设为了true finalboolean shouldSaveState = saveState && !r.activity.mFinished && r.state == null && !r.isPreHoneycomb(); //targetSdkVersion为Android P (Android 9)之前 finalboolean isPreP = r.isPreP(); if (shouldSaveState && isPreP) { callActivityOnSaveInstanceState(r); }
// Disallow entering picture-in-picture after the activity has been stopped //stop后禁用画中画 mCanEnterPictureInPicture = false;
if (!mStopped) { //分发PreStopped事件,执行所有注册的ActivityLifecycleCallbacks的onActivityPreStopped回调 dispatchActivityPreStopped(); //关闭所有子窗口 if (mWindow != null) { mWindow.closeAllPanels(); }
// If we're preserving the window, don't setStoppedState to true, since we // need the window started immediately again. Stopping the window will // destroys hardware resources and causes flicker. if (!preserveWindow && mToken != null && mParent == null) { //设置停止状态,释放硬件资源,销毁Surface WindowManagerGlobal.getInstance().setStoppedState(mToken, true); }
publicvoidhandleDestroyActivity(IBinder token, boolean finishing, int configChanges, boolean getNonConfigInstance, String reason){ //执行onDestroy生命周期 ActivityClientRecord r = performDestroyActivity(token, finishing, configChanges, getNonConfigInstance, reason); if (r != null) { //清理之前设置的延时移除的window cleanUpPendingRemoveWindows(r, finishing); WindowManager wm = r.activity.getWindowManager(); View v = r.activity.mDecor; if (v != null) { if (r.activity.mVisibleFromServer) { mNumVisibleActivities--; } IBinder wtoken = v.getWindowToken(); if (r.activity.mWindowAdded) { if (r.mPreserveWindow) { // Hold off on removing this until the new activity's // window is being added. r.mPendingRemoveWindow = r.window; r.mPendingRemoveWindowManager = wm; // We can only keep the part of the view hierarchy that we control, // everything else must be removed, because it might not be able to // behave properly when activity is relaunching. //从DecorView中移除ContentView r.window.clearContentView(); } else { //立刻执行View的移除操作,释放硬件资源,销毁Surface,回调View.onDetachedFromWindow wm.removeViewImmediate(v); } } if (wtoken != null && r.mPendingRemoveWindow == null) { //移除指定Window下的所有rootView WindowManagerGlobal.getInstance().closeAll(wtoken, r.activity.getClass().getName(), "Activity"); } elseif (r.mPendingRemoveWindow != null) { // We're preserving only one window, others should be closed so app views // will be detached before the final tear down. It should be done now because // some components (e.g. WebView) rely on detach callbacks to perform receiver // unregister and other cleanup. //移除指定Window下除了当前DecorView以外的所有rootView WindowManagerGlobal.getInstance().closeAllExceptView(token, v, r.activity.getClass().getName(), "Activity"); } r.activity.mDecor = null; } if (r.mPendingRemoveWindow == null) { // If we are delaying the removal of the activity window, then // we can't clean up all windows here. Note that we can't do // so later either, which means any windows that aren't closed // by the app will leak. Well we try to warning them a lot // about leaking windows, because that is a bug, so if they are // using this recreate facility then they get to live with leaks. WindowManagerGlobal.getInstance().closeAll(token, r.activity.getClass().getName(), "Activity"); }
// Mocked out contexts won't be participating in the normal // process lifecycle, but if we're running with a proper // ApplicationContext we need to have it tear down things // cleanly. //清理Context Context c = r.activity.getBaseContext(); if (c instanceof ContextImpl) { ((ContextImpl) c).scheduleFinalCleanup( r.activity.getClass().getName(), "Activity"); } } if (finishing) { try { //处理一些销毁后的事项,移除超时回调等 ActivityTaskManager.getService().activityDestroyed(token); } catch (RemoteException ex) { throw ex.rethrowFromSystemServer(); } } mSomeActivitiesChanged = true; }
// dismiss any dialogs we are managing. //关闭所有被管理的Dialog if (mManagedDialogs != null) { finalint numDialogs = mManagedDialogs.size(); for (int i = 0; i < numDialogs; i++) { final ManagedDialog md = mManagedDialogs.valueAt(i); if (md.mDialog.isShowing()) { md.mDialog.dismiss(); } } mManagedDialogs = null; }
// close any cursors we are managing. //关闭所有被管理的Cursor synchronized (mManagedCursors) { int numCursors = mManagedCursors.size(); for (int i = 0; i < numCursors; i++) { ManagedCursor c = mManagedCursors.get(i); if (c != null) { c.mCursor.close(); } } mManagedCursors.clear(); }
// Close any open search dialog //关闭系统搜索服务的弹窗 if (mSearchManager != null) { mSearchManager.stopSearch(); }
if (mActionBar != null) { mActionBar.onDestroy(); }