开篇 本篇以aosp分支android-11.0.0_r25,kernel分支android-msm-wahoo-4.4-android11作为基础解析
上一篇文章Android源码分析 - Binder驱动(上) ,我们已经了解了binder驱动设备是如何注册的,并且分析了binder_open和binder_mmap操作函数,接下来我们继续分析binder驱动中最重要的部分binder_ioctl
ioctl 我们先简单介绍一下ioctl函数,这个函数是用来控制设备的,函数原型如下:
1 int ioctl (int fd , unsigned long cmd , ...)
第一个参数fd为设备的文件描述符
第二个参数cmd为命令码,它由驱动方自定义,用户通过命令码告诉设备驱动想要它做什么
后面为可选参数,具体内容和cmd有关,是传入驱动层的参数
命令码 Linux内核是这么定义一个命令码的
设备类型
序列号
方向
数据尺寸
8 bit
8 bit
2 bit
8~14 bit
这样,一个命令就变成了一个整数形式的命令码了,为了使用起来方便,Linux定义了一些生成命令码的宏:
1
2
3
4
_IO(type,nr) _IOR(type,nr,size ) _IOW(type,nr,size ) _IOWR(type,nr,size )
binder驱动命令码 了解了ioctl和它的命令码后,我们来看看binder驱动定义了哪些命令码,以及它们分别有什么作用
binder驱动命令码被定义在include/uapi/linux/android/binder.h中,其中有几个貌似未使用,我就不列出来了
1 2 3 4 5 6 7 8 #define BINDER_WRITE_READ _IOWR('b' , 1, struct binder_write_read) #define BINDER_SET_MAX_THREADS _IOW('b' , 5, __u32) #define BINDER_SET_CONTEXT_MGR _IOW('b' , 7, __s32) #define BINDER_THREAD_EXIT _IOW('b' , 8, __s32) #define BINDER_VERSION _IOWR('b' , 9, struct binder_version) #define BINDER_GET_NODE_DEBUG_INFO _IOWR('b' , 11, struct binder_node_debug_info) #define BINDER_GET_NODE_INFO_FOR_REF _IOWR('b' , 12, struct binder_node_info_for_ref) #define BINDER_SET_CONTEXT_MGR_EXT _IOW('b' , 13, struct flat_binder_object)
BINDER_WRITE_READ:读写命令,用于数据传输,binder IPC通信中的核心BINDER_SET_MAX_THREADS:设置最大线程数BINDER_SET_CONTEXT_MGR:设置成为binder上下文管理者BINDER_THREAD_EXIT:binder线程退出命令,释放相关资源BINDER_VERSION:获取binder驱动版本号BINDER_GET_NODE_DEBUG_INFO:获得binder节点的debug信息BINDER_GET_NODE_INFO_FOR_REF:从binder引用获得binder节点信息BINDER_SET_CONTEXT_MGR_EXT:和BINDER_SET_CONTEXT_MGR作用相同,携带额外参数
了解了这些binder驱动命令码,我们就可以开始正式分析binder_ioctl
binder_ioctl 这个函数位于drivers/android/binder.c文件中
1
2
3
4
5
6
7
8
9
10
11
12
13
14
15
16
17
18
19
20
21
22
23
24
25
26
27
28
29
30
31
32
33
34
35
36
37
38
39
40
41
42
43
44
45
46
47
48
49
50
51
52
53
54
55
56
static long binder_ioctl (struct file *filp, unsigned int cmd, unsigned long arg) int ret; struct binder_proc *proc = filp ->private_data ; struct binder_thread *thread ; unsigned int size = _IOC_SIZE(cmd); void __user *ubuf = (void __user *)arg; ... ret = wait_event_interruptible(binder_user_error_wait, binder_stop_on_user_error < 2 ); if (ret) goto err_unlocked; thread = binder_get_thread(proc); if (thread == NULL ) { ret = -ENOMEM; goto err; } switch (cmd) { case BINDER_WRITE_READ: ... break ; case BINDER_SET_MAX_THREADS: { ... break ; } case BINDER_SET_CONTEXT_MGR_EXT: { ... break ; } case BINDER_SET_CONTEXT_MGR: ... break ; case BINDER_VERSION: { ... break ; } case BINDER_GET_NODE_INFO_FOR_REF: { ... break ; } case BINDER_GET_NODE_DEBUG_INFO: { ... break ; } default : ret = -EINVAL; goto err; } ret = 0 ; err: ... return ret; }
从整体上来看还是比较清晰的,我们对一些点做一下详解
__user __user是一个宏,它告诉编译器不应该解除这个指针的引用(因为在当前地址空间中它是没有意义的),(void __user *)arg表示arg是一个用户空间的地址,不能直接进行拷贝等,要使用copy_from_user,copy_to_user等函数。
wait_event_interruptible wait_event_interruptible(wq, condition)是一个宏,它是用来挂起进程直到满足判断条件的
binder_stop_on_user_error是一个全局变量,它的初始值为0,binder_user_error_wait是一个等待队列
在正常情况下,binder_stop_on_user_error < 2这个条件是成立的,所以不会进入挂起状态,而当binder因为错误而停止后,调用binder_ioctl,则会挂起进程,直到其他进程通过wake_up_interruptible来唤醒binder_user_error_wait队列,并且满足binder_stop_on_user_error < 2这个条件,binder_ioctl才会继续往后运行
binder_thread结构体 我们需要关注一个重要的结构体binder_thread,它在后续的代码中会频繁的出现,这个结构体描述了进程中的工作线程
1
2
3
4
5
6
7
8
9
10
11
12
13
14
15
16
17
18
19
20
21
22
23
24
25
26
27
28
29
30
31
32
33
struct binder_thread { struct binder_proc *proc ; struct rb_node rb_node ; struct list_head waiting_thread_node ; int pid; int looper; bool looper_need_return; struct binder_transaction *transaction_stack ; struct list_head todo ; bool process_todo; struct binder_error return_error ; struct binder_error reply_error ; wait_queue_head_t wait; struct binder_stats stats ; atomic_t tmp_ref; bool is_dead; struct task_struct *task ; };
binder_get_thread 接下来我们看一下binder_ioctl是怎么获得binder_thread的
1
2
3
4
5
6
7
8
9
10
11
12
13
14
15
16
17
18
19
20
static struct binder_thread *binder_get_thread (struct binder_proc *proc) struct binder_thread *thread ; struct binder_thread *new_thread ; binder_inner_proc_lock(proc); thread = binder_get_thread_ilocked(proc, NULL ); binder_inner_proc_unlock(proc); if (!thread) { new_thread = kzalloc(sizeof (*thread), GFP_KERNEL); if (new_thread == NULL ) return NULL ; binder_inner_proc_lock(proc); thread = binder_get_thread_ilocked(proc, new_thread); binder_inner_proc_unlock(proc); if (thread != new_thread) kfree(new_thread); } return thread; }
我们可以看到里面有锁操作,使用的就是上一章Android源码分析 - Binder驱动(上) 中所介绍过的spinlock,使用的是binder_proc结构体中的inner_lock
简单浏览一下代码我们就可以知道,binder_get_thread首先试着从binder_proc获得binder_thread,如果没能获得,就新建一个,这两种情况都调用了binder_get_thread_ilocked函数
1
2
3
4
5
6
7
8
9
10
11
12
13
14
15
16
17
18
19
20
21
22
23
24
25
26
27
28
29
30
31
32
33
34
35
36
37
38
39
40
41
42
43
static struct binder_thread *binder_get_thread_ilocked ( struct binder_proc *proc, struct binder_thread *new_thread) struct binder_thread *thread = NULL ; struct rb_node *parent = NULL ; struct rb_node **p = &proc ->threads .rb_node ; while (*p) { parent = *p; thread = rb_entry(parent, struct binder_thread, rb_node); if (current->pid < thread->pid) p = &(*p)->rb_left; else if (current->pid > thread->pid) p = &(*p)->rb_right; else return thread; } if (!new_thread) return NULL ; thread = new_thread; binder_stats_created(BINDER_STAT_THREAD); thread->proc = proc; thread->pid = current->pid; get_task_struct(current); thread->task = current; atomic_set(&thread->tmp_ref, 0 ); init_waitqueue_head(&thread->wait); INIT_LIST_HEAD(&thread->todo); rb_link_node(&thread->rb_node, parent, p); rb_insert_color(&thread->rb_node, &proc->threads); thread->looper_need_return = true ; thread->return_error.work.type = BINDER_WORK_RETURN_ERROR; thread->return_error.cmd = BR_OK; thread->reply_error.work.type = BINDER_WORK_RETURN_ERROR; thread->reply_error.cmd = BR_OK; INIT_LIST_HEAD(&new_thread->waiting_thread_node); return thread; }
这个函数分为前后两个部分,前半部分通过binder_proc->threads这个红黑树查找当前系统调用进程pid所对应的binder_thread,后半部分初始化了传入的new_thread,并将其插入到红黑树中(binder_proc->threads)
接下来就是判断命令码cmd,来执行相应的工作了,我们只分析比较重要的几个命令码
BINDER_WRITE_READ binder驱动中最重要的命令码肯定非BINDER_WRITE_READ莫属了,这个命令用来进行binder读写交互
1
2
3
4
5
6
7
8
9
10
11
12
13
14
15
16
17
18
19
static long binder_ioctl (struct file *filp, unsigned int cmd, unsigned long arg) ... switch (cmd) { case BINDER_WRITE_READ: ret = binder_ioctl_write_read(filp, cmd, arg, thread); if (ret) goto err; break ; ... default : ret = -EINVAL; goto err; } ret = 0 ; err: ... return ret; }
switch case命令码后,直接调用了binder_ioctl_write_read函数
1
2
3
4
5
6
7
8
9
10
11
12
13
14
15
16
17
18
19
20
21
22
23
24
25
26
27
28
29
30
31
32
33
34
35
36
37
38
39
40
41
42
43
44
45
46
47
48
49
50
51
52
53
54
55
56
57
58
59
60
61
62
63
static int binder_ioctl_write_read (struct file *filp, unsigned int cmd, unsigned long arg, struct binder_thread *thread) int ret = 0 ; struct binder_proc *proc = filp ->private_data ; unsigned int size = _IOC_SIZE(cmd); void __user *ubuf = (void __user *)arg; struct binder_write_read bwr ; if (size != sizeof (struct binder_write_read)) { ret = -EINVAL; goto out; } if (copy_from_user(&bwr, ubuf, sizeof (bwr))) { ret = -EFAULT; goto out; } ... if (bwr.write_size > 0 ) { ret = binder_thread_write(proc, thread, bwr.write_buffer, bwr.write_size, &bwr.write_consumed); trace_binder_write_done(ret); if (ret < 0 ) { bwr.read_consumed = 0 ; if (copy_to_user(ubuf, &bwr, sizeof (bwr))) ret = -EFAULT; goto out; } } if (bwr.read_size > 0 ) { ret = binder_thread_read(proc, thread, bwr.read_buffer, bwr.read_size, &bwr.read_consumed, filp->f_flags & O_NONBLOCK); trace_binder_read_done(ret); binder_inner_proc_lock(proc); if (!binder_worklist_empty_ilocked(&proc->todo)) binder_wakeup_proc_ilocked(proc); binder_inner_proc_unlock(proc); if (ret < 0 ) { if (copy_to_user(ubuf, &bwr, sizeof (bwr))) ret = -EFAULT; goto out; } } ... if (copy_to_user(ubuf, &bwr, sizeof (bwr))) { ret = -EFAULT; goto out; } out: return ret; }
binder_write_read结构体 BINDER_WRITE_READ命令码所接受的参数为一个binder_write_read结构体,我们先来了解一下它
1
2
3
4
5
6
7
8
struct binder_write_read { binder_size_t write_size; binder_size_t write_consumed; binder_uintptr_t write_buffer; binder_size_t read_size; binder_size_t read_consumed; binder_uintptr_t read_buffer; };
write_size:写数据的总大小write_consumed:已写数据大小write_buffer:写数据的虚拟内存地址read_size:读数据的总大小read_consumed:已读数据大小read_buffer:读数据的虚拟内存地址
整个binder_ioctl_write_read函数结构是比较简单的,首先校验了一下用户空间所传的参数arg为binder_write_read结构体,接着将其从用户空间拷贝至内核空间bwr,接下来便是分别检查写缓存读缓存中是否有数据,有的话则执行相应的写读操作。这里需要注意的是,读写操作所传入的write_consumed和read_consumed是以地址的形式,即会对这两个值进行修改,不管读写操作是否执行,成功或者失败,最后都会调用copy_to_user将bwr从内核空间复制到用户空间ubuf
看到这里,可能有些同学会觉得有些奇怪,说好binder只进行一次复制的呢?其实是这样的没错,这里的copy_from_user或者copy_to_user只是复制了binder_write_read结构体,得到了需要IPC数据的虚拟内存地址而已,真正的复制操作是在binder读写操作中进行的
binder_thread_write 先看binder写操作,这个函数首先从传入的参数中,计算出待写的起始地址和结束地址,因为可能数据中含有多个命令和对应数据要处理,所以这里开了一个循环,在循环中,首先调用get_user,从用户空间读取一个值到内核空间中来,这个值就是binder请求码,然后将指针向后移动32位,使其指向对应请求码的数据头,接着根据binder请求码去完成不同的工作,处理完后修改已写数据大小
1
2
3
4
5
6
7
8
9
10
11
12
13
14
15
16
17
18
19
20
21
22
23
24
25
26
27
28
29
30
31
32
33
34
35
36
37
38
39
40
41
42
43
44
45
46
47
48
49
50
51
52
53
54
55
56
57
58
59
60
61
62
63
64
65
66
67
68
69
70
71
72
73
74
75
76
77
78
79
80
81
82
83
84
85
86
87
88
89
90
91
static int binder_thread_write (struct binder_proc *proc, struct binder_thread *thread, binder_uintptr_t binder_buffer, size_t size , binder_size_t *consumed) uint32_t cmd; struct binder_context *context = proc ->context ; void __user *buffer = (void __user *)(uintptr_t )binder_buffer; void __user *ptr = buffer + *consumed; void __user *end = buffer + size ; while (ptr < end && thread->return_error.cmd == BR_OK) { int ret; if (get_user(cmd, (uint32_t __user *)ptr)) return -EFAULT; ptr += sizeof (uint32_t ); trace_binder_command(cmd); if (_IOC_NR(cmd) < ARRAY_SIZE(binder_stats.bc)) { atomic_inc(&binder_stats.bc[_IOC_NR(cmd)]); atomic_inc(&proc->stats.bc[_IOC_NR(cmd)]); atomic_inc(&thread->stats.bc[_IOC_NR(cmd)]); } switch (cmd) { case BC_INCREFS: case BC_ACQUIRE: case BC_RELEASE: case BC_DECREFS: { ... break ; } case BC_INCREFS_DONE: case BC_ACQUIRE_DONE: { ... break ; } case BC_ATTEMPT_ACQUIRE: pr_err("BC_ATTEMPT_ACQUIRE not supported\n" ); return -EINVAL; case BC_ACQUIRE_RESULT: pr_err("BC_ACQUIRE_RESULT not supported\n" ); return -EINVAL; case BC_FREE_BUFFER: { ... break ; } case BC_TRANSACTION_SG: case BC_REPLY_SG: { ... break ; } case BC_TRANSACTION: case BC_REPLY: { ... break ; } case BC_REGISTER_LOOPER: ... break ; case BC_ENTER_LOOPER: ... break ; case BC_EXIT_LOOPER: ... break ; case BC_REQUEST_DEATH_NOTIFICATION: case BC_CLEAR_DEATH_NOTIFICATION: { ... } break ; case BC_DEAD_BINDER_DONE: { ... } break ; default : pr_err("%d:%d unknown command %d\n" , proc->pid, thread->pid, cmd); return -EINVAL; } *consumed = ptr - buffer ; } return 0 ; }
binder请求码 binder请求码用于用户空间程序向binder驱动发送请求消息,以BC开头,被定义在enum binder_driver_command_protocol中(include/uapi/linux/android/binder.h)
命令 | 说明 | 参数类型 |
其中,最重要且最频繁的操作为BC_TRANSACTION/BC_REPLY,我们就只分析一下这两个请求码做了什么事
binder_transaction 1 2 3 4 5 6 7 8 9 10 11 12 13 14 15 16 17 18 19 20 21 22 23 24 25 static int binder_thread_write (struct binder_proc *proc, struct binder_thread *thread, binder_uintptr_t binder_buffer, size_t size , binder_size_t *consumed) ... while (...) { ... switch (cmd) { ... case BC_TRANSACTION: case BC_REPLY: { struct binder_transaction_data tr ; if (copy_from_user(&tr, ptr, sizeof (tr))) return -EFAULT; ptr += sizeof (tr); binder_transaction(proc, thread, &tr, cmd == BC_REPLY, 0 ); break ; } ... } ... }
对于这两个请求码,首先从用户空间中复制了一份binder_transaction_data到内核空间,接着就调用binder_transaction函数继续处理
binder_transaction_data结构体 在分析binder_transaction函数前,我们需要先了解一些结构体
binder_transaction_data结构体就是BC_TRANSACTION/BC_REPLY所对应的参数类型,它被定义在include/uapi/linux/android/binder.h中
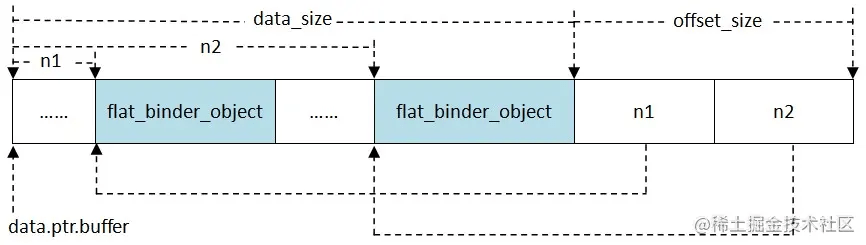
1 2 3 4 5 6 7 8 9 10 11 12 13 14 15 16 17 18 19 20 21 22 23 24 25 26 27 28 29 30 31 32 33 34 35 struct binder_transaction_data { union { __u32 handle; binder_uintptr_t ptr; } target; binder_uintptr_t cookie; __u32 code; __u32 flags; pid_t sender_pid; uid_t sender_euid; binder_size_t data_size; binder_size_t offsets_size; union { struct { binder_uintptr_t buffer ; binder_uintptr_t offsets; } ptr; __u8 buf[8 ]; } data; };
可以看到,真正需要拷贝的数据的地址是保存在data域中的,可能文字描述的data结构不是特别清晰,可以结合下图理解:
这里我用一个例子来解释一下binder_transaction_data传输的数据是什么样子的
小伙伴们应该都了解Parcel吧,它是一个存放读取数据的容器,我们binder_transaction_data中实际传输的数据就是通过它组合而成的,它可以传输基本数据类型,Parcelable类型和binder类型
其中基本数据类型就不用说了,每种基本类型所占用的大小是固定的,Parcelable类型实际上也是传输基本数据类型,它是通过实现Parcelable接口将一个复杂对象中的成员序列化成了一个个基本数据类型传输,而binder类型的传输有点特别,它会将这个binder对象 “压扁” 成一个flat_binder_object结构体传输
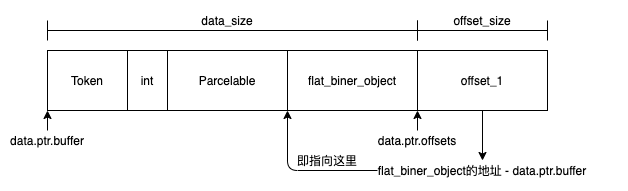
假设我们有一个客户端client,一个服务端server,client想要向binder驱动发起一个事物,调用server的某个方法,我们该怎么构建binder_transaction_data的数据区呢?
一般来说,我们需要先写一个token,这个token是为了进行校验的,两端需要保持一致。接着我们需要按顺序依次写入参数,假设我们想要调用server的callMe(int, Parcelable, IBinder)函数,那我们就需要先写入一个int,再写入一个Parcelable,最后再将IBinder “压扁” 成一个flat_binder_object写入。
此时数据布局如下图所示:
从图中我们可以看出来,offsets指示出了buffer中传输的binder对象的位置,有几个binder对象,就会有几个offset与之对应
transaction_flags 我们再看一下有哪些事务标志,他们分别代表什么意思
1 2 3 4 5 6 7 8 9 10 enum transaction_flags { TF_ONE_WAY = 0x01 , TF_ROOT_OBJECT = 0x04 , TF_STATUS_CODE = 0x08 , TF_ACCEPT_FDS = 0x10 , };
binder_transaction结构体 binder_transaction结构体用来描述进程间通信过程(事务),它被定义在drivers/android/binder.c中
1 2 3 4 5 6 7 8 9 10 11 12 13 14 15 16 17 18 19 20 21 22 23 24 25 26 27 28 29 30 31 32 33 struct binder_transaction { int debug_id; struct binder_work work ; struct binder_thread *from ; struct binder_transaction *from_parent ; struct binder_proc *to_proc ; struct binder_thread *to_thread ; struct binder_transaction *to_parent ; unsigned need_reply:1 ; struct binder_buffer *buffer ; unsigned int code; unsigned int flags; struct binder_priority priority ; struct binder_priority saved_priority ; bool set_priority_called; kuid_t sender_euid; binder_uintptr_t security_ctx; spinlock_t lock; };
binder_work结构体 binder_work结构体用来描述需要处理的工作事项,它被定义在drivers/android/binder.c中
1 2 3 4 5 6 7 8 9 10 11 12 13 14 15 struct binder_work { struct list_head entry ; enum binder_work_type { BINDER_WORK_TRANSACTION = 1 , BINDER_WORK_TRANSACTION_COMPLETE, BINDER_WORK_RETURN_ERROR, BINDER_WORK_NODE, BINDER_WORK_DEAD_BINDER, BINDER_WORK_DEAD_BINDER_AND_CLEAR, BINDER_WORK_CLEAR_DEATH_NOTIFICATION, } type; };
简单看完了一些必要的结构体后,我们把目光转回binder_transaction函数上
binder_transaction函数的代码很长,我们精简一下,然后再分段来看,从整体上,我们可以将它分为几个部分:
获得目标进程/线程信息
将数据拷贝到目标进程所映射的内存中(此时会建立实际的映射关系)
将待处理的任务加入todo队列,唤醒目标线程
第一部分:获得目标进程/线程信息 这里根据是否为reply,分成了两种情况
BC_TRANSACTION 我们先看BC_TRANSACTION的情况
1 2 3 4 5 6 7 8 9 10 11 12 13 14 15 16 17 18 19 20 21 22 23 24 25 26 27 28 29 30 31 32 33 34 35 36 37 38 39 40 41 42 43 44 45 46 47 48 49 50 51 52 53 54 55 56 57 58 59 60 61 62 63 64 65 66 67 68 69 70 71 72 73 74 75 76 static void binder_transaction (struct binder_proc *proc, struct binder_thread *thread, struct binder_transaction_data *tr, int reply, binder_size_t extra_buffers_size) struct binder_proc *target_proc = NULL ; struct binder_thread *target_thread = NULL ; struct binder_node *target_node = NULL ; uint32_t return_error = 0 ; struct binder_context *context = proc ->context ; if (reply) { ... } else { if (tr->target.handle) { struct binder_ref *ref; binder_proc_lock(proc); ref = binder_get_ref_olocked(proc, tr->target.handle, true ); target_node = binder_get_node_refs_for_txn( ref->node, &target_proc, &return_error); binder_proc_unlock(proc); } else { mutex_lock(&context->context_mgr_node_lock); target_node = context->binder_context_mgr_node; if (target_node) target_node = binder_get_node_refs_for_txn( target_node, &target_proc, &return_error); else return_error = BR_DEAD_REPLY; mutex_unlock(&context->context_mgr_node_lock); if (target_node && target_proc == proc) { ... } } ... if (security_binder_transaction(proc->tsk, target_proc->tsk) < 0 ) { ... } binder_inner_proc_lock(proc); if (!(tr->flags & TF_ONE_WAY) && thread->transaction_stack) { struct binder_transaction *tmp ; tmp = thread->transaction_stack; if (tmp->to_thread != thread) { ... } while (tmp) { struct binder_thread *from ; spin_lock(&tmp->lock); from = tmp->from; if (from && from->proc == target_proc) { atomic_inc(&from->tmp_ref); target_thread = from; spin_unlock(&tmp->lock); break ; } spin_unlock(&tmp->lock); tmp = tmp->from_parent; } } binder_inner_proc_unlock(proc); } ... }
可以看到,虽然整个函数很长很复杂,但经过我们的拆分精简,逻辑就清晰很多了
binder_transaction_data.target.handle用一个int值表示目标binder引用,当它不为0时,调用binder_get_ref_olocked函数查找binder_ref
binder_get_ref_olocked 1 2 3 4 5 6 7 8 9 10 11 12 13 14 15 16 17 18 19 20 21 22 static struct binder_ref *binder_get_ref_olocked (struct binder_proc *proc, u32 desc, bool need_strong_ref) struct rb_node *n = proc ->refs_by_desc .rb_node ; struct binder_ref *ref ; while (n) { ref = rb_entry(n, struct binder_ref, rb_node_desc); if (desc < ref->data.desc) { n = n->rb_left; } else if (desc > ref->data.desc) { n = n->rb_right; } else if (need_strong_ref && !ref->data.strong) { binder_user_error("tried to use weak ref as strong ref\n" ); return NULL ; } else { return ref; } } return NULL ; }
可以看到,这个函数就是从binder_proc.refs_by_desc这个红黑树中,通过desc句柄查找到对应的binder引用binder_ref,这样就可以通过binder_ref.node获得到binder实体binder_node
接着再调用binder_get_node_refs_for_txn函数通过目标binder实体获取目标进程信息
binder_get_node_refs_for_txn 1 2 3 4 5 6 7 8 9 10 11 12 13 14 15 16 17 18 19 20 21 22 23 24 static struct binder_node *binder_get_node_refs_for_txn ( struct binder_node *node, struct binder_proc **procp, uint32_t *error) struct binder_node *target_node = NULL ; binder_node_inner_lock(node); if (node->proc) { target_node = node; binder_inc_node_nilocked(node, 1 , 0 , NULL ); binder_inc_node_tmpref_ilocked(node); atomic_inc(&node->proc->tmp_ref); *procp = node->proc; } else *error = BR_DEAD_REPLY; binder_node_inner_unlock(node); return target_node; }
这个函数第二个参数接受一个binder_proc **类型,即指向指针的指针,调用方对proc取地址,即指向proc指针分配在栈上的地址,这样函数中对procp解引用就得到了proc指针本身的地址,即可使proc指针指向binder_proc的地址
当binder_transaction_data.target.handle为0时,表示目标是ServiceManager,而ServiceManager是binder驱动的context,所以可以直接从context中获取binder实体,关于ServiceManager是怎么成为binder驱动的context的,我们会在后面的章节进行分析
接下来做一下安全检查,当flags不带TF_ONE_WAY(即需要reply)并且当前线程存在binder事务栈时,寻找一个合适的目标binder工作线程用来处理此事务(线程复用)
这里client端可能是第一次请求服务,此时binder_thread里是不存在binder事务栈,所以是没法找到目标binder线程的
BC_REPLY 接着,我们再看BC_REPLY的情况
1 2 3 4 5 6 7 8 9 10 11 12 13 14 15 16 17 18 19 20 21 22 23 24 25 26 27 28 29 30 31 32 33 34 35 36 static void binder_transaction (struct binder_proc *proc, struct binder_thread *thread, struct binder_transaction_data *tr, int reply, binder_size_t extra_buffers_size) struct binder_proc *target_proc = NULL ; struct binder_thread *target_thread = NULL ; struct binder_transaction *in_reply_to = NULL ; if (reply) { binder_inner_proc_lock(proc); in_reply_to = thread->transaction_stack; if (in_reply_to == NULL ) { ... } if (in_reply_to->to_thread != thread) { ... } thread->transaction_stack = in_reply_to->to_parent; binder_inner_proc_unlock(proc); target_thread = binder_get_txn_from_and_acq_inner(in_reply_to); if (target_thread->transaction_stack != in_reply_to) { ... } target_proc = target_thread->proc; atomic_inc(&target_proc->tmp_ref); binder_inner_proc_unlock(target_thread->proc); } else { ... } ... }
1 2 3 4 5 6 7 8 9 10 11 12 13 14 15 16 17 18 static struct binder_thread *binder_get_txn_from_and_acq_inner ( struct binder_transaction *t) struct binder_thread *from ; from = binder_get_txn_from(t); if (!from) return NULL ; binder_inner_proc_lock(from->proc); if (t->from) { BUG_ON(from != t->from); return from; } binder_inner_proc_unlock(from->proc); binder_thread_dec_tmpref(from); return NULL ; }
BC_REPLY获取目标进程/线程信息就更简单了,BC_TRANSACTION中我们还需要根据binder句柄来获取各种信息,BC_REPLY我们只需要找到需要回应的那个事务,那个事务所在的线程和进程即为reply事务的目标线程和目标进程
第二部分:数据拷贝,建立映射 1 2 3 4 5 6 7 8 9 10 11 12 13 14 15 16 17 18 19 20 21 22 23 24 25 26 27 28 29 30 31 32 33 34 35 36 37 38 39 40 41 42 43 44 45 46 47 48 49 50 51 52 53 54 55 56 57 58 59 60 61 62 63 64 65 66 67 68 69 70 71 72 73 74 75 76 77 78 79 80 81 82 83 84 85 86 87 88 89 90 91 92 93 94 95 96 97 98 99 100 101 102 103 104 105 106 107 108 109 110 111 112 113 114 115 116 117 118 119 120 121 122 123 124 125 126 127 128 129 130 131 static void binder_transaction (struct binder_proc *proc, struct binder_thread *thread, struct binder_transaction_data *tr, int reply, binder_size_t extra_buffers_size) int ret; struct binder_transaction *t ; struct binder_work *tcomplete ; binder_size_t *offp, *off_end, *off_start; binder_size_t off_min; u8 *sg_bufp, *sg_buf_end; struct binder_proc *target_proc = NULL ; struct binder_thread *target_thread = NULL ; struct binder_node *target_node = NULL u32 secctx_sz = 0; ... t = kzalloc(sizeof (*t), GFP_KERNEL); spin_lock_init(&t->lock); tcomplete = kzalloc(sizeof (*tcomplete), GFP_KERNEL); t->debug_id = t_debug_id; if (!reply && !(tr->flags & TF_ONE_WAY)) t->from = thread; else t->from = NULL ; t->sender_euid = task_euid(proc->tsk); t->to_proc = target_proc; t->to_thread = target_thread; t->code = tr->code; t->flags = tr->flags; if (!(t->flags & TF_ONE_WAY) && binder_supported_policy(current->policy)) { t->priority.sched_policy = current->policy; t->priority.prio = current->normal_prio; } else { t->priority = target_proc->default_priority; } if (target_node && target_node->txn_security_ctx) { ... } t->buffer = binder_alloc_new_buf(&target_proc->alloc, tr->data_size, tr->offsets_size, extra_buffers_size, !reply && (t->flags & TF_ONE_WAY)); t->buffer ->debug_id = t->debug_id; t->buffer ->transaction = t; t->buffer ->target_node = target_node; off_start = (binder_size_t *)(t->buffer ->data + ALIGN(tr->data_size, sizeof (void *))); offp = off_start; copy_from_user(t->buffer ->data, (const void __user *)(uintptr_t ) tr->data.ptr.buffer , tr->data_size); copy_from_user(offp, (const void __user *)(uintptr_t ) tr->data.ptr.offsets, tr->offsets_size); if (!IS_ALIGNED(tr->offsets_size, sizeof (binder_size_t ))) { ... } if (!IS_ALIGNED(extra_buffers_size, sizeof (u64))) { ... } off_end = (void *)off_start + tr->offsets_size; sg_bufp = (u8 *)(PTR_ALIGN(off_end, sizeof (void *))); sg_buf_end = sg_bufp + extra_buffers_size - ALIGN(secctx_sz, sizeof (u64)); off_min = 0 ; for (; offp < off_end; offp++) { struct binder_object_header *hdr ; size_t object_size = binder_validate_object(t->buffer , *offp); if (object_size == 0 || *offp < off_min) { ... } hdr = (struct binder_object_header *)(t->buffer ->data + *offp); off_min = *offp + object_size; switch (hdr->type) { case BINDER_TYPE_BINDER: case BINDER_TYPE_WEAK_BINDER: { struct flat_binder_object *fp ; fp = to_flat_binder_object(hdr); ret = binder_translate_binder(fp, t, thread); } break ; case BINDER_TYPE_HANDLE: case BINDER_TYPE_WEAK_HANDLE: { struct flat_binder_object *fp ; fp = to_flat_binder_object(hdr); ret = binder_translate_handle(fp, t, thread); } break ; case BINDER_TYPE_FD: { ... } break ; case BINDER_TYPE_FDA: { ... } break ; case BINDER_TYPE_PTR: { ... } break ; default : ... } } tcomplete->type = BINDER_WORK_TRANSACTION_COMPLETE; t->work.type = BINDER_WORK_TRANSACTION; ... }
我们可以将这一部分再细分成几个部分:
分配缓存,建立映射
数据拷贝
binder类型转换
分配缓存,建立映射 我们首先看分配缓存,建立映射是怎么做的,它调用了binder_alloc_new_buf函数,这个函数定义在drivers/android/binder_alloc.c中,内部加了锁后调用了binder_alloc_new_buf_locked函数
1 2 3 4 5 6 7 8 9 10 11 12 13 14 15 16 17 18 19 20 21 22 23 24 25 26 27 28 29 30 31 32 33 34 35 36 37 38 39 40 41 42 43 44 45 46 47 48 49 50 51 52 53 54 55 56 57 58 59 60 61 62 63 64 65 66 67 68 69 70 71 72 73 74 75 76 77 78 79 80 81 82 83 84 85 86 87 88 89 90 91 92 93 94 95 96 97 98 99 100 101 102 103 static struct binder_buffer *binder_alloc_new_buf_locked ( struct binder_alloc *alloc, size_t data_size, size_t offsets_size, size_t extra_buffers_size, int is_async) struct rb_node *n = alloc ->free_buffers .rb_node ; struct binder_buffer *buffer ; size_t buffer_size; struct rb_node *best_fit = NULL ; void *has_page_addr; void *end_page_addr; size_t size , data_offsets_size; int ret; if (alloc->vma == NULL ) { ... } data_offsets_size = ALIGN(data_size, sizeof (void *)) + ALIGN(offsets_size, sizeof (void *)); size = data_offsets_size + ALIGN(extra_buffers_size, sizeof (void *)); size = max (size , sizeof (void *)); while (n) { buffer = rb_entry(n, struct binder_buffer, rb_node); BUG_ON(!buffer ->free ); buffer_size = binder_alloc_buffer_size(alloc, buffer ); if (size < buffer_size) { best_fit = n; n = n->rb_left; } else if (size > buffer_size) n = n->rb_right; else { best_fit = n; break ; } } if (best_fit == NULL ) { ... } if (n == NULL ) { buffer = rb_entry(best_fit, struct binder_buffer, rb_node); buffer_size = binder_alloc_buffer_size(alloc, buffer ); } has_page_addr = (void *)(((uintptr_t )buffer ->data + buffer_size) & PAGE_MASK); WARN_ON(n && buffer_size != size ); end_page_addr = (void *)PAGE_ALIGN((uintptr_t )buffer ->data + size ); if (end_page_addr > has_page_addr) end_page_addr = has_page_addr; ret = binder_update_page_range(alloc, 1 , (void *)PAGE_ALIGN((uintptr_t )buffer ->data), end_page_addr); if (ret) return ERR_PTR(ret); if (buffer_size != size ) { struct binder_buffer *new_buffer ; new_buffer = kzalloc(sizeof (*buffer ), GFP_KERNEL); new_buffer->data = (u8 *)buffer ->data + size ; list_add(&new_buffer->entry, &buffer ->entry); new_buffer->free = 1 ; binder_insert_free_buffer(alloc, new_buffer); } rb_erase(best_fit, &alloc->free_buffers); buffer ->free = 0 ; buffer ->allow_user_free = 0 ; binder_insert_allocated_buffer_locked(alloc, buffer ); buffer ->data_size = data_size; buffer ->offsets_size = offsets_size; buffer ->async_transaction = is_async; buffer ->extra_buffers_size = extra_buffers_size; if (is_async) { alloc->free_async_space -= size + sizeof (struct binder_buffer); } return buffer ; ... }
这个函数的整体逻辑分为三个部分:
找到可用的空闲内核缓存区,计算我们需要分配的大小
分配物理页,建立映射
初始化新分配的buffer
其中1、3部分已经用注释标出来了,应该还是比较好理解的,我们终点看一下第2部分:怎么分配物理页,建立映射
我们在上一章Android源码分析 - Binder驱动(上) 中说到,binder_mmap并没有立即将内核虚拟内存和进程虚拟内存与物理内存做映射,实际上这个映射操作是在binder_update_page_range这里做的
1 2 3 4 5 6 7 8 9 10 11 12 13 14 15 16 17 18 19 20 21 22 23 24 25 26 27 28 29 30 31 32 33 34 35 36 37 38 39 40 41 42 43 44 45 46 47 48 49 50 51 52 53 54 55 56 57 58 59 60 61 62 63 64 65 66 67 68 69 70 71 72 73 74 75 76 77 78 79 80 81 82 83 84 85 86 87 88 89 90 91 92 93 94 95 96 97 static int binder_update_page_range (struct binder_alloc *alloc, int allocate, void *start, void *end ) void *page_addr; unsigned long user_page_addr; struct binder_lru_page *page ; struct vm_area_struct *vma = NULL ; struct mm_struct *mm = NULL ; bool need_mm = false ; if (end <= start) return 0 ; if (allocate == 0 ) goto free_range; for (page_addr = start; page_addr < end ; page_addr += PAGE_SIZE) { page = &alloc->pages[(page_addr - alloc->buffer ) / PAGE_SIZE]; if (!page->page_ptr) { need_mm = true ; break ; } } if (need_mm && atomic_inc_not_zero(&alloc->vma_vm_mm->mm_users)) mm = alloc->vma_vm_mm; if (mm) { down_read(&mm->mmap_sem); if (!mmget_still_valid(mm)) { if (allocate == 0 ) goto free_range; goto err_no_vma; } vma = alloc->vma; } if (!vma && need_mm) { ... } for (page_addr = start; page_addr < end ; page_addr += PAGE_SIZE) { int ret; bool on_lru; size_t index; index = (page_addr - alloc->buffer ) / PAGE_SIZE; page = &alloc->pages[index]; if (page->page_ptr) { on_lru = list_lru_del(&binder_alloc_lru, &page->lru); continue ; } page->page_ptr = alloc_page(GFP_KERNEL | __GFP_HIGHMEM | __GFP_ZERO); if (!page->page_ptr) { ... } page->alloc = alloc; INIT_LIST_HEAD(&page->lru); ret = map_kernel_range_noflush((unsigned long )page_addr, PAGE_SIZE, PAGE_KERNEL, &page->page_ptr); flush_cache_vmap((unsigned long )page_addr, (unsigned long )page_addr + PAGE_SIZE); user_page_addr = (uintptr_t )page_addr + alloc->user_buffer_offset; ret = vm_insert_page(vma, user_page_addr, page[0 ].page_ptr); if (index + 1 > alloc->pages_high) alloc->pages_high = index + 1 ; } if (mm) { up_read(&mm->mmap_sem); mmput(mm); } return 0 ; ... }
代码中的注释写的应该比较清楚了,总之就是先分配物理内存,再将这块物理内存分别映射到内核虚拟空间和用户进程虚拟空间,这样内核虚拟空间与用户进程虚拟空间相当于也间接的建立了映射关系
关于物理内存的分配以及映射,就是Linux内核层的事情了,感兴趣的同学可以再深入往里看看,这里就不再多说了
数据拷贝 关于数据拷贝这部分就不用多说了,物理内存已经分配好了,映射也建立了,接下来直接调用copy_from_user将数据从用户空间拷贝至映射的那块内存就可以了
binder类型转换 最后循环遍历每一个binder对象,对其中每一个binder对象类型做转换,因为在一个进程中为本地binder对象,对于另一个进程则为远程binder对象,反之亦然
flat_binder_object结构体 这里就是我们之前提到的,binder对象在传输过程中会被 “压扁” 的结构
1 2 3 4 5 6 7 8 9 10 11 12 13 14 15 16 17 18 struct flat_binder_object { struct binder_object_header hdr ; __u32 flags; union { binder_uintptr_t binder; __u32 handle; }; binder_uintptr_t cookie; };
binder_translate_binder BINDER_TYPE_BINDER表示是一个binder实体对象,需要将它转换成binder引用句柄
1 2 3 4 5 6 7 8 9 10 11 12 13 14 15 16 17 18 19 20 21 22 23 24 25 26 27 28 29 30 31 32 33 34 35 36 37 38 39 40 41 42 43 44 45 46 47 48 49 50 51 static int binder_translate_binder (struct flat_binder_object *fp, struct binder_transaction *t, struct binder_thread *thread) struct binder_node *node ; struct binder_proc *proc = thread ->proc ; struct binder_proc *target_proc = t ->to_proc ; struct binder_ref_data rdata ; int ret = 0 ; node = binder_get_node(proc, fp->binder); if (!node) { node = binder_new_node(proc, fp); if (!node) return -ENOMEM; } if (fp->cookie != node->cookie) { ... } if (security_binder_transfer_binder(proc->tsk, target_proc->tsk)) { ret = -EPERM; goto done; } ret = binder_inc_ref_for_node(target_proc, node, fp->hdr.type == BINDER_TYPE_BINDER, &thread->todo, &rdata); if (ret) goto done; if (fp->hdr.type == BINDER_TYPE_BINDER) fp->hdr.type = BINDER_TYPE_HANDLE; else fp->hdr.type = BINDER_TYPE_WEAK_HANDLE; fp->binder = 0 ; fp->handle = rdata.desc; fp->cookie = 0 ; done: binder_put_node(node); return ret; }
binder_translate_handle BINDER_TYPE_HANDLE表示是一个binder引用句柄,,需要将它转换成binder实体对象
1 2 3 4 5 6 7 8 9 10 11 12 13 14 15 16 17 18 19 20 21 22 23 24 25 26 27 28 29 30 31 32 33 34 35 36 37 38 39 40 41 42 43 44 45 46 47 48 49 50 51 52 53 54 55 56 57 58 59 static int binder_translate_handle (struct flat_binder_object *fp, struct binder_transaction *t, struct binder_thread *thread) struct binder_proc *proc = thread ->proc ; struct binder_proc *target_proc = t ->to_proc ; struct binder_node *node ; struct binder_ref_data src_rdata ; int ret = 0 ; node = binder_get_node_from_ref(proc, fp->handle, fp->hdr.type == BINDER_TYPE_HANDLE, &src_rdata); if (security_binder_transfer_binder(proc->tsk, target_proc->tsk)) { ret = -EPERM; goto done; } binder_node_lock(node); if (node->proc == target_proc) { if (fp->hdr.type == BINDER_TYPE_HANDLE) fp->hdr.type = BINDER_TYPE_BINDER; else fp->hdr.type = BINDER_TYPE_WEAK_BINDER; fp->binder = node->ptr; fp->cookie = node->cookie; if (node->proc) binder_inner_proc_lock(node->proc); binder_inc_node_nilocked(node, fp->hdr.type == BINDER_TYPE_BINDER, 0 , NULL ); if (node->proc) binder_inner_proc_unlock(node->proc); binder_node_unlock(node); } else { struct binder_ref_data dest_rdata; binder_node_unlock(node); ret = binder_inc_ref_for_node(target_proc, node, fp->hdr.type == BINDER_TYPE_HANDLE, NULL , &dest_rdata); if (ret) goto done; fp->binder = 0 ; fp->handle = dest_rdata.desc; fp->cookie = 0 ; } done: binder_put_node(node); return ret; }
第三部分:加入todo队列,唤醒目标线程 1 2 3 4 5 6 7 8 9 10 11 12 13 14 15 16 17 18 19 20 21 22 23 24 25 26 27 28 29 30 31 32 33 34 35 36 37 38 39 40 41 42 43 44 45 46 47 48 49 50 51 52 53 54 55 56 57 58 59 60 61 62 63 64 65 66 67 static void binder_transaction (struct binder_proc *proc, struct binder_thread *thread, struct binder_transaction_data *tr, int reply, binder_size_t extra_buffers_size) struct binder_transaction *t ; struct binder_work *tcomplete ; struct binder_thread *target_thread = NULL ; struct binder_transaction *in_reply_to = NULL ; ... if (reply) { binder_enqueue_thread_work(thread, tcomplete); binder_inner_proc_lock(target_proc); if (target_thread->is_dead) { binder_inner_proc_unlock(target_proc); goto err_dead_proc_or_thread; } binder_pop_transaction_ilocked(target_thread, in_reply_to); binder_enqueue_thread_work_ilocked(target_thread, &t->work); binder_inner_proc_unlock(target_proc); wake_up_interruptible_sync(&target_thread->wait); binder_restore_priority(current, in_reply_to->saved_priority); binder_free_transaction(in_reply_to); } else if (!(t->flags & TF_ONE_WAY)) { binder_inner_proc_lock(proc); binder_enqueue_deferred_thread_work_ilocked(thread, tcomplete); t->need_reply = 1 ; t->from_parent = thread->transaction_stack; thread->transaction_stack = t; binder_inner_proc_unlock(proc); if (!binder_proc_transaction(t, target_proc, target_thread)) { binder_inner_proc_lock(proc); binder_pop_transaction_ilocked(thread, t); binder_inner_proc_unlock(proc); goto err_dead_proc_or_thread; } } else { binder_enqueue_thread_work(thread, tcomplete); if (!binder_proc_transaction(t, target_proc, NULL )) goto err_dead_proc_or_thread; } if (target_thread) binder_thread_dec_tmpref(target_thread); binder_proc_dec_tmpref(target_proc); if (target_node) binder_dec_node_tmpref(target_node); return ; ... }
这一块的代码基本上格式都是一样的,都是将tcomplete插入到事务发起binder线程的todo队列中,t->work插入到目标binder线程的todo队列中,最后唤醒目标进程
这里需要注意的是,在BC_TRANSACTION的情况下,需要区分事务的flags中是否包含TF_ONE_WAY,这意味着这个事务是否需要回应
在没有TF_ONE_WAY的情况下,会使用binder_enqueue_deferred_thread_work_ilocked函数将tcomplete插入到事务发起binder线程的todo队列中,这个函数区别于binder_enqueue_thread_work_ilocked函数,它没有将thread->process_todo设为true,这个标记在之前介绍binder_thread结构体的时候提到了,当其为false的情况下会在binder_thread_read中休眠,延迟执行BINDER_WORK_TRANSACTION_COMPLETE,具体是怎么操作的,我们会在后续的binder_thread_read函数中进行分析
在TF_ONE_WAY的情况下,我们是没有去寻找合适的目标处理binder线程的,关于这一点,我们需要看一下binder_proc_transaction函数是怎么处理没有传入binder_thread的情况的
1 2 3 4 5 6 7 8 9 10 11 12 13 14 15 16 17 18 19 20 21 22 23 24 25 26 27 28 29 30 31 32 33 34 35 36 37 38 39 40 41 42 43 44 45 46 47 48 49 50 51 52 53 54 55 56 57 58 59 60 61 62 static bool binder_proc_transaction (struct binder_transaction *t, struct binder_proc *proc, struct binder_thread *thread) struct binder_node *node = t ->buffer ->target_node ; struct binder_priority node_prio ; bool oneway = !!(t->flags & TF_ONE_WAY); bool pending_async = false ; binder_node_lock(node); node_prio.prio = node->min_priority; node_prio.sched_policy = node->sched_policy; if (oneway) { if (node->has_async_transaction) { pending_async = true ; } else { node->has_async_transaction = true ; } } binder_inner_proc_lock(proc); if (proc->is_dead || (thread && thread->is_dead)) { binder_inner_proc_unlock(proc); binder_node_unlock(node); return false ; } if (!thread && !pending_async) thread = binder_select_thread_ilocked(proc); if (thread) { binder_transaction_priority(thread->task, t, node_prio, node->inherit_rt); binder_enqueue_thread_work_ilocked(thread, &t->work); } else if (!pending_async) { binder_enqueue_work_ilocked(&t->work, &proc->todo); } else { binder_enqueue_work_ilocked(&t->work, &node->async_todo); } if (!pending_async) binder_wakeup_thread_ilocked(proc, thread, !oneway ); binder_inner_proc_unlock(proc); binder_node_unlock(node); return true ; }
当没有传入目标binder线程时,从目标进程的等待线程链表中取出第一个binder_thread作为处理线程处理该事务,如果没找到合适的空闲线程,分为两种情况:
目标binder实体对象正在处理一个异步事务:将相应的binder_work插入到目标binder实体的async_todo队列中
目标binder实体对象没有正在处理一个异步事务:将相应的binder_work插入到目标binder进程的todo队列中
关于binder驱动是怎么从这些todo队列取出binder_work并处理的,我们马上在后面binder_thread_read里分析,这里我们最后再看一下如何唤醒目标binder线程的等待队列
1 2 3 4 5 6 7 8 9 10 11 12 13 14 15 16 17 18 19 20 21 static void binder_wakeup_thread_ilocked (struct binder_proc *proc, struct binder_thread *thread, bool sync) assert_spin_locked(&proc->inner_lock); if (thread) { if (sync) wake_up_interruptible_sync(&thread->wait); else wake_up_interruptible(&thread->wait); return ; } binder_wakeup_poll_threads_ilocked(proc, sync); }
这个函数也有可能binder_thread参数传入NULL,在这种情况下,我们需要循环获取目标进程下的所有binder线程,对所有不处理事务工作的线程全部执行唤醒操作
1
2
3
4
5
6
7
8
9
10
11
12
13
14
15
16
17
static void binder_wakeup_poll_threads_ilocked (struct binder_proc *proc, bool sync) struct rb_node *n ; struct binder_thread *thread ; for (n = rb_first(&proc->threads); n != NULL ; n = rb_next(n)) { thread = rb_entry(n, struct binder_thread, rb_node); if (thread->looper & BINDER_LOOPER_STATE_POLL && binder_available_for_proc_work_ilocked(thread)) { if (sync) wake_up_interruptible_sync(&thread->wait); else wake_up_interruptible(&thread->wait); } } }
总结 到这里,我们已经分析了binder_ioctl函数的一半binder_thread_write,了解了一些相关的数据结构,并且补充了binder_mmap篇未完成的内存映射的分析,大家应该对binder请求的发起与调度有了一个初步的认识了
本来这一篇是打算把整个binder_ioctl分析完的,但没想到写到后面内容这么多,只好再分一篇,下一篇我们将分析binder_thread_read,将binder驱动篇完结