WSL编译AOSP必要的几个前置工作

前言

首先,关于AOSP的编译可以查看我的这篇文章:AOSP的编译及刷机

我之前都是在MacOS上构建的AOSP的,但是自2021年6月22日起,AOSP不再支持在WindowsMacOS上构建,但我又不想给我的电脑安装Ubuntu双系统,只得另寻他路,在Windows上使用WSL就是一个很好的选择。

其实之前我尝试过用WSL编译AOSP,但几次都失败了,这次过年回家潜心研究了几天,总算是成功了,我会将我之前失败的原因和这次成功的心得总结分享给大家,教大家如何避坑

关于NAS

我是将我的AOSP源码放在NAS上进行编译的,毕竟磁盘空间够大,而且共享起来也方便,但需要千万注意 不要使用SMB协议共享AOSP源码编译,这样做直接就会卡在源码sync完后的lunch那一步,可以使用iSCSI协议将NAS上的一部分磁盘空间映射成一个虚拟磁盘,这样在Windows上就可以将这块磁盘当成普通的硬盘使用,几乎完全没有区别

修改大小写敏感

在同步AOSP源码前一定要做的工作,不然你就等着把辛苦下载好的源码删了重新下吧

在同步AOSP源码之前,我们会首先创建一个新的目录用来保存它,我们新建完这个目录后,用管理员身份打开WindowsPowershell,执行以下命令:

1
fsutil.exe file setCaseSensitiveInfo <path> enable

其中的path就是刚新建用来同步AOSP源码的目录,需要注意的是,这个命令只对指定的目录有效,不会改变已存在的子目录的大小写敏感,所以千万要在同步代码之前做这件事

重新挂载磁盘

如果你的AOSP源码放在了Windows驱动器上,比如说 F:\aosp ,在WSL中的路径应该是 /mnt/f/aosp 这种形式的,此时需要以drvfs文件系统重新挂载盘符,否则编译到中途会报错:

1
2
sudo umount /mnt/f
sudo mount -t drvfs F: /mnt/f -o metadata

注意,每次WSL重启,在编译AOSP之前都需要执行这步操作,当然你也可以将它新建成WSL的一个开机服务,确保每次打开WSL都会执行这两段命令

尾声

可以发现,用WSL编译出错主要还是文件系统的问题,经过以上几步前置工作,相信你一定可以顺利的编译AOSP


史上最完美的Android沉浸式状态导航栏攻略

前言

最近我在小破站开发一款新App,叫高能链。我是一个完美主义者,所以不管对架构还是UI,我都是比较抠细节的,在状态栏和导航栏沉浸式这一块,我还是踩了挺多坑,费了挺多精力的。这次我将我踩坑,适配各机型总结出来的史上最完美的Android沉浸式状态导航栏攻略分享给大家,大家也可以去 高能链官网 下载体验一下我们的App,实际感受一下沉浸式状态导航栏的效果(登录,实名等账号相关页面由于不是我开发的,就没有适配沉浸式导航栏啦,嘻嘻)

注:此攻略只针对 Android 5.0 及以上机型,即 minSdkVersion >= 21

实际效果

在开始攻略之前,我们先看看完美的沉浸式状态导航栏效果

传统三键式导航栏

客态列表页_三键式

客态详情页_三键式

全面屏导航条

客态列表页_导航条

客态详情页_导航条

理论分析

在上具体实现代码之前,我们先分析一下,实现沉浸式状态导航栏需要几步

  1. 状态栏导航栏底色透明

  2. 根据当前页面的背景色,给状态栏字体和导航栏按钮(或导航条)设置亮色或暗色

  3. 状态栏导航栏设置透明后,我们页面的布局会延伸到原本状态栏导航栏的位置,这时候需要一些手段将我们需要显示的正文内容回缩到其正确的显示范围内

    这里我给大家提供以下几种思路,大家可以根据实际情况自行选择:

    • 设置fitsSystemWindows属性
    • 根据状态栏导航栏的高度,给根布局设置相应的paddingToppaddingBottom
    • 根据状态栏导航栏的高度,给需要移位的控件设置相应的marginTopmarginBottom
    • 在顶部和底部增加两个占位的View,高度分别设置成状态栏和导航栏的高度
    • 针对滑动视图,巧用clipChildrenclipToPadding属性(可参照高能链藏品详情页样式)

沉浸式状态栏

思路说完了,我们现在开始进入实战,沉浸式状态栏比较简单,没什么坑

状态栏透明

首先第一步,我们需要将状态栏的背景设置为透明,这里我直接放代码

1
2
3
4
5
6
7
8
9
10
11
12
fun transparentStatusBar(window: Window) {
window.clearFlags(WindowManager.LayoutParams.FLAG_TRANSLUCENT_STATUS)
window.addFlags(WindowManager.LayoutParams.FLAG_DRAWS_SYSTEM_BAR_BACKGROUNDS)
var systemUiVisibility = window.decorView.systemUiVisibility
systemUiVisibility =
systemUiVisibility or View.SYSTEM_UI_FLAG_LAYOUT_FULLSCREEN or View.SYSTEM_UI_FLAG_LAYOUT_STABLE
window.decorView.systemUiVisibility = systemUiVisibility
window.statusBarColor = Color.TRANSPARENT

//设置状态栏文字颜色
setStatusBarTextColor(window, NightMode.isNightMode(window.context))
}

首先,我们需要将FLAG_TRANSLUCENT_STATUS这个windowFlag换成FLAG_DRAWS_SYSTEM_BAR_BACKGROUNDS,否则状态栏不会完全透明,会有一个半透明的灰色蒙层

FLAG_DRAWS_SYSTEM_BAR_BACKGROUNDS这个flag表示系统Bar的背景将交给当前window绘制

SYSTEM_UI_FLAG_LAYOUT_FULLSCREEN这个flag表示Activity全屏显示,但状态栏不会被隐藏,依然可见

SYSTEM_UI_FLAG_LAYOUT_STABLE这个flag表示保持整个View稳定,使View不会因为系统UI的变化而重新layout

SYSTEM_UI_FLAG_LAYOUT_FULLSCREENSYSTEM_UI_FLAG_LAYOUT_STABLE这两个flag通常是一起使用的,我们设置这两个flag,然后再将statusBarColor设置为透明,就达成了状态栏背景透明的效果

状态栏文字颜色

接着我们就该设置状态栏文字颜色了,细心的小伙伴们应该已经注意到了,我在transparentStatusBar方法的末尾加了一个setStatusBarTextColor的方法调用,一般情况下,如果是日间模式,页面背景通常都是亮色,所以此时状态栏文字颜色设置为黑色比较合理,而在夜间模式下,页面背景通常都是暗色,此时状态栏文字颜色设置为白色比较合理,对应代码如下

1
2
3
4
5
6
7
8
9
10
11
fun setStatusBarTextColor(window: Window, light: Boolean) {
if (Build.VERSION.SDK_INT >= Build.VERSION_CODES.M) {
var systemUiVisibility = window.decorView.systemUiVisibility
systemUiVisibility = if (light) { //白色文字
systemUiVisibility and View.SYSTEM_UI_FLAG_LIGHT_STATUS_BAR.inv()
} else { //黑色文字
systemUiVisibility or View.SYSTEM_UI_FLAG_LIGHT_STATUS_BAR
}
window.decorView.systemUiVisibility = systemUiVisibility
}
}

Android 8.0以上才支持导航栏文字颜色的修改,SYSTEM_UI_FLAG_LIGHT_STATUS_BAR这个flag表示亮色状态栏,即黑色状态栏文字,所以如果希望状态栏文字为黑色,就设置这个flag,如果希望状态栏文字为白色,就将这个flagsystemUiVisibility中剔除

可能有小伙伴不太了解kotlin中的位运算,kotlin中的orandinv分别对应着或、与、取反运算

所以

1
systemUiVisibility and View.SYSTEM_UI_FLAG_LIGHT_STATUS_BAR.inv()

翻译成java即为

1
systemUiVisibility & ~View.SYSTEM_UI_FLAG_LIGHT_STATUS_BAR

在原生系统上,这么设置就可以成功设置状态栏文字颜色,但我发现,在某些系统上,这样设置后的效果是不可预期的,譬如MIUI系统的状态栏文字颜色似乎是根据状态栏背景颜色自适应的,且日间模式和黑夜模式下的自适应策略还略有不同。不过在大多数情况下,它自适应的颜色都是正常的,我们就按照我们希望的结果设置就可以了。

矫正显示区域

fitsSystemWindows

矫正状态栏显示区域最简单的办法就是设置fitsSystemWindows属性,设置了该属性的View的所有padding属性都将失效,并且系统会自动为其添加paddingTop(设置了透明状态栏的情况下)和paddingBottom(设置了透明导航栏的情况下)

我个人是不用这种方式的,首先它会覆盖你设置的padding,其次,如果你同时设置了透明状态栏和透明导航栏,这个属性没有办法分开来处理,很不灵活

获取状态栏高度

除了fitsSystemWindows这种方法外,其他的方法都得依靠获取状态栏高度了,这里直接上代码

1
2
3
4
5
6
fun getStatusBarHeight(context: Context): Int {
val resId = context.resources.getIdentifier(
"status_bar_height", "dimen", "android"
)
return context.resources.getDimensionPixelSize(resId)
}

状态栏不像导航栏那样多变,所以直接这样获取高度就可以了,导航栏的高度飘忽不定才是真正的噩梦

这里再给两个设置View marginpadding的工具方法吧,帮助大家快速使用

1
2
3
4
5
6
7
8
9
10
11
12
13
14
15
16
17
fun fixStatusBarMargin(vararg views: View) {
views.forEach { view ->
(view.layoutParams as? ViewGroup.MarginLayoutParams)?.let { lp ->
lp.topMargin = lp.topMargin + getStatusBarHeight(view.context)
view.requestLayout()
}
}
}

fun paddingByStatusBar(view: View) {
view.setPadding(
view.paddingLeft,
view.paddingTop + getStatusBarHeight(view.context),
view.paddingRight,
view.paddingBottom
)
}

沉浸式导航栏

沉浸式导航栏相比沉浸式状态栏坑会多很多,具体原因我们后面再说

导航栏透明

和沉浸式状态栏一样,第一步我们需要将导航栏的背景设置为透明

1
2
3
4
5
6
7
8
9
10
11
12
13
14
15
fun transparentNavigationBar(window: Window) {
if (Build.VERSION.SDK_INT >= Build.VERSION_CODES.Q) {
window.isNavigationBarContrastEnforced = false
}
window.clearFlags(WindowManager.LayoutParams.FLAG_TRANSLUCENT_NAVIGATION)
window.addFlags(WindowManager.LayoutParams.FLAG_DRAWS_SYSTEM_BAR_BACKGROUNDS)
var systemUiVisibility = window.decorView.systemUiVisibility
systemUiVisibility =
systemUiVisibility or View.SYSTEM_UI_FLAG_LAYOUT_HIDE_NAVIGATION
window.decorView.systemUiVisibility = systemUiVisibility
window.navigationBarColor = Color.TRANSPARENT

//设置导航栏按钮或导航条颜色
setNavigationBarBtnColor(window, NightMode.isNightMode(window.context))
}

Android 10以上,当设置了导航栏栏背景为透明时,isNavigationBarContrastEnforced如果为true,则系统会自动绘制一个半透明背景来提供对比度,所以我们要将这个属性设为false

ps:状态栏其实也有对应的属性isStatusBarContrastEnforced,只不过这个属性默认即为false,我们不需要特意去设置

导航栏按钮或导航条颜色

和设置状态栏文字颜色一样,我这里就不多介绍了

1
2
3
4
5
6
7
8
9
10
11
fun setNavigationBarBtnColor(window: Window, light: Boolean) {
if (Build.VERSION.SDK_INT >= Build.VERSION_CODES.O) {
var systemUiVisibility = window.decorView.systemUiVisibility
systemUiVisibility = if (light) { //白色按钮
systemUiVisibility and View.SYSTEM_UI_FLAG_LIGHT_NAVIGATION_BAR.inv()
} else { //黑色按钮
systemUiVisibility or View.SYSTEM_UI_FLAG_LIGHT_NAVIGATION_BAR
}
window.decorView.systemUiVisibility = systemUiVisibility
}
}

矫正显示区域

fitsSystemWindows

和状态栏使用一样,我就不重复说明了

获取导航栏高度

自从全面屏手势开始流行,导航栏也从原先的三键式,变成了三键式、导航条、全隐藏这三种情况,这三种情况下的高度也是互不相同的

三键式和导航条这两种情况我们都可以通过android.R.dimen.navigation_bar_height这个资源获取到准确高度,但现在很多系统都支持隐藏导航栏的功能,在这种情况下,虽然实际导航栏的高度应该是0,但是通过资源获取到的高度却为三键式或导航条的高度,这就给我们沉浸式导航栏的适配带来了很大困难

经过我的各种尝试,我发现只有一种方式可以准确的获取到当前导航栏的高度,那就是WindowInsets,至于WindowInsets是什么我就不多介绍了,我们直接看代码

1
2
3
4
5
6
7
8
9
/**
* 仅当view attach window后生效
*/
private fun getRealNavigationBarHeight(view: View): Int {
val insets = ViewCompat.getRootWindowInsets(view)
?.getInsets(WindowInsetsCompat.Type.navigationBars())
//WindowInsets为null则默认通过资源获取高度
return insets?.bottom ?: getNavigationBarHeight(view.context)
}

这里需要注意到我在方法上写的注释,只有当ViewWindow attach 后,才能获得到WindowInsets,否则为null,所以我一开始的想法是先检查View是否 attach 了Window,如果有的话则直接调用getRealNavigationBarHeight方法,如果没有的话,调用View.addOnAttachStateChangeListener方法,当出发attach回调后,再调用getRealNavigationBarHeight方法获取高度

这种方式在大部分情况下运行良好,但在我一次无意中切换了系统夜间模式后发现,获取到的导航栏高度变成了0,并且这还是一个偶现的问题,于是我尝试使用View.setOnApplyWindowInsetsListener,监听WindowInsets的变化发现,这个回调有可能会触发多次,在触发多次的情况下,前几次的值都为0,只有最后一次的值为真正的导航栏高度

于是我准备用View.setOnApplyWindowInsetsListener代替View.addOnAttachStateChangeListener,但毕竟一个是setListener,一个是addListener,setListener有可能会把之前设置好的Listener覆盖,或者被别的Listener覆盖掉,再考虑到之后会提到的底部Dialog沉浸式导航栏适配的问题,我折中了一下,决定只对Activity下的rootView设置回调

以下是完整代码

1
2
3
4
5
6
7
8
9
10
11
12
13
14
15
16
17
18
19
20
21
22
23
24
25
26
27
28
29
30
31
32
33
34
35
36
37
38
39
40
41
42
43
44
45
46
47
48
49
50
51
52
53
54
55
56
57
58
59
60
61
62
63
64
65
66
67
68
69
70
71
72
73
74
75
76
77
78
79
80
81
82
83
84
85
86
87
88
89
90
91
92
93
94
95
96
97
98
99
100
101
102
103
104
105
106
107
108
109
110
111
112
113
114
115
116
117
private class NavigationViewInfo(
val hostRef: WeakReference<View>,
val viewRef: WeakReference<View>,
val rawBottom: Int,
val onNavHeightChangeListener: (View, Int, Int) -> Unit
)

private val navigationViewInfoList = mutableListOf<NavigationViewInfo>()

private val onApplyWindowInsetsListener = View.OnApplyWindowInsetsListener { v, insets ->
val windowInsetsCompat = WindowInsetsCompat.toWindowInsetsCompat(insets, v)
val navHeight =
windowInsetsCompat.getInsets(WindowInsetsCompat.Type.navigationBars()).bottom
val it = navigationViewInfoList.iterator()
while (it.hasNext()) {
val info = it.next()
val host = info.hostRef.get()
val view = info.viewRef.get()
if (host == null || view == null) {
it.remove()
continue
}

if (host == v) {
info.onNavHeightChangeListener(view, info.rawBottom, navHeight)
}
}
insets
}

private val actionMarginNavigation: (View, Int, Int) -> Unit =
{ view, rawBottomMargin, navHeight ->
(view.layoutParams as? ViewGroup.MarginLayoutParams)?.let {
it.bottomMargin = rawBottomMargin + navHeight
view.requestLayout()
}
}

private val actionPaddingNavigation: (View, Int, Int) -> Unit =
{ view, rawBottomPadding, navHeight ->
view.setPadding(
view.paddingLeft,
view.paddingTop,
view.paddingRight,
rawBottomPadding + navHeight
)
}

fun fixNavBarMargin(vararg views: View) {
views.forEach {
fixSingleNavBarMargin(it)
}
}

private fun fixSingleNavBarMargin(view: View) {
val lp = view.layoutParams as? ViewGroup.MarginLayoutParams ?: return
val rawBottomMargin = lp.bottomMargin

val viewForCalculate = getViewForCalculate(view)

if (viewForCalculate.isAttachedToWindow) {
val realNavigationBarHeight = getRealNavigationBarHeight(viewForCalculate)
lp.bottomMargin = rawBottomMargin + realNavigationBarHeight
view.requestLayout()
}

//isAttachedToWindow方法并不能保证此时的WindowInsets是正确的,仍然需要添加监听
val hostRef = WeakReference(viewForCalculate)
val viewRef = WeakReference(view)
val info = NavigationViewInfo(hostRef, viewRef, rawBottomMargin, actionMarginNavigation)
navigationViewInfoList.add(info)
viewForCalculate.setOnApplyWindowInsetsListener(onApplyWindowInsetsListener)
}

fun paddingByNavBar(view: View) {
val rawBottomPadding = view.paddingBottom

val viewForCalculate = getViewForCalculate(view)

if (viewForCalculate.isAttachedToWindow) {
val realNavigationBarHeight = getRealNavigationBarHeight(viewForCalculate)
view.setPadding(
view.paddingLeft,
view.paddingTop,
view.paddingRight,
rawBottomPadding + realNavigationBarHeight
)
}

//isAttachedToWindow方法并不能保证此时的WindowInsets是正确的,仍然需要添加监听
val hostRef = WeakReference(viewForCalculate)
val viewRef = WeakReference(view)
val info =
NavigationViewInfo(hostRef, viewRef, rawBottomPadding, actionPaddingNavigation)
navigationViewInfoList.add(info)
viewForCalculate.setOnApplyWindowInsetsListener(onApplyWindowInsetsListener)
}

/**
* Dialog下的View在低版本机型中获取到的WindowInsets值有误,
* 所以尝试去获得Activity的contentView,通过Activity的contentView获取WindowInsets
*/
@SuppressLint("ContextCast")
private fun getViewForCalculate(view: View): View {
return (view.context as? ContextWrapper)?.let {
return@let (it.baseContext as? Activity)?.findViewById<View>(android.R.id.content)?.rootView
} ?: view.rootView
}

/**
* 仅当view attach window后生效
*/
private fun getRealNavigationBarHeight(view: View): Int {
val insets = ViewCompat.getRootWindowInsets(view)
?.getInsets(WindowInsetsCompat.Type.navigationBars())
return insets?.bottom ?: getNavigationBarHeight(view.context)
}

我简单解释一下这段代码:为所有需要沉浸的页面的根View设置同一个回调,并将待适配导航栏高度的View添加到列表中,当WindowInsets回调触发后,遍历这个列表,判断触发回调的Viewhost是否与待适配导航栏高度的View对应,对应的话则处理View适配导航栏高度

这里需要注意,WindowInsets的分发其实是在dispatchAttachedToWindow之后的,所以isAttachedToWindow方法并不能保证此时的WindowInsets是正确的,具体可以去看ViewRootImpl中的源码,关键方法:dispatchApplyInsets,这里判断isAttachedToWindow并设置高度是为了防止出现View已经完全布局完成,之后再也不会触发OnApplyWindowInsets的情况

这里我也测试了内存泄漏情况,确认无内存泄漏,大家可以放心食用

底部Dialog适配沉浸式

底部Dialog适配沉浸式要比正常的Activity更麻烦一些,主要问题也是集中在沉浸式导航栏上

获取导航栏高度

仔细的小伙伴们可以已经注意到了我在沉浸式导航栏获取高度那里代码中的注释,Dialog下的View在低版本机型(经测试,Android 9一下就会有这个问题)中获取到的WindowInsets值有误,所以尝试去获得ActivitycontentView,通过ActivitycontentView获取WindowInsets

LayoutParams导致的异常

在某些系统上(比如MIUI),当我window.setLayout(ViewGroup.LayoutParams.MATCH_PARENT, ViewGroup.LayoutParams.WRAP_CONTENT)时,沉浸式会出现问题,状态栏会被蒙层盖住,Dialog底部的内容也会被一个莫名其妙的东西遮挡住

我的解决方案是,window.setLayout(ViewGroup.LayoutParams.MATCH_PARENT, ViewGroup.LayoutParams.MATCH_PARENT),然后布局最外层全部占满,内部留一个底部容器

1
2
3
4
5
6
7
8
9
10
11
12
13
14
15
<!-- dialog_pangu_bottom_wrapper -->
<FrameLayout xmlns:android="http://schemas.android.com/apk/res/android"
android:layout_width="match_parent"
android:layout_height="match_parent"
android:background="@android:color/transparent">

<FrameLayout
android:id="@+id/pangu_bottom_dialog_container"
android:layout_width="match_parent"
android:layout_height="wrap_content"
android:layout_gravity="bottom"
android:clickable="true"
android:focusable="true" />

</FrameLayout>

然后在代码中重写setContentView方法

1
2
3
4
5
6
7
8
9
10
11
12
13
14
15
16
17
18
19
20
21
22
23
24
25
26
27
28
29
30
31
32
33
34
35
36
37
38
39
40
41
42
private var canceledOnTouchOutside = true

override fun setContentView(layoutResID: Int) {
setContentView(
LayoutInflater.from(context).inflate(layoutResID, null, false)
)
}

override fun setContentView(view: View) {
setContentView(
view,
ViewGroup.LayoutParams(
ViewGroup.LayoutParams.MATCH_PARENT,
ViewGroup.LayoutParams.WRAP_CONTENT
)
)
}

override fun setContentView(view: View, params: ViewGroup.LayoutParams?) {
val root =
LayoutInflater.from(context).inflate(R.layout.dialog_pangu_bottom_wrapper, null, false)
root.setOnClickListener {
if (canceledOnTouchOutside) {
dismiss()
}
}
val container = root.findViewById<ViewGroup>(R.id.pangu_bottom_dialog_container)
container.addView(view, params)

super.setContentView(
root,
ViewGroup.LayoutParams(
ViewGroup.LayoutParams.MATCH_PARENT,
ViewGroup.LayoutParams.MATCH_PARENT
)
)
}

override fun setCanceledOnTouchOutside(cancel: Boolean) {
super.setCanceledOnTouchOutside(cancel)
canceledOnTouchOutside = cancel
}

这样的话视觉效果就和普通的底部Dialog一样了,为了进一步减小底部Dialog显示隐藏动画之间的差异,我将动画插值器从linear_interpolator换成了decelerate_interpolatoraccelerate_interpolator

1
2
3
4
5
6
<!-- dialog_enter_from_bottom_to_top -->
<translate xmlns:android="http://schemas.android.com/apk/res/android"
android:duration="300"
android:fromYDelta="100%"
android:interpolator="@android:anim/decelerate_interpolator"
android:toYDelta="0" />
1
2
3
4
5
6
<!-- dialog_exit_from_top_to_bottom -->
<translate xmlns:android="http://schemas.android.com/apk/res/android"
android:duration="300"
android:fromYDelta="0"
android:interpolator="@android:anim/accelerate_interpolator"
android:toYDelta="100%" />

尾声

自此,目前沉浸式遇到的问题全部都解决了,如果以后发现了什么新的问题,我会在这篇文章中补充说明,如果还有什么不明白的地方可以评论,我考虑要不要拿几个具体的场景实战讲解,各位看官老爷麻烦点个赞收个藏不迷路😄


Android源码分析 - Activity启动流程(下)

开篇

本篇以android-11.0.0_r25作为基础解析

上一篇文章 Android源码分析 - Activity启动流程(中) 中,我们分析了App进程的启动过程,包括Application是怎么创建并执行onCreate方法的,本篇文章我们将会继续分析App进程启动、Application创建完成后,Activity是如何启动的

两种路径启动Activity

我们在 Android源码分析 - Activity启动流程(上) 的末尾分析过,Activity的启动存在两条路径

启动进程,然后启动Activity

这条路径就是我们在上一篇文章 Android源码分析 - Activity启动流程(中) 中分析了前半部分:启动进程

当进程启动后,会执行到AMS.attachApplicationLocked方法,在这个方法的最后,会有一段代码检查是否有Activity等待启动

1
2
3
4
5
6
7
8
9
10
11
12
13
14
15
16
17
18
private boolean attachApplicationLocked(@NonNull IApplicationThread thread,
int pid, int callingUid, long startSeq) {
...

// See if the top visible activity is waiting to run in this process...
//检查是否有Activity等待启动
if (normalMode) {
try {
didSomething = mAtmInternal.attachApplication(app.getWindowProcessController());
} catch (Exception e) {
badApp = true;
}
}

...

return true;
}

然后调用ActivityTaskManagerInternal.attachApplicationActivityTaskManagerInternal是一个抽象类,被ATMS的内部类LocalService实现

1
2
3
4
5
6
7
8
9
public boolean attachApplication(WindowProcessController wpc) throws RemoteException {
synchronized (mGlobalLockWithoutBoost) {
try {
return mRootWindowContainer.attachApplication(wpc);
} finally {
...
}
}
}

接着调用RootWindowContainer.attachApplication

1
2
3
4
5
6
7
8
9
10
11
12
13
14
15
16
17
18
19
20
21
22
23
24
25
26
27
28
29
30
31
32
33
34
boolean attachApplication(WindowProcessController app) throws RemoteException {
boolean didSomething = false;
for (int displayNdx = getChildCount() - 1; displayNdx >= 0; --displayNdx) {
mTmpRemoteException = null;
mTmpBoolean = false; // Set to true if an activity was started.

final DisplayContent display = getChildAt(displayNdx);
for (int areaNdx = display.getTaskDisplayAreaCount() - 1; areaNdx >= 0; --areaNdx) {
final TaskDisplayArea taskDisplayArea = display.getTaskDisplayAreaAt(areaNdx);
for (int taskNdx = taskDisplayArea.getStackCount() - 1; taskNdx >= 0; --taskNdx) {
final ActivityStack rootTask = taskDisplayArea.getStackAt(taskNdx);
if (rootTask.getVisibility(null /*starting*/) == STACK_VISIBILITY_INVISIBLE) {
break;
}
//遍历ActivityStack下的所有ActivityRecord,
//以其为参数调用startActivityForAttachedApplicationIfNeeded方法
final PooledFunction c = PooledLambda.obtainFunction(
RootWindowContainer::startActivityForAttachedApplicationIfNeeded, this,
PooledLambda.__(ActivityRecord.class), app,
rootTask.topRunningActivity());
rootTask.forAllActivities(c);
c.recycle();
if (mTmpRemoteException != null) {
throw mTmpRemoteException;
}
}
}
didSomething |= mTmpBoolean;
}
if (!didSomething) {
ensureActivitiesVisible(null, 0, false /* preserve_windows */);
}
return didSomething;
}

这里有两层for循环,可以看出来,这个方法遍历了所有可见的ActivityStack,然后再对每个可见的ActivityStack进行操作

其中,PooledLambda这个类采用了池化技术,用于构造可回收复用的匿名函数,这里PooledLambda.obtainFunction方法得到的结果是一个Function<ActivityRecord, Boolean>forAllActivities方法被定义在父类WindowContainer中,就是遍历执行所有childforAllActivities方法,而ActivityRecord中重写了这个方法,直接用自身执行这个Function

简单来说,可以将这部分代码看作以下伪代码:

1
2
3
rootTask.forEachAllActivityRecord((activityRecord) -> {
startActivityForAttachedApplicationIfNeeded(activityRecord, app, rootTask.topRunningActivity())
})

接着我们来观察startActivityForAttachedApplicationIfNeeded方法

1
2
3
4
5
6
7
8
9
10
11
12
13
14
15
16
17
18
19
20
21
private boolean startActivityForAttachedApplicationIfNeeded(ActivityRecord r,
WindowProcessController app, ActivityRecord top) {
//Activity是否正在finish,是否应为当前用户显示Activity,忽略锁屏情况,此Activity是否可见
//对比Activity与发起进程的uid和进程名
if (r.finishing || !r.okToShowLocked() || !r.visibleIgnoringKeyguard || r.app != null
|| app.mUid != r.info.applicationInfo.uid || !app.mName.equals(r.processName)) {
return false;
}

try {
//启动Activity
if (mStackSupervisor.realStartActivityLocked(r, app,
top == r && r.isFocusable() /*andResume*/, true /*checkConfig*/)) {
mTmpBoolean = true;
}
} catch (RemoteException e) {
...
return true;
}
return false;
}

上面一系列的判断检查传入的ActivityRecord所对应的Activity是否需要启动,然后调用ActivityStackSupervisor.realStartActivityLocked方法启动Activity

已有进程,直接启动Activity

这条路径我在 Android源码分析 - Activity启动流程(上) 中的末尾也分析过,如果App进程已经启动,则会调用ActivityStackSupervisor.startSpecificActivity方法

1
2
3
4
5
6
7
8
9
10
11
12
13
14
15
16
17
18
19
20
21
22
23
24
25
26
27
28
void startSpecificActivity(ActivityRecord r, boolean andResume, boolean checkConfig) {
// Is this activity's application already running?
final WindowProcessController wpc =
mService.getProcessController(r.processName, r.info.applicationInfo.uid);

boolean knownToBeDead = false;
if (wpc != null && wpc.hasThread()) {
try {
//启动Activity
realStartActivityLocked(r, wpc, andResume, checkConfig);
return;
} catch (RemoteException e) {
Slog.w(TAG, "Exception when starting activity "
+ r.intent.getComponent().flattenToShortString(), e);
}

// If a dead object exception was thrown -- fall through to
// restart the application.
knownToBeDead = true;
}

//锁屏状态下启动Activity防闪烁机制
r.notifyUnknownVisibilityLaunchedForKeyguardTransition();

//出现异常,重启进程
final boolean isTop = andResume && r.isTopRunningActivity();
mService.startProcessAsync(r, knownToBeDead, isTop, isTop ? "top-activity" : "activity");
}

可以看到,这里也调用了ActivityStackSupervisor.realStartActivityLocked方法启动Activity

realStartActivityLocked

最终两条路径都走到了ActivityStackSupervisor.realStartActivityLocked方法中,那我们就来看看这个方法做了什么

1
2
3
4
5
6
7
8
9
10
11
12
13
14
15
16
17
18
19
20
21
22
23
24
25
26
27
28
29
30
31
32
33
34
35
36
37
38
39
40
41
42
43
44
45
46
47
48
49
50
51
52
53
54
55
56
57
58
59
60
61
62
63
64
65
66
67
68
69
70
71
72
73
74
75
76
77
78
79
80
81
82
83
84
85
86
87
88
89
90
91
92
93
94
95
96
97
98
99
100
101
102
103
104
105
106
107
108
109
110
111
112
113
114
115
116
117
118
119
120
121
122
123
124
125
126
127
128
129
130
131
132
133
134
135
136
137
138
139
140
141
142
143
144
145
146
147
148
149
150
151
152
153
154
155
156
157
158
159
160
161
162
163
164
165
166
167
168
169
170
171
172
173
174
175
176
177
178
179
180
181
182
183
184
185
186
187
188
189
190
191
192
193
194
195
196
197
198
199
200
201
202
203
204
205
206
207
208
209
210
211
212
213
214
215
216
217
218
219
220
221
222
boolean realStartActivityLocked(ActivityRecord r, WindowProcessController proc,
boolean andResume, boolean checkConfig) throws RemoteException {

//确保所有Activity都已暂停
if (!mRootWindowContainer.allPausedActivitiesComplete()) {
// While there are activities pausing we skipping starting any new activities until
// pauses are complete. NOTE: that we also do this for activities that are starting in
// the paused state because they will first be resumed then paused on the client side.
return false;
}

final Task task = r.getTask();
final ActivityStack stack = task.getStack();

//延迟resume以避免重复resume
//通过设置标记位mDeferResumeCount,只有当其为0时才能执行resume
beginDeferResume();

try {
//冻结屏幕(不接收输入、不执行动画,截取屏幕进行显示)
r.startFreezingScreenLocked(proc, 0);

// schedule launch ticks to collect information about slow apps.
//收集启动缓慢信息
r.startLaunchTickingLocked();

r.setProcess(proc);

// Ensure activity is allowed to be resumed after process has set.
//确保Activity允许被resume
if (andResume && !r.canResumeByCompat()) {
andResume = false;
}

//锁屏状态下启动Activity防闪烁机制
r.notifyUnknownVisibilityLaunchedForKeyguardTransition();

// Have the window manager re-evaluate the orientation of the screen based on the new
// activity order. Note that as a result of this, it can call back into the activity
// manager with a new orientation. We don't care about that, because the activity is
// not currently running so we are just restarting it anyway.
if (checkConfig) {
// Deferring resume here because we're going to launch new activity shortly.
// We don't want to perform a redundant launch of the same record while ensuring
// configurations and trying to resume top activity of focused stack.
//确保所有Activity的可见性、更新屏幕方向和配置
mRootWindowContainer.ensureVisibilityAndConfig(r, r.getDisplayId(),
false /* markFrozenIfConfigChanged */, true /* deferResume */);
}

//检查Activity是否在后台锁屏状态下启动
if (r.getRootTask().checkKeyguardVisibility(r, true /* shouldBeVisible */,
true /* isTop */) && r.allowMoveToFront()) {
// We only set the visibility to true if the activity is not being launched in
// background, and is allowed to be visible based on keyguard state. This avoids
// setting this into motion in window manager that is later cancelled due to later
// calls to ensure visible activities that set visibility back to false.
//只有Activity不是在后台启动,才将其可见性设置为true
r.setVisibility(true);
}

... //异常情况检查

r.launchCount++;
r.lastLaunchTime = SystemClock.uptimeMillis();
proc.setLastActivityLaunchTime(r.lastLaunchTime);

//屏幕固定功能
final LockTaskController lockTaskController = mService.getLockTaskController();
if (task.mLockTaskAuth == LOCK_TASK_AUTH_LAUNCHABLE
|| task.mLockTaskAuth == LOCK_TASK_AUTH_LAUNCHABLE_PRIV
|| (task.mLockTaskAuth == LOCK_TASK_AUTH_WHITELISTED
&& lockTaskController.getLockTaskModeState()
== LOCK_TASK_MODE_LOCKED)) {
lockTaskController.startLockTaskMode(task, false, 0 /* blank UID */);
}

try {
if (!proc.hasThread()) {
throw new RemoteException();
}
List<ResultInfo> results = null;
List<ReferrerIntent> newIntents = null;
if (andResume) {
// We don't need to deliver new intents and/or set results if activity is going
// to pause immediately after launch.
results = r.results;
newIntents = r.newIntents;
}
//如果是ACTIVITY_TYPE_HOME类型的应用(Launcher)
if (r.isActivityTypeHome()) {
// Home process is the root process of the task.
updateHomeProcess(task.getBottomMostActivity().app);
}
//信息记录
mService.getPackageManagerInternalLocked().notifyPackageUse(
r.intent.getComponent().getPackageName(), NOTIFY_PACKAGE_USE_ACTIVITY);
r.setSleeping(false);
r.forceNewConfig = false;
//如果有必要的话,显示一些App警告弹窗(不支持的CompileSdk、不支持的TargetSdk、不支持的显示大小)
mService.getAppWarningsLocked().onStartActivity(r);
//兼容性信息
r.compat = mService.compatibilityInfoForPackageLocked(r.info.applicationInfo);

// Because we could be starting an Activity in the system process this may not go
// across a Binder interface which would create a new Configuration. Consequently
// we have to always create a new Configuration here.

final MergedConfiguration mergedConfiguration = new MergedConfiguration(
proc.getConfiguration(), r.getMergedOverrideConfiguration());
r.setLastReportedConfiguration(mergedConfiguration);


// Create activity launch transaction.
//创建或获取一个client事务
final ClientTransaction clientTransaction = ClientTransaction.obtain(
proc.getThread(), r.appToken);

final DisplayContent dc = r.getDisplay().mDisplayContent;
//添加一条Activity启动消息
clientTransaction.addCallback(LaunchActivityItem.obtain(new Intent(r.intent),
System.identityHashCode(r), r.info,
// TODO: Have this take the merged configuration instead of separate global
// and override configs.
mergedConfiguration.getGlobalConfiguration(),
mergedConfiguration.getOverrideConfiguration(), r.compat,
r.launchedFromPackage, task.voiceInteractor, proc.getReportedProcState(),
r.getSavedState(), r.getPersistentSavedState(), results, newIntents,
dc.isNextTransitionForward(), proc.createProfilerInfoIfNeeded(),
r.assistToken, r.createFixedRotationAdjustmentsIfNeeded()));

// Set desired final state.
final ActivityLifecycleItem lifecycleItem;
if (andResume) {
lifecycleItem = ResumeActivityItem.obtain(dc.isNextTransitionForward());
} else {
lifecycleItem = PauseActivityItem.obtain();
}
//设置client执行事务后应处于的生命周期状态
clientTransaction.setLifecycleStateRequest(lifecycleItem);

// Schedule transaction.
//调度执行此事务,启动Activity
mService.getLifecycleManager().scheduleTransaction(clientTransaction);

//处理重量级进程
if ((proc.mInfo.privateFlags & ApplicationInfo.PRIVATE_FLAG_CANT_SAVE_STATE) != 0
&& mService.mHasHeavyWeightFeature) {
// This may be a heavy-weight process! Note that the package manager will ensure
// that only activity can run in the main process of the .apk, which is the only
// thing that will be considered heavy-weight.
if (proc.mName.equals(proc.mInfo.packageName)) {
if (mService.mHeavyWeightProcess != null
&& mService.mHeavyWeightProcess != proc) {
Slog.w(TAG, "Starting new heavy weight process " + proc
+ " when already running "
+ mService.mHeavyWeightProcess);
}
mService.setHeavyWeightProcess(r);
}
}

} catch (RemoteException e) {
if (r.launchFailed) {
// This is the second time we failed -- finish activity and give up.
//第二次启动失败,finish掉Activity并放弃重试,直接返回false
Slog.e(TAG, "Second failure launching "
+ r.intent.getComponent().flattenToShortString() + ", giving up", e);
proc.appDied("2nd-crash");
r.finishIfPossible("2nd-crash", false /* oomAdj */);
return false;
}

// This is the first time we failed -- restart process and
// retry.
//第一次启动失败,尝试重启进程并重试启动Activity
r.launchFailed = true;
proc.removeActivity(r);
throw e;
}
} finally {
endDeferResume();
}

r.launchFailed = false;

// TODO(lifecycler): Resume or pause requests are done as part of launch transaction,
// so updating the state should be done accordingly.
//更新生命周期状态
if (andResume && readyToResume()) {
// As part of the process of launching, ActivityThread also performs
// a resume.
stack.minimalResumeActivityLocked(r);
} else {
// This activity is not starting in the resumed state... which should look like we asked
// it to pause+stop (but remain visible), and it has done so and reported back the
// current icicle and other state.
r.setState(PAUSED, "realStartActivityLocked");
mRootWindowContainer.executeAppTransitionForAllDisplay();
}
// Perform OOM scoring after the activity state is set, so the process can be updated with
// the latest state.
//更新进程oom adj,更新进程状态
proc.onStartActivity(mService.mTopProcessState, r.info);

// Launch the new version setup screen if needed. We do this -after-
// launching the initial activity (that is, home), so that it can have
// a chance to initialize itself while in the background, making the
// switch back to it faster and look better.
if (mRootWindowContainer.isTopDisplayFocusedStack(stack)) {
mService.getActivityStartController().startSetupActivity();
}

// Update any services we are bound to that might care about whether
// their client may have activities.
//更新进程绑定的所有服务
if (r.app != null) {
r.app.updateServiceConnectionActivities();
}

return true;
}

这个方法中最关键的部分在于创建了ClientTransaction事务,并向里添加了一条启动Activity的消息,然后调用ATMS.getLifecycleManager.scheduleTransaction调度执行这个事务,启动Activity

ClientTransaction

我们先来看看ClientTransaction这个对象是怎么创建获取的,我们首先调用了ClientTransaction.obtain方法,并传入了一个ActivityThread内部类ApplicationThreadBinder对象IApplicationThread和一个ActivityRecord.Token对象

1
2
3
4
5
6
7
8
9
10
public static ClientTransaction obtain(IApplicationThread client, IBinder activityToken) {
ClientTransaction instance = ObjectPool.obtain(ClientTransaction.class);
if (instance == null) {
instance = new ClientTransaction();
}
instance.mClient = client;
instance.mActivityToken = activityToken;

return instance;
}

这个方法很简单,从池子里拿一个实例,或者新创建一个实例对象,将这个实例对象的两个成员变量赋值后返回

然后我们调用了ClientTransaction.addCallback方法将ClientTransactionItem加入到回调队列中,ClientTransactionItem是一条能够被执行的生命周期回调消息,它是一个抽象类,子类需要实现它的preExecuteexecutepostExecute方法

我们这里传入的是LaunchActivityItem,这条消息是用来启动Activity

然后我们调用ClientTransaction.setLifecycleStateRequest设置当事务执行结束后,Activity应该处在一个怎样的生命周期

最后调用ATMS.getLifecycleManager.scheduleTransaction调度执行这个事务,ATMS.getLifecycleManager获得的是一个ClientLifecycleManager对象,我们沿着这个方法继续往下看

1
2
3
4
5
6
7
8
9
10
void scheduleTransaction(ClientTransaction transaction) throws RemoteException {
final IApplicationThread client = transaction.getClient();
transaction.schedule();
if (!(client instanceof Binder)) {
// If client is not an instance of Binder - it's a remote call and at this point it is
// safe to recycle the object. All objects used for local calls will be recycled after
// the transaction is executed on client in ActivityThread.
transaction.recycle();
}
}

除了回收调用recycle之外,我们又回到了ClientTransaction中,调用其schedule方法

1
2
3
public void schedule() throws RemoteException {
mClient.scheduleTransaction(this);
}

这里又跨进程回到了App进程中,调用ApplicationThread.scheduleTransaction

1
2
3
public void scheduleTransaction(ClientTransaction transaction) throws RemoteException {
ActivityThread.this.scheduleTransaction(transaction);
}

最后调用ActivityThread.scheduleTransaction执行事务,ActivityThread继承自ClientTransactionHandlerscheduleTransaction方法是在这里面定义的

1
2
3
4
void scheduleTransaction(ClientTransaction transaction) {
transaction.preExecute(this);
sendMessage(ActivityThread.H.EXECUTE_TRANSACTION, transaction);
}

首先,调用ClientTransaction.preExecute方法,然后通过Handler发送执行一条EXECUTE_TRANSACTION消息,我们先看一下preExecute

1
2
3
4
5
6
7
8
9
10
11
public void preExecute(android.app.ClientTransactionHandler clientTransactionHandler) {
if (mActivityCallbacks != null) {
final int size = mActivityCallbacks.size();
for (int i = 0; i < size; ++i) {
mActivityCallbacks.get(i).preExecute(clientTransactionHandler, mActivityToken);
}
}
if (mLifecycleStateRequest != null) {
mLifecycleStateRequest.preExecute(clientTransactionHandler, mActivityToken);
}
}

可以看到,就是遍历整个callback列表,执行preExecute方法,最后再执行LifecycleStateRequestpreExecute方法,对应到Activity启动流程中,就是先执行LaunchActivityItem.preExecute,再执行ResumeActivityItem.preExecute

1
2
3
4
5
6
// LaunchActivityItem
public void preExecute(ClientTransactionHandler client, IBinder token) {
client.countLaunchingActivities(1);
client.updateProcessState(mProcState, false);
client.updatePendingConfiguration(mCurConfig);
}
1
2
3
4
5
6
7
// ResumeActivityItem
public void preExecute(ClientTransactionHandler client, IBinder token) {
//这里mUpdateProcState为false,不执行
if (mUpdateProcState) {
client.updateProcessState(mProcState, false);
}
}

都是一些状态更新之类的东西,我们就直接跳过,然后我们看ActivityThread在收到EXECUTE_TRANSACTION消息后做了什么

1
2
3
4
5
6
7
8
9
10
11
12
public void handleMessage(Message msg) {
switch (msg.what) {
...
case EXECUTE_TRANSACTION:
final ClientTransaction transaction = (ClientTransaction) msg.obj;
mTransactionExecutor.execute(transaction);
...
break;
...
}
...
}

这里可以看到,调用了TransactionExecutor对象的execute方法,TransactionExecutor对象在ActivityThread创建时便创建了,内部持有一个ClientTransactionHandler引用,即ActivityThread自身

1
2
3
4
5
6
7
8
9
10
11
12
13
14
15
16
17
18
19
20
21
22
23
24
25
26
27
28
29
public void execute(ClientTransaction transaction) {
final IBinder token = transaction.getActivityToken();
//处理需要销毁的Activities
if (token != null) {
final Map<IBinder, ClientTransactionItem> activitiesToBeDestroyed =
mTransactionHandler.getActivitiesToBeDestroyed();
final ClientTransactionItem destroyItem = activitiesToBeDestroyed.get(token);
if (destroyItem != null) {
if (transaction.getLifecycleStateRequest() == destroyItem) {
// It is going to execute the transaction that will destroy activity with the
// token, so the corresponding to-be-destroyed record can be removed.
activitiesToBeDestroyed.remove(token);
}
if (mTransactionHandler.getActivityClient(token) == null) {
// The activity has not been created but has been requested to destroy, so all
// transactions for the token are just like being cancelled.
//Activity尚未被创建就被请求destroy,直接取消整个事务
Slog.w(TAG, tId(transaction) + "Skip pre-destroyed transaction:\n"
+ transactionToString(transaction, mTransactionHandler));
return;
}
}
}

executeCallbacks(transaction);

executeLifecycleState(transaction);
mPendingActions.clear();
}

处理需要销毁的Activities这里我们不关注,就直接跳过,然后就是分别执行各个ClientTransactionItem回调消息,最后让其调度执行我们设置的最终的生命周期

1
2
3
4
5
6
7
8
9
10
11
12
13
14
15
16
17
18
19
20
21
22
23
24
25
26
27
28
public void executeCallbacks(ClientTransaction transaction) {
final List<ClientTransactionItem> callbacks = transaction.getCallbacks();
if (callbacks == null || callbacks.isEmpty()) {
// No callbacks to execute, return early.
return;
}

final IBinder token = transaction.getActivityToken();
ActivityClientRecord r = mTransactionHandler.getActivityClient(token);

... //生命周期转换相关

final int size = callbacks.size();
for (int i = 0; i < size; ++i) {
final ClientTransactionItem item = callbacks.get(i);
... //生命周期转换,在Activity启动时不会走进这个case

item.execute(mTransactionHandler, token, mPendingActions);
item.postExecute(mTransactionHandler, token, mPendingActions);
if (r == null) {
// Launch activity request will create an activity record.
//在执行完启动Activity后会新建一个ActivityClientRecord,重新赋值
r = mTransactionHandler.getActivityClient(token);
}

... //生命周期转换,在Activity启动时不会走进这个case
}
}

关于生命周期转换,由于Activity启动的当前阶段不会进入这些case,所以这里就不提了

经过简化,实际上也就执行了LaunchActivityItem.executeLaunchActivityItem.postExecute方法

1
2
3
4
5
6
7
8
public void execute(ClientTransactionHandler client, IBinder token,
PendingTransactionActions pendingActions) {
ActivityClientRecord r = new ActivityClientRecord(token, mIntent, mIdent, mInfo,
mOverrideConfig, mCompatInfo, mReferrer, mVoiceInteractor, mState, mPersistentState,
mPendingResults, mPendingNewIntents, mIsForward,
mProfilerInfo, client, mAssistToken, mFixedRotationAdjustments);
client.handleLaunchActivity(r, pendingActions, null /* customIntent */);
}

这里使用之前在AMS中创建LaunchActivityItem所使用到的信息,创建了一个ActivityClientRecord对象,接着回到ActivityThread,调用其handleLaunchActivity方法

handleLaunchActivity

1
2
3
4
5
6
7
8
9
10
11
12
13
14
15
16
17
18
19
20
21
22
23
24
25
26
27
28
29
30
31
32
33
34
35
36
37
38
39
40
41
42
43
44
45
46
47
48
49
50
51
52
53
54
55
56
57
58
public Activity handleLaunchActivity(ActivityClientRecord r,
PendingTransactionActions pendingActions, Intent customIntent) {
// If we are getting ready to gc after going to the background, well
// we are back active so skip it.
unscheduleGcIdler();
mSomeActivitiesChanged = true;

if (r.profilerInfo != null) {
mProfiler.setProfiler(r.profilerInfo);
mProfiler.startProfiling();
}

// Make sure we are running with the most recent config.
//确保Configuration为最新
handleConfigurationChanged(null, null);

// Initialize before creating the activity
//初始化硬件加速
if (!ThreadedRenderer.sRendererDisabled
&& (r.activityInfo.flags & ActivityInfo.FLAG_HARDWARE_ACCELERATED) != 0) {
HardwareRenderer.preload();
}
//确保WMS被初始化
WindowManagerGlobal.initialize();

// Hint the GraphicsEnvironment that an activity is launching on the process.
//通知有Activity启动
GraphicsEnvironment.hintActivityLaunch();

//执行启动Activity
final Activity a = performLaunchActivity(r, customIntent);

if (a != null) {
//设置Configuration
r.createdConfig = new Configuration(mConfiguration);
reportSizeConfigurations(r);
//设置一些延迟执行的动作(作用域到整个ClientTransaction结束)
if (!r.activity.mFinished && pendingActions != null) {
pendingActions.setOldState(r.state);
//当Activity生命周期走到onStart前,会通过这里设置的值
//判断是否需要执行onRestoreInstanceState、onPostCreate
pendingActions.setRestoreInstanceState(true);
pendingActions.setCallOnPostCreate(true);
}
} else {
// If there was an error, for any reason, tell the activity manager to stop us.
//出现错误,停止启动Activity
try {
ActivityTaskManager.getService()
.finishActivity(r.token, Activity.RESULT_CANCELED, null,
Activity.DONT_FINISH_TASK_WITH_ACTIVITY);
} catch (RemoteException ex) {
throw ex.rethrowFromSystemServer();
}
}

return a;
}

这个方法中,最重要的莫过于performLaunchActivity了,它是创建Activity的核心方法

1
2
3
4
5
6
7
8
9
10
11
12
13
14
15
16
17
18
19
20
21
22
23
24
25
26
27
28
29
30
31
32
33
34
35
36
37
38
39
40
41
42
43
44
45
46
47
48
49
50
51
52
53
54
55
56
57
58
59
60
61
62
63
64
65
66
67
68
69
70
71
72
73
74
75
76
77
78
79
80
81
82
83
84
85
86
87
88
89
90
91
92
93
94
95
96
97
98
99
100
101
102
103
104
105
106
107
108
109
110
111
112
113
114
115
116
117
118
119
120
121
122
123
124
125
126
127
128
/**  Core implementation of activity launch. */
private Activity performLaunchActivity(ActivityClientRecord r, Intent customIntent) {
ActivityInfo aInfo = r.activityInfo;
//设置LoadedApk
if (r.packageInfo == null) {
r.packageInfo = getPackageInfo(aInfo.applicationInfo, r.compatInfo,
Context.CONTEXT_INCLUDE_CODE);
}

ComponentName component = r.intent.getComponent();
if (component == null) {
component = r.intent.resolveActivity(
mInitialApplication.getPackageManager());
r.intent.setComponent(component);
}

//如果启动的Activity是一个activity-alias,将Component设置为真正的Activity组件
//详见:https://developer.android.com/guide/topics/manifest/activity-alias-element?hl=zh-cn
if (r.activityInfo.targetActivity != null) {
component = new ComponentName(r.activityInfo.packageName,
r.activityInfo.targetActivity);
}

//为Activity创建BaseContext
ContextImpl appContext = createBaseContextForActivity(r);
Activity activity = null;
try {
java.lang.ClassLoader cl = appContext.getClassLoader();
//实例化Activity
activity = mInstrumentation.newActivity(
cl, component.getClassName(), r.intent);
StrictMode.incrementExpectedActivityCount(activity.getClass());
r.intent.setExtrasClassLoader(cl);
r.intent.prepareToEnterProcess();
if (r.state != null) {
r.state.setClassLoader(cl);
}
} catch (Exception e) {
...
}

try {
//创建或获取Application
//如果该Activity指定在其他的一个新的进程中启动(设置了android:process属性),则会新创建Application
//正常不涉及多进程,都是直接获取之前创建好的Application
Application app = r.packageInfo.makeApplication(false, mInstrumentation);

if (activity != null) {
//Manifest中Activity标签下的label属性
CharSequence title = r.activityInfo.loadLabel(appContext.getPackageManager());
//准备Configuration
Configuration config = new Configuration(mCompatConfiguration);
if (r.overrideConfig != null) {
config.updateFrom(r.overrideConfig);
}
Window window = null;
//当relaunch Activity的时候mPreserveWindow才会为true(比如说调用Activity.recreate方法)
if (r.mPendingRemoveWindow != null && r.mPreserveWindow) {
window = r.mPendingRemoveWindow;
r.mPendingRemoveWindow = null;
r.mPendingRemoveWindowManager = null;
}

// Activity resources must be initialized with the same loaders as the
// application context.
//设置Activity Resource的Loaders与Application Resource的Loaders一致
appContext.getResources().addLoaders(
app.getResources().getLoaders().toArray(new ResourcesLoader[0]));

appContext.setOuterContext(activity);
//重要:绑定BaseContext、创建PhoneWindow等一系列初始化工作
activity.attach(appContext, this, getInstrumentation(), r.token,
r.ident, app, r.intent, r.activityInfo, title, r.parent,
r.embeddedID, r.lastNonConfigurationInstances, config,
r.referrer, r.voiceInteractor, window, r.configCallback,
r.assistToken);

if (customIntent != null) {
activity.mIntent = customIntent;
}
r.lastNonConfigurationInstances = null;
//更新网络状态
checkAndBlockForNetworkAccess();
activity.mStartedActivity = false;
//设置主题
int theme = r.activityInfo.getThemeResource();
if (theme != 0) {
activity.setTheme(theme);
}

activity.mCalled = false;
//调用Activity的onCreate方法
if (r.isPersistable()) {
mInstrumentation.callActivityOnCreate(activity, r.state, r.persistentState);
} else {
mInstrumentation.callActivityOnCreate(activity, r.state);
}
if (!activity.mCalled) {
//在执行完super.onCreate方法后,mCalled会被置为true
//如果mCalled为false,说明没有执行super.onCreate方法
throw new SuperNotCalledException(
"Activity " + r.intent.getComponent().toShortString() +
" did not call through to super.onCreate()");
}
r.activity = activity;
mLastReportedWindowingMode.put(activity.getActivityToken(),
config.windowConfiguration.getWindowingMode());
}
//设置生命周期状态为onCreate
r.setState(ON_CREATE);

// updatePendingActivityConfiguration() reads from mActivities to update
// ActivityClientRecord which runs in a different thread. Protect modifications to
// mActivities to avoid race.
//将新建的ActivityClientRecord添加到mActivities中
synchronized (mResourcesManager) {
mActivities.put(r.token, r);
}

} catch (SuperNotCalledException e) {
throw e;

} catch (Exception e) {
...
}

return activity;
}

这个方法主要做了以下几个工作:

  1. 准备创建Activity所必要的信息,譬如类名等

  2. Activity创建BaseContext

  3. 通过Instrumentation实例化Activity

  4. 创建或获取Activity进程所对应的Application

  5. 初始化Activity,执行各种绑定工作,创建PhoneWindow

  6. 执行ActivityonCreate生命周期方法

  7. ActivityClientRecord生命周期状态设置为onCreate

我们重点看一下最主要的实例化、attachonCreate这三点

Instrumentation.newActivity

我们在 Android源码分析 - Activity启动流程(中) 中分析了,Application是怎么通过Instrumentation创建的,Activity的创建和它类似

1
2
3
4
5
6
7
8
public Activity newActivity(ClassLoader cl, String className,
Intent intent)
throws InstantiationException, IllegalAccessException,
ClassNotFoundException {
String pkg = intent != null && intent.getComponent() != null
? intent.getComponent().getPackageName() : null;
return getFactory(pkg).instantiateActivity(cl, className, intent);
}

同样的使用了AppComponentFactory创建,我们还是去看一下它的默认实现

1
2
3
4
5
public @NonNull Activity instantiateActivity(@NonNull ClassLoader cl, @NonNull String className,
@Nullable Intent intent)
throws InstantiationException, IllegalAccessException, ClassNotFoundException {
return (Activity) cl.loadClass(className).newInstance();
}

同样的,也是通过类名反射创建一个Activity的实例

Activity.attach

紧接着,我们来看Activity.attach方法

1
2
3
4
5
6
7
8
9
10
11
12
13
14
15
16
17
18
19
20
21
22
23
24
25
26
27
28
29
30
31
32
33
34
35
36
37
38
39
40
41
42
43
44
45
46
47
48
49
50
51
52
53
54
55
56
57
58
59
60
61
62
63
64
65
66
67
68
69
70
71
final void attach(Context context, ActivityThread aThread,
Instrumentation instr, IBinder token, int ident,
Application application, Intent intent, ActivityInfo info,
CharSequence title, Activity parent, String id,
NonConfigurationInstances lastNonConfigurationInstances,
Configuration config, String referrer, IVoiceInteractor voiceInteractor,
Window window, ActivityConfigCallback activityConfigCallback, IBinder assistToken) {
//绑定BaseContext
attachBaseContext(context);
//初始化Fragment控制器
mFragments.attachHost(null /*parent*/);

//创建并设置Window用于显示界面
mWindow = new PhoneWindow(this, window, activityConfigCallback);
mWindow.setWindowControllerCallback(mWindowControllerCallback);
mWindow.setCallback(this);
mWindow.setOnWindowDismissedCallback(this);
mWindow.getLayoutInflater().setPrivateFactory(this);
if (info.softInputMode != WindowManager.LayoutParams.SOFT_INPUT_STATE_UNSPECIFIED) {
mWindow.setSoftInputMode(info.softInputMode);
}
if (info.uiOptions != 0) {
mWindow.setUiOptions(info.uiOptions);
}

//各成员变量初始化
mUiThread = Thread.currentThread();

mMainThread = aThread;
mInstrumentation = instr;
mToken = token;
mAssistToken = assistToken;
mIdent = ident;
mApplication = application;
mIntent = intent;
mReferrer = referrer;
mComponent = intent.getComponent();
mActivityInfo = info;
mTitle = title;
mParent = parent;
mEmbeddedID = id;
mLastNonConfigurationInstances = lastNonConfigurationInstances;
if (voiceInteractor != null) {
if (lastNonConfigurationInstances != null) {
mVoiceInteractor = lastNonConfigurationInstances.voiceInteractor;
} else {
mVoiceInteractor = new VoiceInteractor(voiceInteractor, this, this,
Looper.myLooper());
}
}

//设置WindowManager、ActivityRecordToken以及是否使用硬件加速
mWindow.setWindowManager(
(WindowManager)context.getSystemService(Context.WINDOW_SERVICE),
mToken, mComponent.flattenToString(),
(info.flags & ActivityInfo.FLAG_HARDWARE_ACCELERATED) != 0);
if (mParent != null) {
mWindow.setContainer(mParent.getWindow());
}
mWindowManager = mWindow.getWindowManager();
mCurrentConfig = config;

mWindow.setColorMode(info.colorMode);
mWindow.setPreferMinimalPostProcessing(
(info.flags & ActivityInfo.FLAG_PREFER_MINIMAL_POST_PROCESSING) != 0);

//设置自动填充选项
setAutofillOptions(application.getAutofillOptions());
//设置内容捕获功能
setContentCaptureOptions(application.getContentCaptureOptions());
}

这里可以看到,attach方法主要做了以下几件事:

  1. 绑定BaseContext

  2. 初始化Fragment控制器

  3. 创建并设置Window

  4. 各种成员变量及其他属性初始化

看完这个方法,我们可以发现,原来ActivityWindow是在这个时候创建的,并且Window的具体实现类为PhoneWindow

再然后便是通过Instrumentation执行ActivityonCreate生命周期方法了

1
2
3
4
5
public void callActivityOnCreate(Activity activity, Bundle icicle) {
prePerformCreate(activity);
activity.performCreate(icicle);
postPerformCreate(activity);
}

其中prePerformCreatepostPerformCreate似乎只有在单元测试和CTS测试下才会产生实质性的影响,在正常情况下我们就当作它们不存在,我们接着看performCreate方法

Activity.performCreate

1
2
3
4
5
6
7
8
9
10
11
12
13
14
15
16
17
18
19
20
21
22
23
24
25
26
27
28
29
30
31
32
33
34
35
final void performCreate(Bundle icicle) {
performCreate(icicle, null);
}

final void performCreate(Bundle icicle, PersistableBundle persistentState) {
//分发PreCreated事件,执行所有注册的ActivityLifecycleCallbacks的onActivityPreCreated回调
dispatchActivityPreCreated(icicle);
mCanEnterPictureInPicture = true;
// initialize mIsInMultiWindowMode and mIsInPictureInPictureMode before onCreate
final int windowingMode = getResources().getConfiguration().windowConfiguration
.getWindowingMode();
//多窗口模式
mIsInMultiWindowMode = inMultiWindowMode(windowingMode);
//画中画模式(小窗播放视频等场景)
mIsInPictureInPictureMode = windowingMode == WINDOWING_MODE_PINNED;
//恢复请求权限中的标志位
restoreHasCurrentPermissionRequest(icicle);
//执行onCreate生命周期方法
if (persistentState != null) {
onCreate(icicle, persistentState);
} else {
onCreate(icicle);
}
//共享元素动画相关
mActivityTransitionState.readState(icicle);

mVisibleFromClient = !mWindow.getWindowStyle().getBoolean(
com.android.internal.R.styleable.Window_windowNoDisplay, false);
//FragmentManager分发ACTIVITY_CREATED状态
mFragments.dispatchActivityCreated();
//共享元素动画相关
mActivityTransitionState.setEnterActivityOptions(this, getActivityOptions());
//分发PostCreated事件,执行所有注册的ActivityLifecycleCallbacks的onActivityPostCreated回调
dispatchActivityPostCreated(icicle);
}

其中的参数icicle就是我们平时重写Activity.onCreate方法时的第一个入参savedInstanceState,如果Activity发生了重建之类的情况,它会保存一些状态数据,第一次启动Activity时为null

无论persistentState是否为null,最终都会进入到单个参数的onCreate方法中

1
2
3
4
5
6
7
8
9
10
11
12
13
14
15
16
17
18
19
20
21
22
23
24
25
26
27
28
29
30
31
32
33
34
35
36
37
38
39
40
protected void onCreate(@Nullable Bundle savedInstanceState) {
//恢复LoaderManager
if (mLastNonConfigurationInstances != null) {
mFragments.restoreLoaderNonConfig(mLastNonConfigurationInstances.loaders);
}
//ActionBar
if (mActivityInfo.parentActivityName != null) {
if (mActionBar == null) {
mEnableDefaultActionBarUp = true;
} else {
mActionBar.setDefaultDisplayHomeAsUpEnabled(true);
}
}
if (savedInstanceState != null) {
//自动填充功能
mAutoFillResetNeeded = savedInstanceState.getBoolean(AUTOFILL_RESET_NEEDED, false);
mLastAutofillId = savedInstanceState.getInt(LAST_AUTOFILL_ID,
View.LAST_APP_AUTOFILL_ID);

if (mAutoFillResetNeeded) {
getAutofillManager().onCreate(savedInstanceState);
}

//恢复FragmentManager状态
Parcelable p = savedInstanceState.getParcelable(FRAGMENTS_TAG);
mFragments.restoreAllState(p, mLastNonConfigurationInstances != null
? mLastNonConfigurationInstances.fragments : null);
}
//FragmentManager分发CREATED状态,执行内部Fragment的生命周期
mFragments.dispatchCreate();
//分发Created事件,执行所有注册的ActivityLifecycleCallbacks的onActivityCreated回调
dispatchActivityCreated(savedInstanceState);
//语音交互功能
if (mVoiceInteractor != null) {
mVoiceInteractor.attachActivity(this);
}
mRestoredFromBundle = savedInstanceState != null;
//这里表示已调用过super.onCreate方法
mCalled = true;
}

到这里,ActivityonCreate生命周期就走完了,我们也可以从这整个流程中得到一些新的收获,比如说,原来注册在Application中的ActivityLifecycleCallbacks回调是在这里触发的,FragmentManager状态分发的顺序是这样的,为什么必须要调用super.onCreate方法等等

接着,我们再回到TransactionExecutor中,它接下来执行的是LaunchActivityItem.postExecute

1
2
3
4
public void postExecute(ClientTransactionHandler client, IBinder token,
PendingTransactionActions pendingActions) {
client.countLaunchingActivities(-1);
}

这里就非常简单了,计数器减一

postExecute执行完后,整个LaunchActivityItem的工作就完成了,接下来执行的是TransactionExecutor.executeLifecycleState方法

1
2
3
4
5
6
7
8
9
10
11
12
13
14
15
16
17
18
19
20
21
22
23
24
25
private void executeLifecycleState(ClientTransaction transaction) {
final ActivityLifecycleItem lifecycleItem = transaction.getLifecycleStateRequest();
if (lifecycleItem == null) {
// No lifecycle request, return early.
return;
}

final IBinder token = transaction.getActivityToken();
final ActivityClientRecord r = mTransactionHandler.getActivityClient(token);

if (r == null) {
// Ignore requests for non-existent client records for now.
return;
}

// Cycle to the state right before the final requested state.
//excludeLastState为true的情况下,推进生命周期直到最终生命周期的上一个生命周期
//excludeLastState为false的情况下,推进生命周期直到最终生命周期
cycleToPath(r, lifecycleItem.getTargetState(), true /* excludeLastState */, transaction);

// Execute the final transition with proper parameters.
//执行最终的生命周期事务
lifecycleItem.execute(mTransactionHandler, token, mPendingActions);
lifecycleItem.postExecute(mTransactionHandler, token, mPendingActions);
}

我们目前处在的生命周期为ON_CREATE最终目标要到达的生命周期为ON_RESUMEcycleToPath方法会帮助我们把生命周期推进到ON_RESUME的上一个生命周期也就是ON_START

1
2
3
4
5
6
private void cycleToPath(ActivityClientRecord r, int finish, boolean excludeLastState,
ClientTransaction transaction) {
final int start = r.getLifecycleState();
final IntArray path = mHelper.getLifecyclePath(start, finish, excludeLastState);
performLifecycleSequence(r, path, transaction);
}

TransactionExecutorHelper.getLifecyclePath方法会帮我们计算出一个剩余要经过的生命周期路线的一个有序数组

1
2
3
4
5
6
7
8
9
10
11
12
13
14
15
16
17
18
19
20
21
22
23
24
25
26
27
28
29
30
31
32
33
34
35
36
37
38
39
40
41
42
43
44
45
46
47
48
49
50
51
52
53
54
public IntArray getLifecyclePath(int start, int finish, boolean excludeLastState) {
... //错误判断

mLifecycleSequence.clear();
if (finish >= start) {
if (start == ON_START && finish == ON_STOP) {
// A case when we from start to stop state soon, we don't need to go
// through the resumed, paused state.
mLifecycleSequence.add(ON_STOP);
} else {
// just go there
//按顺序添加生命周期
for (int i = start + 1; i <= finish; i++) {
mLifecycleSequence.add(i);
}
}
} else { // finish < start, can't just cycle down
if (start == ON_PAUSE && finish == ON_RESUME) {
// Special case when we can just directly go to resumed state.
mLifecycleSequence.add(ON_RESUME);
} else if (start <= ON_STOP && finish >= ON_START) {
// Restart and go to required state.

// Go to stopped state first.
for (int i = start + 1; i <= ON_STOP; i++) {
mLifecycleSequence.add(i);
}
// Restart
mLifecycleSequence.add(ON_RESTART);
// Go to required state
for (int i = ON_START; i <= finish; i++) {
mLifecycleSequence.add(i);
}
} else {
// Relaunch and go to required state

// Go to destroyed state first.
for (int i = start + 1; i <= ON_DESTROY; i++) {
mLifecycleSequence.add(i);
}
// Go to required state
for (int i = ON_CREATE; i <= finish; i++) {
mLifecycleSequence.add(i);
}
}
}

// Remove last transition in case we want to perform it with some specific params.
if (excludeLastState && mLifecycleSequence.size() != 0) {
mLifecycleSequence.remove(mLifecycleSequence.size() - 1);
}

return mLifecycleSequence;
}

其实从这个方法,我们就能看出Activity生命周期是怎么设计的,代码很简单,我就不解释了

1
2
3
4
5
6
7
8
9
public static final int UNDEFINED = -1;
public static final int PRE_ON_CREATE = 0;
public static final int ON_CREATE = 1;
public static final int ON_START = 2;
public static final int ON_RESUME = 3;
public static final int ON_PAUSE = 4;
public static final int ON_STOP = 5;
public static final int ON_DESTROY = 6;
public static final int ON_RESTART = 7;

我们结合这上面这个生命周期大小来看,startON_CREATEfinishON_RESUMEexcludeLastStatetrue移除最后一个生命周期,得出的结果便是[ON_START],然后调用performLifecycleSequence方法执行生命周期

1
2
3
4
5
6
7
8
9
10
11
12
13
14
15
16
17
18
19
20
21
22
23
24
25
26
27
28
29
30
31
32
33
34
35
36
37
38
39
40
41
42
private void performLifecycleSequence(ActivityClientRecord r, IntArray path,
ClientTransaction transaction) {
final int size = path.size();
for (int i = 0, state; i < size; i++) {
state = path.get(i);
switch (state) {
case ON_CREATE:
mTransactionHandler.handleLaunchActivity(r, mPendingActions,
null /* customIntent */);
break;
case ON_START:
mTransactionHandler.handleStartActivity(r, mPendingActions,
null /* activityOptions */);
break;
case ON_RESUME:
mTransactionHandler.handleResumeActivity(r, false /* finalStateRequest */,
r.isForward, "LIFECYCLER_RESUME_ACTIVITY");
break;
case ON_PAUSE:
mTransactionHandler.handlePauseActivity(r, false /* finished */,
false /* userLeaving */, 0 /* configChanges */,
false /* autoEnteringPip */, mPendingActions,
"LIFECYCLER_PAUSE_ACTIVITY");
break;
case ON_STOP:
mTransactionHandler.handleStopActivity(r, 0 /* configChanges */,
mPendingActions, false /* finalStateRequest */,
"LIFECYCLER_STOP_ACTIVITY");
break;
case ON_DESTROY:
mTransactionHandler.handleDestroyActivity(r, false /* finishing */,
0 /* configChanges */, false /* getNonConfigInstance */,
"performLifecycleSequence. cycling to:" + path.get(size - 1));
break;
case ON_RESTART:
mTransactionHandler.performRestartActivity(r, false /* start */);
break;
default:
throw new IllegalArgumentException("Unexpected lifecycle state: " + state);
}
}
}

这个方法很简单啊,就是遍历这个数组,依次执行生命周期,结合我们传入的数组[ON_START],最后便是调用ActivityThread.handleStartActivity方法

handleStartActivity

1
2
3
4
5
6
7
8
9
10
11
12
13
14
15
16
17
18
19
20
21
22
23
24
25
26
27
28
29
30
31
32
33
34
35
36
37
38
39
40
41
42
43
44
45
46
47
48
49
50
51
52
53
54
55
56
57
public void handleStartActivity(IBinder token, PendingTransactionActions pendingActions) {
final ActivityClientRecord r = mActivities.get(token);
final Activity activity = r.activity;
... //检查

unscheduleGcIdler();

// Start
//执行onStart生命周期
activity.performStart("handleStartActivity");
//设置生命周期状态为onStart
r.setState(ON_START);

if (pendingActions == null) {
// No more work to do.
return;
}

// Restore instance state
//之前在handleLaunchActivity方法中设置了pendingActions.setRestoreInstanceState(true)
//这里便会判断是否需要并执行Activity.onRestoreInstanceState
if (pendingActions.shouldRestoreInstanceState()) {
if (r.isPersistable()) {
if (r.state != null || r.persistentState != null) {
mInstrumentation.callActivityOnRestoreInstanceState(activity, r.state,
r.persistentState);
}
} else if (r.state != null) {
mInstrumentation.callActivityOnRestoreInstanceState(activity, r.state);
}
}

// Call postOnCreate()
//之前在handleLaunchActivity方法中设置了pendingActions.setCallOnPostCreate(true)
//这里便会执行Activity.onPostCreate,如果不是从onCreate转到onStart,不会进入此case
if (pendingActions.shouldCallOnPostCreate()) {
activity.mCalled = false;
//调用Activity.onPostCreate
if (r.isPersistable()) {
mInstrumentation.callActivityOnPostCreate(activity, r.state,
r.persistentState);
} else {
mInstrumentation.callActivityOnPostCreate(activity, r.state);
}
if (!activity.mCalled) {
//和onCreate一样,onPostCreate也必须要调用super.onPostCreate
throw new SuperNotCalledException(
"Activity " + r.intent.getComponent().toShortString()
+ " did not call through to super.onPostCreate()");
}
}

//更新可见性
//Activity启动时,由于此时mDecor还未赋值,所以不会产生影响
updateVisibility(r, true /* show */);
mSomeActivitiesChanged = true;
}

这里有一点需要注意,我们一般重写ActivityonCreate方法,在其中调用setContentView方法,此时DecorView虽然被创建出来了,但是只在PhoneWindow中持有,尚未给Activity.mDecor赋值,所以此时调用updateVisibility方法并不会将DecorView加入到WindowManager中,也就是目前界面还尚未可见

另外,我们可以注意到,performStart是先于callActivityOnPostCreate,所以Activity中的生命周期回调onPostCreate是在onStart之后触发的,各位在开发App的时候不要弄错了这一点

其他的地方注释都写的都很明白了哈,也没什么必要再看performStart了,无非也就和performCreate一样,执行ActivityLifecycleCallbacks回调,FragmentManager分发STARTED状态,调用onStart方法等

接下来我们再回到TransactionExecutor中,后面便是执行ResumeActivityItemexecutepostExecute方法了

1
2
3
4
5
public void execute(ClientTransactionHandler client, ActivityClientRecord r,
PendingTransactionActions pendingActions) {
client.handleResumeActivity(r, true /* finalStateRequest */, mIsForward,
"RESUME_ACTIVITY");
}

可以看到,又执行了ActivityThread.handleResumeActivity方法

handleResumeActivity

1
2
3
4
5
6
7
8
9
10
11
12
13
14
15
16
17
18
19
20
21
22
23
24
25
26
27
28
29
30
31
32
33
34
35
36
37
38
39
40
41
42
43
44
45
46
47
48
49
50
51
52
53
54
55
56
57
58
59
60
61
62
63
64
65
66
67
68
69
70
71
72
73
74
75
76
77
78
79
80
81
82
83
84
85
86
87
88
89
90
91
92
93
94
95
96
97
98
99
100
101
102
103
104
105
106
107
108
109
110
111
112
113
114
115
116
117
118
119
120
public void handleResumeActivity(IBinder token, boolean finalStateRequest, boolean isForward,
String reason) {
// If we are getting ready to gc after going to the background, well
// we are back active so skip it.
unscheduleGcIdler();
mSomeActivitiesChanged = true;

// TODO Push resumeArgs into the activity for consideration
//执行onResume生命周期
final ActivityClientRecord r = performResumeActivity(token, finalStateRequest, reason);
if (r == null) {
// We didn't actually resume the activity, so skipping any follow-up actions.
return;
}
//如果Activity将被destroy,那就没必要再执行resume了,直接返回
if (mActivitiesToBeDestroyed.containsKey(token)) {
// Although the activity is resumed, it is going to be destroyed. So the following
// UI operations are unnecessary and also prevents exception because its token may
// be gone that window manager cannot recognize it. All necessary cleanup actions
// performed below will be done while handling destruction.
return;
}

final Activity a = r.activity;

final int forwardBit = isForward
? WindowManager.LayoutParams.SOFT_INPUT_IS_FORWARD_NAVIGATION : 0;

// If the window hasn't yet been added to the window manager,
// and this guy didn't finish itself or start another activity,
// then go ahead and add the window.
boolean willBeVisible = !a.mStartedActivity;
if (!willBeVisible) {
try {
willBeVisible = ActivityTaskManager.getService().willActivityBeVisible(
a.getActivityToken());
} catch (RemoteException e) {
throw e.rethrowFromSystemServer();
}
}
//设置Window
if (r.window == null && !a.mFinished && willBeVisible) {
r.window = r.activity.getWindow();
View decor = r.window.getDecorView();
//DecorView暂时不可见
decor.setVisibility(View.INVISIBLE);
ViewManager wm = a.getWindowManager();
WindowManager.LayoutParams l = r.window.getAttributes();
//给Activity的mDecor成员变量赋值
a.mDecor = decor;
l.type = WindowManager.LayoutParams.TYPE_BASE_APPLICATION;
l.softInputMode |= forwardBit;
if (r.mPreserveWindow) {
a.mWindowAdded = true;
r.mPreserveWindow = false;
// Normally the ViewRoot sets up callbacks with the Activity
// in addView->ViewRootImpl#setView. If we are instead reusing
// the decor view we have to notify the view root that the
// callbacks may have changed.
ViewRootImpl impl = decor.getViewRootImpl();
if (impl != null) {
impl.notifyChildRebuilt();
}
}
//如果DecorView尚未添加到WindowManager中,将其添加进去,否则更新Window属性
//Activity启动过程中,第一次resume时,DecorView还尚未添加至WindowManager,所以会走进上面这个case
//由于我们之前将DecorView的Visibility设置成了INVISIBLE,所以此时界面还是不可见
if (a.mVisibleFromClient) {
if (!a.mWindowAdded) {
a.mWindowAdded = true;
wm.addView(decor, l);
} else {
// The activity will get a callback for this {@link LayoutParams} change
// earlier. However, at that time the decor will not be set (this is set
// in this method), so no action will be taken. This call ensures the
// callback occurs with the decor set.
a.onWindowAttributesChanged(l);
}
}

// If the window has already been added, but during resume
// we started another activity, then don't yet make the
// window visible.
} else if (!willBeVisible) {
r.hideForNow = true;
}

// Get rid of anything left hanging around.
//清除遗留的东西
cleanUpPendingRemoveWindows(r, false /* force */);

// The window is now visible if it has been added, we are not
// simply finishing, and we are not starting another activity.
if (!r.activity.mFinished && willBeVisible && r.activity.mDecor != null && !r.hideForNow) {
//分发Configuration更新事件
if (r.newConfig != null) {
performConfigurationChangedForActivity(r, r.newConfig);
r.newConfig = null;
}
//当DecorView add进WindowManager后,ViewRootImpl被创建
ViewRootImpl impl = r.window.getDecorView().getViewRootImpl();
WindowManager.LayoutParams l = impl != null
? impl.mWindowAttributes : r.window.getAttributes();

... //软键盘相关

r.activity.mVisibleFromServer = true;
mNumVisibleActivities++;
//使DecorView可见
if (r.activity.mVisibleFromClient) {
r.activity.makeVisible();
}
}

//当空闲时,检查处理其他后台Activity状态
//对处在stopping或finishing的Activity执行onStop或onDestroy生命周期
r.nextIdle = mNewActivities;
mNewActivities = r;
Looper.myQueue().addIdleHandler(new Idler());
}

这里有三个重要的地方需要注意:

  1. 执行performResumeActivity,这里和之前分析的两个生命周期类似,我们后面再看

  2. ActivitymDecor成员变量赋值,将DecorView添加到WindowManager中,使DecorView可见

  3. 将上一个活动的ActivityClientRecord以链表的形式串在当前ActivityClientRecord后面,向MessageQueue添加一条闲时处理消息Idler,这条消息会遍历ActivityClientRecord的整条nextIdle链,依次检查是否需要stopdestroy Activity,这一点我会在后面关于Activity其他生命周期的文章中再分析

接下来我们简单过一下performResumeActivity

1
2
3
4
5
6
7
8
9
10
11
12
13
14
15
16
17
18
19
20
21
22
23
24
25
26
27
28
29
30
31
32
33
34
35
36
37
38
39
40
41
public ActivityClientRecord performResumeActivity(IBinder token, boolean finalStateRequest,
String reason) {
final ActivityClientRecord r = mActivities.get(token);

... //状态检查

//为最终生命周期状态
if (finalStateRequest) {
r.hideForNow = false;
r.activity.mStartedActivity = false;
}
try {
r.activity.onStateNotSaved();
//标记Fragments状态为未保存
r.activity.mFragments.noteStateNotSaved();
//更新网络状态
checkAndBlockForNetworkAccess();
if (r.pendingIntents != null) {
deliverNewIntents(r, r.pendingIntents);
r.pendingIntents = null;
}
if (r.pendingResults != null) {
deliverResults(r, r.pendingResults, reason);
r.pendingResults = null;
}
//执行Activity.onResume生命周期
r.activity.performResume(r.startsNotResumed, reason);

//将保存信息的savedInstanceState和persistentState重置为null
r.state = null;
r.persistentState = null;
//设置生命周期状态
r.setState(ON_RESUME);

//回调Activity.onTopResumedActivityChanged,报告栈顶活动Activity发生变化
reportTopResumedActivityChanged(r, r.isTopResumedActivity, "topWhenResuming");
} catch (Exception e) {
...
}
return r;
}
1
2
3
4
5
6
7
8
9
10
11
12
13
14
15
16
17
18
19
20
21
22
23
24
25
26
27
28
29
30
31
32
33
34
35
36
37
38
39
40
41
42
43
44
45
46
final void performResume(boolean followedByPause, String reason) {
//回调ActivityLifecycleCallbacks.onActivityPreResumed
dispatchActivityPreResumed();
//执行onRestart生命周期
//内部会判断当前Activity是否为stop状态,是的话才会真正执行onRestart生命周期
//启动Activity第一次resume时不会进入onRestart生命周期
performRestart(true /* start */, reason);

mFragments.execPendingActions();

mLastNonConfigurationInstances = null;

... //自动填充功能

mCalled = false;
// mResumed is set by the instrumentation
//执行Activity.onResume回调
mInstrumentation.callActivityOnResume(this);
if (!mCalled) {
//必须执行super.onResume方法
throw new SuperNotCalledException(
"Activity " + mComponent.toShortString() +
" did not call through to super.onResume()");
}

// invisible activities must be finished before onResume() completes
... //异常检查

// Now really resume, and install the current status bar and menu.
mCalled = false;

//FragmentManager分发resume状态
mFragments.dispatchResume();
mFragments.execPendingActions();

//执行onPostResume回调
onPostResume();
if (!mCalled) {
//必须要执行super.onPostResume
throw new SuperNotCalledException(
"Activity " + mComponent.toShortString() +
" did not call through to super.onPostResume()");
}
//回调ActivityLifecycleCallbacks.onActivityPostResumed
dispatchActivityPostResumed();
}
1
2
3
4
5
6
7
8
9
10
protected void onResume() {
//回调ActivityLifecycleCallbacks.onActivityResumed
dispatchActivityResumed();
//共享元素动画
mActivityTransitionState.onResume(this);
... //自动填充功能
notifyContentCaptureManagerIfNeeded(CONTENT_CAPTURE_RESUME);

mCalled = true;
}

可以看到,基本上和之前的两个生命周期的执行是一个套路,唯一需要注意的是,在执行onResume生命周期之前,会先检查Activity是否处在stop状态,如果是的话,则会先执行onRestart生命周期,其他地方我在注释上标注的应该已经很明白了,这里就不再多讲了

不要忘了,在TransactionExecutor中还有最后一步ResumeActivityItem.postExecute没做

1
2
3
4
5
6
7
8
9
public void postExecute(ClientTransactionHandler client, IBinder token,
PendingTransactionActions pendingActions) {
try {
// TODO(lifecycler): Use interface callback instead of AMS.
ActivityTaskManager.getService().activityResumed(token);
} catch (RemoteException ex) {
throw ex.rethrowFromSystemServer();
}
}

这里通过Binder又回到了系统进程调用了ATMS.activityResumed方法

1
2
3
4
5
6
7
public final void activityResumed(IBinder token) {
final long origId = Binder.clearCallingIdentity();
synchronized (mGlobalLock) {
ActivityRecord.activityResumedLocked(token);
}
Binder.restoreCallingIdentity(origId);
}
1
2
3
4
5
6
7
8
9
10
11
12
13
14
15
16
static void activityResumedLocked(IBinder token, boolean handleSplashScreenExit) {
final ActivityRecord r = ActivityRecord.forTokenLocked(token);
if (r == null) {
// If an app reports resumed after a long delay, the record on server side might have
// been removed (e.g. destroy timeout), so the token could be null.
return;
}
//SplashScreen
r.setCustomizeSplashScreenExitAnimation(handleSplashScreenExit);
//重置savedState Bundle
r.setSavedState(null /* savedState */);

r.mDisplayContent.handleActivitySizeCompatModeIfNeeded(r);
//防闪烁功能
r.mDisplayContent.mUnknownAppVisibilityController.notifyAppResumedFinished(r);
}

可以看到,最后也就做了一些收尾工作,到这里,整个Activity的启动流程也就圆满结束了

结尾

至此为止,我们Activity启动流程三部连续剧终于是圆满完成了,历时整整半年的时间,我心里压着的这块石头也终于是落地了,后面我应该会再做一些关于Activity其他生命周期变换的分析,比如说Activity是怎样销毁的,欢迎感兴趣的小伙伴点赞、收藏、关注我


Android源码分析 - Activity启动流程(中)

开篇

本篇以android-11.0.0_r25作为基础解析

上一篇文章 Android源码分析 - Activity启动流程(上) 中,我们分析了Activity启动流程中的一小部分,基本上可以算是Activity启动的前置准备工作,这篇文章我们将会分析App进程启动的主要流程

启动App进程

准备ProcessRecord

上篇文章中我们说过了,如果App尚未启动,则会调用ATMSstartProcessAsync方法去启动App进程

1
2
3
4
5
6
7
8
9
10
11
12
13
14
void startProcessAsync(ActivityRecord activity, boolean knownToBeDead, boolean isTop,
String hostingType) {
try {
...
// Post message to start process to avoid possible deadlock of calling into AMS with the
// ATMS lock held.
final Message m = PooledLambda.obtainMessage(ActivityManagerInternal::startProcess,
mAmInternal, activity.processName, activity.info.applicationInfo, knownToBeDead,
isTop, hostingType, activity.intent.getComponent());
mH.sendMessage(m);
} finally {
...
}
}

这个方法实际上是通过Hander调用了ActivityManagerInternal (AMS.LocalService)startProcess方法

1
2
3
4
5
6
7
8
9
10
11
12
13
14
15
16
17
18
@Override
public void startProcess(String processName, ApplicationInfo info, boolean knownToBeDead,
boolean isTop, String hostingType, ComponentName hostingName) {
try {
...
synchronized (ActivityManagerService.this) {
// If the process is known as top app, set a hint so when the process is
// started, the top priority can be applied immediately to avoid cpu being
// preempted by other processes before attaching the process of top app.
startProcessLocked(processName, info, knownToBeDead, 0 /* intentFlags */,
new HostingRecord(hostingType, hostingName, isTop),
ZYGOTE_POLICY_FLAG_LATENCY_SENSITIVE, false /* allowWhileBooting */,
false /* isolated */, true /* keepIfLarge */);
}
} finally {
...
}
}

这里将进程启动的一些信息封装到了HostingRecord类中

1
2
3
4
5
6
7
8
9
final ProcessRecord startProcessLocked(String processName,
ApplicationInfo info, boolean knownToBeDead, int intentFlags,
HostingRecord hostingRecord, int zygotePolicyFlags, boolean allowWhileBooting,
boolean isolated, boolean keepIfLarge) {
return mProcessList.startProcessLocked(processName, info, knownToBeDead, intentFlags,
hostingRecord, zygotePolicyFlags, allowWhileBooting, isolated, 0 /* isolatedUid */,
keepIfLarge, null /* ABI override */, null /* entryPoint */,
null /* entryPointArgs */, null /* crashHandler */);
}

AMS将启动进程的任务转交给了ProcessList,这个类的职责是管理进程,包括管理进程优先级(Adj)、进程OOM等

1
2
3
4
5
6
7
8
9
10
11
12
13
14
15
16
17
18
19
20
21
22
23
24
25
26
27
28
29
30
31
32
33
34
35
36
37
38
39
40
41
42
43
44
45
46
47
48
49
50
51
52
53
54
55
56
57
58
59
60
61
62
63
64
65
66
67
68
69
70
71
72
73
74
75
76
77
78
79
80
81
82
83
84
85
86
87
88
89
90
91
92
93
94
95
96
97
98
99
100
101
102
103
104
105
106
107
108
109
110
111
final ProcessRecord startProcessLocked(String processName, ApplicationInfo info,
boolean knownToBeDead, int intentFlags, HostingRecord hostingRecord,
int zygotePolicyFlags, boolean allowWhileBooting, boolean isolated, int isolatedUid,
boolean keepIfLarge, String abiOverride, String entryPoint, String[] entryPointArgs,
Runnable crashHandler) {
long startTime = SystemClock.uptimeMillis();
ProcessRecord app;
if (!isolated) {
//先通过进程名和uid查找相应App的ProcessRecord
app = getProcessRecordLocked(processName, info.uid, keepIfLarge);

//如果是由后台进程发起的 startProcess
//判断启动进程是否为 bad process,如果是,直接启动失败返回
//这里 bad process 的定义为:短时间内连续崩溃两次以上的进程
if ((intentFlags & Intent.FLAG_FROM_BACKGROUND) != 0) {
// If we are in the background, then check to see if this process
// is bad. If so, we will just silently fail.
if (mService.mAppErrors.isBadProcessLocked(info)) {
return null;
}
} else {
// When the user is explicitly starting a process, then clear its
// crash count so that we won't make it bad until they see at
// least one crash dialog again, and make the process good again
// if it had been bad.
//如果是用户显式的要求启动进程,则会清空启动进程的崩溃次数,将启动进程从 bad process 列表中移除
mService.mAppErrors.resetProcessCrashTimeLocked(info);
if (mService.mAppErrors.isBadProcessLocked(info)) {
EventLog.writeEvent(EventLogTags.AM_PROC_GOOD,
UserHandle.getUserId(info.uid), info.uid,
info.processName);
mService.mAppErrors.clearBadProcessLocked(info);
if (app != null) {
app.bad = false;
}
}
}
} else {
// If this is an isolated process, it can't re-use an existing process.
app = null;
}

// We don't have to do anything more if:
// (1) There is an existing application record; and
// (2) The caller doesn't think it is dead, OR there is no thread
// object attached to it so we know it couldn't have crashed; and
// (3) There is a pid assigned to it, so it is either starting or
// already running.
ProcessRecord precedence = null;
//如果已经存在了对应App的ProcessRecord,并且分配了pid
if (app != null && app.pid > 0) {
//如果进程没有死亡或者进程还未绑定binder线程,说明进程是正常运行状态或正在启动中
if ((!knownToBeDead && !app.killed) || app.thread == null) {
// We already have the app running, or are waiting for it to
// come up (we have a pid but not yet its thread), so keep it.
// If this is a new package in the process, add the package to the list
//将要启动的包信息记录在ProcessRecord中(Android多个App可以运行在同一个进程中)
app.addPackage(info.packageName, info.longVersionCode, mService.mProcessStats);
return app;
}

// An application record is attached to a previous process,
// clean it up now.
//App绑定在之前的一个进程上了,杀死并清理这个进程
ProcessList.killProcessGroup(app.uid, app.pid);

Slog.wtf(TAG_PROCESSES, app.toString() + " is attached to a previous process");
// We are not going to re-use the ProcessRecord, as we haven't dealt with the cleanup
// routine of it yet, but we'd set it as the precedence of the new process.
precedence = app;
app = null;
}

//没有找到对应的ProcessRecord
if (app == null) {
//新创建一个ProcessRecord对象
app = newProcessRecordLocked(info, processName, isolated, isolatedUid, hostingRecord);
if (app == null) {
Slog.w(TAG, "Failed making new process record for "
+ processName + "/" + info.uid + " isolated=" + isolated);
return null;
}
app.crashHandler = crashHandler;
app.isolatedEntryPoint = entryPoint;
app.isolatedEntryPointArgs = entryPointArgs;
if (precedence != null) {
app.mPrecedence = precedence;
precedence.mSuccessor = app;
}
} else { //存在对应的ProcessRecord,但进程尚未启动或已被清理
// If this is a new package in the process, add the package to the list
//将要启动的包信息记录在ProcessRecord中
app.addPackage(info.packageName, info.longVersionCode, mService.mProcessStats);
}

// If the system is not ready yet, then hold off on starting this
// process until it is.
//如果系统尚未准备好(开机中或system_server进程崩溃重启中),将其先添加到等待队列中
if (!mService.mProcessesReady
&& !mService.isAllowedWhileBooting(info)
&& !allowWhileBooting) {
if (!mService.mProcessesOnHold.contains(app)) {
mService.mProcessesOnHold.add(app);
}
return app;
}

final boolean success =
startProcessLocked(app, hostingRecord, zygotePolicyFlags, abiOverride);
return success ? app : null;
}

这个方法主要是处理ProcessRecord对象,如果找不到对应的ProcessRecord或对应的ProcessRecord里的信息表明App进程尚未启动,则会调用另一个startProcessLocked重载方法启动进程

1
2
3
4
5
6
7
8
9
10
11
12
13
14
15
16
17
18
19
20
21
22
23
24
25
26
27
28
29
30
31
32
33
34
35
36
37
38
39
40
41
42
43
44
45
46
47
48
49
50
51
52
53
54
55
56
57
58
59
60
61
62
63
64
65
66
67
68
69
70
71
72
73
74
75
76
77
78
79
80
81
82
83
84
85
86
87
88
89
90
91
92
93
94
95
96
97
98
99
100
101
102
103
104
105
106
107
108
109
110
111
112
113
114
115
116
117
118
119
120
121
122
123
124
125
126
127
128
129
130
131
132
133
134
135
136
137
138
139
140
141
142
143
144
145
146
147
148
149
150
151
152
153
154
155
156
157
158
159
final boolean startProcessLocked(ProcessRecord app, HostingRecord hostingRecord,
int zygotePolicyFlags, String abiOverride) {
return startProcessLocked(app, hostingRecord, zygotePolicyFlags,
false /* disableHiddenApiChecks */, false /* disableTestApiChecks */,
false /* mountExtStorageFull */, abiOverride);
}

boolean startProcessLocked(ProcessRecord app, HostingRecord hostingRecord,
int zygotePolicyFlags, boolean disableHiddenApiChecks, boolean disableTestApiChecks,
boolean mountExtStorageFull, String abiOverride) {
//进程正在启动中
if (app.pendingStart) {
return true;
}
//从刚才方法中的判断来看,应该不会进入这个case
if (app.pid > 0 && app.pid != ActivityManagerService.MY_PID) {
//将ProcessRecord的pid从PidMap中移除
mService.removePidLocked(app);
app.bindMountPending = false;
//将ProcessRecord的pid重置为0
app.setPid(0);
app.startSeq = 0;
}

//将ProcessRecord从启动等待队列中移除
mService.mProcessesOnHold.remove(app);

mService.updateCpuStats();

try {
try {
//检测当前用户是否可以启动这个App
final int userId = UserHandle.getUserId(app.uid);
AppGlobals.getPackageManager().checkPackageStartable(app.info.packageName, userId);
} catch (RemoteException e) {
throw e.rethrowAsRuntimeException();
}

int uid = app.uid;
int[] gids = null;
//默认不挂载外置存储
int mountExternal = Zygote.MOUNT_EXTERNAL_NONE;
if (!app.isolated) {
int[] permGids = null;
try {
final IPackageManager pm = AppGlobals.getPackageManager();
//获取GIDS(App申请的权限)
permGids = pm.getPackageGids(app.info.packageName,
MATCH_DIRECT_BOOT_AUTO, app.userId);
if (StorageManager.hasIsolatedStorage() && mountExtStorageFull) {
//挂载外置存储,允许读写
mountExternal = Zygote.MOUNT_EXTERNAL_FULL;
} else {
StorageManagerInternal storageManagerInternal = LocalServices.getService(
StorageManagerInternal.class);
//获取App对外置存储的读写权限
mountExternal = storageManagerInternal.getExternalStorageMountMode(uid,
app.info.packageName);
}
} catch (RemoteException e) {
throw e.rethrowAsRuntimeException();
}

// Remove any gids needed if the process has been denied permissions.
// NOTE: eventually we should probably have the package manager pre-compute
// this for us?
//从刚刚过去的App申请权限中剔除进程所被拒绝的权限
if (app.processInfo != null && app.processInfo.deniedPermissions != null) {
for (int i = app.processInfo.deniedPermissions.size() - 1; i >= 0; i--) {
int[] denyGids = mService.mPackageManagerInt.getPermissionGids(
app.processInfo.deniedPermissions.valueAt(i), app.userId);
if (denyGids != null) {
for (int gid : denyGids) {
permGids = ArrayUtils.removeInt(permGids, gid);
}
}
}
}

//计算得出进程所应拥有的所有权限
gids = computeGidsForProcess(mountExternal, uid, permGids);
}
//设置挂载模式
app.mountMode = mountExternal;
//工厂测试进程
if (mService.mAtmInternal.isFactoryTestProcess(app.getWindowProcessController())) {
uid = 0;
}
//进程启动参数(传递到Zygoto)
int runtimeFlags = 0;
//如果manifest中设置了android:debuggable
if ((app.info.flags & ApplicationInfo.FLAG_DEBUGGABLE) != 0) {
runtimeFlags |= Zygote.DEBUG_ENABLE_JDWP;
runtimeFlags |= Zygote.DEBUG_JAVA_DEBUGGABLE;
// Also turn on CheckJNI for debuggable apps. It's quite
// awkward to turn on otherwise.
runtimeFlags |= Zygote.DEBUG_ENABLE_CHECKJNI;

// Check if the developer does not want ART verification
if (android.provider.Settings.Global.getInt(mService.mContext.getContentResolver(),
android.provider.Settings.Global.ART_VERIFIER_VERIFY_DEBUGGABLE, 1) == 0) {
runtimeFlags |= Zygote.DISABLE_VERIFIER;
Slog.w(TAG_PROCESSES, app + ": ART verification disabled");
}
}
... //设置各种高进程启动参数

String invokeWith = null;
//如果manifest中设置了android:debuggable
//使用logwrapper工具捕获stdout信息
if ((app.info.flags & ApplicationInfo.FLAG_DEBUGGABLE) != 0) {
// Debuggable apps may include a wrapper script with their library directory.
String wrapperFileName = app.info.nativeLibraryDir + "/wrap.sh";
StrictMode.ThreadPolicy oldPolicy = StrictMode.allowThreadDiskReads();
try {
if (new File(wrapperFileName).exists()) {
invokeWith = "/system/bin/logwrapper " + wrapperFileName;
}
} finally {
StrictMode.setThreadPolicy(oldPolicy);
}
}

//确定App进程使用的abi(有so库的App会通过so库的架构决定,没有so库的使用系统最优先支持的abi)
String requiredAbi = (abiOverride != null) ? abiOverride : app.info.primaryCpuAbi;
if (requiredAbi == null) {
requiredAbi = Build.SUPPORTED_ABIS[0];
}

//将abi转成InstructionSet
String instructionSet = null;
if (app.info.primaryCpuAbi != null) {
instructionSet = VMRuntime.getInstructionSet(app.info.primaryCpuAbi);
}

app.gids = gids;
app.setRequiredAbi(requiredAbi);
app.instructionSet = instructionSet;

...

final String seInfo = app.info.seInfo
+ (TextUtils.isEmpty(app.info.seInfoUser) ? "" : app.info.seInfoUser);
// Start the process. It will either succeed and return a result containing
// the PID of the new process, or else throw a RuntimeException.
//重要:设置进程启动入口
final String entryPoint = "android.app.ActivityThread";

//启动进程
return startProcessLocked(hostingRecord, entryPoint, app, uid, gids,
runtimeFlags, zygotePolicyFlags, mountExternal, seInfo, requiredAbi,
instructionSet, invokeWith, startTime);
} catch (RuntimeException e) {
...
mService.forceStopPackageLocked(app.info.packageName, UserHandle.getAppId(app.uid),
false, false, true, false, false, app.userId, "start failure");
return false;
}
}

到这一步位置仍然是在进行准备工作,主要做了以下几件事:

  1. 权限处理:App安装时会检测manifest里申请的权限,并由此生成出一个GIDS数组
  2. 设置挂载模式
  3. 设置进程的各种启动参数
  4. 设置App进程使用的abi
  5. 设置进程启动入口
  6. 继续调用重载方法启动进程
1
2
3
4
5
6
7
8
9
10
11
12
13
14
15
16
17
18
19
20
21
22
23
24
25
26
27
28
29
30
31
32
33
34
35
36
37
38
39
40
41
42
43
44
45
boolean startProcessLocked(HostingRecord hostingRecord, String entryPoint, ProcessRecord app,
int uid, int[] gids, int runtimeFlags, int zygotePolicyFlags, int mountExternal,
String seInfo, String requiredAbi, String instructionSet, String invokeWith,
long startTime) {
//初始化一些参数
//标识App进程正在启动
app.pendingStart = true;
app.killedByAm = false;
app.removed = false;
app.killed = false;
app.mDisabledCompatChanges = null;
if (mPlatformCompat != null) {
app.mDisabledCompatChanges = mPlatformCompat.getDisabledChanges(app.info);
}
final long startSeq = app.startSeq = ++mProcStartSeqCounter;
app.setStartParams(uid, hostingRecord, seInfo, startTime);
app.setUsingWrapper(invokeWith != null
|| Zygote.getWrapProperty(app.processName) != null);
//将ProcessRecord添加到待启动列表中
mPendingStarts.put(startSeq, app);

if (mService.mConstants.FLAG_PROCESS_START_ASYNC) { //异步启动进程
if (DEBUG_PROCESSES) Slog.i(TAG_PROCESSES,
"Posting procStart msg for " + app.toShortString());
mService.mProcStartHandler.post(() -> handleProcessStart(
app, entryPoint, gids, runtimeFlags, zygotePolicyFlags, mountExternal,
requiredAbi, instructionSet, invokeWith, startSeq));
return true;
} else { //同步启动进程
try {
final Process.ProcessStartResult startResult = startProcess(hostingRecord,
entryPoint, app,
uid, gids, runtimeFlags, zygotePolicyFlags, mountExternal, seInfo,
requiredAbi, instructionSet, invokeWith, startTime);
handleProcessStartedLocked(app, startResult.pid, startResult.usingWrapper,
startSeq, false);
} catch (RuntimeException e) {
//出错,将pendingStart标志复位并强行停止进程
app.pendingStart = false;
mService.forceStopPackageLocked(app.info.packageName, UserHandle.getAppId(app.uid),
false, false, true, false, false, app.userId, "start failure");
}
return app.pid > 0;
}
}

在异步模式下,程序会等待ProcessRecord.mPrecedence进程结束才会启动进程(这里对应着最开始的startProcessLocked方法中,已经存在了对应App的ProcessRecord,并且分配了pid,但是进程被标记为死亡这种情况)

最终都会进入到startProcesshandleProcessStartedLocked方法中来

startProcess

1
2
3
4
5
6
7
8
9
10
11
12
13
14
15
16
17
18
19
20
21
22
23
24
25
26
27
28
29
30
31
32
33
34
35
36
37
38
39
40
41
42
43
44
45
46
47
48
49
50
51
52
53
54
55
56
57
58
59
60
61
62
63
64
65
66
67
68
69
70
71
72
73
74
75
76
77
78
79
80
81
82
83
84
85
86
87
88
89
90
91
92
93
94
95
96
97
98
99
100
101
102
103
104
105
106
private Process.ProcessStartResult startProcess(HostingRecord hostingRecord, String entryPoint,
ProcessRecord app, int uid, int[] gids, int runtimeFlags, int zygotePolicyFlags,
int mountExternal, String seInfo, String requiredAbi, String instructionSet,
String invokeWith, long startTime) {
try {
final boolean isTopApp = hostingRecord.isTopApp();
if (isTopApp) {
// Use has-foreground-activities as a temporary hint so the current scheduling
// group won't be lost when the process is attaching. The actual state will be
// refreshed when computing oom-adj.
app.setHasForegroundActivities(true);
}

//处理应用目录隔离机制
Map<String, Pair<String, Long>> pkgDataInfoMap;
Map<String, Pair<String, Long>> whitelistedAppDataInfoMap;
boolean bindMountAppStorageDirs = false;
boolean bindMountAppsData = mAppDataIsolationEnabled
&& (UserHandle.isApp(app.uid) || UserHandle.isIsolated(app.uid))
&& mPlatformCompat.isChangeEnabled(APP_DATA_DIRECTORY_ISOLATION, app.info);

// Get all packages belongs to the same shared uid. sharedPackages is empty array
// if it doesn't have shared uid.
final PackageManagerInternal pmInt = mService.getPackageManagerInternalLocked();
final String[] sharedPackages = pmInt.getSharedUserPackagesForPackage(
app.info.packageName, app.userId);
final String[] targetPackagesList = sharedPackages.length == 0
? new String[]{app.info.packageName} : sharedPackages;

pkgDataInfoMap = getPackageAppDataInfoMap(pmInt, targetPackagesList, uid);
if (pkgDataInfoMap == null) {
// TODO(b/152760674): Handle inode == 0 case properly, now we just give it a
// tmp free pass.
bindMountAppsData = false;
}

// Remove all packages in pkgDataInfoMap from mAppDataIsolationWhitelistedApps, so
// it won't be mounted twice.
final Set<String> whitelistedApps = new ArraySet<>(mAppDataIsolationWhitelistedApps);
for (String pkg : targetPackagesList) {
whitelistedApps.remove(pkg);
}

whitelistedAppDataInfoMap = getPackageAppDataInfoMap(pmInt,
whitelistedApps.toArray(new String[0]), uid);
if (whitelistedAppDataInfoMap == null) {
// TODO(b/152760674): Handle inode == 0 case properly, now we just give it a
// tmp free pass.
bindMountAppsData = false;
}

int userId = UserHandle.getUserId(uid);
StorageManagerInternal storageManagerInternal = LocalServices.getService(
StorageManagerInternal.class);
if (needsStorageDataIsolation(storageManagerInternal, app)) {
bindMountAppStorageDirs = true;
if (pkgDataInfoMap == null ||
!storageManagerInternal.prepareStorageDirs(userId, pkgDataInfoMap.keySet(),
app.processName)) {
// Cannot prepare Android/app and Android/obb directory or inode == 0,
// so we won't mount it in zygote, but resume the mount after unlocking device.
app.bindMountPending = true;
bindMountAppStorageDirs = false;
}
}

// If it's an isolated process, it should not even mount its own app data directories,
// since it has no access to them anyway.
if (app.isolated) {
pkgDataInfoMap = null;
whitelistedAppDataInfoMap = null;
}

final Process.ProcessStartResult startResult;
if (hostingRecord.usesWebviewZygote()) {
startResult = startWebView(entryPoint,
app.processName, uid, uid, gids, runtimeFlags, mountExternal,
app.info.targetSdkVersion, seInfo, requiredAbi, instructionSet,
app.info.dataDir, null, app.info.packageName, app.mDisabledCompatChanges,
new String[]{PROC_START_SEQ_IDENT + app.startSeq});
} else if (hostingRecord.usesAppZygote()) {
final AppZygote appZygote = createAppZygoteForProcessIfNeeded(app);

// We can't isolate app data and storage data as parent zygote already did that.
startResult = appZygote.getProcess().start(entryPoint,
app.processName, uid, uid, gids, runtimeFlags, mountExternal,
app.info.targetSdkVersion, seInfo, requiredAbi, instructionSet,
app.info.dataDir, null, app.info.packageName,
/*zygotePolicyFlags=*/ ZYGOTE_POLICY_FLAG_EMPTY, isTopApp,
app.mDisabledCompatChanges, pkgDataInfoMap, whitelistedAppDataInfoMap,
false, false,
new String[]{PROC_START_SEQ_IDENT + app.startSeq});
} else { //没有特别指定hostingZygote时,进入此case
startResult = Process.start(entryPoint,
app.processName, uid, uid, gids, runtimeFlags, mountExternal,
app.info.targetSdkVersion, seInfo, requiredAbi, instructionSet,
app.info.dataDir, invokeWith, app.info.packageName, zygotePolicyFlags,
isTopApp, app.mDisabledCompatChanges, pkgDataInfoMap,
whitelistedAppDataInfoMap, bindMountAppsData, bindMountAppStorageDirs,
new String[]{PROC_START_SEQ_IDENT + app.startSeq});
}
return startResult;
} finally {
Trace.traceEnd(Trace.TRACE_TAG_ACTIVITY_MANAGER);
}
}

Android 11开始引入了应用目录隔离机制,使得应用仅可以发现和访问自己的储存目录,不可以访问其他应用的储存目录

这里处理完应用目录隔离机制后,调用了Process.start方法启动进程,最终走到ZygoteProcess.startViaZygote方法

向zygoto发送socket请求

1
2
3
4
5
6
7
8
9
10
11
12
13
14
15
16
17
18
19
20
21
22
23
24
25
26
27
28
29
30
31
32
33
34
35
36
37
38
39
40
41
42
43
44
45
46
47
48
49
50
51
52
53
54
55
56
57
58
59
60
61
62
63
64
65
66
67
68
69
70
71
72
73
74
75
76
77
78
79
80
81
82
83
84
85
86
87
88
89
90
91
92
93
94
95
96
97
98
99
100
101
102
103
104
105
106
107
108
109
110
111
112
113
114
115
116
117
118
119
120
121
122
123
124
125
126
127
128
129
130
131
132
133
134
135
136
137
138
139
140
141
142
143
144
145
146
147
148
149
150
151
152
153
154
155
156
157
158
159
160
161
162
163
164
165
166
private Process.ProcessStartResult startViaZygote(@NonNull final String processClass,
@Nullable final String niceName,
final int uid, final int gid,
@Nullable final int[] gids,
int runtimeFlags, int mountExternal,
int targetSdkVersion,
@Nullable String seInfo,
@NonNull String abi,
@Nullable String instructionSet,
@Nullable String appDataDir,
@Nullable String invokeWith,
boolean startChildZygote,
@Nullable String packageName,
int zygotePolicyFlags,
boolean isTopApp,
@Nullable long[] disabledCompatChanges,
@Nullable Map<String, Pair<String, Long>>
pkgDataInfoMap,
@Nullable Map<String, Pair<String, Long>>
allowlistedDataInfoList,
boolean bindMountAppsData,
boolean bindMountAppStorageDirs,
@Nullable String[] extraArgs)
throws ZygoteStartFailedEx {
ArrayList<String> argsForZygote = new ArrayList<>();

// --runtime-args, --setuid=, --setgid=,
// and --setgroups= must go first
argsForZygote.add("--runtime-args");
argsForZygote.add("--setuid=" + uid);
argsForZygote.add("--setgid=" + gid);
argsForZygote.add("--runtime-flags=" + runtimeFlags);
if (mountExternal == Zygote.MOUNT_EXTERNAL_DEFAULT) {
argsForZygote.add("--mount-external-default");
} else if (mountExternal == Zygote.MOUNT_EXTERNAL_INSTALLER) {
argsForZygote.add("--mount-external-installer");
} else if (mountExternal == Zygote.MOUNT_EXTERNAL_PASS_THROUGH) {
argsForZygote.add("--mount-external-pass-through");
} else if (mountExternal == Zygote.MOUNT_EXTERNAL_ANDROID_WRITABLE) {
argsForZygote.add("--mount-external-android-writable");
}

argsForZygote.add("--target-sdk-version=" + targetSdkVersion);

// --setgroups is a comma-separated list
if (gids != null && gids.length > 0) {
final StringBuilder sb = new StringBuilder();
sb.append("--setgroups=");

final int sz = gids.length;
for (int i = 0; i < sz; i++) {
if (i != 0) {
sb.append(',');
}
sb.append(gids[i]);
}

argsForZygote.add(sb.toString());
}

if (niceName != null) {
argsForZygote.add("--nice-name=" + niceName);
}

if (seInfo != null) {
argsForZygote.add("--seinfo=" + seInfo);
}

if (instructionSet != null) {
argsForZygote.add("--instruction-set=" + instructionSet);
}

if (appDataDir != null) {
argsForZygote.add("--app-data-dir=" + appDataDir);
}

if (invokeWith != null) {
argsForZygote.add("--invoke-with");
argsForZygote.add(invokeWith);
}

if (startChildZygote) {
argsForZygote.add("--start-child-zygote");
}

if (packageName != null) {
argsForZygote.add("--package-name=" + packageName);
}

if (isTopApp) {
argsForZygote.add(Zygote.START_AS_TOP_APP_ARG);
}
if (pkgDataInfoMap != null && pkgDataInfoMap.size() > 0) {
StringBuilder sb = new StringBuilder();
sb.append(Zygote.PKG_DATA_INFO_MAP);
sb.append("=");
boolean started = false;
for (Map.Entry<String, Pair<String, Long>> entry : pkgDataInfoMap.entrySet()) {
if (started) {
sb.append(',');
}
started = true;
sb.append(entry.getKey());
sb.append(',');
sb.append(entry.getValue().first);
sb.append(',');
sb.append(entry.getValue().second);
}
argsForZygote.add(sb.toString());
}
if (allowlistedDataInfoList != null && allowlistedDataInfoList.size() > 0) {
StringBuilder sb = new StringBuilder();
sb.append(Zygote.ALLOWLISTED_DATA_INFO_MAP);
sb.append("=");
boolean started = false;
for (Map.Entry<String, Pair<String, Long>> entry : allowlistedDataInfoList.entrySet()) {
if (started) {
sb.append(',');
}
started = true;
sb.append(entry.getKey());
sb.append(',');
sb.append(entry.getValue().first);
sb.append(',');
sb.append(entry.getValue().second);
}
argsForZygote.add(sb.toString());
}

if (bindMountAppStorageDirs) {
argsForZygote.add(Zygote.BIND_MOUNT_APP_STORAGE_DIRS);
}

if (bindMountAppsData) {
argsForZygote.add(Zygote.BIND_MOUNT_APP_DATA_DIRS);
}

if (disabledCompatChanges != null && disabledCompatChanges.length > 0) {
StringBuilder sb = new StringBuilder();
sb.append("--disabled-compat-changes=");

int sz = disabledCompatChanges.length;
for (int i = 0; i < sz; i++) {
if (i != 0) {
sb.append(',');
}
sb.append(disabledCompatChanges[i]);
}

argsForZygote.add(sb.toString());
}

argsForZygote.add(processClass);

if (extraArgs != null) {
Collections.addAll(argsForZygote, extraArgs);
}

synchronized(mLock) {
// The USAP pool can not be used if the application will not use the systems graphics
// driver. If that driver is requested use the Zygote application start path.
return zygoteSendArgsAndGetResult(openZygoteSocketIfNeeded(abi),
zygotePolicyFlags,
argsForZygote);
}
}

这个方法的功能就很简单了,就是将各种参数拼装起来,然后调用zygoteSendArgsAndGetResult方法

我们先看openZygoteSocketIfNeeded这个方法,它返回了一个ZygoteState对象,这个类是对与ZygoteServerSocket建立连接后的封装

1
2
3
4
5
6
7
8
9
10
11
12
13
14
15
16
17
18
19
20
21
22
23
24
25
26
private ZygoteState openZygoteSocketIfNeeded(String abi) throws ZygoteStartFailedEx {
try {
//尝试连接主ZygoteServerSocket
attemptConnectionToPrimaryZygote();

//主zygote进程支持此abi
if (primaryZygoteState.matches(abi)) {
return primaryZygoteState;
}

if (mZygoteSecondarySocketAddress != null) {
// The primary zygote didn't match. Try the secondary.
//尝试连接辅ZygoteServerSocket
attemptConnectionToSecondaryZygote();

//辅zygote进程支持此abi
if (secondaryZygoteState.matches(abi)) {
return secondaryZygoteState;
}
}
} catch (IOException ioe) {
throw new ZygoteStartFailedEx("Error connecting to zygote", ioe);
}

throw new ZygoteStartFailedEx("Unsupported zygote ABI: " + abi);
}

attemptConnectionToxxxZygote方法使用LocalSocket进行连接,并返回一个ZygoteState封装对象

我们之前在 Android源码分析 - Zygote进程 中说过,一般,64位的cpu会启动两个zygoto进程,一个64位(主zygote),一个32位(辅zygote

zygote

接下来我们看zygoteSendArgsAndGetResult方法

1
2
3
4
5
6
7
8
9
10
11
12
13
14
15
16
17
18
19
20
21
22
23
24
25
26
27
28
29
30
31
32
33
private Process.ProcessStartResult zygoteSendArgsAndGetResult(
ZygoteState zygoteState, int zygotePolicyFlags, @NonNull ArrayList<String> args)
throws ZygoteStartFailedEx {

...

/*
* See com.android.internal.os.ZygoteArguments.parseArgs()
* Presently the wire format to the zygote process is:
* a) a count of arguments (argc, in essence)
* b) a number of newline-separated argument strings equal to count
*
* After the zygote process reads these it will write the pid of
* the child or -1 on failure, followed by boolean to
* indicate whether a wrapper process was used.
*/
//构建出符合zygote解析规则的参数(argc + argv)
String msgStr = args.size() + "\n" + String.join("\n", args) + "\n";

//USAP机制
if (shouldAttemptUsapLaunch(zygotePolicyFlags, args)) {
try {
return attemptUsapSendArgsAndGetResult(zygoteState, msgStr);
} catch (IOException ex) {
// If there was an IOException using the USAP pool we will log the error and
// attempt to start the process through the Zygote.
Log.e(LOG_TAG, "IO Exception while communicating with USAP pool - "
+ ex.getMessage());
}
}

return attemptZygoteSendArgsAndGetResult(zygoteState, msgStr);
}

USAP机制我们先跳过,这个方法就做了一件事:拼装参数,然后调用attemptZygoteSendArgsAndGetResult方法

1
2
3
4
5
6
7
8
9
10
11
12
13
14
15
16
17
18
19
20
21
22
23
24
25
26
27
28
private Process.ProcessStartResult attemptZygoteSendArgsAndGetResult(
ZygoteState zygoteState, String msgStr) throws ZygoteStartFailedEx {
try {
final BufferedWriter zygoteWriter = zygoteState.mZygoteOutputWriter;
final DataInputStream zygoteInputStream = zygoteState.mZygoteInputStream;

zygoteWriter.write(msgStr);
zygoteWriter.flush();

// Always read the entire result from the input stream to avoid leaving
// bytes in the stream for future process starts to accidentally stumble
// upon.
Process.ProcessStartResult result = new Process.ProcessStartResult();
result.pid = zygoteInputStream.readInt();
result.usingWrapper = zygoteInputStream.readBoolean();

if (result.pid < 0) {
throw new ZygoteStartFailedEx("fork() failed");
}

return result;
} catch (IOException ex) {
zygoteState.close();
Log.e(LOG_TAG, "IO Exception while communicating with Zygote - "
+ ex.toString());
throw new ZygoteStartFailedEx(ex);
}
}

这个方法很明显就能看出来,这是一次socket通信发送 -> 接收

具体zygote进程接收到socket后做了什么可以回顾我之前写的文章 Android源码分析 - Zygote进程

handleProcessStartedLocked

zygote发送完socket请求后,zygote开始forkApp进程,fork完后会将App进程的pidusingWrapper信息再通过socket传回system_server,此时程序会继续执行handleProcessStartedLocked方法

1
2
3
4
5
6
7
8
9
10
11
12
13
14
15
16
17
18
19
20
21
22
23
24
25
26
27
28
29
30
31
32
33
34
35
36
37
38
39
40
41
42
43
44
45
46
47
48
49
50
boolean handleProcessStartedLocked(ProcessRecord app, int pid, boolean usingWrapper,
long expectedStartSeq, boolean procAttached) {
//从待启动列表中移除此ProcessRecord
mPendingStarts.remove(expectedStartSeq);
final String reason = isProcStartValidLocked(app, expectedStartSeq);
//未通过进程启动验证,杀死进程
if (reason != null) {
app.pendingStart = false;
killProcessQuiet(pid);
Process.killProcessGroup(app.uid, app.pid);
noteAppKill(app, ApplicationExitInfo.REASON_OTHER,
ApplicationExitInfo.SUBREASON_INVALID_START, reason);
return false;
}

... //记录进程启动

//通知看门狗有进程启动
Watchdog.getInstance().processStarted(app.processName, pid);

... //记录进程启动

//设置ProcessRecord
app.setPid(pid);
app.setUsingWrapper(usingWrapper);
app.pendingStart = false;
//从PidMap中获取未清理的ProcessRecord
ProcessRecord oldApp;
synchronized (mService.mPidsSelfLocked) {
oldApp = mService.mPidsSelfLocked.get(pid);
}
// If there is already an app occupying that pid that hasn't been cleaned up
//清理ProcessRecord
if (oldApp != null && !app.isolated) {
mService.cleanUpApplicationRecordLocked(oldApp, false, false, -1,
true /*replacingPid*/);
}
//将ProcessRecord添加到PidMap中
mService.addPidLocked(app);
synchronized (mService.mPidsSelfLocked) {
//attach超时检测
if (!procAttached) {
Message msg = mService.mHandler.obtainMessage(PROC_START_TIMEOUT_MSG);
msg.obj = app;
mService.mHandler.sendMessageDelayed(msg, usingWrapper
? PROC_START_TIMEOUT_WITH_WRAPPER : PROC_START_TIMEOUT);
}
}
return true;
}

这个方法将从zygote fork后得到的信息设置到ProcessRecord中,然后将此ProcessRecord添加到PidMap中(AMS.mPidsSelfLocked),后续当attachApplication时会用到它

ActivityThread

zygote进程将App进程fork出来后,便通过反射调用我们之前设置的entryPoint类的main方法,即android.app.ActivityThread.main(String[] args)方法

1
2
3
4
5
6
7
8
9
10
11
12
13
14
15
16
17
18
19
20
21
22
23
24
25
26
27
28
29
30
31
32
33
34
35
36
37
38
39
40
41
42
43
44
45
46
47
48
49
50
51
52
53
54
55
public static void main(String[] args) {
// Install selective syscall interception
//设置拦截器,拦截部分系统调用自行处理
AndroidOs.install();

// CloseGuard defaults to true and can be quite spammy. We
// disable it here, but selectively enable it later (via
// StrictMode) on debug builds, but using DropBox, not logs.
//资源关闭检测器
CloseGuard.setEnabled(false);

//初始化用户环境
Environment.initForCurrentUser();

// Make sure TrustedCertificateStore looks in the right place for CA certificates
//设置CA证书搜索位置
final File configDir = Environment.getUserConfigDirectory(UserHandle.myUserId());
TrustedCertificateStore.setDefaultUserDirectory(configDir);

// Call per-process mainline module initialization.
//初始化主模块各个注册服务
initializeMainlineModules();

//预设进程名
Process.setArgV0("<pre-initialized>");

//准备Looper
Looper.prepareMainLooper();

// Find the value for {@link #PROC_START_SEQ_IDENT} if provided on the command line.
// It will be in the format "seq=114"
//查找startSeq参数
long startSeq = 0;
if (args != null) {
for (int i = args.length - 1; i >= 0; --i) {
if (args[i] != null && args[i].startsWith(PROC_START_SEQ_IDENT)) {
startSeq = Long.parseLong(
args[i].substring(PROC_START_SEQ_IDENT.length()));
}
}
}
//创建App进程ActivityThread实例
ActivityThread thread = new ActivityThread();
thread.attach(false, startSeq);

//设置全局Handler
if (sMainThreadHandler == null) {
sMainThreadHandler = thread.getHandler();
}

//Looper循环处理消息
Looper.loop();

throw new RuntimeException("Main thread loop unexpectedly exited");
}

main方法中主要做了两件事,一是启动Looper,循环处理消息,保证进程不会退出,二是实例化ActivityThread并执行attach方法

1
2
3
4
5
6
7
8
9
10
11
12
13
14
15
16
17
18
19
20
21
22
23
24
25
26
27
28
29
30
31
32
33
34
35
36
37
38
39
40
41
42
43
44
45
46
47
48
49
50
51
52
53
54
55
56
57
58
59
60
61
62
63
64
65
66
67
private void attach(boolean system, long startSeq) {
sCurrentActivityThread = this;
mConfigurationController = new ConfigurationController(this);
mSystemThread = system;
if (!system) { //非系统ActivityThread
//预设进程名
android.ddm.DdmHandleAppName.setAppName("<pre-initialized>",
UserHandle.myUserId());
//处理一些错误异常需要使用ActivityThread,将其传入
RuntimeInit.setApplicationObject(mAppThread.asBinder());
//AMS代理binder对象
final IActivityManager mgr = ActivityManager.getService();
try {
//执行AMS.attachApplication方法
mgr.attachApplication(mAppThread, startSeq);
} catch (RemoteException ex) {
throw ex.rethrowFromSystemServer();
}
// Watch for getting close to heap limit.
//每次GC时检测内存,如果内存不足则会尝试释放部分不可见的Activity
BinderInternal.addGcWatcher(new Runnable() {
@Override public void run() {
if (!mSomeActivitiesChanged) {
return;
}
Runtime runtime = Runtime.getRuntime();
long dalvikMax = runtime.maxMemory();
long dalvikUsed = runtime.totalMemory() - runtime.freeMemory();
if (dalvikUsed > ((3*dalvikMax)/4)) {
if (DEBUG_MEMORY_TRIM) Slog.d(TAG, "Dalvik max=" + (dalvikMax/1024)
+ " total=" + (runtime.totalMemory()/1024)
+ " used=" + (dalvikUsed/1024));
mSomeActivitiesChanged = false;
try {
ActivityTaskManager.getService().releaseSomeActivities(mAppThread);
} catch (RemoteException e) {
throw e.rethrowFromSystemServer();
}
}
}
});
} else { //系统ActivityThread
...
}

//处理ConfigChanged相关逻辑(屏幕旋转之类)
ViewRootImpl.ConfigChangedCallback configChangedCallback = (Configuration globalConfig) -> {
synchronized (mResourcesManager) {
// We need to apply this change to the resources immediately, because upon returning
// the view hierarchy will be informed about it.
if (mResourcesManager.applyConfigurationToResources(globalConfig,
null /* compat */)) {
mConfigurationController.updateLocaleListFromAppContext(
mInitialApplication.getApplicationContext());

// This actually changed the resources! Tell everyone about it.
final Configuration updatedConfig =
mConfigurationController.updatePendingConfiguration(globalConfig);
if (updatedConfig != null) {
sendMessage(H.CONFIGURATION_CHANGED, globalConfig);
mPendingConfiguration = updatedConfig;
}
}
}
};
ViewRootImpl.addConfigCallback(configChangedCallback);
}

attach方法最重要的一步又是调用了AMSattachApplication方法

AMS.attachApplication

1
2
3
4
5
6
7
8
9
10
11
12
13
14
15
16
17
18
19
20
21
22
23
24
25
26
27
28
29
30
31
32
33
34
35
36
37
38
39
40
41
42
43
44
45
46
47
48
49
50
51
52
53
54
55
56
57
58
59
60
61
62
63
64
65
66
67
68
69
70
71
72
73
74
75
76
77
78
79
80
81
82
83
84
85
86
87
88
89
90
91
92
93
94
95
96
97
98
99
100
101
102
103
104
105
106
107
108
109
110
111
112
113
114
115
116
117
118
119
120
121
122
123
124
125
126
127
128
129
130
131
132
133
134
135
136
137
138
139
140
141
142
143
144
145
146
147
148
149
150
151
152
153
154
155
156
157
158
159
160
161
162
163
164
165
166
167
168
169
170
171
172
173
174
175
176
177
178
179
180
181
182
183
184
185
186
187
188
189
190
191
192
193
194
195
196
197
198
199
200
201
202
203
204
205
206
207
208
209
210
211
212
213
214
215
216
217
218
219
220
221
222
223
224
225
226
227
228
229
230
231
232
233
234
235
236
237
238
239
240
241
242
243
244
245
246
247
248
249
250
251
252
253
254
255
256
257
258
259
260
261
262
263
264
265
266
267
268
269
270
271
272
273
274
275
276
277
278
279
280
281
282
283
284
285
286
287
288
289
public final void attachApplication(IApplicationThread thread, long startSeq) {
if (thread == null) {
throw new SecurityException("Invalid application interface");
}
synchronized (this) {
int callingPid = Binder.getCallingPid();
final int callingUid = Binder.getCallingUid();
final long origId = Binder.clearCallingIdentity();
attachApplicationLocked(thread, callingPid, callingUid, startSeq);
Binder.restoreCallingIdentity(origId);
}
}

private boolean attachApplicationLocked(@NonNull IApplicationThread thread,
int pid, int callingUid, long startSeq) {

// Find the application record that is being attached... either via
// the pid if we are running in multiple processes, or just pull the
// next app record if we are emulating process with anonymous threads.
ProcessRecord app;
long startTime = SystemClock.uptimeMillis();
long bindApplicationTimeMillis;
if (pid != MY_PID && pid >= 0) {
//通过pid查找PidMap中存在的ProcessRecord
//对应着handleProcessStartedLocked方法中执行的中的mService.addPidLocked方法
//在进程同步启动模式下,这里应该是必能取到的
synchronized (mPidsSelfLocked) {
app = mPidsSelfLocked.get(pid);
}
//如果此ProcessRecord对不上App的ProcessRecord,则将其清理掉
if (app != null && (app.startUid != callingUid || app.startSeq != startSeq)) {
...
// If there is already an app occupying that pid that hasn't been cleaned up
cleanUpApplicationRecordLocked(app, false, false, -1,
true /*replacingPid*/);
removePidLocked(app);
app = null;
}
} else {
app = null;
}

// It's possible that process called attachApplication before we got a chance to
// update the internal state.
//在进程异步启动模式下,有可能尚未执行到handleProcessStartedLocked方法
//所以从PidMap中无法取到相应的ProcessRecord
//这时候从ProcessList.mPendingStarts这个待启动列表中获取ProcessRecord
if (app == null && startSeq > 0) {
final ProcessRecord pending = mProcessList.mPendingStarts.get(startSeq);
if (pending != null && pending.startUid == callingUid && pending.startSeq == startSeq
&& mProcessList.handleProcessStartedLocked(pending, pid, pending
.isUsingWrapper(),
startSeq, true)) {
app = pending;
}
}

//没有找到相应的ProcessRecord,杀死进程
if (app == null) {
if (pid > 0 && pid != MY_PID) {
killProcessQuiet(pid);
} else {
try {
thread.scheduleExit();
} catch (Exception e) {
// Ignore exceptions.
}
}
return false;
}

// If this application record is still attached to a previous
// process, clean it up now.
//如果ProcessRecord绑定了其他的ApplicationThread,则需要清理这个进程
if (app.thread != null) {
handleAppDiedLocked(app, true, true);
}

final String processName = app.processName;
try {
//注册App进程死亡回调
AppDeathRecipient adr = new AppDeathRecipient(
app, pid, thread);
thread.asBinder().linkToDeath(adr, 0);
app.deathRecipient = adr;
} catch (RemoteException e) {
//如果出现异常则重启进程
app.resetPackageList(mProcessStats);
mProcessList.startProcessLocked(app,
new HostingRecord("link fail", processName),
ZYGOTE_POLICY_FLAG_EMPTY);
return false;
}

//初始化ProcessRecord各参数
app.curAdj = app.setAdj = app.verifiedAdj = ProcessList.INVALID_ADJ;
mOomAdjuster.setAttachingSchedGroupLocked(app);
app.forcingToImportant = null;
updateProcessForegroundLocked(app, false, 0, false);
app.hasShownUi = false;
app.setDebugging(false);
app.setCached(false);
app.killedByAm = false;
app.killed = false;


// We carefully use the same state that PackageManager uses for
// filtering, since we use this flag to decide if we need to install
// providers when user is unlocked later
app.unlocked = StorageManager.isUserKeyUnlocked(app.userId);

//移除之前在handleProcessStartedLocked中设置的attach超时检测
mHandler.removeMessages(PROC_START_TIMEOUT_MSG, app);

//普通App启动肯定在system_server准备完成后,所以此处为true
boolean normalMode = mProcessesReady || isAllowedWhileBooting(app.info);
List<ProviderInfo> providers = normalMode ? generateApplicationProvidersLocked(app) : null;
//设置ContentProvider启动超时检测
if (providers != null && checkAppInLaunchingProvidersLocked(app)) {
Message msg = mHandler.obtainMessage(CONTENT_PROVIDER_PUBLISH_TIMEOUT_MSG);
msg.obj = app;
mHandler.sendMessageDelayed(msg,
ContentResolver.CONTENT_PROVIDER_PUBLISH_TIMEOUT_MILLIS);
}

final BackupRecord backupTarget = mBackupTargets.get(app.userId);
try {
//对应着开发者模式里的 Select debug app 和 Wait for debugger
int testMode = ApplicationThreadConstants.DEBUG_OFF;
if (mDebugApp != null && mDebugApp.equals(processName)) {
testMode = mWaitForDebugger
? ApplicationThreadConstants.DEBUG_WAIT
: ApplicationThreadConstants.DEBUG_ON;
app.setDebugging(true);
if (mDebugTransient) {
mDebugApp = mOrigDebugApp;
mWaitForDebugger = mOrigWaitForDebugger;
}
}

boolean enableTrackAllocation = false;
if (mTrackAllocationApp != null && mTrackAllocationApp.equals(processName)) {
enableTrackAllocation = true;
mTrackAllocationApp = null;
}

// If the app is being launched for restore or full backup, set it up specially
boolean isRestrictedBackupMode = false;
... //备份相关

final ActiveInstrumentation instr;
... //自动化测试相关

ApplicationInfo appInfo = instr != null ? instr.mTargetInfo : app.info;
app.compat = compatibilityInfoForPackage(appInfo);

ProfilerInfo profilerInfo = null;
String preBindAgent = null;
... //性能分析相关

// We deprecated Build.SERIAL and it is not accessible to
// Instant Apps and target APIs higher than O MR1. Since access to the serial
// is now behind a permission we push down the value.
//序列号(Android 8.0后不可再通过Build.SERIAL获取序列号)
final String buildSerial = (!appInfo.isInstantApp()
&& appInfo.targetSdkVersion < Build.VERSION_CODES.P)
? sTheRealBuildSerial : Build.UNKNOWN;


... //自动化测试相关
... //性能分析相关

//debug模式
if ((app.info.flags & ApplicationInfo.FLAG_DEBUGGABLE) != 0) {
thread.attachStartupAgents(app.info.dataDir);
}

... //自动填充功能(账号密码等)
... //内容捕获相关(ContentCaptureManager)

//自动化测试
final ActiveInstrumentation instr2 = app.getActiveInstrumentation();
if (mPlatformCompat != null) {
mPlatformCompat.resetReporting(app.info);
}
final ProviderInfoList providerList = ProviderInfoList.fromList(providers);
//调用ApplicationThread.bindApplication方法
if (app.isolatedEntryPoint != null) {
// This is an isolated process which should just call an entry point instead of
// being bound to an application.
thread.runIsolatedEntryPoint(app.isolatedEntryPoint, app.isolatedEntryPointArgs);
} else if (instr2 != null) {
thread.bindApplication(processName, appInfo, providerList,
instr2.mClass,
profilerInfo, instr2.mArguments,
instr2.mWatcher,
instr2.mUiAutomationConnection, testMode,
mBinderTransactionTrackingEnabled, enableTrackAllocation,
isRestrictedBackupMode || !normalMode, app.isPersistent(),
new Configuration(app.getWindowProcessController().getConfiguration()),
app.compat, getCommonServicesLocked(app.isolated),
mCoreSettingsObserver.getCoreSettingsLocked(),
buildSerial, autofillOptions, contentCaptureOptions,
app.mDisabledCompatChanges);
} else {
thread.bindApplication(processName, appInfo, providerList, null, profilerInfo,
null, null, null, testMode,
mBinderTransactionTrackingEnabled, enableTrackAllocation,
isRestrictedBackupMode || !normalMode, app.isPersistent(),
new Configuration(app.getWindowProcessController().getConfiguration()),
app.compat, getCommonServicesLocked(app.isolated),
mCoreSettingsObserver.getCoreSettingsLocked(),
buildSerial, autofillOptions, contentCaptureOptions,
app.mDisabledCompatChanges);
}
...

// Make app active after binding application or client may be running requests (e.g
// starting activities) before it is ready.
//ProcessRecord保存ApplicationThread代理对象
app.makeActive(thread, mProcessStats);
//更新进程使用情况
mProcessList.updateLruProcessLocked(app, false, null);
app.lastRequestedGc = app.lastLowMemory = SystemClock.uptimeMillis();
} catch (Exception e) {
//出现错误,杀死进程
app.resetPackageList(mProcessStats);
app.unlinkDeathRecipient();
app.kill("error during bind", ApplicationExitInfo.REASON_INITIALIZATION_FAILURE, true);
handleAppDiedLocked(app, false, true);
return false;
}

// Remove this record from the list of starting applications.
//从persistent启动列表中移除此ProcessRecord
//persistent是manifest中application标签下的一个属性
//设置了此属性代表此App会跟随系统启动而启动
mPersistentStartingProcesses.remove(app);

boolean badApp = false;
boolean didSomething = false;

// See if the top visible activity is waiting to run in this process...
//检查是否有Activity等待启动
if (normalMode) {
try {
didSomething = mAtmInternal.attachApplication(app.getWindowProcessController());
} catch (Exception e) {
badApp = true;
}
}

// Find any services that should be running in this process...
//检查是否有Services等待启动
if (!badApp) {
try {
didSomething |= mServices.attachApplicationLocked(app, processName);
} catch (Exception e) {
badApp = true;
}
}

// Check if a next-broadcast receiver is in this process...
//检查是否有广播接收器需要启动
if (!badApp && isPendingBroadcastProcessLocked(pid)) {
try {
didSomething |= sendPendingBroadcastsLocked(app);
} catch (Exception e) {
// If the app died trying to launch the receiver we declare it 'bad'
badApp = true;
}
}

... //备份相关

//以上几步发生异常,杀死App进程
if (badApp) {
app.kill("error during init", ApplicationExitInfo.REASON_INITIALIZATION_FAILURE, true);
handleAppDiedLocked(app, false, true);
return false;
}

if (!didSomething) {
//更新进程OOM等级
updateOomAdjLocked(app, OomAdjuster.OOM_ADJ_REASON_PROCESS_BEGIN);
}

return true;
}

总结一下这个方法主要做了哪些事,首先获取ProcessRecord,然后对其做一些初始化设置,然后调用ApplicaionThread.bindApplication方法,最后分别检查处理ActivityServiceBroadcastReceiver的启动

获取ProcessRecord

我们看一下这个方法是怎么获取ProcessRecord的,我们先回顾一下之前在startProcessLocked方法的最后,会使用同步或异步的方式启动进程,最终两者都会调用startProcesshandleProcessStartedLocked方法

同步启动进程

我们回顾一下之前讲到的ActivityManagerInternal.startProcess方法,可以发现它内部使用了synchronized (ActivityManagerService.this)加锁,而AMS.attachApplication方法同样也使用了AMS实例对象加了锁,所以在同步启动进程的情况下,必然会先执行handleProcessStartedLocked方法,再执行attachApplication方法,根据之前所分析的,handleProcessStartedLocked方法会将ProcessRecord存到PidMap中,然后attachApplication方法又会从PidMap中去取,此时取出的ProcessRecord必然不为null

异步启动进程

在异步启动进程的情况下,是通过Handler将启动进程的工作插入到任务队列中,这个任务的执行是不在锁的作用域范围内的,在这个任务内没有对startProcess方法加锁,只对handleProcessStartedLocked方法加了锁,所以这里会有两种情况:

  • 先执行handleProcessStartedLocked方法,再执行attachApplication方法

    这种情况和同步启动进程的执行顺序是一样的,ProcessRecord获取方式也相同

  • 先执行attachApplication方法,再执行handleProcessStartedLocked方法

    这种情况下,PidMap中取不到相应的ProcessRecord,此时ProcessList.mPendingStarts中还没有将ProcessRecord移除,所以会从mPendingStarts这个启动列表中取出ProcessRecord,然后再调用handleProcessStartedLocked方法,等到attachApplication方法走完,锁释放后,在进入到外部的handleProcessStartedLocked重载方法,这个方法会先判断mPendingStarts中是否还存在对应的ProcessRecord,如果不存在,便会直接返回,保证handleProcessStartedLocked方法只执行一次

ApplicationThread.bindApplication

接着,我们继续看重点方法ApplicationThread.bindApplication

ApplicationThreadActivityThread的一个内部类

1
2
3
4
5
6
7
8
9
10
11
12
13
14
15
16
17
18
19
20
21
22
23
24
25
26
27
28
29
30
31
32
33
34
35
36
37
38
39
40
41
public final void bindApplication(String processName, ApplicationInfo appInfo,
ProviderInfoList providerList, ComponentName instrumentationName,
ProfilerInfo profilerInfo, Bundle instrumentationArgs,
IInstrumentationWatcher instrumentationWatcher,
IUiAutomationConnection instrumentationUiConnection, int debugMode,
boolean enableBinderTracking, boolean trackAllocation,
boolean isRestrictedBackupMode, boolean persistent, Configuration config,
CompatibilityInfo compatInfo, Map services, Bundle coreSettings,
String buildSerial, AutofillOptions autofillOptions,
ContentCaptureOptions contentCaptureOptions, long[] disabledCompatChanges) {
if (services != null) {
...
// Setup the service cache in the ServiceManager
//初始化通用系统服务缓存
ServiceManager.initServiceCache(services);
}

setCoreSettings(coreSettings);

AppBindData data = new AppBindData();
data.processName = processName;
data.appInfo = appInfo;
data.providers = providerList.getList();
data.instrumentationName = instrumentationName;
data.instrumentationArgs = instrumentationArgs;
data.instrumentationWatcher = instrumentationWatcher;
data.instrumentationUiAutomationConnection = instrumentationUiConnection;
data.debugMode = debugMode;
data.enableBinderTracking = enableBinderTracking;
data.trackAllocation = trackAllocation;
data.restrictedBackupMode = isRestrictedBackupMode;
data.persistent = persistent;
data.config = config;
data.compatInfo = compatInfo;
data.initProfilerInfo = profilerInfo;
data.buildSerial = buildSerial;
data.autofillOptions = autofillOptions;
data.contentCaptureOptions = contentCaptureOptions;
data.disabledCompatChanges = disabledCompatChanges;
sendMessage(H.BIND_APPLICATION, data);
}

这个方法很简单,只是将参数包装成一个AppBindData,然后通过Handler发送消息处理,根据消息的类型,最终会调用ActivityThread.handleBindApplication方法

1
2
3
4
5
6
7
8
9
10
11
12
13
14
15
16
17
18
19
20
21
22
23
24
25
26
27
28
29
30
31
32
33
34
35
36
37
38
39
40
41
42
43
44
45
46
47
48
49
50
51
52
53
54
55
56
57
58
59
60
61
62
63
64
65
66
67
68
69
70
71
72
73
74
75
76
77
78
79
80
81
82
83
84
85
86
87
88
89
90
91
92
93
94
95
96
97
98
99
100
101
102
103
104
105
106
107
108
109
110
111
112
113
114
115
116
117
118
119
120
121
122
123
124
125
126
127
128
129
130
131
132
133
134
135
136
137
138
139
140
141
142
143
144
145
146
147
148
149
150
151
152
153
154
155
156
157
158
159
160
161
162
163
164
165
166
167
168
169
170
171
172
173
174
175
176
177
178
179
180
181
182
183
184
185
186
187
188
189
190
191
192
193
194
195
196
197
198
199
200
201
202
203
204
205
206
207
208
209
210
211
212
213
214
215
216
217
218
219
220
221
222
223
224
225
226
227
228
229
230
231
232
233
234
235
236
237
238
239
240
241
242
243
244
245
246
247
248
249
250
251
252
253
254
255
256
257
258
259
260
261
262
263
264
265
266
267
268
269
270
271
272
273
274
275
276
277
278
279
280
281
282
283
284
285
286
287
288
289
290
291
292
293
294
295
296
297
298
299
300
301
302
303
304
305
306
307
308
309
310
311
312
313
314
315
316
317
318
319
320
321
322
323
324
325
326
327
328
329
330
331
332
333
334
335
336
337
338
339
340
341
342
343
344
345
346
347
348
349
350
351
352
353
354
355
356
357
358
359
360
361
362
363
364
365
366
367
368
369
370
371
372
373
374
375
376
377
378
379
private void handleBindApplication(AppBindData data) {
// Register the UI Thread as a sensitive thread to the runtime.
//将UI线程注册成JIT敏感线程
VMRuntime.registerSensitiveThread();

...

mProfiler = new Profiler();
... //性能分析相关

// send up app name; do this *before* waiting for debugger
//设置进程名
Process.setArgV0(data.processName);
android.ddm.DdmHandleAppName.setAppName(data.processName,
data.appInfo.packageName,
UserHandle.myUserId());
VMRuntime.setProcessPackageName(data.appInfo.packageName);

// Pass data directory path to ART. This is used for caching information and
// should be set before any application code is loaded.
//设置进程数据目录
VMRuntime.setProcessDataDirectory(data.appInfo.dataDir);

//性能分析相关
if (mProfiler.profileFd != null) {
mProfiler.startProfiling();
}

// If the app is Honeycomb MR1 or earlier, switch its AsyncTask
// implementation to use the pool executor. Normally, we use the
// serialized executor as the default. This has to happen in the
// main thread so the main looper is set right.
//当App的targetSdkVersion小于等于 3.1 (12) 时,AsyncTask使用线程池实现
if (data.appInfo.targetSdkVersion <= android.os.Build.VERSION_CODES.HONEYCOMB_MR1) {
AsyncTask.setDefaultExecutor(AsyncTask.THREAD_POOL_EXECUTOR);
}

// Let the util.*Array classes maintain "undefined" for apps targeting Pie or earlier.
//当App的targetSdkVersion大于等于 10 (29) 时,针对Android SDK提供的容器(SparseArray等)
//如果index越界,会主动抛ArrayIndexOutOfBoundsException异常
//(之前数组越界的行为未被定义)
UtilConfig.setThrowExceptionForUpperArrayOutOfBounds(
data.appInfo.targetSdkVersion >= Build.VERSION_CODES.Q);

//当App的targetSdkVersion大于等于 5.0 (21) 时,回收正在使用的Message会抛出异常
Message.updateCheckRecycle(data.appInfo.targetSdkVersion);

// Prior to P, internal calls to decode Bitmaps used BitmapFactory,
// which may scale up to account for density. In P, we switched to
// ImageDecoder, which skips the upscale to save memory. ImageDecoder
// needs to still scale up in older apps, in case they rely on the
// size of the Bitmap without considering its density.
ImageDecoder.sApiLevel = data.appInfo.targetSdkVersion;

/*
* Before spawning a new process, reset the time zone to be the system time zone.
* This needs to be done because the system time zone could have changed after the
* the spawning of this process. Without doing this this process would have the incorrect
* system time zone.
*/
//设置时区
TimeZone.setDefault(null);

/*
* Set the LocaleList. This may change once we create the App Context.
*/
LocaleList.setDefault(data.config.getLocales());

//更新Configuration
synchronized (mResourcesManager) {
/*
* Update the system configuration since its preloaded and might not
* reflect configuration changes. The configuration object passed
* in AppBindData can be safely assumed to be up to date
*/
mResourcesManager.applyConfigurationToResourcesLocked(data.config, data.compatInfo);
mCurDefaultDisplayDpi = data.config.densityDpi;

// This calls mResourcesManager so keep it within the synchronized block.
applyCompatConfiguration(mCurDefaultDisplayDpi);
}

//获取LoadedApk
data.info = getPackageInfoNoCheck(data.appInfo, data.compatInfo);

//性能分析器代理JVM(JVMTI)
if (agent != null) {
handleAttachAgent(agent, data.info);
}

/**
* Switch this process to density compatibility mode if needed.
*/
//在manifest,supports-screens标签中设置了android:anyDensity
//详见:https://developer.android.com/guide/topics/manifest/supports-screens-element#any
if ((data.appInfo.flags&ApplicationInfo.FLAG_SUPPORTS_SCREEN_DENSITIES)
== 0) {
//指示App包含用于适应任何屏幕密度的资源
mDensityCompatMode = true;
Bitmap.setDefaultDensity(DisplayMetrics.DENSITY_DEFAULT);
}
//设置默认密度
updateDefaultDensity();

/* 设置 12/24 小时时间制 */
final String use24HourSetting = mCoreSettings.getString(Settings.System.TIME_12_24);
Boolean is24Hr = null;
if (use24HourSetting != null) {
is24Hr = "24".equals(use24HourSetting) ? Boolean.TRUE : Boolean.FALSE;
}
// null : use locale default for 12/24 hour formatting,
// false : use 12 hour format,
// true : use 24 hour format.
DateFormat.set24HourTimePref(is24Hr);

//更新view debug属性sDebugViewAttributes
//设置了这个属性,View将会保存它本身的属性
//和Layout Inspector相关
updateDebugViewAttributeState();

//初始化默认线程策略
StrictMode.initThreadDefaults(data.appInfo);
//初始化默认VM策略
StrictMode.initVmDefaults(data.appInfo);

//debug模式
if (data.debugMode != ApplicationThreadConstants.DEBUG_OFF) {
// XXX should have option to change the port.
Debug.changeDebugPort(8100);
if (data.debugMode == ApplicationThreadConstants.DEBUG_WAIT) {
Slog.w(TAG, "Application " + data.info.getPackageName()
+ " is waiting for the debugger on port 8100...");

IActivityManager mgr = ActivityManager.getService();
try {
mgr.showWaitingForDebugger(mAppThread, true);
} catch (RemoteException ex) {
throw ex.rethrowFromSystemServer();
}

Debug.waitForDebugger();

try {
mgr.showWaitingForDebugger(mAppThread, false);
} catch (RemoteException ex) {
throw ex.rethrowFromSystemServer();
}

} else {
Slog.w(TAG, "Application " + data.info.getPackageName()
+ " can be debugged on port 8100...");
}
}

// Allow binder tracing, and application-generated systrace messages if we're profileable.
//性能分析模式
boolean isAppProfileable = data.appInfo.isProfileableByShell();
//允许应用程序跟踪
Trace.setAppTracingAllowed(isAppProfileable);
if ((isAppProfileable || Build.IS_DEBUGGABLE) && data.enableBinderTracking) {
Binder.enableTracing();
}

// Initialize heap profiling.
//初始化堆分析
if (isAppProfileable || Build.IS_DEBUGGABLE) {
nInitZygoteChildHeapProfiling();
}

// Allow renderer debugging features if we're debuggable.
boolean isAppDebuggable = (data.appInfo.flags & ApplicationInfo.FLAG_DEBUGGABLE) != 0;
//开启硬件加速调试功能
HardwareRenderer.setDebuggingEnabled(isAppDebuggable || Build.IS_DEBUGGABLE);
HardwareRenderer.setPackageName(data.appInfo.packageName);

/**
* Initialize the default http proxy in this process for the reasons we set the time zone.
*/
//设置默认HTTP代理
final IBinder b = ServiceManager.getService(Context.CONNECTIVITY_SERVICE);
if (b != null) {
// In pre-boot mode (doing initial launch to collect password), not
// all system is up. This includes the connectivity service, so don't
// crash if we can't get it.
final IConnectivityManager service = IConnectivityManager.Stub.asInterface(b);
try {
Proxy.setHttpProxySystemProperty(service.getProxyForNetwork(null));
} catch (RemoteException e) {
Trace.traceEnd(Trace.TRACE_TAG_ACTIVITY_MANAGER);
throw e.rethrowFromSystemServer();
}
}

// Instrumentation info affects the class loader, so load it before
// setting up the app context.
//准备自动化测试信息
final InstrumentationInfo ii;
if (data.instrumentationName != null) {
try {
ii = new ApplicationPackageManager(
null, getPackageManager(), getPermissionManager())
.getInstrumentationInfo(data.instrumentationName, 0);
} catch (PackageManager.NameNotFoundException e) {
throw new RuntimeException(
"Unable to find instrumentation info for: " + data.instrumentationName);
}

// Warn of potential ABI mismatches.
...

mInstrumentationPackageName = ii.packageName;
mInstrumentationAppDir = ii.sourceDir;
mInstrumentationSplitAppDirs = ii.splitSourceDirs;
mInstrumentationLibDir = getInstrumentationLibrary(data.appInfo, ii);
mInstrumentedAppDir = data.info.getAppDir();
mInstrumentedSplitAppDirs = data.info.getSplitAppDirs();
mInstrumentedLibDir = data.info.getLibDir();
} else {
ii = null;
}

//创建Context
final ContextImpl appContext = ContextImpl.createAppContext(this, data.info);
//更新区域列表
updateLocaleListFromAppContext(appContext,
mResourcesManager.getConfiguration().getLocales());

if (!Process.isIsolated()) {
final int oldMask = StrictMode.allowThreadDiskWritesMask();
try {
setupGraphicsSupport(appContext);
} finally {
StrictMode.setThreadPolicyMask(oldMask);
}
} else {
HardwareRenderer.setIsolatedProcess(true);
}

// Install the Network Security Config Provider. This must happen before the application
// code is loaded to prevent issues with instances of TLS objects being created before
// the provider is installed.
//网络安全设置
NetworkSecurityConfigProvider.install(appContext);

// Continue loading instrumentation.
if (ii != null) { //如果设置了自动化测试,实例化指定的自动化测试类
ApplicationInfo instrApp;
try {
instrApp = getPackageManager().getApplicationInfo(ii.packageName, 0,
UserHandle.myUserId());
} catch (RemoteException e) {
instrApp = null;
}
if (instrApp == null) {
instrApp = new ApplicationInfo();
}
ii.copyTo(instrApp);
instrApp.initForUser(UserHandle.myUserId());
final LoadedApk pi = getPackageInfo(instrApp, data.compatInfo,
appContext.getClassLoader(), false, true, false);

// The test context's op package name == the target app's op package name, because
// the app ops manager checks the op package name against the real calling UID,
// which is what the target package name is associated with.
final ContextImpl instrContext = ContextImpl.createAppContext(this, pi,
appContext.getOpPackageName());

try {
final ClassLoader cl = instrContext.getClassLoader();
mInstrumentation = (Instrumentation)
cl.loadClass(data.instrumentationName.getClassName()).newInstance();
} catch (Exception e) {
throw new RuntimeException(
"Unable to instantiate instrumentation "
+ data.instrumentationName + ": " + e.toString(), e);
}

final ComponentName component = new ComponentName(ii.packageName, ii.name);
mInstrumentation.init(this, instrContext, appContext, component,
data.instrumentationWatcher, data.instrumentationUiAutomationConnection);

if (mProfiler.profileFile != null && !ii.handleProfiling
&& mProfiler.profileFd == null) {
mProfiler.handlingProfiling = true;
final File file = new File(mProfiler.profileFile);
file.getParentFile().mkdirs();
Debug.startMethodTracing(file.toString(), 8 * 1024 * 1024);
}
} else { //直接实例化Instrumentation
mInstrumentation = new Instrumentation();
mInstrumentation.basicInit(this);
}

//调整应用可用内存上限
if ((data.appInfo.flags&ApplicationInfo.FLAG_LARGE_HEAP) != 0) {
dalvik.system.VMRuntime.getRuntime().clearGrowthLimit();
} else {
// Small heap, clamp to the current growth limit and let the heap release
// pages after the growth limit to the non growth limit capacity. b/18387825
dalvik.system.VMRuntime.getRuntime().clampGrowthLimit();
}

// Allow disk access during application and provider setup. This could
// block processing ordered broadcasts, but later processing would
// probably end up doing the same disk access.
Application app;
final StrictMode.ThreadPolicy savedPolicy = StrictMode.allowThreadDiskWrites();
final StrictMode.ThreadPolicy writesAllowedPolicy = StrictMode.getThreadPolicy();
try {
// If the app is being launched for full backup or restore, bring it up in
// a restricted environment with the base application class.
//创建Application
app = data.info.makeApplication(data.restrictedBackupMode, null);

// Propagate autofill compat state
//设置自动填充功能
app.setAutofillOptions(data.autofillOptions);

// Propagate Content Capture options
//设置内容捕获功能
app.setContentCaptureOptions(data.contentCaptureOptions);

mInitialApplication = app;

// don't bring up providers in restricted mode; they may depend on the
// app's custom Application class
//在非受限模式下启动ContentProvider
if (!data.restrictedBackupMode) {
if (!ArrayUtils.isEmpty(data.providers)) {
installContentProviders(app, data.providers);
}
}

// Do this after providers, since instrumentation tests generally start their
// test thread at this point, and we don't want that racing.
//执行onCreate方法(默认Instrumentation实现为空方法)
try {
mInstrumentation.onCreate(data.instrumentationArgs);
}
catch (Exception e) {
...
}
//执行Application的onCreate方法
try {
mInstrumentation.callApplicationOnCreate(app);
} catch (Exception e) {
...
}
} finally {
// If the app targets < O-MR1, or doesn't change the thread policy
// during startup, clobber the policy to maintain behavior of b/36951662
if (data.appInfo.targetSdkVersion < Build.VERSION_CODES.O_MR1
|| StrictMode.getThreadPolicy().equals(writesAllowedPolicy)) {
StrictMode.setThreadPolicy(savedPolicy);
}
}

// Preload fonts resources
//预加载字体资源
FontsContract.setApplicationContextForResources(appContext);
if (!Process.isIsolated()) {
try {
final ApplicationInfo info =
getPackageManager().getApplicationInfo(
data.appInfo.packageName,
PackageManager.GET_META_DATA /*flags*/,
UserHandle.myUserId());
if (info.metaData != null) {
final int preloadedFontsResource = info.metaData.getInt(
ApplicationInfo.METADATA_PRELOADED_FONTS, 0);
if (preloadedFontsResource != 0) {
data.info.getResources().preloadFonts(preloadedFontsResource);
}
}
} catch (RemoteException e) {
throw e.rethrowFromSystemServer();
}
}
}

这个方法很重要,我们先过一下几个重点部分,然后再按着主线继续往下研究:

  • DebugProfilerLayout Inspector

    Android应用开发的同学对这三样肯定不陌生,在Android Studio中我们可以对App进行调试,性能分析和布局检查,在这个方法中,我们可以找到与这三样相关的一些代码

  • 获取LoadedApk

    LoadedApkApk文件在内存中的表示,包含了Apk文件中的代码、资源、组件、manifest等信息

  • 创建Context

    这里通过ActivityThreadLoadedApk创建出了一个ContextImpl

  • 实例化Instrumentation

    这里和自动化测试相关,如果设置了自动化测试,实例化指定的自动化测试类,否则实例化默认的Instrumentation

  • 创建Application

    这里根据LoadedApk创建出相应的Application,需要注意,这里创建的Application并不与上面创建出的ContextImpl绑定,而是在创建Application的过程中,以同样的参数重新创建了一个ContextImpl,然后调用attachBaseContext方法绑定它

  • 设置HTTP代理

    App在启动过程中设置HTTP代理,所以我们在开发过程中使用代理抓包等时候需要注意,设置了代理后需要重启App才会生效

  • 启动ContentProvider

    ContentProvider的启动过程以后会新开文章进行分析,这里只需要知道ContentProvider启动的入口在这就行了

  • 执行ApplicationonCreate方法

    当创建完Application,执行attachBaseContext方法后,便会调用onCreate方法

我们拣重点来看,首先是Application的创建过程

LoadedApk.makeApplication

在上文的方法中,调用了data.info.makeApplication方法创建Application,其中data.infoLoadedApk类型

1
2
3
4
5
6
7
8
9
10
11
12
13
14
15
16
17
18
19
20
21
22
23
24
25
26
27
28
29
30
31
32
33
34
35
36
37
38
39
40
41
42
43
44
45
46
47
48
49
50
51
52
53
54
55
56
57
58
59
60
61
62
63
64
65
public Application makeApplication(boolean forceDefaultAppClass,
Instrumentation instrumentation) {
//如果之前创建过了就可以直接返回
if (mApplication != null) {
return mApplication;
}

Application app = null;

//获取Application类名(App可以自定义Application这个应该所有开发都知道吧)
//对应AndroidManifest中application标签下的android:name属性
String appClass = mApplicationInfo.className;
//没有设置自定义Application或强制使用默认Application的情况下,使用默认Application
if (forceDefaultAppClass || (appClass == null)) {
appClass = "android.app.Application";
}

try {
//初始化ContextClassLoader
final java.lang.ClassLoader cl = getClassLoader();
if (!mPackageName.equals("android")) {
initializeJavaContextClassLoader();
}

// Rewrite the R 'constants' for all library apks.
//Android共享库资源ID动态映射
SparseArray<String> packageIdentifiers = getAssets().getAssignedPackageIdentifiers(
false, false);
for (int i = 0, n = packageIdentifiers.size(); i < n; i++) {
final int id = packageIdentifiers.keyAt(i);
if (id == 0x01 || id == 0x7f) {
continue;
}

rewriteRValues(cl, packageIdentifiers.valueAt(i), id);
}

//创建Context
ContextImpl appContext = ContextImpl.createAppContext(mActivityThread, this);
// The network security config needs to be aware of multiple
// applications in the same process to handle discrepancies
//网络安全设置
NetworkSecurityConfigProvider.handleNewApplication(appContext);
//创建Application
app = mActivityThread.mInstrumentation.newApplication(
cl, appClass, appContext);
appContext.setOuterContext(app);
} catch (Exception e) {
...
}
//加入Application列表中(多个App可以运行在同一个进程中)
mActivityThread.mAllApplications.add(app);
mApplication = app;

if (instrumentation != null) {
//调用Application的OnCreate方法
try {
instrumentation.callApplicationOnCreate(app);
} catch (Exception e) {
...
}
}

return app;
}

这个方法首先尝试取成员变量mApplication,如果不为null,说明曾创建过,直接返回就可以了

然后再去获取Application类名,默认为android.app.Application,开发可以通过设置AndroidManifestapplication标签下的android:name属性来选择创建自定义的Application

然后对共享库资源ID做动态映射,关于这部分感兴趣的同学可以去搜索Android Dynamic Reference

接着创建出ContextImpl作为ApplicationBaseContextApplication继承自ContextWrapper,而ContextWrapper又继承自ContextContextWrapper是对Context的包装,里面有一个mBase成员变量,调用任何方法实际上都是调用mBase这个实例的方法,在Application创建后会调用attachBaseContext将刚刚创建出来的ContextImpl赋值给mBase成员变量,所以调用Application中的任何Context方法,实际上最终都是调用ContextImpl的方法

然后创建Application,并将其设置成ContextImplOuterContext

最后将创建好的Application设置给成员变量mApplication,方便以后获取,然后将其再添加到mActivityThread.mAllApplications列表中,返回

ContextImpl.createAppContext

我们简单看一下ContextImpl的创建,对于不同的组件,创建ContextImpl对象的方法不同,比如说ActivityContext是通过createActivityContext方法创建的,我们这里是通过createAppContext创建ApplicationContext

1
2
3
4
5
6
7
8
9
10
11
12
13
14
15
static ContextImpl createAppContext(ActivityThread mainThread, LoadedApk packageInfo) {
return createAppContext(mainThread, packageInfo, null);
}

static ContextImpl createAppContext(ActivityThread mainThread, LoadedApk packageInfo,
String opPackageName) {
if (packageInfo == null) throw new IllegalArgumentException("packageInfo");
ContextImpl context = new ContextImpl(null, mainThread, packageInfo,
ContextParams.EMPTY, null, null, null, null, null, 0, null, opPackageName);
context.setResources(packageInfo.getResources());
//检查android.permission.STATUS_BAR_SERVICE权限
context.mContextType = isSystemOrSystemUI(context) ? CONTEXT_TYPE_SYSTEM_OR_SYSTEM_UI
: CONTEXT_TYPE_NON_UI;
return context;
}

简单看看就好,我们的重点不在这里,这个方法实例化了一个ContextImpl对象,然后通过ResourcesManager获得ApkResource,将其设置到ContextImpl

Instrumentation.newApplication

接着我们来看一下Application是怎么创建的

1
2
3
4
5
6
7
8
public Application newApplication(ClassLoader cl, String className, Context context)
throws InstantiationException, IllegalAccessException,
ClassNotFoundException {
Application app = getFactory(context.getPackageName())
.instantiateApplication(cl, className);
app.attach(context);
return app;
}

这里,getFactory方法返回的是一个AppComponentFactory对象,这个类是在Android 9之后加入的,它包括一个实例化ClassLoader的方法,一个实例化Application的方法和四个实例化四大组件的方法

我们可以在AndroidManifest中设置application标签的android:appComponentFactory属性,将其设置成我们自定义的AppComponentFactory,从而进行一些监控或别的操作

我们看一下AppComponentFactory的默认实现是怎样的

1
2
3
4
5
public @NonNull Application instantiateApplication(@NonNull ClassLoader cl,
@NonNull String className)
throws InstantiationException, IllegalAccessException, ClassNotFoundException {
return (Application) cl.loadClass(className).newInstance();
}

可以看到非常简单,就是通过className反射实例化出一个Application

接着我们回到newApplication方法中,我们对新创建的Application调用了attach方法去绑定ContextImpl

1
2
3
4
/* package */ final void attach(Context context) {
attachBaseContext(context);
mLoadedApk = ContextImpl.getImpl(context).mPackageInfo;
}

这里的attachBaseContext调用的是父类ContextWrapper中的方法

1
2
3
4
5
6
protected void attachBaseContext(Context base) {
if (mBase != null) {
throw new IllegalStateException("Base context already set");
}
mBase = base;
}

可以看到,就是将ContextImpl赋值给ContextWrapper中的mBase赋值,这样后面对Application调用Context的方法,实际上就是代理给这个mBase去执行了

到这一步位置,Application就创建完成了,接下来在ActivityThread.handleBindApplication方法中,还有一步重要操作,就是调用ApplicationonCreate方法

这里是借助了Instrumentation.callApplicationOnCreate方法

1
2
3
public void callApplicationOnCreate(Application app) {
app.onCreate();
}

就是简简单单直接调用了ApplicationonCreate方法

结束

到这里为止,整个Application的工作都做完了,接下来还剩检查并启动ActivityServiceBroadcastReceiver,这些内容就放到下一篇再讲吧

话说回来有点惭愧,这篇文章距离上一篇间隔了三个月,最近在忙一些别的项目,这篇文章断断续续写了一个多月才憋出来,感谢大家的支持,在这里我厚着脸皮求点赞求收藏,大家的支持就是我创作的动力


Android交叉编译OpenCV+FFmpeg+x264的艰难历程

前言

如果你没有兴趣看完本文,只想获得可编译的代码或编译后的产物,可以直接点击下面的链接,跟随步骤编译代码或直接下载我编译好的产物

注:编译顺序要按照 x264 -> FFmpeg -> OpenCV 这样来

x264

FFmpeg

OpenCV

起因

最近在做一个视频生成的app,使用OpenCV库实现,用的是C语言,一开始我是在mac_x86上书写代码,fourcc视频编码器选择的是mp4v,视频输出一切正常,然后当我将代码移植到Android上时发现,从OpenCV官网下载的so库它不支持编码mp4v格式,只能编码成mjpg格式,后缀名为avi,尴尬的是Android原生又不支持播放这种格式的视频,所以要想办法让OpenCV支持编码mp4vh264等格式

我在网上搜索了一下为什么OpenCV默认不支持h264格式,得知OpenCV默认使用FFmpeg做视频处理,FFmpeg使用的是LGPL协议,而x264使用的是GPL协议,GPL协议具有传染性,如果代码中使用了GPL协议的软件,则要求你的代码也必须开源。我猜测是因为这个原因,FFmpeg默认不使用GPL协议的软件,避免产生一些不必要的问题和纠纷,如果想要使用GPL协议的软件,则需要在编译的时候加上--enable-gpl选项

基于此上原因,我开启了我艰难的编译之路

声明

本篇文章只针对Linux系统编译,其他系统不保证可以编译通过

本篇文章使用的NDK版本为21.4.7075529,不同的版本可能会有些差别,需要自行调整

本人对c/c++编译这块并不是很了解,很多东西也是边学习边尝试的,如果有什么错误的话也恳请大佬们指正,谢谢

准备

准备一台Linux系统的电脑或使用虚拟机,安装一些最基本的编译工具(makecmake等),我使用的是Ubuntu系统,强烈建议在安装的时候选择完整安装,这样这些编译工具应该都会跟随系统自动安装好

Android交叉编译肯定是需要NDK的,我使用的是21.4.7075529版本,r19以上版本的NDK都是直接自带了工具链,而r19之前的版本则需要先生成工具链,具体可以参考独立工具链(已弃用)这篇文档

x264

既然需要依赖x264,那我们肯定是先要编译x264库,各位可以clone我准备好的tag

1
git clone -b v0.164_compilable https://github.com/dreamgyf/x264.git

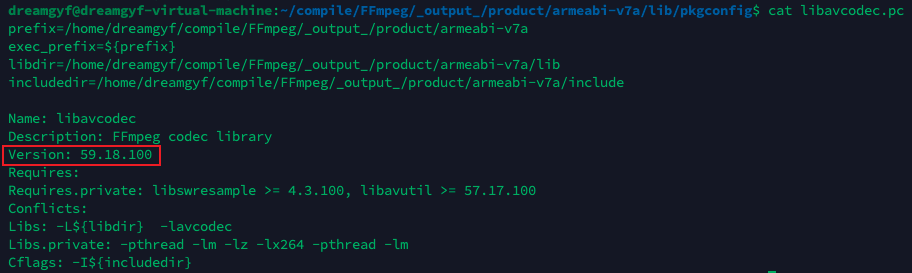
这个版本是从原x264镜像仓库的stable分支切出的,版本为0.164。想知道x264版本的话,可以运行其目录下的version.sh脚本,它会输出三串数字,前面的164是在x264.h中定义的X264_BUILD,第二个3095+4表示master分支的提交数 + master分支到HEAD的提交数,最后的一串数字表示当前分支最新的commit id

在构建编译脚本之前,我们先要看看这个库提供了哪些编译选项,我们可以看到在x264根目录下有一个configure文件,这是一个脚本文件,大多数库都提供了这个脚本,用来负责生成Makefile,准备好构建环境,我们可以通过下面这个命令获取帮助文件

1
./configure --help > help.txt

可以看到,里面提供了一些编译选项及其描述,我们可以根据这些选项和描述构建编译脚本

先看一下我写好的脚本吧

1
2
3
4
5
6
7
8
9
10
11
12
13
14
15
16
17
18
19
20
21
22
23
24
25
26
27
28
29
30
31
32
33
34
35
36
37
38
39
40
41
42
43
44
45
46
47
48
49
50
51
52
53
54
55
56
57
58
59
60
61
62
63
64
65
66
67
68
# Linux 交叉编译 Android 库脚本
if [[ -z $ANDROID_NDK ]]; then
echo 'Error: Can not find ANDROID_NDK path.'
exit 1
fi

echo "ANDROID_NDK path: ${ANDROID_NDK}"

OUTPUT_DIR="_output_"

mkdir ${OUTPUT_DIR}
cd ${OUTPUT_DIR}

OUTPUT_PATH=`pwd`

API=21
TOOLCHAIN=$ANDROID_NDK/toolchains/llvm/prebuilt/linux-x86_64

function build {
ABI=$1

if [[ $ABI == "armeabi-v7a" ]]; then
ARCH="arm"
TRIPLE="armv7a-linux-androideabi"
elif [[ $ABI == "arm64-v8a" ]]; then
ARCH="arm64"
TRIPLE="aarch64-linux-android"
elif [[ $ABI == "x86" ]]; then
ARCH="x86"
TRIPLE="i686-linux-android"
elif [[ $ABI == "x86-64" ]]; then
ARCH="x86_64"
TRIPLE="x86_64-linux-android"
else
echo "Unsupported ABI ${ABI}!"
exit 1
fi

echo "Build ABI ${ABI}..."

rm -rf ${ABI}
mkdir ${ABI} && cd ${ABI}

PREFIX=${OUTPUT_PATH}/product/$ABI

export CC=$TOOLCHAIN/bin/${TRIPLE}${API}-clang
export CFLAGS="-g -DANDROID -fdata-sections -ffunction-sections -funwind-tables -fstack-protector-strong -no-canonical-prefixes -D_FORTIFY_SOURCE=2 -Wformat -Werror=format-security -O0 -DNDEBUG -fPIC --gcc-toolchain=$TOOLCHAIN --target=${TRIPLE}${API}"

../../configure \
--host=${TRIPLE} \
--prefix=$PREFIX \
--enable-static \
--enable-shared \
--enable-pic \
--disable-lavf \
--sysroot=$TOOLCHAIN/sysroot

make clean && make -j`nproc` && make install

cd ..
}

echo "Select arch:"
select arch in "armeabi-v7a" "arm64-v8a" "x86" "x86-64"
do
build $arch
break
done

这也是我其他库编译脚本的基本结构,首先需要ANDROID_NDK环境变量用来确定NDK的位置

OUTPUT_DIR为编译的输出路径,我这里命名为_output_,防止和源码本身的目录重名

API为最低支持的Android API版本,我这里写的21,也就是Android 5.0

TOOLCHAIN为交叉编译工具链的路径,对于r19之前的NDK,需要将其改为你生成出来的工具链的路径,r19之后不需要改动

我这里定义了一个build函数,通过输入的ABI编译出对应架构的产物。ABI总共有四种:armeabi-v7aarm64-v8ax86x86-64,这个决定你的App能在哪些平台架构上运行

这里,我通过不同的ABI定义了不同的TRIPLE变量,这是遵循了NDK工具链的命名规则,可以在 将 NDK 与其他构建系统配合使用 这篇文档中找到

TRIPLE

$TOOLCHAIN/bin目录下,我们也能发现这种命名方式

TRIPLE

我们需要根据其命名规则,指定相应的编译器,设置相应的hosttarget

关于buildhosttarget的含义可以参阅 Cross-Compilation 这篇文档

  • build: 编译该库所使用的平台,不设置的话,编译器会自动推测所在平台

  • host: 编译出的库要运行在哪个平台上,不设置的话,默认为build值,但这样也就不再是交叉编译了

  • target: 该库所处理的目标平台,不设置的话,默认为host

多数UNIX平台会通过CC调用C语言编译器,而CFLAGS则是C语言编译器的编译选项,根据我们上文所说的命名规则可以发现,工具链中C语言编译器的命名规则为${TRIPLE}${API}-clang,假设我们要编译arm64-v8a ABIAPI 21的库,则需要指定CCaarch64-linux-android21-clang

至于CFLAGS这里就不多说了,可以自行查阅 Clang编译器参数手册 ,这里需要注意的是,必须要指定--gcc-toolchain--target,否则编译会报错

然后就是configure的选项了,这里必须指定--host--sysrootsysroot表示使用这个值作为编译的头文件和库文件的查找目录,该目录结构如下

1
2
3
4
5
6
7
8
sysroot
└── usr
├── include
└── lib
├── aarch64-linux-android
├── arm-linux-androideabi
├── i686-linux-android
└── x86_64-linux-android

--prefix为编译后的安装路径,也就是编译产物的输出路径

--enable-static--enable-shared选项表示生成静态库和动态库,大家可以根据情况自行选择

nprocLinux下的一个命令,表示当前进程可用的CPU核数,一般make使用线程数为CPU核数就可以了,如果编译产生问题,可以尝试调小这个值

到这里基本上整个构建脚本就分析完了,大家调整完编译选项后保存,就可以执行命令./build.sh开始编译了

FFmpeg

然后我们开始编译FFmpeg

1
git clone -b v5.0_compilable https://github.com/dreamgyf/FFmpeg.git

这个版本是从原FFmpeg镜像仓库的n5.0分支切出的,版本为5.0。其实我一开始用的是5.1版本,但当我解决了各种问题编译OpenCV到一半时,提示我FFmpeg的一些符号找不到,然后我去查了一下OpenCV的 Change Log ,发现它的最新版本4.6.0刚刚支持FFmpeg 5.0版本,无奈切到5.0重新编译

还是一样,先看编译脚本

1
2
3
4
5
6
7
8
9
10
11
12
13
14
15
16
17
18
19
20
21
22
23
24
25
26
27
28
29
30
31
32
33
34
35
36
37
38
39
40
41
42
43
44
45
46
47
48
49
50
51
52
53
54
55
56
57
58
59
60
61
62
63
64
65
66
67
68
69
70
71
72
73
74
75
76
77
78
79
80
81
82
83
84
85
86
87
88
89
90
91
92
93
94
95
96
97
# Linux 交叉编译 Android 库脚本
if [[ -z $ANDROID_NDK ]]; then
echo 'Error: Can not find ANDROID_NDK path.'
exit 1
fi

echo "ANDROID_NDK path: ${ANDROID_NDK}"

ROOT_PATH=`pwd`

OUTPUT_DIR="_output_"

mkdir ${OUTPUT_DIR}
cd ${OUTPUT_DIR}

OUTPUT_PATH=`pwd`

API=21
TOOLCHAIN=$ANDROID_NDK/toolchains/llvm/prebuilt/linux-x86_64
# 编译出的x264库地址
X264_ANDROID_DIR=/home/dreamgyf/compile/x264/_output_/product

EXTRA_CONFIGURATIONS="--disable-stripping \
--disable-ffmpeg \
--disable-doc \
--disable-appkit \
--disable-avfoundation \
--disable-coreimage \
--disable-amf \
--disable-audiotoolbox \
--disable-cuda-llvm \
--disable-cuvid \
--disable-d3d11va \
--disable-dxva2 \
--disable-ffnvcodec \
--disable-nvdec \
--disable-nvenc \
--disable-vdpau \
--disable-videotoolbox"

function build {
ABI=$1

if [[ $ABI == "armeabi-v7a" ]]; then
ARCH="arm"
TRIPLE="armv7a-linux-androideabi"
elif [[ $ABI == "arm64-v8a" ]]; then
ARCH="arm64"
TRIPLE="aarch64-linux-android"
elif [[ $ABI == "x86" ]]; then
ARCH="x86"
TRIPLE="i686-linux-android"
elif [[ $ABI == "x86-64" ]]; then
ARCH="x86_64"
TRIPLE="x86_64-linux-android"
else
echo "Unsupported ABI ${ABI}!"
exit 1
fi

echo "Build ABI ${ABI}..."

rm -rf ${ABI}
mkdir ${ABI} && cd ${ABI}

PREFIX=${OUTPUT_PATH}/product/$ABI

export CC=$TOOLCHAIN/bin/${TRIPLE}${API}-clang
export CFLAGS="-g -DANDROID -fdata-sections -ffunction-sections -funwind-tables -fstack-protector-strong -no-canonical-prefixes -D_FORTIFY_SOURCE=2 -Wformat -Werror=format-security -O0 -DNDEBUG -fPIC --gcc-toolchain=$TOOLCHAIN --target=${TRIPLE}${API}"

../../configure \
--prefix=$PREFIX \
--enable-cross-compile \
--sysroot=$TOOLCHAIN/sysroot \
--cc=$CC \
--enable-static \
--enable-shared \
--disable-asm \
--enable-gpl \
--enable-libx264 \
--extra-cflags="-I${X264_ANDROID_DIR}/${ABI}/include" \
--extra-ldflags="-L${X264_ANDROID_DIR}/${ABI}/lib" \
$EXTRA_CONFIGURATIONS

make clean && make -j`nproc` && make install

cd $PREFIX
`$ROOT_PATH/ffmpeg-config-gen.sh ${X264_ANDROID_DIR}/${ABI}/lib/libx264.a`
cd $OUTPUT_PATH
}

echo "Select arch:"
select arch in "armeabi-v7a" "arm64-v8a" "x86" "x86-64"
do
build $arch
break
done

这个脚本和x264的编译脚本基本相同,由于我们需要依赖x264库,所以我们要使刚刚编译出来的x264产物参与FFmpeg的编译,为此,需要将X264_ANDROID_DIR改成自己编译出来的x264产物路径

configure选项中,我们需要--enable-cross-compile选项表示开启交叉编译,我们这里需要设置--cc选择C语言编译器,否则编译时会使用系统默认的编译器,--disable-asm选项我测试是必须要带上的,否则编译会报错,然后就是--enable-libx264开启x264依赖了,根据我在起因中说到的开源协议问题,所以--enable-gpl选项也要开启,最后需要指定x264的头文件和库文件目录,分别使用--extra-cflags--extra-ldflags加上对应的参数

这里提一下,编译器会优先从-I -L两个参数指定的目录中去查找头文件和库文件,如果没找到的话再会从sysroot目录中查找

最后,我还写了一个ffmpeg-config-gen.sh脚本,它的作用是生成ffmpeg-config.cmake文件,用来给OpenCV编译提供FFmpeg依赖查找,这个等我们后面讲到OpenCV依赖FFmpeg的处理时再说

x264一样,大家调整完编译选项后保存,就可以执行命令./build.sh开始编译了

OpenCV

最后,我们开始编译OpenCV

1
git clone -b v4.6.0_compilable https://github.com/dreamgyf/opencv.git

这个版本是从原OpenCV仓库的4.6.0分支切出的,版本为4.6.0,是目前的最新版本。其实前面两个库的编译都挺顺利的,最麻烦的问题都出在OpenCV这里

我们还是先看编译脚本

1
2
3
4
5
6
7
8
9
10
11
12
13
14
15
16
17
18
19
20
21
22
23
24
25
26
27
28
29
30
31
32
33
34
35
36
37
38
39
40
41
42
43
44
45
46
47
48
49
50
51
52
53
54
55
56
57
58
59
60
61
62
63
64
65
66
67
68
69
70
71
72
73
74
75
76
77
78
79
80
81
82
83
84
85
86
87
88
89
90
91
92
93
94
95
96
97
98
99
100
101
# Linux 交叉编译 Android 库脚本
if [[ -z $ANDROID_NDK ]]; then
echo 'Error: Can not find ANDROID_NDK path.'
exit 1
fi

echo "ANDROID_NDK path: ${ANDROID_NDK}"

OUTPUT_DIR="_output_"

mkdir ${OUTPUT_DIR}
cd ${OUTPUT_DIR}

OUTPUT_PATH=`pwd`

API=21
TOOLCHAIN=$ANDROID_NDK/toolchains/llvm/prebuilt/linux-x86_64
# 编译出的ffmpeg库地址
FFMPEG_ANDROID_DIR=/home/dreamgyf/compile/FFmpeg/_output_/product

EXTRA_ATTRS="-DWITH_CUDA=OFF \
-DWITH_GTK=OFF \
-DWITH_1394=OFF \
-DWITH_GSTREAMER=OFF \
-DWITH_LIBV4L=OFF \
-DWITH_TIFF=OFF \
-DBUILD_OPENEXR=OFF \
-DWITH_OPENEXR=OFF \
-DBUILD_opencv_ocl=OFF \
-DWITH_OPENCL=OFF"

function build {
ABI=$1

if [[ $ABI == "armeabi-v7a" ]]; then
ARCH="arm"
TRIPLE="armv7a-linux-androideabi"
TOOLCHAIN_NAME="arm-linux-androideabi"
elif [[ $ABI == "arm64-v8a" ]]; then
ARCH="arm64"
TRIPLE="aarch64-linux-android"
TOOLCHAIN_NAME="aarch64-linux-android"
elif [[ $ABI == "x86" ]]; then
ARCH="x86"
TRIPLE="i686-linux-android"
TOOLCHAIN_NAME="i686-linux-android"
elif [[ $ABI == "x86-64" ]]; then
ARCH="x86_64"
TRIPLE="x86_64-linux-android"
TOOLCHAIN_NAME="x86_64-linux-android"
else
echo "Unsupported ABI ${ABI}!"
exit 1
fi

echo "Build ABI ${ABI}..."

rm -rf ${ABI}
mkdir ${ABI} && cd ${ABI}

PREFIX=${OUTPUT_PATH}/product/$ABI

cmake ../.. \
-DCMAKE_INSTALL_PREFIX=$PREFIX \
-DCMAKE_TOOLCHAIN_FILE=$ANDROID_NDK/build/cmake/android.toolchain.cmake \
-DANDROID_ABI=$ABI \
-DANDROID_NDK=$ANDROID_NDK \
-DANDROID_PLATFORM="android-${API}" \
-DANDROID_LINKER_FLAGS="-Wl,-rpath-link=$TOOLCHAIN/sysroot/usr/lib/$TOOLCHAIN_NAME/$API" \
-DBUILD_ANDROID_PROJECTS=OFF \
-DBUILD_ANDROID_EXAMPLES=OFF \
-DBUILD_SHARED_LIBS=$BUILD_SHARED_LIBS \
-DWITH_FFMPEG=ON \
-DOPENCV_GENERATE_PKGCONFIG=ON \
-DOPENCV_FFMPEG_USE_FIND_PACKAGE=ON \
-DFFMPEG_DIR=${FFMPEG_ANDROID_DIR}/${ABI} \
$EXTRA_ATTRS

make clean && make -j`nproc` && make install

cd ..
}

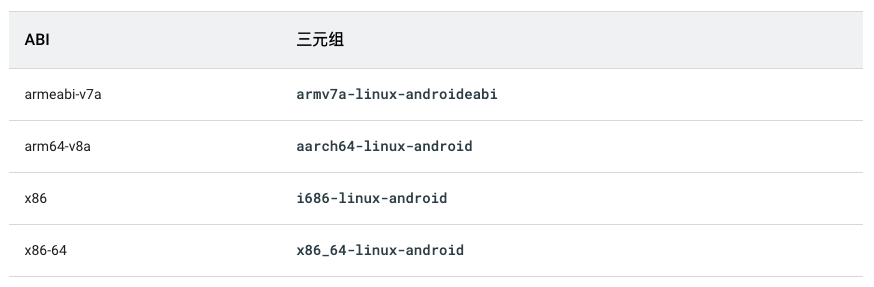
echo "Select arch:"
select arch in "armeabi-v7a" "arm64-v8a" "x86" "x86-64"
do
echo "Select build static or shared libs:"
select type in "static" "shared"
do
if [[ $type == "static" ]]; then
BUILD_SHARED_LIBS=OFF
elif [[ $type == "shared" ]]; then
BUILD_SHARED_LIBS=ON
else
BUILD_SHARED_LIBS=OFF
fi
break
done
build $arch
break
done

上面的准备工作和前面的几个脚本一样,不同的是,OpenCV并没有为我们准备configure脚本,所以这次我们使用cmake生成Makefile,再进行编译

既然使用cmake了,我们就可以不再像之前一样,自己指定编译器等工具链了,NDK为我们提供了交叉编译工具链cmake脚本$ANDROID_NDK/build/cmake/android.toolchain.cmake,我们只需要指定其为CMAKE_TOOLCHAIN_FILE,然后为其提供相关参数即可,具体的使用方式可以参考 CMake 这篇文档。我们这里只需要提供最低限度的几个参数ANDROID_ABIANDROID_NDKANDROID_PLATFORM即可

如果需要编译Android示例工程的话,还需要在环境变量中设置ANDROID_HOMEANDROID_SDK,我这里就直接使用-DBUILD_ANDROID_PROJECTS=OFF-DBUILD_ANDROID_EXAMPLES=OFF将其关闭了

然后就是如何让OpenCV依赖我们编译的FFmpeg的问题了,到这一步我们就需要去它的CMakeLists.txt中看看它是怎样声明FFmpeg的了

打开CMakeLists.txt文件,搜索FFMPEG关键字,我们可以找到这一段代码

1
2
3
4
5
6
7
8
9
10
11
12
13
14
if(WITH_FFMPEG OR HAVE_FFMPEG)
if(OPENCV_FFMPEG_USE_FIND_PACKAGE)
status(" FFMPEG:" HAVE_FFMPEG THEN "YES (find_package)" ELSE "NO (find_package)")
elseif(WIN32)
status(" FFMPEG:" HAVE_FFMPEG THEN "YES (prebuilt binaries)" ELSE NO)
else()
status(" FFMPEG:" HAVE_FFMPEG THEN YES ELSE NO)
endif()
status(" avcodec:" FFMPEG_libavcodec_VERSION THEN "YES (${FFMPEG_libavcodec_VERSION})" ELSE NO)
status(" avformat:" FFMPEG_libavformat_VERSION THEN "YES (${FFMPEG_libavformat_VERSION})" ELSE NO)
status(" avutil:" FFMPEG_libavutil_VERSION THEN "YES (${FFMPEG_libavutil_VERSION})" ELSE NO)
status(" swscale:" FFMPEG_libswscale_VERSION THEN "YES (${FFMPEG_libswscale_VERSION})" ELSE NO)
status(" avresample:" FFMPEG_libavresample_VERSION THEN "YES (${FFMPEG_libavresample_VERSION})" ELSE NO)
endif()

我们可以发现,要想依赖FFmpeg,我们需要将HAVE_FFMPEG的值设为true,并且要指定FFmpeg libs的版本

我们再看到OPENCV_FFMPEG_USE_FIND_PACKAGE这个参数,表示通过find_package的方式寻找FFmpeg

这里,我们其实有两种办法依赖FFmpeg库,一是通过find_package,二是通过pkg-config,我两种方式都尝试了后,觉得还是使用find_package这种方式比较容易,侵入性较小,使用pkg-config需要手动修改OpenCV检测FFmpegcmake文件源码,不优雅

接着我们去看OpenCV是如何检测FFmpeg是否存在的,这里我们需要找到$OPENCV/modules/videoio/cmake/detect_ffmpeg.cmake这个文件,在开头第一段代码中,我们就可以发现

1
2
3
4
5
6
7
8
9
if(NOT HAVE_FFMPEG AND OPENCV_FFMPEG_USE_FIND_PACKAGE)
if(OPENCV_FFMPEG_USE_FIND_PACKAGE STREQUAL "1" OR OPENCV_FFMPEG_USE_FIND_PACKAGE STREQUAL "ON")
set(OPENCV_FFMPEG_USE_FIND_PACKAGE "FFMPEG")
endif()
find_package(${OPENCV_FFMPEG_USE_FIND_PACKAGE}) # Required components: AVCODEC AVFORMAT AVUTIL SWSCALE
if(FFMPEG_FOUND OR FFmpeg_FOUND)
set(HAVE_FFMPEG TRUE)
endif()
endif()

如果OPENCV_FFMPEG_USE_FIND_PACKAGE选项被打开,则会使用find_package(FFMPEG)去查找这个库

find_package(<PackageName>)有两种模式,一种是Module模式,一种是Config模式

Module模式中,cmake需要找到一个名为Find<PackageName>.cmake的文件,这个文件负责找到库所在路径,引入头文件和库文件。cmake会在两个地方查找这个文件,先是我们手动指定的CMAKE_MODULE_PATH目录,搜索不到再搜索$CMAKE/share/cmake-<version>/Modules目录

如果Module模式没找到相应文件,则会转为Config模式,在这个模式下,cmake需要找到<lowercasePackageName>-config.cmake<PackageName>Config.cmake文件,通过这个文件找到库所在路径,引入头文件和库文件。cmake会优先在<PackageName>_DIR目录下搜索相应文件

关于find_package更详细的解释,可以去查看 官方文档

我这里选用了Config模式,再结合之前在CMakeLists.txtdetect_ffmpeg.cmake中的内容,我们可以得出结论:

我们需要在构建脚本中设置WITH_FFMPEG=ONOPENCV_FFMPEG_USE_FIND_PACKAGE=ONFFMPEG_DIR并且FFMPEG_DIR目录下需要有ffmpeg-config.cmakeFFMPEGConfig.cmake文件

这里就衔接了上文,我为什么要写一个ffmpeg-config-gen.sh脚本,脚本的内容很简单,我们直接看它生成出来的ffmpeg-config.cmake文件

1
2
3
4
5
6
7
8
9
10
11
12
13
14
15
16
17
18
19
20
21
22
23
24
25
26
27
28
29
30
31
32
33
34
35
36
37
38
39
set(FFMPEG_PATH "${CMAKE_CURRENT_LIST_DIR}")

set(FFMPEG_EXEC_DIR "${FFMPEG_PATH}/bin")
set(FFMPEG_LIBDIR "${FFMPEG_PATH}/lib")
set(FFMPEG_INCLUDE_DIRS "${FFMPEG_PATH}/include")

set(FFMPEG_LIBRARIES
${FFMPEG_LIBDIR}/libavformat.a
${FFMPEG_LIBDIR}/libavdevice.a
${FFMPEG_LIBDIR}/libavcodec.a
${FFMPEG_LIBDIR}/libavutil.a
${FFMPEG_LIBDIR}/libswscale.a
${FFMPEG_LIBDIR}/libswresample.a
${FFMPEG_LIBDIR}/libavfilter.a
${FFMPEG_LIBDIR}/libpostproc.a
/home/dreamgyf/compile/x264/_output_/product/arm64-v8a/lib/libx264.a
z
)

set(FFMPEG_libavformat_FOUND TRUE)
set(FFMPEG_libavdevice_FOUND TRUE)
set(FFMPEG_libavcodec_FOUND TRUE)
set(FFMPEG_libavutil_FOUND TRUE)
set(FFMPEG_libswscale_FOUND TRUE)
set(FFMPEG_libswresample_FOUND TRUE)
set(FFMPEG_libavfilter_FOUND TRUE)
set(FFMPEG_libpostproc_FOUND TRUE)

set(FFMPEG_libavcodec_VERSION 59.18.100)
set(FFMPEG_libavdevice_VERSION 59.4.100)
set(FFMPEG_libavfilter_VERSION 8.24.100)
set(FFMPEG_libavformat_VERSION 59.16.100)
set(FFMPEG_libavutil_VERSION 57.17.100)
set(FFMPEG_libpostproc_VERSION 56.3.100)
set(FFMPEG_libswresample_VERSION 4.3.100)
set(FFMPEG_libswscale_VERSION 6.4.100)

set(FFMPEG_FOUND TRUE)
set(FFMPEG_LIBS ${FFMPEG_LIBRARIES})

这里主要为cmake提供了三个变量

  • FFMPEG_INCLUDE_DIRS:提供头文件目录

  • FFMPEG_LIBRARIES:提供库文件链接

  • FFMPEG_FOUND:告诉cmake找到了FFmpeg

这里还有几个点要说,首先,cmake中的库文件链接顺序符合gcc链接顺序规则,所以说库的书写顺序也是有严格要求的,被依赖的库要放在依赖它的库的后面,正如这个文件,FFmpeg需要依赖x264,所以我需要将x264放在所有FFmpeg库的最后面

FFmpeg需要依赖zlib库,所以我在后面增加了一个z表示依赖zlib

FFmpeg这些库的版本定义是从$FFMPEG_PRODUCT/$ABI/lib/pkgconfig目录下各个文件读出来的

pkgconfig

version

ffmpeg-config.cmake文件写完,我们再回过头来看一下detect_ffmpeg.cmake

1
2
3
4
5
6
7
8
9
if(NOT HAVE_FFMPEG AND OPENCV_FFMPEG_USE_FIND_PACKAGE)
if(OPENCV_FFMPEG_USE_FIND_PACKAGE STREQUAL "1" OR OPENCV_FFMPEG_USE_FIND_PACKAGE STREQUAL "ON")
set(OPENCV_FFMPEG_USE_FIND_PACKAGE "FFMPEG")
endif()
find_package(${OPENCV_FFMPEG_USE_FIND_PACKAGE}) # Required components: AVCODEC AVFORMAT AVUTIL SWSCALE
if(FFMPEG_FOUND OR FFmpeg_FOUND)
set(HAVE_FFMPEG TRUE)
endif()
endif()

可以看到最后的 if 中,如果FFMPEG_FOUNDtrue,则设置HAVE_FFMPEGtrue,正好对应了我们在ffmpeg-config.cmake中的行为,这下,CMakeLists.txt就可以找到我们的FFmpeg库了

这里还有一点,detect_ffmpeg.cmake中有一段用来测试的代码

1
2
3
4
5
6
7
8
9
10
11
12
13
14
if(HAVE_FFMPEG AND NOT HAVE_FFMPEG_WRAPPER AND NOT OPENCV_FFMPEG_SKIP_BUILD_CHECK)
try_compile(__VALID_FFMPEG
"${OpenCV_BINARY_DIR}"
"${OpenCV_SOURCE_DIR}/cmake/checks/ffmpeg_test.cpp"
CMAKE_FLAGS "-DINCLUDE_DIRECTORIES:STRING=${FFMPEG_INCLUDE_DIRS}"
"-DLINK_LIBRARIES:STRING=${FFMPEG_LIBRARIES}"
OUTPUT_VARIABLE TRY_OUT
)
if(NOT __VALID_FFMPEG)
message(FATAL_ERROR "FFMPEG: test check build log:\n${TRY_OUT}")
message(STATUS "WARNING: Can't build ffmpeg test code")
set(HAVE_FFMPEG FALSE)
endif()
endif()

其中的message(FATAL_ERROR "FFMPEG: test check build log:\n${TRY_OUT}")原本是被注释了的,我强烈建议各位将其打开,这样如果哪里有误,一开始就可以报错并附带详细信息,免得到时候编到一半才报错,浪费时间

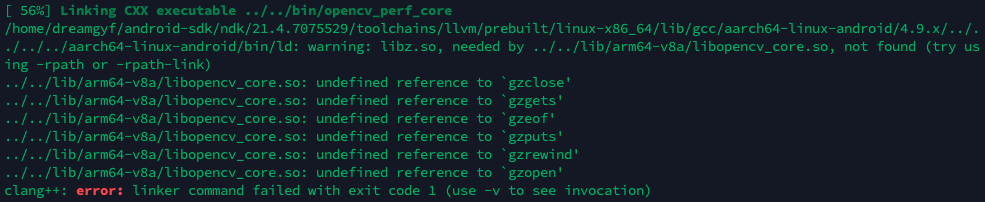
到这里,我本以为万事大吉了,于是开始编译,这里我使用了BUILD_SHARED_LIBS=ON选项编译动态库,armeabi-v7a顺利编译通过,但当arm64-v8a编译到一半时突然报错,提示libz.so, needed by ../../lib/arm64-v8a/libopencv_core.so, not found (try using -rpath or -rpath-link)

rpath_error

我观察了一下NDK目录结构,发现libz.so动态库文件可以在$TOOLCHAIN/sysroot/usr/lib/$TOOLCHAIN_NAME/$API下找到,需要注意的是,这里的TOOLCHAIN_NAMETRIPLE很相似,但在armeabi-v7a情况下又有些细微的不同,所以我又新定义了这个变量

然后我开始尝试加入-rpath-link选项,首先,我尝试添加了一项cmake选项CMAKE_SHARED_LINKER_FLAGS="-Wl,-rpath-link=$TOOLCHAIN/sysroot/usr/lib/$TOOLCHAIN_NAME/$API",发现,虽然在编译开头的输出中可以看出,这个参数确实被加上生效了,但在编译到同样的地方时,仍然会报相同的错误,这里我不太清楚,难道参数的顺序也会对编译造成影响吗?

于是我去查看了android.toolchain.cmake文件,看他是怎么添加这些选项的,发现了这么一行

1
set(CMAKE_SHARED_LINKER_FLAGS "${ANDROID_LINKER_FLAGS} ${CMAKE_SHARED_LINKER_FLAGS}")

于是我在这行代码前加了这么一行

1
list(APPEND ANDROID_LINKER_FLAGS -Wl,-rpath-link=${ANDROID_TOOLCHAIN_ROOT}/sysroot/usr/lib/${ANDROID_TOOLCHAIN_NAME}/${ANDROID_PLATFORM_LEVEL})

-rpath-link这个选项提前一点,果不其然,编译顺利通过了,但这样做有点麻烦,还得改NDK里的配置,于是我在构建脚本里加了一个参数ANDROID_LINKER_FLAGS="-Wl,-rpath-link=$TOOLCHAIN/sysroot/usr/lib/$TOOLCHAIN_NAME/$API",这样的话,-rpath-link选项会被提到Linker flags的最前面,经过测试,这样也可以编译通过,于是OpenCV的编译脚本也就这么完成了

当然这里还剩一个疑点,为什么不加-rpath-link的时候,arm64-v8a编译报错但armeabi-v7a却编译通过,希望有大佬可以指点一下

FreeType

我的App中还用到了FreeType库渲染字体,在这里顺便也把它的编译方式放出来吧

直接去 FreeType 这里下载我编译好的版本或者源码,根据我写的步骤进行编译就可以了

在Android中使用

在Android中使用时需要注意,如果你使用静态库的方式的话,需要将OpenCV编译出来的第三方库也加入到链接中,放在OpenCV的后面,另外FFmpeg还需要mediandkzlib这两个依赖,具体可以参考下面的代码

1
2
3
4
5
6
7
8
9
10
11
12
13
14
15
16
17
18
19
20
21
22
23
24
25
26
27
28
29
30
31
32
33
34
35
36
37
38
39
40
41
42
43
44
45
46
target_link_libraries(
textvideo

freetype

# opencv
opencv_videoio
opencv_photo
opencv_highgui
opencv_imgproc
opencv_imgcodecs
opencv_dnn
opencv_core

# ffmpeg
ffmpeg_avformat
ffmpeg_avdevice
ffmpeg_avcodec
ffmpeg_avutil
ffmpeg_swscale
ffmpeg_swresample
ffmpeg_avfilter

# ffmpeg依赖
mediandk
z

# x264
x264

# opencv第三方支持库
ade
cpufeatures
ittnotify
libjpeg-turbo
libopenjp2
libpng
libprotobuf
libwebp
quirc
tegra_hal

# android jni库
jnigraphics
android
log)

总结

虽然我这篇文章写的看起来编译的过程很简单,根本不像标题所说的那么艰难,但实际上我前前后后弄了大概有一个多星期才真正完整编出可用版本,前前后后编译失败了不说一百次也有几十次,对我这种不懂c语言编译的简直是折磨。因为我是在全部弄完后才开始写的文章,所以基本上坑都踩的差不多了,其中有些坑印象也没那么清楚了,我也没那么多精力再去复现出那些坑了,怎么说呢,能成功就万事大吉吧 😭


Android源码分析 - Activity启动流程(上)

开篇

本篇以android-11.0.0_r25作为基础解析

作为一名Android开发,我们最熟悉并且最常打交道的当然非四大组件中的Activity莫属,这次我们就来讲讲一个Activity是怎样启动起来的

本来本篇想要讲ActivityManagerService的,但AMS中的内容过多过于繁杂,不如用这种以线及面的方式,通过Activity的启动流程这一条线,去了解ActivityThreadAMS等是怎么工作的

Android窗口结构关系

在开始正式深入代码之前,我们需要先理一下Android的窗口结构关系,以免后面看到源码里各种parentchild头晕,我画了一张树状关系图来描述它

Android窗口结构关系

上图中的所有类都是WindowContainer的子类,WindowContainer是一个窗口容器,它的child也是WindowContainer,它是用来管理窗口子容器的

可以先不用纠结理解这张图中的关系,顺着源码往下看,碰到不理解的地方回头看一下就可以了

startActivity

作为Android开发,startActivity这个方法一定非常熟悉,我们以这个函数作为入口来分析Activity的启动流程

ActivityContextImplstartActivity方法实现不太一样,但最终都调用了Instrumentation.execStartActivity方法

Instrumentation

路径:frameworks/base/core/java/android/app/Instrumentation.java

以下是Google官方对这个类功能的注释

Base class for implementing application instrumentation code. When running with instrumentation turned on, this class will be instantiated for you before any of the application code, allowing you to monitor all of the interaction the system has with the application. An Instrumentation implementation is described to the system through an AndroidManifest.xml’s <instrumentation> tag.

简单翻译一下,就是这个类是用于监控系统与应用的交互的(onCreate等生命周期会经历Instrumentation这么一环),它会在任何App代码执行前被初始化。

本人猜测,这个类主要存在的意义是为了给自动化测试提供一个切入点

1
2
3
4
5
6
7
8
9
10
11
12
13
14
15
16
17
18
19
20
21
22
23
24
25
26
27
28
29
public ActivityResult execStartActivity(
Context who, IBinder contextThread, IBinder token, Activity target,
Intent intent, int requestCode, Bundle options) {
IApplicationThread whoThread = (IApplicationThread) contextThread;
//记录调用者
Uri referrer = target != null ? target.onProvideReferrer() : null;
if (referrer != null) {
intent.putExtra(Intent.EXTRA_REFERRER, referrer);
}

... //自动化测试相关

try {
//迁移额外的URI数据流到剪贴板(处理Intent使用ACTION_SEND或ACTION_SEND_MULTIPLE共享数据的情况)
intent.migrateExtraStreamToClipData(who);
//处理离开当前App进程的情况
intent.prepareToLeaveProcess(who);
//请求ATMS启动Activity
int result = ActivityTaskManager.getService().startActivity(whoThread,
who.getBasePackageName(), who.getAttributionTag(), intent,
intent.resolveTypeIfNeeded(who.getContentResolver()), token,
target != null ? target.mEmbeddedID : null, requestCode, 0, null, options);
//检查异常情况,抛出对应异常
checkStartActivityResult(result, intent);
} catch (RemoteException e) {
throw new RuntimeException("Failure from system", e);
}
return null;
}

这个函数调用了ActivityTaskManager.getService.startActivity方法

1
2
3
4
5
6
7
8
9
10
11
12
public static IActivityTaskManager getService() {
return IActivityTaskManagerSingleton.get();
}

private static final Singleton<IActivityTaskManager> IActivityTaskManagerSingleton =
new Singleton<IActivityTaskManager>() {
@Override
protected IActivityTaskManager create() {
final IBinder b = ServiceManager.getService(Context.ACTIVITY_TASK_SERVICE);
return IActivityTaskManager.Stub.asInterface(b);
}
};

这里getService出来的很明显的是一个远程binder对象,我们之前已经分析过那么多binder知识了,以后就不再过多啰嗦了,这里实际上调用的是ActivityTaskManagerSerivce(以下简称ATMS)的startActivity方法

ActivityTaskManagerSerivce

ATMSAndroid 10以后新加的一个服务,用来专门处理Activity相关工作,分担AMS的工作

1
2
3
4
5
6
7
8
9
10
11
12
13
14
15
16
17
18
19
20
21
22
23
24
25
26
27
28
29
30
31
32
33
34
35
36
37
38
39
40
41
42
43
44
45
46
47
48
49
@Override
public final int startActivity(IApplicationThread caller, String callingPackage,
String callingFeatureId, Intent intent, String resolvedType, IBinder resultTo,
String resultWho, int requestCode, int startFlags, ProfilerInfo profilerInfo,
Bundle bOptions) {
return startActivityAsUser(caller, callingPackage, callingFeatureId, intent, resolvedType,
resultTo, resultWho, requestCode, startFlags, profilerInfo, bOptions,
UserHandle.getCallingUserId());
}

@Override
public int startActivityAsUser(IApplicationThread caller, String callingPackage,
String callingFeatureId, Intent intent, String resolvedType, IBinder resultTo,
String resultWho, int requestCode, int startFlags, ProfilerInfo profilerInfo,
Bundle bOptions, int userId) {
return startActivityAsUser(caller, callingPackage, callingFeatureId, intent, resolvedType,
resultTo, resultWho, requestCode, startFlags, profilerInfo, bOptions, userId,
true /*validateIncomingUser*/);
}

private int startActivityAsUser(IApplicationThread caller, String callingPackage,
@Nullable String callingFeatureId, Intent intent, String resolvedType,
IBinder resultTo, String resultWho, int requestCode, int startFlags,
ProfilerInfo profilerInfo, Bundle bOptions, int userId, boolean validateIncomingUser) {
//断言发起startActivity请求方的UID和callingPackage指向的是同一个App
assertPackageMatchesCallingUid(callingPackage);
//确认请求方没有被隔离
enforceNotIsolatedCaller("startActivityAsUser");

//检查并获取当前用户ID(多用户模式)
userId = getActivityStartController().checkTargetUser(userId, validateIncomingUser,
Binder.getCallingPid(), Binder.getCallingUid(), "startActivityAsUser");

//使用ActivityStarter启动Activity
return getActivityStartController().obtainStarter(intent, "startActivityAsUser")
.setCaller(caller) //调用方ApplicationThread
.setCallingPackage(callingPackage) //调用方包名
.setCallingFeatureId(callingFeatureId) // Context.getAttributionTag()
.setResolvedType(resolvedType) //设置Intent解析类型
.setResultTo(resultTo) //设置目标Activity Token(ContextImpl.startActivity传入参数为null)
.setResultWho(resultWho) //设置目标Activity(ContextImpl.startActivity传入参数为null)
.setRequestCode(requestCode) //设置requestCode
.setStartFlags(startFlags) // startFlags == 0
.setProfilerInfo(profilerInfo) // null
.setActivityOptions(bOptions) //设置Activity Options Bundle
.setUserId(userId) //设置用户ID
.execute();

}

这个函数大部分内容都是检查,最重要的是最后一段使用ActivityStarter启动Activity,首先通过ActivityStartControllerobtainStarter方法获取一个ActivityStarter实例,然后调用各种set方法设置参数,最后执行execute方法执行

ActivityStarter

这个类从名字就能看出来,就是一个专门处理Activity启动的类

1
2
3
4
5
6
7
8
9
10
11
12
13
14
15
16
17
18
19
20
21
22
23
24
25
26
27
28
29
30
31
32
33
34
35
36
37
38
39
40
41
42
43
44
45
46
47
48
49
50
51
52
53
54
55
56
57
58
59
60
61
62
int execute() {
try {
// Refuse possible leaked file descriptors
//校验Intent,不允许其携带fd
if (mRequest.intent != null && mRequest.intent.hasFileDescriptors()) {
throw new IllegalArgumentException("File descriptors passed in Intent");
}

final LaunchingState launchingState;
synchronized (mService.mGlobalLock) {
//通过Token获取调用方ActivityRecord
final ActivityRecord caller = ActivityRecord.forTokenLocked(mRequest.resultTo);
//记录启动状态
launchingState = mSupervisor.getActivityMetricsLogger().notifyActivityLaunching(
mRequest.intent, caller);
}

// If the caller hasn't already resolved the activity, we're willing
// to do so here. If the caller is already holding the WM lock here,
// and we need to check dynamic Uri permissions, then we're forced
// to assume those permissions are denied to avoid deadlocking.
//通过Intent解析Activity信息
if (mRequest.activityInfo == null) {
mRequest.resolveActivity(mSupervisor);
}

int res;
synchronized (mService.mGlobalLock) {
... //处理Configuration

//清除Binder调用方UID和PID,用当前进程的UID和PID替代,并返回之前的UID和PID(UID:前32位,PID:后32位)
final long origId = Binder.clearCallingIdentity();

//解析成为重量级进程(如果设置了相关flag的话)
//这里的重量级进程指的是不能保存状态的应用进程
res = resolveToHeavyWeightSwitcherIfNeeded();
if (res != START_SUCCESS) {
return res;
}
//执行请求
res = executeRequest(mRequest);

//恢复之前的Binder调用方UID和PID
Binder.restoreCallingIdentity(origId);

... //更新Configuration

// Notify ActivityMetricsLogger that the activity has launched.
// ActivityMetricsLogger will then wait for the windows to be drawn and populate
// WaitResult.
//记录启动状态
mSupervisor.getActivityMetricsLogger().notifyActivityLaunched(launchingState, res,
mLastStartActivityRecord);
//返回启动结果
return getExternalResult(mRequest.waitResult == null ? res
: waitForResult(res, mLastStartActivityRecord));
}
} finally {
//清理回收工作
onExecutionComplete();
}
}

这个函数每一步做了什么我都用注释标出来了,大家看看就好,重点在于其中的executeRequest(mRequest)

1
2
3
4
5
6
7
8
9
10
11
12
13
14
15
16
17
18
19
20
21
22
23
24
25
26
27
28
29
30
31
32
33
34
35
36
37
38
39
40
41
42
43
44
45
46
47
48
49
50
51
52
53
54
55
56
57
58
59
60
61
62
63
64
65
66
67
68
69
70
71
72
73
74
75
76
77
78
79
80
81
82
83
84
85
86
87
88
89
90
91
92
93
94
95
96
97
98
99
100
101
102
103
104
105
106
107
108
109
110
111
112
113
114
115
116
117
118
119
120
121
122
123
124
125
126
127
128
129
130
131
132
133
134
135
136
137
138
139
140
141
142
143
144
145
146
147
148
149
150
151
152
153
154
155
156
157
158
159
160
161
162
163
164
165
166
167
168
169
170
171
172
173
174
175
176
177
178
179
180
181
182
183
184
185
186
187
188
189
190
191
192
193
194
195
196
197
198
199
200
201
202
203
204
205
206
207
208
209
210
211
212
213
214
215
216
217
218
219
220
221
222
223
224
225
226
227
228
229
230
231
232
233
234
235
236
237
238
239
240
241
242
243
244
245
246
247
248
249
250
251
252
253
254
255
256
257
258
259
260
261
262
263
264
265
266
267
268
269
270
271
272
273
274
275
276
277
278
279
280
281
282
283
284
285
286
287
288
289
290
291
292
293
294
295
296
297
298
299
300
301
302
303
304
305
306
307
308
309
310
311
312
313
314
315
316
317
318
319
/**
* Executing activity start request and starts the journey of starting an activity. Here
* begins with performing several preliminary checks. The normally activity launch flow will
* go through {@link #startActivityUnchecked} to {@link #startActivityInner}.
*/
private int executeRequest(Request request) {
if (TextUtils.isEmpty(request.reason)) {
throw new IllegalArgumentException("Need to specify a reason.");
}
mLastStartReason = request.reason;
mLastStartActivityTimeMs = System.currentTimeMillis();
mLastStartActivityRecord = null;

final IApplicationThread caller = request.caller;
Intent intent = request.intent;
NeededUriGrants intentGrants = request.intentGrants;
String resolvedType = request.resolvedType;
ActivityInfo aInfo = request.activityInfo;
ResolveInfo rInfo = request.resolveInfo;
final IVoiceInteractionSession voiceSession = request.voiceSession;
final IBinder resultTo = request.resultTo;
String resultWho = request.resultWho;
int requestCode = request.requestCode;
int callingPid = request.callingPid;
int callingUid = request.callingUid;
String callingPackage = request.callingPackage;
String callingFeatureId = request.callingFeatureId;
final int realCallingPid = request.realCallingPid;
final int realCallingUid = request.realCallingUid;
final int startFlags = request.startFlags;
final SafeActivityOptions options = request.activityOptions;
Task inTask = request.inTask;

int err = ActivityManager.START_SUCCESS;
// Pull the optional Ephemeral Installer-only bundle out of the options early.
final Bundle verificationBundle =
options != null ? options.popAppVerificationBundle() : null;

WindowProcessController callerApp = null;
if (caller != null) {
//获取调用方应用进程对应的WindowProcessController
//这个类是用于和ProcessRecord进行通讯的
callerApp = mService.getProcessController(caller);
if (callerApp != null) {
callingPid = callerApp.getPid();
callingUid = callerApp.mInfo.uid;
} else {
//异常情况,startActivity的调用方进程不存在或未启动
Slog.w(TAG, "Unable to find app for caller " + caller + " (pid=" + callingPid
+ ") when starting: " + intent.toString());
err = ActivityManager.START_PERMISSION_DENIED;
}
}

//获取当前用户ID
final int userId = aInfo != null && aInfo.applicationInfo != null
? UserHandle.getUserId(aInfo.applicationInfo.uid) : 0;
if (err == ActivityManager.START_SUCCESS) {
Slog.i(TAG, "START u" + userId + " {" + intent.toShortString(true, true, true, false)
+ "} from uid " + callingUid);
}

ActivityRecord sourceRecord = null;
ActivityRecord resultRecord = null;
//调用方Activity Token != null
if (resultTo != null) {
//获取调用方ActivityRecord(要求存在任意一个Window栈中,即是RootWindow的子嗣)
sourceRecord = mRootWindowContainer.isInAnyStack(resultTo);
if (DEBUG_RESULTS) {
Slog.v(TAG_RESULTS, "Will send result to " + resultTo + " " + sourceRecord);
}
if (sourceRecord != null) {
//调用方需要response
if (requestCode >= 0 && !sourceRecord.finishing) {
resultRecord = sourceRecord;
}
}
}

final int launchFlags = intent.getFlags();
//多Activity传值场景
if ((launchFlags & Intent.FLAG_ACTIVITY_FORWARD_RESULT) != 0 && sourceRecord != null) {
...
}

//找不到可以处理此Intent的组件
if (err == ActivityManager.START_SUCCESS && intent.getComponent() == null) {
// We couldn't find a class that can handle the given Intent.
// That's the end of that!
err = ActivityManager.START_INTENT_NOT_RESOLVED;
}

//Intent中解析不出相应的Activity信息
if (err == ActivityManager.START_SUCCESS && aInfo == null) {
// We couldn't find the specific class specified in the Intent.
// Also the end of the line.
err = ActivityManager.START_CLASS_NOT_FOUND;
}

if (err == ActivityManager.START_SUCCESS && sourceRecord != null
&& sourceRecord.getTask().voiceSession != null) {
... //语言交互相关
}

if (err == ActivityManager.START_SUCCESS && voiceSession != null) {
... //语言交互相关
}

final ActivityStack resultStack = resultRecord == null
? null : resultRecord.getRootTask();

if (err != START_SUCCESS) {
//回调给调用方Activity结果
if (resultRecord != null) {
resultRecord.sendResult(INVALID_UID, resultWho, requestCode, RESULT_CANCELED,
null /* data */, null /* dataGrants */);
}
SafeActivityOptions.abort(options);
return err;
}

//检查启动Activity的权限
boolean abort = !mSupervisor.checkStartAnyActivityPermission(intent, aInfo, resultWho,
requestCode, callingPid, callingUid, callingPackage, callingFeatureId,
request.ignoreTargetSecurity, inTask != null, callerApp, resultRecord, resultStack);
abort |= !mService.mIntentFirewall.checkStartActivity(intent, callingUid,
callingPid, resolvedType, aInfo.applicationInfo);
abort |= !mService.getPermissionPolicyInternal().checkStartActivity(intent, callingUid,
callingPackage);

boolean restrictedBgActivity = false;
if (!abort) {
try {
Trace.traceBegin(Trace.TRACE_TAG_WINDOW_MANAGER,
"shouldAbortBackgroundActivityStart");
//检查是否要限制后台启动Activity
restrictedBgActivity = shouldAbortBackgroundActivityStart(callingUid,
callingPid, callingPackage, realCallingUid, realCallingPid, callerApp,
request.originatingPendingIntent, request.allowBackgroundActivityStart,
intent);
} finally {
Trace.traceEnd(Trace.TRACE_TAG_WINDOW_MANAGER);
}
}

// Merge the two options bundles, while realCallerOptions takes precedence.
//过渡动画相关
ActivityOptions checkedOptions = options != null
? options.getOptions(intent, aInfo, callerApp, mSupervisor) : null;
if (request.allowPendingRemoteAnimationRegistryLookup) {
checkedOptions = mService.getActivityStartController()
.getPendingRemoteAnimationRegistry()
.overrideOptionsIfNeeded(callingPackage, checkedOptions);
}
if (mService.mController != null) {
try {
// The Intent we give to the watcher has the extra data stripped off, since it
// can contain private information.
Intent watchIntent = intent.cloneFilter();
//这个方法似乎只打印了一些日志,恒返回true,即abort |= false
abort |= !mService.mController.activityStarting(watchIntent,
aInfo.applicationInfo.packageName);
} catch (RemoteException e) {
mService.mController = null;
}
}

//初始化ActivityStartInterceptor
mInterceptor.setStates(userId, realCallingPid, realCallingUid, startFlags, callingPackage,
callingFeatureId);
if (mInterceptor.intercept(intent, rInfo, aInfo, resolvedType, inTask, callingPid,
callingUid, checkedOptions)) {
// activity start was intercepted, e.g. because the target user is currently in quiet
// mode (turn off work) or the target application is suspended
//拦截并转化成其他的启动模式
intent = mInterceptor.mIntent;
rInfo = mInterceptor.mRInfo;
aInfo = mInterceptor.mAInfo;
resolvedType = mInterceptor.mResolvedType;
inTask = mInterceptor.mInTask;
callingPid = mInterceptor.mCallingPid;
callingUid = mInterceptor.mCallingUid;
checkedOptions = mInterceptor.mActivityOptions;

// The interception target shouldn't get any permission grants
// intended for the original destination
intentGrants = null;
}

if (abort) {
//回调给调用方Activity结果
if (resultRecord != null) {
resultRecord.sendResult(INVALID_UID, resultWho, requestCode, RESULT_CANCELED,
null /* data */, null /* dataGrants */);
}
// We pretend to the caller that it was really started, but they will just get a
// cancel result.
ActivityOptions.abort(checkedOptions);
return START_ABORTED;
}

// If permissions need a review before any of the app components can run, we
// launch the review activity and pass a pending intent to start the activity
// we are to launching now after the review is completed.
if (aInfo != null) {
//如果启动的Activity没有相应权限,则需要用户手动确认允许权限后,再进行启动工作
if (mService.getPackageManagerInternalLocked().isPermissionsReviewRequired(
aInfo.packageName, userId)) {
//将原来的Intent包装在新的Intent中,用这个确认权限的新Intent继续后面的启动工作
final IIntentSender target = mService.getIntentSenderLocked(
ActivityManager.INTENT_SENDER_ACTIVITY, callingPackage, callingFeatureId,
callingUid, userId, null, null, 0, new Intent[]{intent},
new String[]{resolvedType}, PendingIntent.FLAG_CANCEL_CURRENT
| PendingIntent.FLAG_ONE_SHOT, null);

Intent newIntent = new Intent(Intent.ACTION_REVIEW_PERMISSIONS);

int flags = intent.getFlags();
flags |= Intent.FLAG_ACTIVITY_EXCLUDE_FROM_RECENTS;

/*
* Prevent reuse of review activity: Each app needs their own review activity. By
* default activities launched with NEW_TASK or NEW_DOCUMENT try to reuse activities
* with the same launch parameters (extras are ignored). Hence to avoid possible
* reuse force a new activity via the MULTIPLE_TASK flag.
*
* Activities that are not launched with NEW_TASK or NEW_DOCUMENT are not re-used,
* hence no need to add the flag in this case.
*/
if ((flags & (FLAG_ACTIVITY_NEW_TASK | FLAG_ACTIVITY_NEW_DOCUMENT)) != 0) {
flags |= Intent.FLAG_ACTIVITY_MULTIPLE_TASK;
}
newIntent.setFlags(flags);

newIntent.putExtra(Intent.EXTRA_PACKAGE_NAME, aInfo.packageName);
newIntent.putExtra(Intent.EXTRA_INTENT, new IntentSender(target));
if (resultRecord != null) {
newIntent.putExtra(Intent.EXTRA_RESULT_NEEDED, true);
}
intent = newIntent;

// The permissions review target shouldn't get any permission
// grants intended for the original destination
intentGrants = null;

resolvedType = null;
callingUid = realCallingUid;
callingPid = realCallingPid;

rInfo = mSupervisor.resolveIntent(intent, resolvedType, userId, 0,
computeResolveFilterUid(
callingUid, realCallingUid, request.filterCallingUid));
aInfo = mSupervisor.resolveActivity(intent, rInfo, startFlags,
null /*profilerInfo*/);
}
}

// If we have an ephemeral app, abort the process of launching the resolved intent.
// Instead, launch the ephemeral installer. Once the installer is finished, it
// starts either the intent we resolved here [on install error] or the ephemeral
// app [on install success].
if (rInfo != null && rInfo.auxiliaryInfo != null) {
... //Instant App相关
}

//创建启动Activity的ActivityRecord
final ActivityRecord r = new ActivityRecord(mService, callerApp, callingPid, callingUid,
callingPackage, callingFeatureId, intent, resolvedType, aInfo,
mService.getGlobalConfiguration(), resultRecord, resultWho, requestCode,
request.componentSpecified, voiceSession != null, mSupervisor, checkedOptions,
sourceRecord);
mLastStartActivityRecord = r;

if (r.appTimeTracker == null && sourceRecord != null) {
// If the caller didn't specify an explicit time tracker, we want to continue
// tracking under any it has.
r.appTimeTracker = sourceRecord.appTimeTracker;
}

//获取顶层焦点的Acticity栈
final ActivityStack stack = mRootWindowContainer.getTopDisplayFocusedStack();

// If we are starting an activity that is not from the same uid as the currently resumed
// one, check whether app switches are allowed.
//当此时栈顶Activity UID != 调用方 UID的时候(比如悬浮窗)
if (voiceSession == null && stack != null && (stack.getResumedActivity() == null
|| stack.getResumedActivity().info.applicationInfo.uid != realCallingUid)) {
//检查是否可以直接切换应用
// 1. 设置的 mAppSwitchesAllowedTime < 当前系统时间(stopAppSwitches)
// 2. 调用方在最近任务中
// 3. 调用方具有 STOP_APP_SWITCHES 权限
// ...
if (!mService.checkAppSwitchAllowedLocked(callingPid, callingUid,
realCallingPid, realCallingUid, "Activity start")) {
//加入到延时启动列表中
if (!(restrictedBgActivity && handleBackgroundActivityAbort(r))) {
mController.addPendingActivityLaunch(new PendingActivityLaunch(r,
sourceRecord, startFlags, stack, callerApp, intentGrants));
}
ActivityOptions.abort(checkedOptions);
return ActivityManager.START_SWITCHES_CANCELED;
}
}

//回调处理延迟应用切换
mService.onStartActivitySetDidAppSwitch();
mController.doPendingActivityLaunches(false);

//核心:进入Activity启动的下一阶段
mLastStartActivityResult = startActivityUnchecked(r, sourceRecord, voiceSession,
request.voiceInteractor, startFlags, true /* doResume */, checkedOptions, inTask,
restrictedBgActivity, intentGrants);

if (request.outActivity != null) {
request.outActivity[0] = mLastStartActivityRecord;
}

return mLastStartActivityResult;
}

这个函数大部分都是检查工作,这些可以看我标的注释,基本上介绍的比较详细了,然后进入到Activity启动的下一步,startActivityUnchecked

1
2
3
4
5
6
7
8
9
10
11
12
13
14
15
16
17
18
19
20
21
22
23
24
25
26
27
28
29
30
/**
* Start an activity while most of preliminary checks has been done and caller has been
* confirmed that holds necessary permissions to do so.
* Here also ensures that the starting activity is removed if the start wasn't successful.
*/
private int startActivityUnchecked(final ActivityRecord r, ActivityRecord sourceRecord,
IVoiceInteractionSession voiceSession, IVoiceInteractor voiceInteractor,
int startFlags, boolean doResume, ActivityOptions options, Task inTask,
boolean restrictedBgActivity, NeededUriGrants intentGrants) {
int result = START_CANCELED;
final ActivityStack startedActivityStack;
try {
//暂停布局工作,避免重复刷新
mService.deferWindowLayout();
Trace.traceBegin(Trace.TRACE_TAG_WINDOW_MANAGER, "startActivityInner");
//接着把启动Activity工作交给这个方法
result = startActivityInner(r, sourceRecord, voiceSession, voiceInteractor,
startFlags, doResume, options, inTask, restrictedBgActivity, intentGrants);
} finally {
Trace.traceEnd(Trace.TRACE_TAG_WINDOW_MANAGER);
//进行一些更新Configuration,清理栈等收尾工作
startedActivityStack = handleStartResult(r, result);
//恢复布局工作
mService.continueWindowLayout();
}

postStartActivityProcessing(r, result, startedActivityStack);

return result;
}

这个方法也不是主要逻辑所在,我们往下接着看startActivityInner方法

1
2
3
4
5
6
7
8
9
10
11
12
13
14
15
16
17
18
19
20
21
22
23
24
25
26
27
28
29
30
31
32
33
34
35
36
37
38
39
40
41
42
43
44
45
46
47
48
49
50
51
52
53
54
55
56
57
58
59
60
61
62
63
64
65
66
67
68
69
70
71
72
73
74
75
76
77
78
79
80
81
82
83
84
85
86
87
88
89
90
91
92
93
94
95
96
97
98
99
100
101
102
103
104
105
106
107
108
109
110
111
112
113
114
115
116
117
118
119
120
121
122
123
124
125
126
127
128
129
130
131
132
133
134
135
136
137
138
139
140
141
142
143
144
145
146
147
148
149
150
151
152
153
154
155
156
157
158
159
160
161
162
163
164
165
166
167
/**
* Start an activity and determine if the activity should be adding to the top of an existing
* task or delivered new intent to an existing activity. Also manipulating the activity task
* onto requested or valid stack/display.
*
* Note: This method should only be called from {@link #startActivityUnchecked}.
*/

// TODO(b/152429287): Make it easier to exercise code paths through startActivityInner
@VisibleForTesting
int startActivityInner(final ActivityRecord r, ActivityRecord sourceRecord,
IVoiceInteractionSession voiceSession, IVoiceInteractor voiceInteractor,
int startFlags, boolean doResume, ActivityOptions options, Task inTask,
boolean restrictedBgActivity, NeededUriGrants intentGrants) {
//设置初始化参数
setInitialState(r, options, inTask, doResume, startFlags, sourceRecord, voiceSession,
voiceInteractor, restrictedBgActivity);
//计算处理Activity启动模式
computeLaunchingTaskFlags();
//计算调用方Activity任务栈
computeSourceStack();

//将flags设置为调整后的LaunchFlags
mIntent.setFlags(mLaunchFlags);

//查找是否有可复用的Task
final Task reusedTask = getReusableTask();

// If requested, freeze the task list
if (mOptions != null && mOptions.freezeRecentTasksReordering()
&& mSupervisor.mRecentTasks.isCallerRecents(r.launchedFromUid)
&& !mSupervisor.mRecentTasks.isFreezeTaskListReorderingSet()) {
mFrozeTaskList = true;
mSupervisor.mRecentTasks.setFreezeTaskListReordering();
}

// Compute if there is an existing task that should be used for.
//计算是否存在可使用的现有Task
final Task targetTask = reusedTask != null ? reusedTask : computeTargetTask();
final boolean newTask = targetTask == null;
mTargetTask = targetTask;

//计算启动参数
computeLaunchParams(r, sourceRecord, targetTask);

// Check if starting activity on given task or on a new task is allowed.
//检查是否允许在targetTask上或者新建Task启动
int startResult = isAllowedToStart(r, newTask, targetTask);
if (startResult != START_SUCCESS) {
return startResult;
}

//获得栈顶未finish的ActivityRecord
final ActivityRecord targetTaskTop = newTask
? null : targetTask.getTopNonFinishingActivity();
if (targetTaskTop != null) {
// Recycle the target task for this launch.
//回收,准备复用这个Task
startResult = recycleTask(targetTask, targetTaskTop, reusedTask, intentGrants);
if (startResult != START_SUCCESS) {
return startResult;
}
} else {
mAddingToTask = true;
}

// If the activity being launched is the same as the one currently at the top, then
// we need to check if it should only be launched once.
//处理singleTop启动模式
final ActivityStack topStack = mRootWindowContainer.getTopDisplayFocusedStack();
if (topStack != null) {
startResult = deliverToCurrentTopIfNeeded(topStack, intentGrants);
if (startResult != START_SUCCESS) {
return startResult;
}
}

//复用或创建Activity栈
if (mTargetStack == null) {
mTargetStack = getLaunchStack(mStartActivity, mLaunchFlags, targetTask, mOptions);
}

if (newTask) { //开启新Task
final Task taskToAffiliate = (mLaunchTaskBehind && mSourceRecord != null)
? mSourceRecord.getTask() : null;
//复用或新建一个Task,并建立Task与ActivityRecord之间的关联
setNewTask(taskToAffiliate);
if (mService.getLockTaskController().isLockTaskModeViolation(
mStartActivity.getTask())) {
Slog.e(TAG, "Attempted Lock Task Mode violation mStartActivity=" + mStartActivity);
return START_RETURN_LOCK_TASK_MODE_VIOLATION;
}
} else if (mAddingToTask) { //复用Task
//将启动Activity添加到targetTask容器顶部或将其父容器替换成targetTask(也会将启动Activity添加到targetTask容器顶部)
addOrReparentStartingActivity(targetTask, "adding to task");
}

if (!mAvoidMoveToFront && mDoResume) {
mTargetStack.getStack().moveToFront("reuseOrNewTask", targetTask);
if (mOptions != null) {
if (mOptions.getTaskAlwaysOnTop()) {
mTargetStack.setAlwaysOnTop(true);
}
}
if (!mTargetStack.isTopStackInDisplayArea() && mService.mInternal.isDreaming()) {
// Launching underneath dream activity (fullscreen, always-on-top). Run the launch-
// -behind transition so the Activity gets created and starts in visible state.
mLaunchTaskBehind = true;
r.mLaunchTaskBehind = true;
}
}

...

mTargetStack.mLastPausedActivity = null;

mRootWindowContainer.sendPowerHintForLaunchStartIfNeeded(
false /* forceSend */, mStartActivity);

//将Task移到ActivityStack容器顶部
mTargetStack.startActivityLocked(mStartActivity, topStack.getTopNonFinishingActivity(),
newTask, mKeepCurTransition, mOptions);
if (mDoResume) {
final ActivityRecord topTaskActivity =
mStartActivity.getTask().topRunningActivityLocked();
//启动的Activity不可获得焦点,无法恢复它
if (!mTargetStack.isTopActivityFocusable()
|| (topTaskActivity != null && topTaskActivity.isTaskOverlay()
&& mStartActivity != topTaskActivity)) {
// If the activity is not focusable, we can't resume it, but still would like to
// make sure it becomes visible as it starts (this will also trigger entry
// animation). An example of this are PIP activities.
// Also, we don't want to resume activities in a task that currently has an overlay
// as the starting activity just needs to be in the visible paused state until the
// over is removed.
// Passing {@code null} as the start parameter ensures all activities are made
// visible.
mTargetStack.ensureActivitiesVisible(null /* starting */,
0 /* configChanges */, !PRESERVE_WINDOWS);
// Go ahead and tell window manager to execute app transition for this activity
// since the app transition will not be triggered through the resume channel.
mTargetStack.getDisplay().mDisplayContent.executeAppTransition();
} else {
// If the target stack was not previously focusable (previous top running activity
// on that stack was not visible) then any prior calls to move the stack to the
// will not update the focused stack. If starting the new activity now allows the
// task stack to be focusable, then ensure that we now update the focused stack
// accordingly.
if (mTargetStack.isTopActivityFocusable()
&& !mRootWindowContainer.isTopDisplayFocusedStack(mTargetStack)) {
mTargetStack.moveToFront("startActivityInner");
}
//重点:恢复栈顶Activities
mRootWindowContainer.resumeFocusedStacksTopActivities(
mTargetStack, mStartActivity, mOptions);
}
}
mRootWindowContainer.updateUserStack(mStartActivity.mUserId, mTargetStack);

// Update the recent tasks list immediately when the activity starts
//当Activity启动后立刻更新最近任务列表
mSupervisor.mRecentTasks.add(mStartActivity.getTask());
mSupervisor.handleNonResizableTaskIfNeeded(mStartActivity.getTask(),
mPreferredWindowingMode, mPreferredTaskDisplayArea, mTargetStack);

return START_SUCCESS;
}

这里主要做了一些Task和栈的操作,是否可以复用栈,是否需要新栈,处理栈顶复用等相关操作。我们需要注意一下这里关于Task的操作,不管是新建TasknewTask)还是复用TaskmAddingToTask),都会调用到addOrReparentStartingActivity方法将启动ActivityRecord添加到targetTask容器顶部(newTask的情况下会调用setNewTask方法先复用或创建Task,然后再用这个Task调用addOrReparentStartingActivity方法),之后调用mTargetStack.startActivityLocked方法将Task移到mTargetStack容器顶部,此时调用mTargetStack.topRunningActivity便会得到我们将要启动的这个ActivityRecord

最后判断目标Activity是否可获得焦点,当可获得焦点的时候,调用RootWindowContainer.resumeFocusedStacksTopActivities方法恢复Activity

要注意,从这个方法开始的以后的方法不再只是针对Activity启动的方法,它们有可能被多方调用,所以其中的一些步骤case我们是不会经历的,可以忽略掉这部分

RootWindowContainer

RootWindowContainer是显示窗口的根窗口容器,它主要是用来管理显示屏幕的

1
2
3
4
5
6
7
8
9
10
11
12
13
14
15
16
17
18
19
20
21
22
23
24
25
26
27
28
29
30
31
32
33
34
35
36
37
38
39
40
41
42
43
44
45
46
47
48
49
50
51
52
53
54
55
56
57
58
59
60
61
boolean resumeFocusedStacksTopActivities(
ActivityStack targetStack, ActivityRecord target, ActivityOptions targetOptions) {

if (!mStackSupervisor.readyToResume()) {
return false;
}

boolean result = false;
//目标栈在栈顶显示区域
if (targetStack != null && (targetStack.isTopStackInDisplayArea()
|| getTopDisplayFocusedStack() == targetStack)) {
//使用目标栈进行恢复
result = targetStack.resumeTopActivityUncheckedLocked(target, targetOptions);
}

//可能存在多显示设备(投屏等)
for (int displayNdx = getChildCount() - 1; displayNdx >= 0; --displayNdx) {
boolean resumedOnDisplay = false;
final DisplayContent display = getChildAt(displayNdx);
for (int tdaNdx = display.getTaskDisplayAreaCount() - 1; tdaNdx >= 0; --tdaNdx) {
final TaskDisplayArea taskDisplayArea = display.getTaskDisplayAreaAt(tdaNdx);
for (int sNdx = taskDisplayArea.getStackCount() - 1; sNdx >= 0; --sNdx) {
final ActivityStack stack = taskDisplayArea.getStackAt(sNdx);
final ActivityRecord topRunningActivity = stack.topRunningActivity();
if (!stack.isFocusableAndVisible() || topRunningActivity == null) {
continue;
}
if (stack == targetStack) {
//如果进入到这里,代表着targetStack在上面已经恢复过了,此时只需要记录结果即可
resumedOnDisplay |= result;
continue;
}
if (taskDisplayArea.isTopStack(stack) && topRunningActivity.isState(RESUMED)) {
//执行切换效果
stack.executeAppTransition(targetOptions);
} else {
//使顶部显示的Activity执行Resume、Pause或Start生命周期
resumedOnDisplay |= topRunningActivity.makeActiveIfNeeded(target);
}
}
}
if (!resumedOnDisplay) {
// In cases when there are no valid activities (e.g. device just booted or launcher
// crashed) it's possible that nothing was resumed on a display. Requesting resume
// of top activity in focused stack explicitly will make sure that at least home
// activity is started and resumed, and no recursion occurs.
//当没有任何有效的Activity的时候(设备刚启动或Launcher崩溃),可能没有任何东西可被恢复
//这时候使用DisplayContent中的焦点栈进行恢复
//如果连存在焦点的栈都没有,则恢复Launcher的Activity
final ActivityStack focusedStack = display.getFocusedStack();
if (focusedStack != null) {
result |= focusedStack.resumeTopActivityUncheckedLocked(target, targetOptions);
} else if (targetStack == null) {
result |= resumeHomeActivity(null /* prev */, "no-focusable-task",
display.getDefaultTaskDisplayArea());
}
}
}

return result;
}

这个方法主要做了几件事:

  • 如果目标栈在栈顶显示区域,执行Resume

  • 遍历显示设备,从中遍历所有有焦点并且可见的栈,对其栈顶Activity执行相应的切换效果及生命周期

  • 对每个显示设备,如果存在焦点栈,则使用其执行Resume,否则启动Launcher

在正常情况下,我们会走进ActivityStack.resumeTopActivityUncheckedLocked这个方法

ActivityStack

Activity栈,用于管理栈中的Activity

1
2
3
4
5
6
7
8
9
10
11
12
13
14
15
16
17
18
19
20
21
22
23
24
25
26
27
28
29
30
31
32
boolean resumeTopActivityUncheckedLocked(ActivityRecord prev, ActivityOptions options) {
if (mInResumeTopActivity) {
// Don't even start recursing.
//防止递归
return false;
}

boolean result = false;
try {
// Protect against recursion.
//防止递归
mInResumeTopActivity = true;
result = resumeTopActivityInnerLocked(prev, options);

// When resuming the top activity, it may be necessary to pause the top activity (for
// example, returning to the lock screen. We suppress the normal pause logic in
// {@link #resumeTopActivityUncheckedLocked}, since the top activity is resumed at the
// end. We call the {@link ActivityStackSupervisor#checkReadyForSleepLocked} again here
// to ensure any necessary pause logic occurs. In the case where the Activity will be
// shown regardless of the lock screen, the call to
// {@link ActivityStackSupervisor#checkReadyForSleepLocked} is skipped.
final ActivityRecord next = topRunningActivity(true /* focusableOnly */);
if (next == null || !next.canTurnScreenOn()) {
//准备休眠
checkReadyForSleep();
}
} finally {
mInResumeTopActivity = false;
}

return result;
}

这里做了一个防止递归调用的措施,接下来调用了resumeTopActivityInnerLocked方法

1
2
3
4
5
6
7
8
9
10
11
12
13
14
15
16
17
18
19
20
21
22
23
24
25
26
27
28
29
30
31
32
33
34
35
36
37
38
39
40
41
42
43
44
45
46
47
48
49
50
51
52
53
54
55
56
57
58
59
60
61
62
63
64
65
66
67
68
69
70
71
72
73
74
75
76
77
78
79
80
81
82
83
84
85
86
87
88
89
90
91
92
93
94
95
96
97
98
99
100
101
102
103
104
105
106
107
108
109
110
111
112
113
114
115
116
117
118
119
120
121
122
123
124
125
126
127
128
129
130
131
132
133
134
135
136
137
138
139
140
141
142
143
144
145
146
147
148
149
150
151
152
153
154
155
156
157
158
159
160
161
162
163
164
165
166
167
168
169
170
171
172
173
174
175
176
177
178
179
180
181
182
183
184
185
186
187
188
189
190
191
192
193
194
195
196
197
198
199
200
201
202
203
204
205
206
207
208
209
210
211
212
213
214
215
216
217
218
219
220
221
222
223
224
225
226
227
228
229
230
231
232
private boolean resumeTopActivityInnerLocked(ActivityRecord prev, ActivityOptions options) {
if (!mAtmService.isBooting() && !mAtmService.isBooted()) {
// Not ready yet!
//ATMS服务尚未准备好
return false;
}

// Find the next top-most activity to resume in this stack that is not finishing and is
// focusable. If it is not focusable, we will fall into the case below to resume the
// top activity in the next focusable task.
//在之前我们已经把要启动的ActivityRecord加到了栈顶
ActivityRecord next = topRunningActivity(true /* focusableOnly */);

final boolean hasRunningActivity = next != null;

...

if (!hasRunningActivity) {
// There are no activities left in the stack, let's look somewhere else.
return resumeNextFocusableActivityWhenStackIsEmpty(prev, options);
}

next.delayedResume = false;
final TaskDisplayArea taskDisplayArea = getDisplayArea();

// If the top activity is the resumed one, nothing to do.
//如果需要Resume的已在顶部且状态为Resume,不需要做任何事
//启动Activity不会碰到这种case
if (mResumedActivity == next && next.isState(RESUMED)
&& taskDisplayArea.allResumedActivitiesComplete()) {
...
return false;
}

if (!next.canResumeByCompat()) {
return false;
}

// If we are currently pausing an activity, then don't do anything until that is done.
//如果有正在Pause的Activity,在它Pause完成前不要做任何事
final boolean allPausedComplete = mRootWindowContainer.allPausedActivitiesComplete();
if (!allPausedComplete) {
return false;
}

...

// Make sure that the user who owns this activity is started. If not,
// we will just leave it as is because someone should be bringing
// another user's activities to the top of the stack.
//确保拥有此Activity的用户已启动
if (!mAtmService.mAmInternal.hasStartedUserState(next.mUserId)) {
return false;
}

// The activity may be waiting for stop, but that is no longer
// appropriate for it.
mStackSupervisor.mStoppingActivities.remove(next);
next.setSleeping(false);

//这里似乎重复检查了,我去查看了一下master分支的代码,已经没有这一段了
if (!mRootWindowContainer.allPausedActivitiesComplete()) {
return false;
}

//设置启动Activity UID,获取WakeLock,保证在显示Activity的过程中,系统不会进行休眠状态
mStackSupervisor.setLaunchSource(next.info.applicationInfo.uid);

ActivityRecord lastResumed = null;
//上一个具有焦点的ActivityStack(目前仍是屏幕上正在显示的那个Activity的栈)
final ActivityStack lastFocusedStack = taskDisplayArea.getLastFocusedStack();
if (lastFocusedStack != null && lastFocusedStack != this) {
lastResumed = lastFocusedStack.mResumedActivity;
...
}

//Pause掉其他ActivityStack中的栈顶状态为Resume的Activity
boolean pausing = taskDisplayArea.pauseBackStacks(userLeaving, next);
//Pause掉当前ActivityStack中的栈顶状态为Resume的Activity
if (mResumedActivity != null) {
pausing |= startPausingLocked(userLeaving, false /* uiSleeping */, next);
}
if (pausing) { //有Activity执行了Pause
// At this point we want to put the upcoming activity's process
// at the top of the LRU list, since we know we will be needing it
// very soon and it would be a waste to let it get killed if it
// happens to be sitting towards the end.
if (next.attachedToProcess()) {
//将启动的Activity进程信息移至lru列表的头部
//因为很快就会使用它启动Activity
next.app.updateProcessInfo(false /* updateServiceConnectionActivities */,
true /* activityChange */, false /* updateOomAdj */,
false /* addPendingTopUid */);
} else if (!next.isProcessRunning()) { //App进程未启动
// Since the start-process is asynchronous, if we already know the process of next
// activity isn't running, we can start the process earlier to save the time to wait
// for the current activity to be paused.
final boolean isTop = this == taskDisplayArea.getFocusedStack();
//启动App进程
mAtmService.startProcessAsync(next, false /* knownToBeDead */, isTop,
isTop ? "pre-top-activity" : "pre-activity");
}
...
//这里会先结束掉启动Activity的流程,等待onPause生命周期走完后
//再重新调用这个方法执行下一步操作,避免Activity生命周期紊乱
return true;
} else if (mResumedActivity == next && next.isState(RESUMED)
&& taskDisplayArea.allResumedActivitiesComplete()) {
// It is possible for the activity to be resumed when we paused back stacks above if the
// next activity doesn't have to wait for pause to complete.
// So, nothing else to-do except:
// Make sure we have executed any pending transitions, since there
// should be nothing left to do at this point.
//不需要等待其他的Activity onPause完成
//执行完切换效果后就没有什么其他需要做的了
executeAppTransition(options);
return true;
}

...

//启动Activity流程不会进入这个case
if (prev != null && prev != next && next.nowVisible) {
if (prev.finishing) {
prev.setVisibility(false);
}
}

//修改启动Activity的package的状态
mAtmService.getPackageManager().setPackageStoppedState(
next.packageName, false, next.mUserId);

... //Activity转场动画准备

if (next.attachedToProcess()) { //对于将要启动的ActivityRecord来说,此时尚未完成和Process的绑定,返回false
...
ActivityRecord lastResumedActivity =
lastFocusedStack == null ? null : lastFocusedStack.mResumedActivity;
//保存状态以做后面恢复使用
final ActivityState lastState = next.getState();

mAtmService.updateCpuStats();

//更新ActivityRecord状态
next.setState(RESUMED, "resumeTopActivityInnerLocked");

//更新启动Activity的进程信息并将其移至lru列表的头部
next.app.updateProcessInfo(false /* updateServiceConnectionActivities */,
true /* activityChange */, true /* updateOomAdj */,
true /* addPendingTopUid */);

... //更新Activity显示、方向和Configuration

try {
final ClientTransaction transaction =
ClientTransaction.obtain(next.app.getThread(), next.appToken);
// Deliver all pending results.
ArrayList<ResultInfo> a = next.results;
if (a != null) {
final int N = a.size();
if (!next.finishing && N > 0) {
if (DEBUG_RESULTS) Slog.v(TAG_RESULTS,
"Delivering results to " + next + ": " + a);
transaction.addCallback(ActivityResultItem.obtain(a));
}
}

if (next.newIntents != null) {
transaction.addCallback(
NewIntentItem.obtain(next.newIntents, true /* resume */));
}

// Well the app will no longer be stopped.
// Clear app token stopped state in window manager if needed.
next.notifyAppResumed(next.stopped);

EventLogTags.writeWmResumeActivity(next.mUserId, System.identityHashCode(next),
next.getTask().mTaskId, next.shortComponentName);

next.setSleeping(false);
mAtmService.getAppWarningsLocked().onResumeActivity(next);
next.app.setPendingUiCleanAndForceProcessStateUpTo(mAtmService.mTopProcessState);
next.clearOptionsLocked();
//设置onResume生命周期请求
transaction.setLifecycleStateRequest(
ResumeActivityItem.obtain(next.app.getReportedProcState(),
dc.isNextTransitionForward()));
//调度执行Activity onResume生命周期
mAtmService.getLifecycleManager().scheduleTransaction(transaction);

if (DEBUG_STATES) Slog.d(TAG_STATES, "resumeTopActivityLocked: Resumed "
+ next);
} catch (Exception e) { //resume失败需要尝试restart
//恢复初始状态
next.setState(lastState, "resumeTopActivityInnerLocked");
if (lastResumedActivity != null) {
lastResumedActivity.setState(RESUMED, "resumeTopActivityInnerLocked");
}
...
//重新启动Activity
mStackSupervisor.startSpecificActivity(next, true, false);
return true;
}

// From this point on, if something goes wrong there is no way
// to recover the activity.
try {
//更新信息
next.completeResumeLocked();
} catch (Exception e) {
// If any exception gets thrown, toss away this
// activity and try the next one.
Slog.w(TAG, "Exception thrown during resume of " + next, e);
next.finishIfPossible("resume-exception", true /* oomAdj */);
return true;
}
} else { //尚未绑定Process
// Whoops, need to restart this activity!
if (!next.hasBeenLaunched) {
next.hasBeenLaunched = true;
} else {
if (SHOW_APP_STARTING_PREVIEW) {
next.showStartingWindow(null /* prev */, false /* newTask */,
false /* taskSwich */);
}
}
//启动Activity
mStackSupervisor.startSpecificActivity(next, true, true);
}

return true;
}

这里的代码很长,其实我们只需要关注三个点:

  1. Pause掉其他Activity

  2. 如果对应App尚未启动,启动App进程

  3. 启动Activity

第一步,在启动Activity前,我们需要先Pause掉其他Activity,这一点很好理解,我们可以对照着看Activity生命周期也是这样的,这里会通过ATMS跨进程调用相应ActivityonPause生命周期,等待onPause执行完成后,再跨进程调用回ATMS,经过一系列方法调用,又重新调用resumeTopActivityInnerLocked方法,继续执行下一步操作

第二步,如果App尚未启动,则先去启动App进程,这主要体现在这里

1
2
3
4
5
if (!next.isProcessRunning()) { //App进程未启动
//启动App进程
mAtmService.startProcessAsync(next, false /* knownToBeDead */, isTop,
isTop ? "pre-top-activity" : "pre-activity");
}

在启动完App进程后,会调用ATMSattachApplication方法,最终调用到ActivityStackSupervisor.realStartActivityLocked方法启动Activity,这个方法后面会讲

第三步,如果App进程已经启动,这时候会调用ActivityStackSupervisor.startSpecificActivity方法,最终殊途同归调用ActivityStackSupervisor.realStartActivityLocked方法启动Activity

结束

这里篇幅有点过长了,所以我觉得还是分篇比较好,这一章其实重要内容不是很多,最主要的内容,像Activity的生命周期控制,App进程的启动,Activity具体的启动及其后续生命周期执行都会放在下一章来讲


Android源码分析 - Framework层的Binder(服务端篇)

开篇

本篇以aosp分支android-11.0.0_r25,kernel分支android-msm-wahoo-4.4-android11作为基础解析

我们在上一片文章Android源码分析 - Framework层的Binder(客户端篇)中,分析了客户端是怎么向服务端通过binder驱动发起请求,然后再接收服务端的返回的。本篇文章,我们将会以服务端的视角,分析服务端是怎么通过binder驱动接收客户端的请求,处理,然后再返回给客户端的。

ServiceManager

上篇文章我们是以ServiceManager作为服务端分析的,本篇文章我们还是围绕着它来做分析,它也是一个比较特殊的服务端,我们正好可以顺便分析一下它是怎么成为binder驱动的context_manager

进程启动

ServiceManager是在独立的进程中运行的,它是由init进程从rc文件中解析并启动的,路径为frameworks/native/cmds/servicemanager/servicemanager.rc

1
2
3
4
5
6
7
8
9
10
11
12
13
14
15
16
17
18
service servicemanager /system/bin/servicemanager
class core animation
user system
group system readproc
critical
onrestart restart healthd
onrestart restart zygote
onrestart restart audioserver
onrestart restart media
onrestart restart surfaceflinger
onrestart restart inputflinger
onrestart restart drm
onrestart restart cameraserver
onrestart restart keystore
onrestart restart gatekeeperd
onrestart restart thermalservice
writepid /dev/cpuset/system-background/tasks
shutdown critical

这个服务的入口函数位于frameworks/native/cmds/servicemanager/main.cppmain函数中

1
2
3
4
5
6
7
8
9
10
11
12
13
14
15
16
17
18
19
20
21
22
23
24
25
26
27
28
29
30
31
32
33
34
35
36
37
38
39
int main(int argc, char** argv) {
//根据上面的rc文件,argc == 1, argv[0] == "/system/bin/servicemanager"
if (argc > 2) {
LOG(FATAL) << "usage: " << argv[0] << " [binder driver]";
}

//此时,要使用的binder驱动为/dev/binder
const char* driver = argc == 2 ? argv[1] : "/dev/binder";

//初始化binder驱动
sp<ProcessState> ps = ProcessState::initWithDriver(driver);
ps->setThreadPoolMaxThreadCount(0);
ps->setCallRestriction(ProcessState::CallRestriction::FATAL_IF_NOT_ONEWAY);

//实例化ServiceManager
sp<ServiceManager> manager = new ServiceManager(std::make_unique<Access>());
//将自身作为服务添加
if (!manager->addService("manager", manager, false /*allowIsolated*/, IServiceManager::DUMP_FLAG_PRIORITY_DEFAULT).isOk()) {
LOG(ERROR) << "Could not self register servicemanager";
}

//设置服务端Bbinder对象
IPCThreadState::self()->setTheContextObject(manager);
//设置成为binder驱动的context manager
ps->becomeContextManager(nullptr, nullptr);

//通过Looper epoll机制处理binder事务
sp<Looper> looper = Looper::prepare(false /*allowNonCallbacks*/);

BinderCallback::setupTo(looper);
ClientCallbackCallback::setupTo(looper, manager);

while(true) {
looper->pollAll(-1);
}

//正常走不到这里
return EXIT_FAILURE;
}

初始化Binder

首先读取参数,按照之前的rc文件来看,这里的driver/dev/binder,然后根据此driver初始化此进程的ProcessState单例,根据我们上一章的分析我们知道此时会执行binder_openbinder_mmap,接着对这个单例做一些配置

1
2
3
4
5
6
7
8
9
10
11
12
13
14
15
16
17
18
19
20
21
22
23
24
sp<ProcessState> ProcessState::initWithDriver(const char* driver)
{
Mutex::Autolock _l(gProcessMutex);
if (gProcess != nullptr) {
// Allow for initWithDriver to be called repeatedly with the same
// driver.
//如果已经被初始化过了,并且传入的driver参数和已初始化的驱动名一样,直接返回之前初始化的单例
if (!strcmp(gProcess->getDriverName().c_str(), driver)) {
return gProcess;
}
//否则异常退出
LOG_ALWAYS_FATAL("ProcessState was already initialized.");
}

//判断指定的driver是否存在并可读
if (access(driver, R_OK) == -1) {
ALOGE("Binder driver %s is unavailable. Using /dev/binder instead.", driver);
//回滚默认binder驱动
driver = "/dev/binder";
}

gProcess = new ProcessState(driver);
return gProcess;
}

access

文档:https://man7.org/linux/man-pages/man2/access.2.html

原型:int access(const char *pathname, int mode);

这个函数是用来检查调用进程是否可以对指定文件执行某种操作的,成功返回0,失败返回-1并设置error

mode参数可以为以下几个值:

  • F_OK:文件存在

  • R_OK:文件可读

  • W_OK:文件可写

  • X_OK:文件可执行

注册成为Binder驱动的context manager

接着调用了ProcessStatebecomeContextManager函数注册成为Binder驱动的context manager

1
2
3
4
5
6
7
8
9
10
11
12
13
14
15
16
17
18
19
20
21
22
23
24
bool ProcessState::becomeContextManager()
{
AutoMutex _l(mLock);

flat_binder_object obj {
.flags = FLAT_BINDER_FLAG_TXN_SECURITY_CTX,
};

int result = ioctl(mDriverFD, BINDER_SET_CONTEXT_MGR_EXT, &obj);

// fallback to original method
if (result != 0) {
android_errorWriteLog(0x534e4554, "121035042");

int unused = 0;
result = ioctl(mDriverFD, BINDER_SET_CONTEXT_MGR, &unused);
}

if (result == -1) {
ALOGE("Binder ioctl to become context manager failed: %s\n", strerror(errno));
}

return result == 0;
}

这里通过binder_ioctl,以BINDER_SET_CONTEXT_MGR_EXT为命令码请求binder驱动

1
2
3
4
5
6
7
8
9
10
11
12
13
14
15
16
17
18
static long binder_ioctl(struct file *filp, unsigned int cmd, unsigned long arg)
{
...
switch (cmd) {
...
case BINDER_SET_CONTEXT_MGR_EXT: {
struct flat_binder_object fbo;

if (copy_from_user(&fbo, ubuf, sizeof(fbo))) {
ret = -EINVAL;
goto err;
}
ret = binder_ioctl_set_ctx_mgr(filp, &fbo);
if (ret)
goto err;
break;
}
...
1
2
3
4
5
6
7
8
9
10
11
12
13
14
15
16
17
18
19
20
21
22
23
24
25
26
27
28
29
30
31
32
33
34
35
36
37
38
39
40
41
42
43
44
45
46
47
48
49
50
51
52
53
static int binder_ioctl_set_ctx_mgr(struct file *filp,
struct flat_binder_object *fbo)
{
int ret = 0;
struct binder_proc *proc = filp->private_data;
struct binder_context *context = proc->context;
struct binder_node *new_node;
kuid_t curr_euid = current_euid();

mutex_lock(&context->context_mgr_node_lock);
//binder的context manager只能设置一次
if (context->binder_context_mgr_node) {
pr_err("BINDER_SET_CONTEXT_MGR already set\n");
ret = -EBUSY;
goto out;
}
//判断调用进程是否有权限设置context manager
ret = security_binder_set_context_mgr(proc->tsk);
if (ret < 0)
goto out;
//context->binder_context_mgr_uid != -1
if (uid_valid(context->binder_context_mgr_uid)) {
if (!uid_eq(context->binder_context_mgr_uid, curr_euid)) {
pr_err("BINDER_SET_CONTEXT_MGR bad uid %d != %d\n",
from_kuid(&init_user_ns, curr_euid),
from_kuid(&init_user_ns,
context->binder_context_mgr_uid));
ret = -EPERM;
goto out;
}
} else {
//设置Binder驱动context manager所在进程的用户ID
context->binder_context_mgr_uid = curr_euid;
}
//新建binder节点
new_node = binder_new_node(proc, fbo);
if (!new_node) {
ret = -ENOMEM;
goto out;
}
binder_node_lock(new_node);
new_node->local_weak_refs++;
new_node->local_strong_refs++;
new_node->has_strong_ref = 1;
new_node->has_weak_ref = 1;
//设置binder驱动context manager节点
context->binder_context_mgr_node = new_node;
binder_node_unlock(new_node);
binder_put_node(new_node);
out:
mutex_unlock(&context->context_mgr_node_lock);
return ret;
}

这里的过程也很简单,首先检查之前是否设置过context manager,然后做权限校验,通过后通过binder_new_node创建出一个新的binder节点,并将它作为context manager节点

Looper循环处理Binder事务

这里的Looper和我们平常应用开发所说的Looper是一个东西,本篇就不做过多详解了,只需要知道,可以通过Looper::addFd函数监听文件描述符,通过Looper::pollAllLooper::pollOnce函数接收消息,消息抵达后会回调LooperCallback::handleEvent函数

了解了这些后我们来看一下BinderCallback这个类

1
2
3
4
5
6
7
8
9
10
11
12
13
14
15
16
17
18
19
20
21
22
23
24
25
26
27
28
29
30
31
class BinderCallback : public LooperCallback {
public:
static sp<BinderCallback> setupTo(const sp<Looper>& looper) {
sp<BinderCallback> cb = new BinderCallback;

int binder_fd = -1;
//向binder驱动发送BC_ENTER_LOOPER事务请求,并获得binder设备的文件描述符
IPCThreadState::self()->setupPolling(&binder_fd);
LOG_ALWAYS_FATAL_IF(binder_fd < 0, "Failed to setupPolling: %d", binder_fd);

// Flush after setupPolling(), to make sure the binder driver
// knows about this thread handling commands.
IPCThreadState::self()->flushCommands();

//监听binder文件描述符
int ret = looper->addFd(binder_fd,
Looper::POLL_CALLBACK,
Looper::EVENT_INPUT,
cb,
nullptr /*data*/);
LOG_ALWAYS_FATAL_IF(ret != 1, "Failed to add binder FD to Looper");

return cb;
}

int handleEvent(int /* fd */, int /* events */, void* /* data */) override {
//从binder驱动接收到消息并处理
IPCThreadState::self()->handlePolledCommands();
return 1; // Continue receiving callbacks.
}
};

servicemanager进程启动的过程中调用了BinderCallback::setupTo函数,这个函数首先想binder驱动发起了一个BC_ENTER_LOOPER事务请求,获得binder设备的文件描述符,然后调用Looper::addFd函数监听binder设备文件描述符,这样当binder驱动发来消息后,就可以通过Looper::handleEvent函数接收并处理了

1
2
3
4
5
6
7
8
9
10
11
12
13
14
15
16
17
status_t IPCThreadState::setupPolling(int* fd)
{
if (mProcess->mDriverFD < 0) {
return -EBADF;
}

//设置binder请求码
mOut.writeInt32(BC_ENTER_LOOPER);
//检查写缓存是否有可写数据,有的话发送给binder驱动
flushCommands();
//赋值binder驱动的文件描述符
*fd = mProcess->mDriverFD;
pthread_mutex_lock(&mProcess->mThreadCountLock);
mProcess->mCurrentThreads++;
pthread_mutex_unlock(&mProcess->mThreadCountLock);
return 0;
}

Binder事务处理

BinderCallback类重写了handleEvent函数,里面调用了IPCThreadState::handlePolledCommands函数来接收处理binder事务

1
2
3
4
5
6
7
8
9
10
11
12
13
14
status_t IPCThreadState::handlePolledCommands()
{
status_t result;

//当读缓存中数据未消费完时,持续循环
do {
result = getAndExecuteCommand();
} while (mIn.dataPosition() < mIn.dataSize());

//当我们清空执行完所有的命令后,最后处理BR_DECREFS和BR_RELEASE
processPendingDerefs();
flushCommands();
return result;
}

读取并处理响应

这个函数的重点在getAndExecuteCommand,首先无论如何从binder驱动那里读取并处理一次响应,如果处理完后发现读缓存中还有数据尚未消费完,继续循环这个处理过程(理论来说此时不会再从binder驱动那里读写数据,只会处理剩余读缓存)

1
2
3
4
5
6
7
8
9
10
11
12
13
14
15
16
17
18
19
status_t IPCThreadState::getAndExecuteCommand()
{
status_t result;
int32_t cmd;

//从binder驱动中读写数据(理论来说此时写缓存dataSize为0,也就是只读数据)
result = talkWithDriver(/* true */);
if (result >= NO_ERROR) {
size_t IN = mIn.dataAvail();
if (IN < sizeof(int32_t)) return result;
//读取BR响应码
cmd = mIn.readInt32();
...
result = executeCommand(cmd);
...
}

return result;
}

处理响应

这里有很多线程等其他操作,我们不需要关心,我在这里把他们简化掉了,剩余的代码很清晰,首先从binder驱动中读取数据,然后从数据中读取出BR响应码,接着调用executeCommand函数继续往下处理

1
2
3
4
5
6
7
8
9
10
11
12
13
14
15
16
17
18
19
20
21
22
23
24
25
26
27
28
29
30
31
32
33
34
35
36
37
38
39
40
41
42
43
44
45
46
47
48
49
50
51
52
53
54
55
56
57
58
59
60
61
62
63
64
65
66
67
68
69
70
71
72
73
74
75
76
status_t IPCThreadState::executeCommand(int32_t cmd)
{
BBinder* obj;
RefBase::weakref_type* refs;
status_t result = NO_ERROR;

switch ((uint32_t)cmd) {
...
case BR_TRANSACTION_SEC_CTX:
case BR_TRANSACTION:
{
binder_transaction_data_secctx tr_secctx;
binder_transaction_data& tr = tr_secctx.transaction_data;

if (cmd == (int) BR_TRANSACTION_SEC_CTX) {
result = mIn.read(&tr_secctx, sizeof(tr_secctx));
} else {
result = mIn.read(&tr, sizeof(tr));
tr_secctx.secctx = 0;
}

ALOG_ASSERT(result == NO_ERROR,
"Not enough command data for brTRANSACTION");
if (result != NO_ERROR) break;

//读取数据到缓冲区
Parcel buffer;
buffer.ipcSetDataReference(
reinterpret_cast<const uint8_t*>(tr.data.ptr.buffer),
tr.data_size,
reinterpret_cast<const binder_size_t*>(tr.data.ptr.offsets),
tr.offsets_size/sizeof(binder_size_t), freeBuffer, this);

...

Parcel reply;
status_t error;
//对于ServiceManager的binder节点来说,是没有ptr的
if (tr.target.ptr) {
// We only have a weak reference on the target object, so we must first try to
// safely acquire a strong reference before doing anything else with it.
//对于其他binder服务端来说,tr.cookie为本地BBinder对象指针
if (reinterpret_cast<RefBase::weakref_type*>(
tr.target.ptr)->attemptIncStrong(this)) {
error = reinterpret_cast<BBinder*>(tr.cookie)->transact(tr.code, buffer,
&reply, tr.flags);
reinterpret_cast<BBinder*>(tr.cookie)->decStrong(this);
} else {
error = UNKNOWN_TRANSACTION;
}

} else {
//对于ServiceManager来说,使用the_context_object这个BBinder对象
error = the_context_object->transact(tr.code, buffer, &reply, tr.flags);
}

if ((tr.flags & TF_ONE_WAY) == 0) {
LOG_ONEWAY("Sending reply to %d!", mCallingPid);
if (error < NO_ERROR) reply.setError(error);
//非TF_ONE_WAY模式下需要Reply
sendReply(reply, 0);
} else {
... //TF_ONE_WAY模式下不需要Reply,这里只打了些日志
}
...
}
break;
...
}

if (result != NO_ERROR) {
mLastError = result;
}

return result;
}

我们重点分析这个函数在BR_TRANSACTION下的case,其余的都删减掉

首先,这个函数从读缓存中读取了binder_transaction_data,我们知道这个结构体记录了实际数据的地址、大小等信息,然后实例化了一个Parcel对象作为缓冲区,从binder_transaction_data中将实际数据读取出来

接着找到本地BBinder对象,对于ServiceManager来说就是之前在main函数中setTheContextObjectServiceManager对象,而对于其他binder服务端来说,则是通过tr.cookie获取,然后调用BBindertransact函数

1
2
3
4
5
6
7
8
9
10
11
12
13
14
15
16
17
18
19
20
21
22
23
24
25
26
27
28
29
30
31
32
33
34
status_t BBinder::transact(
uint32_t code, const Parcel& data, Parcel* reply, uint32_t flags)
{
//确保从头开始读取数据
data.setDataPosition(0);

if (reply != nullptr && (flags & FLAG_CLEAR_BUF)) {
//标记这个Parcel在释放时需要将内存中数据用0覆盖(涉及安全)
reply->markSensitive();
}

status_t err = NO_ERROR;
//这里的code是由binder客户端请求传递过来的
//是客户端与服务端的一个约定
//它标识了客户端像服务端发起的是哪种请求
switch (code) {
...
default:
err = onTransact(code, data, reply, flags);
break;
}

// In case this is being transacted on in the same process.
if (reply != nullptr) {
//设置数据指针偏移为0,这样后续读取数据便会从头开始
reply->setDataPosition(0);
if (reply->dataSize() > LOG_REPLIES_OVER_SIZE) {
ALOGW("Large reply transaction of %zu bytes, interface descriptor %s, code %d",
reply->dataSize(), String8(getInterfaceDescriptor()).c_str(), code);
}
}

return err;
}

onTransact

这个函数主要调用了onTransact函数,它是一个虚函数,可以被子类重写。我们观察ServiceManager这个类,它继承了BnServiceManager,在BnServiceManager中重写了这个onTransact函数,它们的继承关系如下:

ServiceManager -> BnServiceManager -> BnInterface<IServiceManager> -> IServiceManager & BBinder

这里的BnServiceManager是通过AIDL工具生成出来的(AIDL既可以生成Java代码,也可以生成C++代码),我们找到一份生成后的代码

1
2
3
4
5
6
7
8
9
10
11
12
13
14
15
16
17
18
19
20
21
22
23
24
25
26
27
28
29
30
31
32
33
34
35
36
37
38
39
40
41
42
43
44
45
46
47
::android::status_t BnServiceManager::onTransact(uint32_t _aidl_code, const ::android::Parcel& _aidl_data, ::android::Parcel* _aidl_reply, uint32_t _aidl_flags) {
::android::status_t _aidl_ret_status = ::android::OK;
switch (_aidl_code) {
case BnServiceManager::TRANSACTION_getService: {
//参数name
::std::string in_name;
::android::sp<::android::IBinder> _aidl_return;
//类型检查
if (!(_aidl_data.checkInterface(this))) {
_aidl_ret_status = ::android::BAD_TYPE;
break;
}
//读取参数name
_aidl_ret_status = _aidl_data.readUtf8FromUtf16(&in_name);
if (((_aidl_ret_status) != (::android::OK))) {
break;
}
//确认数据已读完
if (auto st = _aidl_data.enforceNoDataAvail();
!st.isOk()) {
_aidl_ret_status = st.writeToParcel(_aidl_reply);
break;
}
//执行真正的getService函数
::android::binder::Status _aidl_status(getService(in_name, &_aidl_return));
//将状态值写入reply
_aidl_ret_status = _aidl_status.writeToParcel(_aidl_reply);
if (((_aidl_ret_status) != (::android::OK))) {
break;
}
if (!_aidl_status.isOk()) {
break;
}
//将返回值写入reply
_aidl_ret_status = _aidl_reply->writeStrongBinder(_aidl_return);
if (((_aidl_ret_status) != (::android::OK))) {
break;
}
}
break;
...
}
if (_aidl_ret_status == ::android::UNEXPECTED_NULL) {
_aidl_ret_status = ::android::binder::Status::fromExceptionCode(::android::binder::Status::EX_NULL_POINTER).writeOverParcel(_aidl_reply);
}
return _aidl_ret_status;
}

生成出的代码格式比较丑,不易阅读,我把它格式化了一下,提取出我们需要的部分。这个函数主要流程就是先从data中读取所需要的参数,然后根据参数执行相对应的函数,然后将状态值写入reply,最后再将返回值写入reply。这里我们将上一章节AIDL生成出的java文件那部分拿过来做对比,我们可以发现,这里Parcel的写入和那里Parcel的读取顺序是严格一一对应的

1
2
3
4
5
6
7
8
9
10
11
12
13
14
15
16
17
18
19
20
@Override public android.os.IBinder getService(java.lang.String name) throws android.os.RemoteException
{
android.os.Parcel _data = android.os.Parcel.obtain();
android.os.Parcel _reply = android.os.Parcel.obtain();
android.os.IBinder _result;
try {
_data.writeInterfaceToken(DESCRIPTOR);
_data.writeString(name);
boolean _status = mRemote.transact(Stub.TRANSACTION_getService, _data, _reply, 0);
//先读取状态值
_reply.readException();
//再读取返回值
_result = _reply.readStrongBinder();
}
finally {
_reply.recycle();
_data.recycle();
}
return _result;
}

实际功能实现

然后我们来看真正功能实现的地方:getService函数,根据之前所说的继承关系,ServiceManager继承自IServiceManager,实现了其中的纯虚函数,其中就包括了getService

1
2
3
4
5
Status ServiceManager::getService(const std::string& name, sp<IBinder>* outBinder) {
*outBinder = tryGetService(name, true);
// returns ok regardless of result for legacy reasons
return Status::ok();
}
1
2
3
4
5
6
7
8
9
10
11
12
13
14
15
16
17
18
19
20
21
22
23
24
25
26
27
28
29
30
31
32
33
34
35
36
37
38
sp<IBinder> ServiceManager::tryGetService(const std::string& name, bool startIfNotFound) {
auto ctx = mAccess->getCallingContext();

//返回值
sp<IBinder> out;
Service* service = nullptr;
//从map中寻找相应的服务
if (auto it = mNameToService.find(name); it != mNameToService.end()) {
service = &(it->second);

if (!service->allowIsolated) {
uid_t appid = multiuser_get_app_id(ctx.uid);
bool isIsolated = appid >= AID_ISOLATED_START && appid <= AID_ISOLATED_END;

if (isIsolated) {
return nullptr;
}
}
//返回值指向对应service的binder对象
out = service->binder;
}

if (!mAccess->canFind(ctx, name)) {
return nullptr;
}

if (!out && startIfNotFound) {
tryStartService(name);
}

if (out) {
// Setting this guarantee each time we hand out a binder ensures that the client-checking
// loop knows about the event even if the client immediately drops the service
service->guaranteeClient = true;
}

return out;
}

这里面的实现我们就没必要细看了,只需要注意它返回了相应servicebinder对象,根据上面的代码来看,会将其写入到reply

Reply

实际的功能处理完成后,我们回到IPCThreadState::executeCommand中来。对于非TF_ONE_WAY模式,我们要将reply发送给请求方客户端

1
2
3
4
5
6
7
8
9
10
status_t IPCThreadState::sendReply(const Parcel& reply, uint32_t flags)
{
status_t err;
status_t statusBuffer;
//将binder reply请求打包好写入写缓冲区
err = writeTransactionData(BC_REPLY, flags, -1, 0, reply, &statusBuffer);
if (err < NO_ERROR) return err;

return waitForResponse(nullptr, nullptr);
}

writeTransactionData在上一章中已经分析过了,这里就不多做描述了,waitForResponse我们上一章也分析过了,根据我们在上一章所描述的非TF_ONE_WAY的通信过程,在向binder驱动发送BC_REPLY请求后我们会收到BR_TRANSACTION_COMPLETE响应,根据我们传入waitForResponse的两个参数值,会直接跳出函数中的循环,结束此次binder通信

non_oneway

1
2
3
4
5
6
7
8
9
10
11
12
13
14
15
16
17
18
19
20
21
22
23
24
25
26
27
28
29
30
31
32
status_t IPCThreadState::waitForResponse(Parcel *reply, status_t *acquireResult)
{
uint32_t cmd;
int32_t err;

while (1) {
if ((err=talkWithDriver()) < NO_ERROR) break;
err = mIn.errorCheck();
if (err < NO_ERROR) break;
if (mIn.dataAvail() == 0) continue;

cmd = (uint32_t)mIn.readInt32();

switch (cmd) {
...
case BR_TRANSACTION_COMPLETE:
//参数为两个nullptr,直接跳转到finish结束
if (!reply && !acquireResult) goto finish;
break;
...
}

finish:
if (err != NO_ERROR) {
if (acquireResult) *acquireResult = err;
if (reply) reply->setError(err);
mLastError = err;
logExtendedError();
}

return err;
}

至此,binder服务端的一次消息处理到这就结束了,Looper会持续监听着binder驱动fd,等待下一条binder消息的到来

结束

经过这么多篇文章的分析,整个Binder架构的大致通信原理、过程,我们应该都了解的差不多了,至于一些边边角角的细节,以后有机会的话我会慢慢再补充


Android源码分析 - Framework层的Binder(客户端篇)

开篇

本篇以aosp分支android-11.0.0_r25作为基础解析

我们在之前的文章中,从驱动层面分析了Binder是怎样工作的,但Binder驱动只涉及传输部分,待传输对象是怎么产生的呢,这就是framework层的工作了。我们要彻底了解Binder的工作原理,不仅要去看驱动层,还得去看framework层以及应用层(AIDL

ServiceManager

getIServiceManager

我们还是以第一次见到Binder的地方ServiceManager开始分析,我们选取getService方法来分析(这个方法既有入参也有返回),抛除掉它缓存和log的部分,最核心的代码就一句getIServiceManager().getService(name)

1
2
3
4
5
6
7
8
9
10
private static IServiceManager getIServiceManager() {
if (sServiceManager != null) {
return sServiceManager;
}

// Find the service manager
sServiceManager = ServiceManagerNative
.asInterface(Binder.allowBlocking(BinderInternal.getContextObject()));
return sServiceManager;
}

BinderInternal.getContextObject

我们从BinderInternal.getContextObject()开始看起,这个函数是一个native函数,他被实现在frameworks/base/core/jni/android_util_Binder.cpp

1
2
3
4
5
static jobject android_os_BinderInternal_getContextObject(JNIEnv* env, jobject clazz)
{
sp<IBinder> b = ProcessState::self()->getContextObject(NULL);
return javaObjectForIBinder(env, b);
}

ProcessState

我们在这里可以发现一个比较关键的类ProcessState,它是一个负责打开binder驱动并进行mmap映射的单例对象,这从它的self函数就可以看出来,每个进程只存在一个ProcessState实例

位置:frameworks/native/libs/binder/ProcessState.cpp

1
2
3
4
5
6
7
8
9
sp<ProcessState> ProcessState::self()
{
Mutex::Autolock _l(gProcessMutex);
if (gProcess != nullptr) {
return gProcess;
}
gProcess = new ProcessState(kDefaultDriver);
return gProcess;
}

我们来看看它的构造函数

1
2
3
4
5
6
7
8
9
10
11
12
13
14
15
16
17
18
19
20
21
ProcessState::ProcessState(const char *driver)
: mDriverName(String8(driver))
, mDriverFD(open_driver(driver)) //打开binder驱动
, mVMStart(MAP_FAILED)
, mThreadCountLock(PTHREAD_MUTEX_INITIALIZER)
, mThreadCountDecrement(PTHREAD_COND_INITIALIZER)
, mExecutingThreadsCount(0)
, mMaxThreads(DEFAULT_MAX_BINDER_THREADS)
, mStarvationStartTimeMs(0)
, mBinderContextCheckFunc(nullptr)
, mBinderContextUserData(nullptr)
, mThreadPoolStarted(false)
, mThreadPoolSeq(1)
, mCallRestriction(CallRestriction::NONE)
{
if (mDriverFD >= 0) {
// mmap the binder, providing a chunk of virtual address space to receive transactions.
mVMStart = mmap(nullptr, BINDER_VM_SIZE, PROT_READ, MAP_PRIVATE | MAP_NORESERVE, mDriverFD, 0);
...
}
}

这里的:后是c++构造函数初始化赋值的一种语法,可以看到其中调用了open_driver函数打开binder驱动

1
2
3
4
5
6
7
8
9
10
11
12
13
14
15
static int open_driver(const char *driver)
{
//打开binder驱动
int fd = open(driver, O_RDWR | O_CLOEXEC);
int vers = 0;
//验证binder版本
status_t result = ioctl(fd, BINDER_VERSION, &vers);
if (result != 0 || vers != BINDER_CURRENT_PROTOCOL_VERSION) {
...
}
//设置binder最大线程数
size_t maxThreads = DEFAULT_MAX_BINDER_THREADS;
result = ioctl(fd, BINDER_SET_MAX_THREADS, &maxThreads);
return fd;
}

这里做了三件事,打开binder驱动、验证binder版本、设置binder最大线程数,接着构造函数调用mmap建立binder映射,这里面的实现我们已经在Android源码分析 - Binder驱动(上)(中)(下)中分析过了,感兴趣的同学可以回过头去看一看

ProcessState::self函数执行完后,当前进程的binder初始化工作已经执行完毕,接下来我们回过头来看它的getContextObject函数

1
2
3
4
5
6
7
8
9
10
11
12
13
14
sp<IBinder> ProcessState::getContextObject(const sp<IBinder>& /*caller*/)
{
sp<IBinder> context = getStrongProxyForHandle(0);

if (context == nullptr) {
ALOGW("Not able to get context object on %s.", mDriverName.c_str());
}

// The root object is special since we get it directly from the driver, it is never
// written by Parcell::writeStrongBinder.
internal::Stability::tryMarkCompilationUnit(context.get());

return context;
}

我们在binder驱动篇就提到了,handle句柄0代表的就是ServiceManager,所以这里调用getStrongProxyForHandle函数的参数为0

1
2
3
4
5
6
7
8
9
10
11
12
13
14
15
16
17
18
19
20
21
22
23
24
25
26
27
28
29
30
31
32
33
34
sp<IBinder> ProcessState::getStrongProxyForHandle(int32_t handle)
{
sp<IBinder> result;

AutoMutex _l(mLock);

//查找或建立handle对应的handle_entry
handle_entry* e = lookupHandleLocked(handle);

if (e != nullptr) {
IBinder* b = e->binder;
if (b == nullptr || !e->refs->attemptIncWeak(this)) {
if (handle == 0) {
//当handle为ServiceManager的特殊情况
//需要确保在创建Binder引用之前,context manager已经被binder注册
Parcel data;
status_t status = IPCThreadState::self()->transact(
0, IBinder::PING_TRANSACTION, data, nullptr, 0);
if (status == DEAD_OBJECT)
return nullptr;
}
//创建BpBinder并保存下来以便后面再次查找
b = BpBinder::create(handle);
e->binder = b;
if (b) e->refs = b->getWeakRefs();
result = b;
} else {
result.force_set(b);
e->refs->decWeak(this);
}
}

return result;
}
1
2
3
4
5
6
7
8
9
10
11
12
13
ProcessState::handle_entry* ProcessState::lookupHandleLocked(int32_t handle)
{
const size_t N=mHandleToObject.size();
//新建一个handle_entry并插入到vector中
if (N <= (size_t)handle) {
handle_entry e;
e.binder = nullptr;
e.refs = nullptr;
status_t err = mHandleToObject.insertAt(e, N, handle+1-N);
if (err < NO_ERROR) return nullptr;
}
return &mHandleToObject.editItemAt(handle);
}

整条链路下来还是比较清晰的,最终获得了一个BpBinder对象,这是native中的类型,需要将它转换成java中的类型,这里调用了javaObjectForIBinder函数,位于frameworks/base/core/jni/android_util_Binder.cpp

javaObjectForIBinder

1
2
3
4
5
6
7
8
9
10
11
12
13
14
15
16
17
18
19
20
21
22
23
24
25
26
27
28
29
30
31
32
33
34
35
// If the argument is a JavaBBinder, return the Java object that was used to create it.
// Otherwise return a BinderProxy for the IBinder. If a previous call was passed the
// same IBinder, and the original BinderProxy is still alive, return the same BinderProxy.
jobject javaObjectForIBinder(JNIEnv* env, const sp<IBinder>& val)
{
if (val == NULL) return NULL;

//JavaBBinder返回true,其他类均返回flase
if (val->checkSubclass(&gBinderOffsets)) {
// It's a JavaBBinder created by ibinderForJavaObject. Already has Java object.
jobject object = static_cast<JavaBBinder*>(val.get())->object();
return object;
}

BinderProxyNativeData* nativeData = new BinderProxyNativeData();
nativeData->mOrgue = new DeathRecipientList;
nativeData->mObject = val;

jobject object = env->CallStaticObjectMethod(gBinderProxyOffsets.mClass,
gBinderProxyOffsets.mGetInstance, (jlong) nativeData, (jlong) val.get());
if (env->ExceptionCheck()) {
// In the exception case, getInstance still took ownership of nativeData.
return NULL;
}
BinderProxyNativeData* actualNativeData = getBPNativeData(env, object);
//如果object是刚刚新建出来的BinderProxy
if (actualNativeData == nativeData) {
//处理proxy计数
...
} else {
delete nativeData;
}

return object;
}

我们先看一看这个gBinderProxyOffsets是什么

1
2
3
4
5
6
7
8
9
10
11
12
13
14
15
16
17
18
19
20
21
22
23
24
25
26
27
static struct binderproxy_offsets_t
{
// Class state.
jclass mClass;
jmethodID mGetInstance;
jmethodID mSendDeathNotice;

// Object state.
//指向BinderProxyNativeData的指针
jfieldID mNativeData; // Field holds native pointer to BinderProxyNativeData.
} gBinderProxyOffsets;

const char* const kBinderProxyPathName = "android/os/BinderProxy";

static int int_register_android_os_BinderProxy(JNIEnv* env)
{
...
jclass clazz = FindClassOrDie(env, kBinderProxyPathName);
gBinderProxyOffsets.mClass = MakeGlobalRefOrDie(env, clazz);
gBinderProxyOffsets.mGetInstance = GetStaticMethodIDOrDie(env, clazz, "getInstance",
"(JJ)Landroid/os/BinderProxy;");
gBinderProxyOffsets.mSendDeathNotice =
GetStaticMethodIDOrDie(env, clazz, "sendDeathNotice",
"(Landroid/os/IBinder$DeathRecipient;Landroid/os/IBinder;)V");
gBinderProxyOffsets.mNativeData = GetFieldIDOrDie(env, clazz, "mNativeData", "J");
...
}

可以看到,gBinderProxyOffsets实际上是一个用来记录一些java中对应类、方法以及字段的结构体,用于从native层调用java层代码

接下来我们看javaObjectForIBinder函数的具体内容

1
2
3
4
5
6
7
8
9
10
11
12
jobject javaObjectForIBinder(JNIEnv* env, const sp<IBinder>& val)
{
if (val == NULL) return NULL;

//JavaBBinder返回true,其他类均返回flase
if (val->checkSubclass(&gBinderOffsets)) {
// It's a JavaBBinder created by ibinderForJavaObject. Already has Java object.
jobject object = static_cast<JavaBBinder*>(val.get())->object();
return object;
}
...
}

首先有一个IBinder类型检查的判断,我看了一圈发现目前只有当IBinder的实际类型为JavaBBinder的时候会返回true,其他子类均返回falseJavaBBinder类继承自BBinder,里面保存了对javaBinder对象的引用,所以在这种情况下,直接返回里面的object就好了。

从这里可以看出,native层的javaBBinderjava层的Binder是对应关系

我们这里传进来的是BpBinder,会接着往下走

1
2
3
4
5
6
7
8
9
10
11
jobject javaObjectForIBinder(JNIEnv* env, const sp<IBinder>& val)
{
...
BinderProxyNativeData* nativeData = new BinderProxyNativeData();
nativeData->mOrgue = new DeathRecipientList;
nativeData->mObject = val;

jobject object = env->CallStaticObjectMethod(gBinderProxyOffsets.mClass,
gBinderProxyOffsets.mGetInstance, (jlong) nativeData, (jlong) val.get());
...
}

接着实例化一个BinderProxyNativeData,将Binder死亡回调DeathRecipientListBinder对象(这里为BpBinder)赋值给它,然后调用java层方法。gBinderProxyOffsets之前说过了,类为android.os.BinderProxy,方法为getInstance,所以这里调用的即为android.os.BinderProxy.getInstance(nativeData, iBinder)BinderProxy的路径为frameworks/base/core/java/android/os/BinderProxy.java

1
2
3
4
5
6
7
8
9
10
11
12
13
14
15
16
17
18
19
20
21
private static BinderProxy getInstance(long nativeData, long iBinder) {
BinderProxy result;
synchronized (sProxyMap) {
try {
result = sProxyMap.get(iBinder);
if (result != null) {
return result;
}
result = new BinderProxy(nativeData);
} catch (Throwable e) {
// We're throwing an exception (probably OOME); don't drop nativeData.
NativeAllocationRegistry.applyFreeFunction(NoImagePreloadHolder.sNativeFinalizer,
nativeData);
throw e;
}
NoImagePreloadHolder.sRegistry.registerNativeAllocation(result, nativeData);
// The registry now owns nativeData, even if registration threw an exception.
sProxyMap.set(iBinder, result);
}
return result;
}

这里的逻辑比较简单,以iBinderkey 尝试从sProxyMap取出BinderProxy,如果取到值了就直接将它返回出去,如果没取到,用之前传进来的BinderProxyNativeData指针为参数实例化一个BinderProxy,并将其设置到sProxyMap

从这里可以看出每一个服务的BinderProxy都是以单例形式存在的,并且native层的BinderProxyNativeDatajava层的BinderProxy是对应关系

1
2
3
4
5
6
7
8
9
10
11
12
13
14
15
16
17
18
BinderProxyNativeData* getBPNativeData(JNIEnv* env, jobject obj) {
return (BinderProxyNativeData *) env->GetLongField(obj, gBinderProxyOffsets.mNativeData);
}

jobject javaObjectForIBinder(JNIEnv* env, const sp<IBinder>& val)
{
...
BinderProxyNativeData* actualNativeData = getBPNativeData(env, object);
//如果object是刚刚新建出来的BinderProxy
if (actualNativeData == nativeData) {
//处理proxy计数
...
} else {
delete nativeData;
}

return object;
}

接下来判断我们通过BinderProxy.getInstance方法获得的BinderProxy是不是刚刚创建出来的,如果是新建的则需要处理一下proxy计数,这里是通过对比BinderProxy中的mNativeData和我们新建出来的nativeData地址判断的

ServiceManagerNative.asInterface

我们将目光放回getIServiceManager方法,现在我们知道BinderInternal.getContextObject()方法返回了ServiceManager对应的BinderProxy,接着会调用Binder.allowBlocking方法,这个方法只是改变了BinderProxy中的一个参数,使其允许阻塞调用,这样的话getIServiceManager就可以被简化成如下代码

1
2
3
4
5
6
7
8
9
10
private static IServiceManager getIServiceManager() {
if (sServiceManager != null) {
return sServiceManager;
}

// Find the service manager
sServiceManager = ServiceManagerNative
.asInterface(/* BinderProxy */);
return sServiceManager;
}

我们看到asInterface方法实际上是直接实例化了一个ServiceManagerProxy对象

1
2
3
4
5
6
7
8
public static IServiceManager asInterface(IBinder obj) {
if (obj == null) {
return null;
}

// ServiceManager is never local
return new ServiceManagerProxy(obj);
}

ServiceManagerProxy

从名字就能听出来,ServiceManagerProxy其实是一个代理类,它其实是IServiceManager.Stub.Proxy的代理,实际上是没有什么必要的,可以发现作者也在注释中标注了This class should be deleted and replaced with IServiceManager.Stub whenever mRemote is no longer used,我们看一下它的构造方法

1
2
3
4
public ServiceManagerProxy(IBinder remote) {
mRemote = remote;
mServiceManager = IServiceManager.Stub.asInterface(remote);
}

ServiceManagerProxy实现了IServiceManager接口,但这个方法的实现都是直接调用mServiceManager,以addService举例

1
2
3
4
public void addService(String name, IBinder service, boolean allowIsolated, int dumpPriority)
throws RemoteException {
mServiceManager.addService(name, service, allowIsolated, dumpPriority);
}

这与直接使用IServiceManager.Stub.asInterface(remote)得到IServiceManager并没有什么区别

IServiceManager

我们将重点转到IServiceManager上,我们在源码中搜索不到IServiceManager.java文件,因为实际上这个文件是通过aidl生成的

关于aidl我们到后面再详细分析,现在我们只需要知道它其实是辅助我们进行binder通信的一种工具,aidl文件会在编译过程中生成出与之对应的java文件

IServiceManageraidl文件路径为frameworks/native/libs/binder/aidl/android/os/IServiceManager.aidl

我们来看一下它生成出的IServiceManager.Stub.asInterface方法

1
2
3
4
5
6
7
8
9
10
11
public static android.os.IServiceManager asInterface(android.os.IBinder obj)
{
if ((obj == null)) {
return null;
}
android.os.IInterface iin = obj.queryLocalInterface(DESCRIPTOR);
if (((iin != null) && (iin instanceof android.os.IServiceManager))) {
return ((android.os.IServiceManager) iin);
}
return new android.os.IServiceManager.Stub.Proxy(obj);
}

这里我们传入的IBinderBinderProxy,它的queryLocalInterface永远返回null,所以这里返回的是IServiceManager.Stub.Proxy对象,我们接着看之前调用的getService方法

1
2
3
4
5
6
7
8
9
10
11
12
13
14
15
16
17
18
@Override public android.os.IBinder getService(java.lang.String name) throws android.os.RemoteException
{
android.os.Parcel _data = android.os.Parcel.obtain();
android.os.Parcel _reply = android.os.Parcel.obtain();
android.os.IBinder _result;
try {
_data.writeInterfaceToken(DESCRIPTOR);
_data.writeString(name);
boolean _status = mRemote.transact(Stub.TRANSACTION_getService, _data, _reply, 0);
_reply.readException();
_result = _reply.readStrongBinder();
}
finally {
_reply.recycle();
_data.recycle();
}
return _result;
}

Parcel

Parcel是一个存放读取数据的容器,它的基本功能和使用相信进阶Android开发应该都懂,我们在这里只介绍一些关键性函数的含义,其他就不多赘述了,有机会的话以后单独开一章分析它

函数 作用
obtain 获取一个新的Parcel对象
ipcData、data 数据区首地址
ipcDataSize、dataSize 数据大小
ipcObjects 偏移数组首地址
ipcObjectsCount IPC对象数量
dataPosition 数据指针当前的位置
dataCapacity 数据区的总容量(始终 >= dataSize)

这里获取了两个Parcel,一个_data用来传递参数数据,一个_reply用来接收回应。接着,_data首先调用writeInterfaceToken方法,这里的token是客户端与服务端的一个协定,服务端会校验我们写入的这个token,然后按照顺序将参数依次写入到_data中(序列化),然后通过binder调用远程服务真正的方法,然后检查异常。

对于无返回值的方法来说,到这一步已经结束了,但我们这个方法是有返回值的,所以我们需要一个_result,从_reply中读取出数据(反序列化),赋给_result,然后返回出去

BinderProxy.transact

我们重点看transact这一部分,通过我们之前的分析,我们知道mRemote是一个BinderProxy类型的对象,我们来看他的transact方法

1
2
3
4
5
6
7
8
9
10
11
12
13
14
15
16
17
18
19
20
21
22
23
24
25
26
27
public boolean transact(int code, Parcel data, Parcel reply, int flags) throws RemoteException {
//检查Parcel大小
Binder.checkParcel(this, code, data, "Unreasonably large binder buffer");

...

//trace
...

//Binder事务处理回调
...

//AppOpsManager信息记录
...

try {
final boolean result = transactNative(code, data, reply, flags);

if (reply != null && !warnOnBlocking) {
reply.addFlags(Parcel.FLAG_IS_REPLY_FROM_BLOCKING_ALLOWED_OBJECT);
}

return result;
} finally {
...
}
}

我这里简化了一下代码,可以看到,首先就是对Parcel大小的检查

1
2
3
4
5
6
7
8
9
10
11
12
13
14
15
16
17
18
19
20
21
22
static void checkParcel(IBinder obj, int code, Parcel parcel, String msg) {
if (CHECK_PARCEL_SIZE && parcel.dataSize() >= 800*1024) {
// Trying to send > 800k, this is way too much.
StringBuilder sb = new StringBuilder();
sb.append(msg);
sb.append(": on ");
sb.append(obj);
sb.append(" calling ");
sb.append(code);
sb.append(" size ");
sb.append(parcel.dataSize());
sb.append(" (data: ");
parcel.setDataPosition(0);
sb.append(parcel.readInt());
sb.append(", ");
sb.append(parcel.readInt());
sb.append(", ");
sb.append(parcel.readInt());
sb.append(")");
Slog.wtfStack(TAG, sb.toString());
}
}

Android默认设置了Parcel数据传输不能超过800k,当然,各个厂商是可以随意改动这里的代码的,如果超过了的话,便会调用Slog.wtfStack打印日志,需要注意的是,在当前进程不是系统进程并且系统也不是工程版本的情况下,这个方法是会结束进程的,所以在应用开发的时候,我们需要注意跨进程数据传输的大小,避免因此引发crash

省去中间的一些log、回调,接下来便是调用transactNative方法,这是一个native方法,实现在frameworks/base/core/jni/android_util_Binder.cpp

1
2
3
4
5
6
7
8
9
10
11
12
13
14
15
16
17
18
19
20
21
22
23
24
25
26
27
28
29
30
31
32
33
34
35
36
37
38
39
40
static jboolean android_os_BinderProxy_transact(JNIEnv* env, jobject obj,
jint code, jobject dataObj, jobject replyObj, jint flags) // throws RemoteException
{
if (dataObj == NULL) {
jniThrowNullPointerException(env, NULL);
return JNI_FALSE;
}

Parcel* data = parcelForJavaObject(env, dataObj);
if (data == NULL) {
return JNI_FALSE;
}
Parcel* reply = parcelForJavaObject(env, replyObj);
if (reply == NULL && replyObj != NULL) {
return JNI_FALSE;
}

IBinder* target = getBPNativeData(env, obj)->mObject.get();
if (target == NULL) {
jniThrowException(env, "java/lang/IllegalStateException", "Binder has been finalized!");
return JNI_FALSE;
}

//log
...

status_t err = target->transact(code, *data, reply, flags);

//log
...

if (err == NO_ERROR) {
return JNI_TRUE;
} else if (err == UNKNOWN_TRANSACTION) {
return JNI_FALSE;
}

signalExceptionForError(env, obj, err, true /*canThrowRemoteException*/, data->dataSize());
return JNI_FALSE;
}

这里首先是获得native层对应的Parcel并执行判断,Parcel实际上功能是在native中实现的,java中的Parcel类使用mNativePtr成员变量保存了其对应native中的Parcel的指针

然后调用getBPNativeData函数获得BinderProxynative中对应的BinderProxyNativeData,再通过里面的mObject域成员变量得到其对应的BpBinder,这个函数在之前分析javaObjectForIBinder的时候已经出现过了

BpBinder.transact

之后便是调用BpBindertransact函数了

1
2
3
4
5
6
7
8
9
10
11
12
13
14
15
16
status_t BpBinder::transact(
uint32_t code, const Parcel& data, Parcel* reply, uint32_t flags)
{
// Once a binder has died, it will never come back to life.
//判断binder服务是否存活
if (mAlive) {
...
status_t status = IPCThreadState::self()->transact(
mHandle, code, data, reply, flags);
if (status == DEAD_OBJECT) mAlive = 0;

return status;
}

return DEAD_OBJECT;
}

这里有一个Alive判断,可以避免对一个已经死亡的binder服务再发起事务,浪费资源,除此之外便是调用IPCThreadStatetransact函数了

IPCThreadState

路径:frameworks/native/libs/binder/IPCThreadState.cpp

还记得我们之前提到的ProcessState吗?IPCThreadState和它很像,ProcessState负责打开binder驱动并进行mmap映射,而IPCThreadState则是负责与binder驱动进行具体的交互

IPCThreadState也有一个self函数,与ProcessStateself不同的是,ProcessState是进程单例,而IPCThreadState是线程单例,我们来看看它是怎么实现的

1
2
3
4
5
6
7
8
9
10
11
12
13
14
15
16
17
18
19
20
21
22
23
24
25
26
27
28
29
30
31
32
33
34
35
36
37
38
IPCThreadState* IPCThreadState::self()
{
//不是初次调用的情况
if (gHaveTLS.load(std::memory_order_acquire)) {
restart:
//初次调用,生成线程私有变量key后
const pthread_key_t k = gTLS;
//先从线程本地储存空间中尝试获取值
IPCThreadState* st = (IPCThreadState*)pthread_getspecific(k);
if (st) return st;
//没有的话就实例化一个
return new IPCThreadState;
}

//IPCThreadState shutdown后不能再获取
if (gShutdown.load(std::memory_order_relaxed)) {
ALOGW("Calling IPCThreadState::self() during shutdown is dangerous, expect a crash.\n");
return nullptr;
}

//首次获取时gHaveTLS为false,会先走这里
pthread_mutex_lock(&gTLSMutex);
if (!gHaveTLS.load(std::memory_order_relaxed)) {
//创建一个key,作为存放线程本地变量的key
int key_create_value = pthread_key_create(&gTLS, threadDestructor);
if (key_create_value != 0) {
pthread_mutex_unlock(&gTLSMutex);
ALOGW("IPCThreadState::self() unable to create TLS key, expect a crash: %s\n",
strerror(key_create_value));
return nullptr;
}
//创建完毕,gHaveTLS置为true
gHaveTLS.store(true, std::memory_order_release);
}
pthread_mutex_unlock(&gTLSMutex);
//回到gHaveTLS为true的case
goto restart;
}

gHaveTLS是一个原子类型的bool值,它在存取过程中需要指定内存序std::memory_order_xxx,在这里我们直接忽略掉,把它当成一个纯粹的bool值就好了

在这里,TLS的全称为Thread Local Storage,表示线程本地储存空间,和java中的ThreadLocal其实是一个作用

当一个线程初次获取IPCThreadState的时候,会先走到gHaveTLSfalse的case,此时程序会创建一个key,作为存放线程本地变量的key,创建成功后将gHaveTLS置为true,然后gotogHaveTLStrue的case,此时线程本地储存空间中暂时还是没有数据的,所以会new一个IPCThreadState出来,在IPCThreadState的构造函数中,会将自己保存到线程本地储存空间中,这样,当线程第二次再获取IPCThreadState的时候,便会直接走到pthread_getspecific这里获取并返回

1
2
3
4
5
6
7
8
9
10
11
12
13
14
15
16
IPCThreadState::IPCThreadState()
: mProcess(ProcessState::self()),
mServingStackPointer(nullptr),
mServingStackPointerGuard(nullptr),
mWorkSource(kUnsetWorkSource),
mPropagateWorkSource(false),
mIsLooper(false),
mIsFlushing(false),
mStrictModePolicy(0),
mLastTransactionBinderFlags(0),
mCallRestriction(mProcess->mCallRestriction) {
pthread_setspecific(gTLS, this);
clearCaller();
mIn.setDataCapacity(256);
mOut.setDataCapacity(256);
}

我们通过构造函数可以发现,它调用了pthread_setspecific函数将自身保存在了线程本地储存空间中

IPCThreadState中,成员变量mIn用于接收来自binder设备的数据,mOut用于储存发往binder设备的数据,他们的默认容量都为256字节

transact

我们接着看它的transact函数

1
2
3
4
5
6
7
8
9
10
11
12
13
14
15
16
17
18
19
20
21
22
23
24
25
26
27
28
29
30
31
32
33
34
35
36
37
38
39
40
41
42
43
44
45
46
47
48
49
status_t IPCThreadState::transact(int32_t handle,
uint32_t code, const Parcel& data,
Parcel* reply, uint32_t flags)
{
LOG_ALWAYS_FATAL_IF(data.isForRpc(), "Parcel constructed for RPC, but being used with binder.");

status_t err;

flags |= TF_ACCEPT_FDS;

//log
...

err = writeTransactionData(BC_TRANSACTION, flags, handle, code, data, nullptr);

if (err != NO_ERROR) {
if (reply) reply->setError(err);
return (mLastError = err);
}

if ((flags & TF_ONE_WAY) == 0) { //binder事务不为TF_ONE_WAY
//当线程限制binder事务不为TF_ONE_WAY时
if (UNLIKELY(mCallRestriction != ProcessState::CallRestriction::NONE)) {
if (mCallRestriction == ProcessState::CallRestriction::ERROR_IF_NOT_ONEWAY) {
//这个限制只是log记录
ALOGE("Process making non-oneway call (code: %u) but is restricted.", code);
CallStack::logStack("non-oneway call", CallStack::getCurrent(10).get(),
ANDROID_LOG_ERROR);
} else /* FATAL_IF_NOT_ONEWAY */ {
//这个限制会终止线程
LOG_ALWAYS_FATAL("Process may not make non-oneway calls (code: %u).", code);
}
}

if (reply) {
err = waitForResponse(reply);
} else {
Parcel fakeReply;
err = waitForResponse(&fakeReply);
}

//log
...
} else {
err = waitForResponse(nullptr, nullptr);
}

return err;
}

这个函数的重点在于writeTransactionDatawaitForResponse,我们依次分析

writeTransactionData

1
2
3
4
5
6
7
8
9
10
11
12
13
14
15
16
17
18
19
20
21
22
23
24
25
26
27
28
29
30
31
32
33
34
35
36
37
38
39
40
41
status_t IPCThreadState::writeTransactionData(int32_t cmd, uint32_t binderFlags,
int32_t handle, uint32_t code, const Parcel& data, status_t* statusBuffer)
{
binder_transaction_data tr;

tr.target.ptr = 0; /* Don't pass uninitialized stack data to a remote process */
//目标binder句柄值,ServiceManager为0
tr.target.handle = handle;
tr.code = code;
tr.flags = binderFlags;
tr.cookie = 0;
tr.sender_pid = 0;
tr.sender_euid = 0;

const status_t err = data.errorCheck();
if (err == NO_ERROR) {
//数据大小
tr.data_size = data.ipcDataSize();
//数据区起始地址
tr.data.ptr.buffer = data.ipcData();
//传递的偏移数组大小
tr.offsets_size = data.ipcObjectsCount()*sizeof(binder_size_t);
//偏移数组的起始地址
tr.data.ptr.offsets = data.ipcObjects();
} else if (statusBuffer) {
tr.flags |= TF_STATUS_CODE;
*statusBuffer = err;
tr.data_size = sizeof(status_t);
tr.data.ptr.buffer = reinterpret_cast<uintptr_t>(statusBuffer);
tr.offsets_size = 0;
tr.data.ptr.offsets = 0;
} else {
return (mLastError = err);
}

//这里为BC_TRANSACTION
mOut.writeInt32(cmd);
mOut.write(&tr, sizeof(tr));

return NO_ERROR;
}

在分析这个函数之前,我们需要先回忆一下在前面binder驱动章节我们所学习的binder结构和通信过程:Android源码分析 - Binder驱动(中)

binder_tansaction首先会读取一个请求码cmd,当binder请求码为BC_TRANSACTION/BC_REPLY的时候,binder驱动所接收的参数为binder_transaction_data结构体,所以在这个函数中,我们将binder请求码(这里为BC_TRANSACTION)和binder_transaction_data结构体依次写入到mOut中,为之后binder_tansaction做准备

waitForResponse

数据准备好后,接着便来到了waitForResponse函数

1
2
3
4
5
6
7
8
9
10
11
12
13
14
15
16
17
18
19
20
21
22
23
24
25
26
27
28
29
30
31
32
33
34
35
36
37
38
39
40
41
42
43
44
45
46
47
48
49
50
51
52
53
54
55
56
57
58
59
60
61
62
63
64
65
66
67
68
69
70
71
72
73
74
75
76
77
78
79
80
81
82
83
84
85
86
87
88
status_t IPCThreadState::waitForResponse(Parcel *reply, status_t *acquireResult)
{
uint32_t cmd;
int32_t err;

while (1) {
if ((err=talkWithDriver()) < NO_ERROR) break;
err = mIn.errorCheck();
if (err < NO_ERROR) break;
if (mIn.dataAvail() == 0) continue;

cmd = (uint32_t)mIn.readInt32();

IF_LOG_COMMANDS() {
alog << "Processing waitForResponse Command: "
<< getReturnString(cmd) << endl;
}

switch (cmd) {
case BR_ONEWAY_SPAM_SUSPECT:
...
case BR_TRANSACTION_COMPLETE:
//当TF_ONE_WAY模式下收到BR_TRANSACTION_COMPLETE直接返回,本次binder通信结束
if (!reply && !acquireResult) goto finish;
break;
case BR_DEAD_REPLY:
...
case BR_FAILED_REPLY:
...
case BR_FROZEN_REPLY:
...
case BR_ACQUIRE_RESULT:
...
case BR_REPLY:
{
binder_transaction_data tr;
err = mIn.read(&tr, sizeof(tr));
ALOG_ASSERT(err == NO_ERROR, "Not enough command data for brREPLY");
//失败直接返回
if (err != NO_ERROR) goto finish;

if (reply) { //客户端需要接收replay
if ((tr.flags & TF_STATUS_CODE) == 0) { //正常reply内容
reply->ipcSetDataReference(
reinterpret_cast<const uint8_t*>(tr.data.ptr.buffer),
tr.data_size,
reinterpret_cast<const binder_size_t*>(tr.data.ptr.offsets),
tr.offsets_size/sizeof(binder_size_t),
freeBuffer /*释放缓冲区*/);
} else { //内容只是一个32位的状态码
//接收状态码
err = *reinterpret_cast<const status_t*>(tr.data.ptr.buffer);
//释放缓冲区
freeBuffer(nullptr,
reinterpret_cast<const uint8_t*>(tr.data.ptr.buffer),
tr.data_size,
reinterpret_cast<const binder_size_t*>(tr.data.ptr.offsets),
tr.offsets_size/sizeof(binder_size_t));
}
} else { //客户端不需要接收replay
//释放缓冲区
freeBuffer(nullptr,
reinterpret_cast<const uint8_t*>(tr.data.ptr.buffer),
tr.data_size,
reinterpret_cast<const binder_size_t*>(tr.data.ptr.offsets),
tr.offsets_size/sizeof(binder_size_t));
continue;
}
}
goto finish;
default:
//这里是binder服务端部分的处理,现在不需要关注
err = executeCommand(cmd);
if (err != NO_ERROR) goto finish;
break;
}
}

finish:
if (err != NO_ERROR) {
if (acquireResult) *acquireResult = err;
if (reply) reply->setError(err);
mLastError = err;
logExtendedError();
}

return err;
}

这里有一个循环,正如函数名所描述,会一直等待到一整条binder事务链结束返回后才会退出这个循环,在这个循环的开头,便是talkWithDriver方法

talkWithDriver
1
2
3
4
5
6
7
8
9
10
11
12
13
14
15
16
17
18
19
20
21
22
23
24
25
26
27
28
29
30
31
32
33
34
35
36
37
38
39
40
41
42
43
44
45
46
47
48
49
50
51
52
53
54
55
56
57
58
59
60
61
62
63
64
65
66
67
68
69
70
71
72
73
74
75
76
77
78
79
status_t IPCThreadState::talkWithDriver(bool doReceive)
{
//检查打开的binder设备的fd
if (mProcess->mDriverFD < 0) {
return -EBADF;
}

binder_write_read bwr;

// Is the read buffer empty?
//dataPosition >= dataSize说明上一次读取到的数据已经消费完
const bool needRead = mIn.dataPosition() >= mIn.dataSize();

// We don't want to write anything if we are still reading
// from data left in the input buffer and the caller
// has requested to read the next data.
//需要写的数据大小,这里的doReceive默认为true,如果上一次的数据还没读完,则不会写入任何内容
const size_t outAvail = (!doReceive || needRead) ? mOut.dataSize() : 0;

bwr.write_size = outAvail;
bwr.write_buffer = (uintptr_t)mOut.data();

// This is what we'll read.
if (doReceive && needRead) {
//将read_size设置为读缓存可用容量
bwr.read_size = mIn.dataCapacity();
//设置读缓存起始地址
bwr.read_buffer = (uintptr_t)mIn.data();
} else {
bwr.read_size = 0;
bwr.read_buffer = 0;
}

// Return immediately if there is nothing to do.
//没有要读写的数据就直接返回
if ((bwr.write_size == 0) && (bwr.read_size == 0)) return NO_ERROR;

bwr.write_consumed = 0;
bwr.read_consumed = 0;
status_t err;
do {
//调用binder驱动的ioctl
if (ioctl(mProcess->mDriverFD, BINDER_WRITE_READ, &bwr) >= 0)
err = NO_ERROR;
else
err = -errno;

if (mProcess->mDriverFD < 0) {
err = -EBADF;
}
} while (err == -EINTR);

if (err >= NO_ERROR) {
//写数据被消费了
if (bwr.write_consumed > 0) {
//写数据没有被消费完
if (bwr.write_consumed < mOut.dataSize())
LOG_ALWAYS_FATAL("Driver did not consume write buffer. "
"err: %s consumed: %zu of %zu",
statusToString(err).c_str(),
(size_t)bwr.write_consumed,
mOut.dataSize());
else {
//写数据消费完了,将数据大小设置为0,这样下次就不会再写数据了
mOut.setDataSize(0);
processPostWriteDerefs();
}
}
//读到了数据
if (bwr.read_consumed > 0) {
//设置数据大小及数据指针偏移,这样后面就可以从中读取出来数据了
mIn.setDataSize(bwr.read_consumed);
mIn.setDataPosition(0);
}
return NO_ERROR;
}

return err;
}

这里的binder_write_read也是一个我们熟悉的结构,我们在之前的文章Android源码分析 - Binder驱动(中)中了解过,关于binder通信的代码,我们需要结合着binder驱动一起看才能理解

binder驱动层中,binder_ioctl_write_read函数会从用户空间读取一个binder_write_read结构,这个结构体主要描述了数据传输的大小和位置以及消费情况(已读/写数据大小),这么看来,talkWithDriver函数的结构就很清晰了:

  1. 创建出binder_write_read结构,根据之前的读取情况,决定是否读写数据,设置写数据内容和大小,设置读数据的空间和容量

  2. 调用binder驱动的ioctl

  3. 重置写缓存,根据ioctl的结果设置读缓存

这之后,waitForResponse函数就可以从读缓存mIn中读到数据了,我们回到这个函数中,发现它首先从读缓存中读取了一个binder响应码,然后根据这个响应码再处理接下来的工作

处理Reply

在此之前,我们先回顾一下一次binder_tansaction的整个过程,根据事务类型,分为两种情况:

  • TF_ONE_WAY

binder_oneway

  • 非 TF_ONE_WAY

binder_non_oneway

我们先对照着看TF_ONE_WAY的情况

1
2
3
4
5
6
7
8
9
10
11
12
status_t IPCThreadState::waitForResponse(Parcel *reply, status_t *acquireResult)
{
switch (cmd) {
...
case BR_TRANSACTION_COMPLETE:
//当TF_ONE_WAY模式下收到BR_TRANSACTION_COMPLETE直接返回,本次binder通信结束
if (!reply && !acquireResult) goto finish;
break;
...
}
}
}

对于TF_ONE_WAY模式来说,客户端在收到BR_TRANSACTION_COMPLETE响应码后则返回,不会再等待BR_REPLY

而对于非TF_ONE_WAY模式来说,客户端不仅会收到BR_TRANSACTION_COMPLETE响应码,之后还会阻塞等待binder驱动给它发来BR_REPLY响应码,这之后一次binder_transaction才算完成

1
2
3
4
5
6
7
8
9
10
11
12
13
14
15
16
17
18
19
20
21
22
23
24
25
26
27
28
29
30
31
32
33
34
35
36
37
38
39
40
41
42
43
44
45
status_t IPCThreadState::waitForResponse(Parcel *reply, status_t *acquireResult)
{
switch (cmd) {
...
case BR_REPLY:
{
binder_transaction_data tr;
err = mIn.read(&tr, sizeof(tr));
ALOG_ASSERT(err == NO_ERROR, "Not enough command data for brREPLY");
//失败直接返回
if (err != NO_ERROR) goto finish;

if (reply) { //客户端需要接收replay
if ((tr.flags & TF_STATUS_CODE) == 0) { //正常reply内容
reply->ipcSetDataReference(
reinterpret_cast<const uint8_t*>(tr.data.ptr.buffer),
tr.data_size,
reinterpret_cast<const binder_size_t*>(tr.data.ptr.offsets),
tr.offsets_size/sizeof(binder_size_t),
freeBuffer /*释放缓冲区*/);
} else { //内容只是一个32位的状态码
//接收状态码
err = *reinterpret_cast<const status_t*>(tr.data.ptr.buffer);
//释放缓冲区
freeBuffer(nullptr,
reinterpret_cast<const uint8_t*>(tr.data.ptr.buffer),
tr.data_size,
reinterpret_cast<const binder_size_t*>(tr.data.ptr.offsets),
tr.offsets_size/sizeof(binder_size_t));
}
} else { //客户端不需要接收replay
//释放缓冲区
freeBuffer(nullptr,
reinterpret_cast<const uint8_t*>(tr.data.ptr.buffer),
tr.data_size,
reinterpret_cast<const binder_size_t*>(tr.data.ptr.offsets),
tr.offsets_size/sizeof(binder_size_t));
continue;
}
}
goto finish;
...
}
}
}

一般来说,非TF_ONE_WAY模式肯定是需要一个reply来接收的,即reply != null,此时我们来看看接收正常reply的过程(接收32位状态码没什么好说的,直接从读缓冲区中强制类型转换出一个32位的code就完事了)

这里我们就需要看一下ParcelipcSetDataReference函数了

1
2
3
4
5
6
7
8
9
10
11
12
13
14
15
16
17
18
19
20
21
22
23
24
25
26
27
28
29
30
31
32
33
34
35
36
37
38
39
40
void Parcel::ipcSetDataReference(const uint8_t* data, size_t dataSize, const binder_size_t* objects,
size_t objectsCount, release_func relFunc) {
// this code uses 'mOwner == nullptr' to understand whether it owns memory
LOG_ALWAYS_FATAL_IF(relFunc == nullptr, "must provide cleanup function");
//先清理重置一下数据和状态
freeData();

auto* kernelFields = maybeKernelFields();
LOG_ALWAYS_FATAL_IF(kernelFields == nullptr); // guaranteed by freeData.

mData = const_cast<uint8_t*>(data);
mDataSize = mDataCapacity = dataSize;
kernelFields->mObjects = const_cast<binder_size_t*>(objects);
kernelFields->mObjectsSize = kernelFields->mObjectsCapacity = objectsCount;
mOwner = relFunc;

//检查数据
binder_size_t minOffset = 0;
for (size_t i = 0; i < kernelFields->mObjectsSize; i++) {
binder_size_t offset = kernelFields->mObjects[i];
if (offset < minOffset) {
ALOGE("%s: bad object offset %" PRIu64 " < %" PRIu64 "\n",
__func__, (uint64_t)offset, (uint64_t)minOffset);
kernelFields->mObjectsSize = 0;
break;
}
const flat_binder_object* flat
= reinterpret_cast<const flat_binder_object*>(mData + offset);
uint32_t type = flat->hdr.type;
//binder类型出现异常
if (!(type == BINDER_TYPE_BINDER || type == BINDER_TYPE_HANDLE ||
type == BINDER_TYPE_FD)) {
...
kernelFields->mObjectsSize = 0;
break;
}
minOffset = offset + sizeof(flat_binder_object);
}
scanForFds();
}

其实这个函数也不复杂,我们知道binder_mmap做到了一次拷贝,将数据拷贝到了内核物理内存中,然后将其与用户空间虚拟内存做了映射,所以这个函数此时只需要将数据的地址,大小等等无脑赋值进去,客户端后续便可以用Parcel提供的函数方便的从中读取数据了

freeBuffer

最后我们再来看一下freeBuffer这个释放缓冲区的方法,

1
2
3
4
5
6
7
8
9
10
11
12
void IPCThreadState::freeBuffer(Parcel* parcel, const uint8_t* data,
size_t /*dataSize*/,
const binder_size_t* /*objects*/,
size_t /*objectsSize*/)
{
...
if (parcel != nullptr) parcel->closeFileDescriptors();
IPCThreadState* state = self();
state->mOut.writeInt32(BC_FREE_BUFFER);
state->mOut.writePointer((uintptr_t)data);
state->flushIfNeeded();
}

可以看到,这里向binder驱动发送了一个BC_FREE_BUFFER请求,然后binder驱动会负责回收这块缓冲区内存

我们在Parcel::ipcSetDataReference函数中可以发现,它将freeBuffer函数指针赋值给了mOwner,等到什么时候不需要这个Parcel了,便会调用这个函数进行缓冲区内存回收

结束

到这里,我们客户端与binder驱动沟通交互的分析就结束了,相比binder驱动而言,framework层的binder就好理解多了,下一章我们会从服务端的角度来看,它是怎么从binder驱动接收并处理客户端的请求的


Jetpack Compose入门

简介

Jetpack Compose是用于构建原生Android界面的新工具包。它是一种声明式的UI布局,其官方声称可简化并加快Android上的界面开发,使用更少的代码、强大的工具和直观的Kotlin API,快速让应用生动而精彩。

官网:https://developer.android.com/jetpack/compose?hl=zh-cn

我这里也写了一个ComposeDemo,可以对照着看:https://github.com/dreamgyf/ComposeDemo

这个Demo实现了:

  • Compose替代传统布局

Compose替代传统布局

  • 网格列表效果,类似于传统布局中的RecyclerView配合GridLayoutManager

网格列表

  • 在传统View中使用Compose

  • 在Compose中使用传统View

  • 自定义布局

前置工作

使用Jetpack Compose需要先引入一些依赖:

1
2
3
4
5
6
7
8
9
10
11
dependencies {
implementation 'androidx.core:core-ktx:1.7.0'
implementation "androidx.compose.ui:ui:$compose_version"
implementation "androidx.compose.material:material:$compose_version"
implementation "androidx.compose.ui:ui-tooling-preview:$compose_version"
implementation 'androidx.lifecycle:lifecycle-runtime-ktx:2.3.1'
implementation 'androidx.activity:activity-compose:1.3.1'
debugImplementation "androidx.compose.ui:ui-tooling:$compose_version"
//网络图片加载三方库
implementation "io.coil-kt:coil-compose:1.4.0"
}

可组合函数

Jetpack Compose是围绕着可组合函数构建起来的,这些函数以程序化方式定义应用的界面,只需描述应用界面的外观并提供数据依赖项,而不必关注界面的构建过程。此类函数有几个要点:

  • 所有可组合函数必须使用@Composable注解修饰
  • 可组合函数可以像正常函数一样接受参数
1
2
3
4
@Composable
fun Demo(name: String) {
Text(text = "Hello, ${name}!")
}
  • 可组合函数内部可以书写正常代码(譬如可以通过if else控制显示的控件)
1
2
3
4
5
6
7
8
9
10
@Composable
fun Demo(showPic: Boolean) {
if (showPic) {
Image(
painter = painterResource(id = R.drawable.demo),
contentDescription = null
)
}
Text(text = "Hello, compose!")
}

单位

Android常用的单位dpsp等,在Compose中以类的形式被定义,使用的方式也很简单,Compose借助了kotlin的扩展属性,扩展了IntDoubleFloat三个基础类,使用方式如下:

1
2
3
4
//dp
1.dp; 2.3f.dp; 4.5.dp
//sp
1.sp; 2.3f.sp; 4.5.sp

资源

如何在Compose中使用资源呢,可以通过xxxResource方法

1
2
3
4
5
6
7
8
9
10
//图片资源
fun painterResource(@DrawableRes id: Int): Painter
//尺寸资源
fun dimensionResource(@DimenRes id: Int): Dp
//颜色资源
fun colorResource(@ColorRes id: Int): Color
//字符串资源
fun stringResource(@StringRes id: Int): String
//字体资源
fun fontResource(fontFamily: FontFamily): Typeface

Modifier

ModifierCompose中的布局修饰符,它控制了布局的大小,padding,对齐,背景,边框,裁切,点击等属性,几乎所有的Compose布局都需求这项参数,是Compose布局中的重中之重

这里介绍一些常用的基本属性,文中没列到的属性可以去官网查看:https://developer.android.com/jetpack/compose/modifiers-list?hl=zh-cn

尺寸

  • fillMaxWidthfillMaxHeight相当于xml布局中的match_parent
  • fillMaxSize相当于同时设置了fillMaxWidthfillMaxHeight
  • wrapContentWidthwrapContentHeight相当于xml布局中的wrapContent
  • wrapContentSize相当于同时设置了wrapContentWidthwrapContentHeight
  • widthheight则是设置固定宽高,单位为Dp
  • size相当于同时设置了widthheight
  • weight属性仅在RowColumn的内部作用域中可以使用,相当于传统LinearLayout布局中的weight属性

padding

padding方法有几个重载,这些API很简单,看参数就很容易能明白意思

对齐

align属性,使控件可以在父布局中以一种方式对齐,相当于xml布局中的layout_gravity属性。另外还有alignBy以及alignByBaseline属性可以自行研究

绘图

  • background设置背景,不过不能设置图片,如果想以图片作为背景可以使用Box布局,在底部垫一个Image控件
  • alpha设置透明度
  • clip裁剪内容,这个功能很强大,可以直接将视图裁出圆角,圆形等形状

操作

  • clickable方法,可以设置控件的点击事件回调
  • combinedClickable方法,可以设置控件的点击、双击、长按事件回调
  • selectable方法,将控件配置为可点击,同时可以设置点击事件

滚动

  • horizontalScroll:使控件支持水平滚动
  • verticalScroll:使控件支持垂直滚动

注意事项

Modifier中设置属性的前后顺序是很重要的,譬如想要一个背景为蓝色的圆角布局,需要先设置clip,再设置background,反过来background会超出圆角范围

Spacer

Compose中没有了margin的概念,可以用Spacer替代,Spacer为留白的意思,使用起来也很简单

1
2
//水平间隔8dp
Spacer(modifier = Modifier.width(8.dp))

基础布局

Row & Column

这是两个基本布局组件,其中Row为水平布局,Column为垂直布局,他们俩接受的参数相似,其中两个参数为horizontalArrangementverticalAlignment,他们一个表示水平布局方式,一个表示垂直布局方式,他们默认值为STARTTOP,这两个参数用起来就和传统布局的gravity参数一样

Box

Box也是一种基本布局组件,Box布局中的组件是可以叠加的,类似传统布局中的FrameLayout,可以通过contentAlignment参数调整叠加的方式,其默认值为TopStart,叠加到左上角,这个参数也和FrameLayoutgravity参数一样

基础控件

Text

文本控件,对应传统控件TextView,它有以下一些属性

属性 说明
text 文本内容
color 文字颜色
fontSize 文字大小
fontStyle 文本样式(可以设置斜体)
fontWeight 字重(粗体等)
fontFamily 字体
letterSpacing 文字间距
textAlign 文本对齐方式
lineHeight 行高
maxLines 最大行数

Image

图片控件,对应传统控件ImageView,它有以下一些属性

属性 说明
painter 图片内容
contentDescription 无障碍描述(可为null)
alignment 对齐方式
contentScale 缩放方式(和scaleType属性类似)
alpha 透明度

在开发中经常会面对从网络价值图片的情况,这时候可以借助一些第三方库来解决,这里以coil库为例:

  1. 先添加依赖
1
implementation "io.coil-kt:coil-compose:1.4.0"
  1. 使用
1
2
3
4
5
6
7
8
Image(
modifier = Modifier
.size(68.dp, 68.dp)
.clip(RoundedCornerShape(6.dp)),
contentScale = ContentScale.Crop,
painter = rememberImagePainter(picUrl), //使用rememberImagePainter方法填入图片url
contentDescription = null
)

列表

Compose有两种组件LazyRowLazyColumn,一种水平,一种垂直,对应着传统UI中的RecyclerView,用这些组件可以方便的构建列表视图,它们需要提供一个LazyListScope.()块描述列表项内容

LazyListScopeDSL提供了多种函数来描述列表项:

1
2
3
4
5
6
7
8
9
10
11
12
13
14
//用于添加单个列表项
fun item(key: Any? = null, content: @Composable LazyItemScope.() -> Unit)
//用于添加多个列表项
fun items(
count: Int,
key: ((index: Int) -> Any)? = null,
itemContent: @Composable LazyItemScope.(index: Int) -> Unit
)
//用于添加多个列表项
fun <T> LazyListScope.items(
items: List<T>,
noinline key: ((item: T) -> Any)? = null,
crossinline itemContent: @Composable LazyItemScope.(item: T) -> Unit
)

示例:

1
2
3
4
5
6
7
8
9
10
11
12
13
14
15
16
17
18
19
20
21
22
23
val list = mutableListOf(0, 1, 2, 3, 4)

LazyColumn {
//增加单个列表项
item {
Text(text = "First item")
}

//增加5个列表项
items(5) { index ->
Text(text = "Item: $index")
}

//增加5个列表项
items(list) { listItem ->
Text(text = "Item: $listItem")
}

//增加单个列表项
item {
Text(text = "Last item")
}
}

可以使用contentPadding为内容添加内边距,使用verticalArrangementhorizontalArrangement,以Arrangement.spacedBy()为列表项之间添加间距

状态

Compose中,数据的更新和传统命令式UI不同,是通过一种可观察类型对象,当一个可观察类型对象发生改变时,这个对象对应观察的部分会发生重组,从而自动更新UI

可观察类型MutableState<T>通常是通过mutableStateOf()函数创建的,这个对象的value发生变化时,对应UI也会跟着随之变化

1
2
3
4
5
6
7
8
9
10
11
12
13
14
15
16
17
18
19
20
21
22
23
24
25
26
27
//这里使用了kotlin的by关键字,是一种代理模式
//如果使用 = 的话,这个对象的类型会发生变化,需要count.value这样使用它的值
//var count = mutableStateOf(0)
var count by mutableStateOf(0)

@Composable
fun Demo(count: Int) {
Column {
Text(text = "count: ${count}")
Button(onClick = { addCount() }) {
Text(text = "add count")
}
}
}

fun addCount() {
//++count.value
++count
}

@Preview
@Composable
fun Preview() {
//当点击Button时,触发点击事件,更新可观察对象count,触发UI重组
//Demo(count.value)
Demo(count)
}

关于Context

Compose中可以通过LocalContext.current获得当前Context

在传统View中使用Compose

可以在一个传统布局xml中插入一个ComposeView

1
2
3
4
5
6
7
8
9
10
11
12
13
14
15
16
17
18
19
<?xml version="1.0" encoding="utf-8"?>
<LinearLayout xmlns:android="http://schemas.android.com/apk/res/android"
android:layout_width="match_parent"
android:layout_height="match_parent"
android:orientation="vertical">

<TextView
android:id="@+id/hello_world"
android:layout_width="match_parent"
android:layout_height="wrap_content"
android:text="Hello from XML layout" />

<!-- 插入ComposeView -->
<androidx.compose.ui.platform.ComposeView
android:id="@+id/compose_view"
android:layout_width="match_parent"
android:layout_height="match_parent" />

</LinearLayout>

然后在代码中设置这个ComposeView

1
2
3
findViewById<ComposeView>(R.id.compose_view).setContent {
Text("Hello Compose!")
}

在Compose中使用传统View

可以使用AndroidView这个composable函数,这个函数接受一个factory参数,这个参数接受一个Context,用于构建传统View,要求返回一个继承自View的对象

1
2
3
4
5
6
7
8
9
10
11
12
@Composable
fun Demo() {
Column {
Text(text = "Compose Text")
AndroidView(factory = { context ->
//这里也可以使用LayoutInflater从xml中解析出一个View
TextView(context).apply {
text = "传统TextView"
}
})
}
}

自定义UI

Compose中,如果想要自定义一些简单的UI是很简单的,只需要写一个Composable函数就可以了,我们主要学习一下怎么自定义一些复杂的UI

我们先看一下怎么自定义一个布局,对应着传统UI中的ViewGroup,以一个简单的例子来说,我们自定义一个布局,让其中的子布局呈左上到右下依次排列:

1
2
3
4
5
6
7
8
9
10
11
12
13
14
15
16
17
18
19
20
21
22
23
24
@Composable
fun MyLayout(modifier: Modifier = Modifier, content: @Composable () -> Unit) {
Layout(modifier = modifier, content = content) { measurables, constraints ->
//测量每个子布局
val placeables = measurables.map { measurable ->
measurable.measure(constraints)
}

//设置布局大小为最大可容纳大小
layout(constraints.maxWidth, constraints.maxHeight) {
var xPosition = 0
var yPosition = 0

//放置每个子View
placeables.forEach { placeable ->
placeable.placeRelative(x = xPosition, y = yPosition)

//下一个子View的坐标为上一个子View的右下角
xPosition += placeable.width
yPosition += placeable.height
}
}
}
}

我们再看一个使用Canvas自定义View的方式,这个更简单,就是画一条水平线:

1
2
3
4
5
6
7
8
@SuppressLint("ModifierParameter")
@Composable
fun HorizontalLine(modifier: Modifier = Modifier.fillMaxWidth()) {
Canvas(modifier = Modifier
.then(modifier), onDraw = {
drawLine(color = Color.Black, Offset(0f, 0f), Offset(size.width, 0f), 2f)
})
}

我们将两者一起用一下看看效果

1
2
3
4
5
6
7
8
9
@Preview(showBackground = true)
@Composable
fun Preview() {
MyLayout {
Text(text = "Text1")
HorizontalLine(Modifier.width(50.dp))
Text(text = "Text2")
}
}

效果图

其实Compose中的自定义UI的思路和传统自定义View是一样的,只不过需要熟悉Compose中的各种Api才能灵活运用它


Linux信号机制及其原理分析

前言

在最近在工作中,使用到了信号的相关知识,之前我们在分析Android系统init进程的时候也提到了信号,但并没有对信号这个机制做出深入的理解,借此机会,我们深入分析一下Linux信号机制是怎样实现的

简介

信号(signal),是Unix系统中的一种古老的进程间通信机制,而Linux作为类Unix系统,早期也是模仿了Unix系统,自然也保留下了这个机制。信号是一种异步通信机制,它是在软件层面上对中断机制的一种模拟

注:本篇文章基于glibc版本2.35,Linux内核版本5.17,x86_64架构

信号的产生

信号可以由内核产生,也可以由用户产生,这边举几个例子:

  • 用户在终端输入ctrl + c时,会产生一个SIGINT信号

  • 在程序中对一个数除0,会产生一个异常,最终由内核产生一个SIGFPE信号

  • 在程序中非法访问一段内存,会由内核产生一个SIGBUS信号

  • 在终端或程序中手动发送一个信号

    • 终端:比如说kill -9 [pid]

    • 程序:调用kill函数,raise函数等

信号种类

Linux中,信号被分为不可靠信号和可靠信号,一共64种,可以通过kill -l命令来查看

  • 不可靠信号:也称为非实时信号,不支持排队,信号可能会丢失,比如发送多次相同的信号,进程只能收到一次,信号值取值区间为1~31

  • 可靠信号:也称为实时信号,支持排队,信号不会丢失,发多少次,就可以收到多少次,信号值取值区间为32~64

在早期的Linux中,只定义了前面的不可靠信号,随着时间的发展,发现有必要对信号机制加以改进和扩充,又由于原先定义的信号已有应用,出于兼容性考虑,不能再做改动,于是又新增了一部分信号,这些信号被定义为可靠信号。

arch/x86/include/uapi/asm/signal.h中,我们可以发现这些信号的定义,在文末的附录中,我们也详细介绍了每个信号的含义和默认动作

如何使用

我一向认为,如果想要理解一个技术原理,首先我们必须要会使用这个技术

发送信号

之前提过,用户是可以手动向一个进程发送信号的,我们可以使用以下一些函数:

kill

原型:

1
2
3
#include <signal.h>

int kill(pid_t pid, int sig);

文档:https://man7.org/linux/man-pages/man2/kill.2.html

这个函数的作用是向指定进程(或进程组)发送一个信号,成功返回0,失败返回-1

其中的pid参数:

  • pid > 0时,发送信号给pid对应的进程

  • pid = 0时,发送信号给本进程组中的所有进程

  • pid = -1时,发送信号给所有调用进程有权给其发送信号的进程,除了init进程

  • pid < -1时,发送信号给进程组id为-pid的所有进程

sig参数为0时,不会发送任何信号,但仍然会进行参数检测,我们可以用这种方法检查pid对应进程是否存在或允许发送信号

raise

原型:

1
2
3
#include <signal.h>

int raise(int sig);

文档:https://man7.org/linux/man-pages/man3/raise.3.html

这个函数的作用是向本进程或线程发送信号,成功返回0,失败返回-1

这个函数对于主线程来说,相当于kill(getpid(), sig),对于子线程来说,相当于pthread_kill(pthread_self(), sig)

sigqueue

原型:

1
2
3
#include <signal.h>

int sigqueue(pid_t pid, int sig, const union sigval value);

文档:https://man7.org/linux/man-pages/man3/sigqueue.3.html

这个函数的作用是向一个进程发送信号,同时可以传递一些额外数据,成功返回0,失败返回-1

这个函数和kill不同的地方是,它只能向一个进程发送信号,不能发送给信号组,当sig为0时,行为和kill一致

abort

原型:

1
2
3
#include <stdlib.h>

noreturn void abort(void);

文档:https://man7.org/linux/man-pages/man3/abort.3.html

这个函数的作用是向本进程发送SIGABRT信号

需要注意的有两点:

  • abort函数会首先解除进程对SIGABRT信号的阻塞

  • 无论SIGABRT信号是否注册了自定义处理器,最后都会终止进程,因为abort函数会在SIGABRT信号处理完后恢复默认信号处理方式,然后重发这个信号

alarm

原型:

1
2
3
#include <unistd.h>

unsigned int alarm(unsigned int seconds);

文档:https://man7.org/linux/man-pages/man2/alarm.2.html

这个函数的作用是在seconds秒后向本进程发送SIGALRM信号

参数seconds为时间,单位为秒

返回值,如果以前没有设置过alarm或超时,则返回0,如果以前没有设置过alarm,则返回剩余的时间

处理信号

我们是可以自定义一些信号的处理方式,需要注意的是,SIGKILLSIGSTOP是两个特殊的信号,它们不允许被忽略、处理和阻塞

sigaction

原型:

1
2
3
4
#include <signal.h>

int sigaction(int signum, const struct sigaction *restrict act,
struct sigaction *restrict oldact);

文档:https://man7.org/linux/man-pages/man2/sigaction.2.html

这是较新的一个信号处理函数,它的作用是,对一个信号注册一个新的信号处理方式,并获取以前的信号处理方式,成功返回0,失败返回-1

第一个参数signum,用来指定信号的编号(需要设置哪个信号)

第二个参数act用来指定注册的新的信号处理方式

第三个参数oldact不为null时,可以用来获取该信号原来的处理方式

当参数actnulloldact不为null时,这个函数可以用来只获取信号当前的处理方式

sigaction结构体

1
2
3
4
5
6
7
8
9
10
11
12
13
14
15
struct sigaction {
union {
__sighandler_t _sa_handler;
void (*_sa_sigaction)(int, struct siginfo *, void *);
} _u;
sigset_t sa_mask;
unsigned long sa_flags;
void (*sa_restorer)(void);
};

typedef void __signalfn_t(int);
typedef __signalfn_t __user *__sighandler_t;

#define sa_handler _u._sa_handler
#define sa_sigaction _u._sa_sigaction

可以看到,其中有一个联合,它是用来兼容旧版本函数的,当参数sa_mask中含有SA_SIGINFO的时候,回调的是_sa_sigaction函数,当没有这个参数时,回调的是_sa_handler这个旧版本函数

_sa_sigaction函数相对于_sa_handler函数而言,多携带了一些信号信息,譬如说发送信号的进程pid

_sa_handler可以被赋值成SIG_DFLSIG_IGN,它们分别对应着默认处理和忽略信号,需要注意的时,它们只是一个int值,是不能被直接调用的

1
2
#define SIG_DFL	((__force __sighandler_t)0)	/* default signal handling */
#define SIG_IGN ((__force __sighandler_t)1) /* ignore signal */

这个结构体中的sa_mask域为一个信号集,表示当正在执行信号处理函数的时候,阻塞一些信号,只有这个信号处理完了,这些信号才会被处理

这个结构体中的sa_flags域,有如下一些标志:

  • SA_NOCLDSTOP:当signumSIGCHLD的时候才生效,当子进程暂停或恢复时,父进程不会收到SIGCHLD信号

  • SA_NOCLDWAIT:当signumSIGCHLD的时候才生效,当子进程退出时,父进程不会收到SIGCHLD信号,子进程也不会成为僵尸进程

  • SA_NODEFER:一般情况下,当信号处理函数运行时,内核将阻塞对应的信号。但是如果设置了SA_NODEFER标记,那么在该信号处理函数运行时,内核将不会阻塞该信号

  • SA_ONSTACK:表示使用一个备用栈,当发生栈溢出时,内核会发出SIGILL信号,如果此时在原来的栈上调用信号处理函数,也会发生栈溢出,导致死循环,此时就需要准备一个备用栈,在备用栈上处理信号

  • SA_RESETHAND:表示设置的信号处理行为只生效一次,当触发我们设置的信号处理函数后,内核会将信号处理行为重置(SA_ONESHOT作用相同,但它是一个过时的,非标准的flag

  • SA_RESTART:当执行系统调用时,如果收到一个信号,系统默认将中断这个系统调用,转而执行信号处理函数,结束后让这个被中断的系统调用失败,设置了SA_RESTART标志后,当信号处理函数执行完后,会自动恢复执行这个被中断的系统调用

  • SA_SIGINFO:设置这个标志后,会回调_sa_sigaction作为信号处理函数,会携带更多的信号信息

signal

原型:

1
2
3
#include <signal.h>

sighandler_t signal(int signum, sighandler_t handler);

文档:https://man7.org/linux/man-pages/man2/signal.2.html

这个函数的作用是,设置下一次的信号处理函数(只生效一次),成功返回上一次设置的信号处理函数,失败返回SIG_ERR

这个函数在新版本中实际上是通过sigaction函数实现的,推荐使用更加强大的sigaction函数

阻塞信号

信号有几种状态,首先是信号的产生 (Genertion),而实际执行信号处理动作时,状态为递达 (Delivery),信号在产生递达中的状态被称为未决 (Pending)

进程可以选择阻塞 (Blocking)某些信号,被阻塞的信号在产生后将保持在未决状态,直到进程解除对该信号的阻塞,才执行递达的动作

信号集函数

我们可以用信号集函数改变当前进程的信号屏蔽字(Signal Mask),控制信号的阻塞与否

信号集设置函数

1
2
3
4
5
6
7
8
9
10
11
12
13
14
15
16
17
18
19
#include <signal.h>

//信号集数据类型
typedef unsigned long sigset_t;
//清空一个信号集(将这个sigset_t置0)
//文档:https://man7.org/linux/man-pages/man3/sigemptyset.3p.html
void sigemptyset(sigset_t *set);
//填充满一个信号集(将这个sigset_t的每一位都置1)
//文档:https://man7.org/linux/man-pages/man3/sigfillset.3p.html
void sigfillset(sigset_t *set);
//将指定的信号添加到信号集中(将这个sigset_t的对应信号位置1)
//文档:https://man7.org/linux/man-pages/man3/sigaddset.3p.html
int sigaddset(sigset_t *set, int signo);
//将指定的信号从信号集中移除(将这个sigset_t的对应信号位置0)
//文档:https://man7.org/linux/man-pages/man3/sigdelset.3p.html
int sigdelset(sigset_t *set, int signo);
//判断一个信号是否在这个信号集中(判断这个sigset_t的对应信号位是否为1)
//文档:https://man7.org/linux/man-pages/man3/sigismember.3p.html
int sigismember(const sigset_t *set, int signo);

sigpromask

原型:

1
2
3
#include <signal.h>

int sigpromask(int how, const sigset_t *set, sigset_t *oldset);

文档:https://man7.org/linux/man-pages/man2/sigprocmask.2.html

这个函数通过指定的方法和信号集修改进程的信号屏蔽字,成功返回0,失败返回-1

第一个参数how有3种取值:

  • SIG_BLOCK:将set中的信号添加到信号屏蔽字中(不改变原有已存在信号屏蔽字,相当于用set中的信号与原有信号取并集设置)
  • SIG_UNBLOCK:将set中的信号移除信号屏蔽字(相当于用set中的信号的补集与原有信号取交集设置)
  • SIG_SETMASK:使用set中的信号直接代替原有信号屏蔽字中的信号

第二个参数set是一个信号集,怎么使用和参数how相关

第三个参数oldset,如果不为null,会将原有信号屏蔽字的信号集保存进去

sigpending

原型:

1
2
3
#include <signal.h>

int sigpending(sigset_t *set);

这个函数的作用是获得当前进程的信号屏蔽字,将结果保存到传入的set中,成功返回0,失败返回-1

信号原理

我们已经了解了信号的产生和处理,现在我们可以具体的看看一个信号从产生到响应处理,它经历了什么,它的原理是什么

我们在简介中说过:信号是一种异步通信机制,它是在软件层面上对中断机制的一种模拟,该怎么理解这句话呢?

当我们对一个进程发送信号后,会将这个信号暂时存放到这个进程所对应的task_structpending队列中,此时,进程并不知道有新的信号过来了,这也就是异步的意思。那么进程什么时候才能得知并处理这个信号呢?有两个时机,一个是进程从内核态返回到用户态时,一个是进程从睡眠状态被唤醒。让信号看起来是一个异步中断的关键就是,正常的用户进程是会频繁的在用户态和内核态之间切换的,所以信号能很快的得到执行

下图为信号相关的一些结构

task_struct中的信号结构

信号的发送

我们以kill函数为例,看看信号是如何发送的,它被定义在tools/include/nolibc/nolibc.h

1
2
3
4
5
6
7
8
9
10
11
12
13
14
15
16
17
static __attribute__((unused))
int kill(pid_t pid, int signal)
{
int ret = sys_kill(pid, signal);

if (ret < 0) {
SET_ERRNO(-ret);
ret = -1;
}
return ret;
}

static __attribute__((unused))
int sys_kill(pid_t pid, int signal)
{
return my_syscall2(__NR_kill, pid, signal);
}

可以看到,这里使用了系统调用,在Linux内核中,每个syscall都对应着唯一的系统调用号,kill函数的系统调用号为__NR_kill,它被定义在tools/include/uapi/asm-generic/unistd.h

1
2
3
/* kernel/signal.c */
#define __NR_kill 129
__SYSCALL(__NR_kill, sys_kill)

x86_64架构的机器上,my_syscall2是这样被定义的

1
2
3
4
5
6
7
8
9
10
11
12
13
14
15
16
#define my_syscall2(num, arg1, arg2)                                          \
({ \
long _ret; \
register long _num asm("rax") = (num); \
register long _arg1 asm("rdi") = (long)(arg1); \
register long _arg2 asm("rsi") = (long)(arg2); \
\
asm volatile ( \
"syscall\n" \
: "=a"(_ret) \
: "r"(_arg1), "r"(_arg2), \
"0"(_num) \
: "rcx", "r11", "memory", "cc" \
); \
_ret; \
})

这里涉及到了扩展内联汇编,syscall指令需要一个系统调用号和一些参数,在x86_64架构中,系统调用号需要存放在rax寄存器中,参数依次存放在rdi, rsi, rdx, r10, r8, r9寄存器中,执行syscall指令后,内核会通过系统调用号去从系统调用表找到对应函数的入口

我们之前在找系统调用号__NR_kill的时候可以发现,上面标了注释,表明这个函数的实现在kernel/signal.c中,但我们在这个文件中并没有找到sys_kill这个函数,实际上这里隐藏了一个宏定义

include/linux/syscalls.h中,我们可以找到这样一些宏定义

1
2
3
4
5
6
7
8
9
10
11
12
13
14
15
16
17
18
19
20
21
22
23
24
25
26
27
28
29
30
31
32
33
34
35
36
37
38
39
40
41
42
43
44
45
46
47
48
#ifndef SYSCALL_DEFINE0
#define SYSCALL_DEFINE0(sname) \
SYSCALL_METADATA(_##sname, 0); \
asmlinkage long sys_##sname(void); \
ALLOW_ERROR_INJECTION(sys_##sname, ERRNO); \
asmlinkage long sys_##sname(void)
#endif /* SYSCALL_DEFINE0 */

#define SYSCALL_DEFINE1(name, ...) SYSCALL_DEFINEx(1, _##name, __VA_ARGS__)
#define SYSCALL_DEFINE2(name, ...) SYSCALL_DEFINEx(2, _##name, __VA_ARGS__)
#define SYSCALL_DEFINE3(name, ...) SYSCALL_DEFINEx(3, _##name, __VA_ARGS__)
#define SYSCALL_DEFINE4(name, ...) SYSCALL_DEFINEx(4, _##name, __VA_ARGS__)
#define SYSCALL_DEFINE5(name, ...) SYSCALL_DEFINEx(5, _##name, __VA_ARGS__)
#define SYSCALL_DEFINE6(name, ...) SYSCALL_DEFINEx(6, _##name, __VA_ARGS__)

#define SYSCALL_DEFINE_MAXARGS 6

#define SYSCALL_DEFINEx(x, sname, ...) \
SYSCALL_METADATA(sname, x, __VA_ARGS__) \
__SYSCALL_DEFINEx(x, sname, __VA_ARGS__)

#define __PROTECT(...) asmlinkage_protect(__VA_ARGS__)

/*
* The asmlinkage stub is aliased to a function named __se_sys_*() which
* sign-extends 32-bit ints to longs whenever needed. The actual work is
* done within __do_sys_*().
*/
#ifndef __SYSCALL_DEFINEx
#define __SYSCALL_DEFINEx(x, name, ...) \
__diag_push(); \
__diag_ignore(GCC, 8, "-Wattribute-alias", \
"Type aliasing is used to sanitize syscall arguments");\
asmlinkage long sys##name(__MAP(x,__SC_DECL,__VA_ARGS__)) \
__attribute__((alias(__stringify(__se_sys##name)))); \
ALLOW_ERROR_INJECTION(sys##name, ERRNO); \
static inline long __do_sys##name(__MAP(x,__SC_DECL,__VA_ARGS__));\
asmlinkage long __se_sys##name(__MAP(x,__SC_LONG,__VA_ARGS__)); \
asmlinkage long __se_sys##name(__MAP(x,__SC_LONG,__VA_ARGS__)) \
{ \
long ret = __do_sys##name(__MAP(x,__SC_CAST,__VA_ARGS__));\
__MAP(x,__SC_TEST,__VA_ARGS__); \
__PROTECT(x, ret,__MAP(x,__SC_ARGS,__VA_ARGS__)); \
return ret; \
} \
__diag_pop(); \
static inline long __do_sys##name(__MAP(x,__SC_DECL,__VA_ARGS__))
#endif /* __SYSCALL_DEFINEx */

SYSCALL_DEFINEx中的x表示接受x个参数,这个宏定义根据传入的name参数,以sys_name为名定义了一个函数,也就是说SYSCALL_DEFINE2(kill, ...)这个宏展开后基本相当于sys_kill函数,在kernel/signal.c中我们可以找到这段代码

1
2
3
4
5
6
7
8
9
10
11
/**
* sys_kill - send a signal to a process
* @pid: the PID of the process
* @sig: signal to be sent
*/
SYSCALL_DEFINE2(kill, pid_t, pid, int, sig)
{
struct kernel_siginfo info;
prepare_kill_siginfo(sig, &info);
return kill_something_info(sig, &info, pid);
}

这里就是kill函数的真正实现,我们这里主要关注信号的发送,就屏蔽一些细节,只看发送部分

1
2
3
4
5
6
7
8
9
10
11
12
13
14
15
16
17
18
19
20
21
22
23
24
25
26
27
28
29
30
31
32
33
34
35
36
37
38
39
40
41
42
43
44
45
46
47
48
49
50
51
52
53
54
55
56
57
58
59
60
61
62
63
64
65
66
67
68
69
70
71
72
73
74
75
76
77
78
79
80
81
82
83
84
85
86
87
88
89
90
91
92
93
94
95
96
97
98
99
100
101
102
103
104
105
106
107
108
109
110
111
112
113
114
115
116
117
118
119
120
121
122
123
124
125
126
127
128
129
130
131
132
133
134
135
136
137
138
static int kill_something_info(int sig, struct kernel_siginfo *info, pid_t pid)
{
int ret;
//这里我们就只看对一个进程发送信号
if (pid > 0)
return kill_proc_info(sig, info, pid);
...
}

static int kill_proc_info(int sig, struct kernel_siginfo *info, pid_t pid)
{
...
kill_pid_info(sig, info, find_vpid(pid));
...
}

int kill_pid_info(int sig, struct kernel_siginfo *info, struct pid *pid)
{
struct task_struct *p;

for (;;) {
...
//获取pid对应进程的task_struct
p = pid_task(pid, PIDTYPE_PID);
if (p)
//PIDTYPE_TGID表示类型是线程组id,对于同一进程中的所有线程,tgid都是一致的,为该进程的进程id
group_send_sig_info(sig, info, p, PIDTYPE_TGID);
...
}
}

int group_send_sig_info(int sig, struct kernel_siginfo *info,
struct task_struct *p, enum pid_type type)
{
int ret;
...
if (!ret && sig)
ret = do_send_sig_info(sig, info, p, type);

return ret;
}

int do_send_sig_info(int sig, struct kernel_siginfo *info, struct task_struct *p,
enum pid_type type)
{
...
send_signal(sig, info, p, type);
...
}

static int send_signal(int sig, struct kernel_siginfo *info, struct task_struct *t,
enum pid_type type)
{
/* Should SIGKILL or SIGSTOP be received by a pid namespace init? */
...
return __send_signal(sig, info, t, type, force);
}

static int __send_signal(int sig, struct kernel_siginfo *info, struct task_struct *t,
enum pid_type type, bool force)
{
struct sigpending *pending;
struct sigqueue *q;
int override_rlimit;
int ret = 0, result;

result = TRACE_SIGNAL_IGNORED;
//判断是否可以忽略信号
if (!prepare_signal(sig, t, force))
goto ret;

//选择信号pending队列
//线程组共享队列(t->signal->shared_pending) 或 进程私有队列(t->pending)
pending = (type != PIDTYPE_PID) ? &t->signal->shared_pending : &t->pending;

result = TRACE_SIGNAL_ALREADY_PENDING;
//如果该信号是不可靠信号,且已经在padding队列中,则忽略这个信号
if (legacy_queue(pending, sig))
goto ret;

result = TRACE_SIGNAL_DELIVERED;

//对SIGKILL信号和内核进程跳过信号的pending
if ((sig == SIGKILL) || (t->flags & PF_KTHREAD))
goto out_set;

//实时信号可以突破队列大小限制,否则丢弃信号
if (sig < SIGRTMIN)
override_rlimit = (is_si_special(info) || info->si_code >= 0);
else
override_rlimit = 0;

//新分配一个sigqueue,并将其加入pending队尾
q = __sigqueue_alloc(sig, t, GFP_ATOMIC, override_rlimit, 0);
if (q) {
list_add_tail(&q->list, &pending->list);
switch ((unsigned long) info) {
case (unsigned long) SEND_SIG_NOINFO:
clear_siginfo(&q->info);
q->info.si_signo = sig;
q->info.si_errno = 0;
q->info.si_code = SI_USER;
q->info.si_pid = task_tgid_nr_ns(current,
task_active_pid_ns(t));
rcu_read_lock();
q->info.si_uid =
from_kuid_munged(task_cred_xxx(t, user_ns),
current_uid());
rcu_read_unlock();
break;
case (unsigned long) SEND_SIG_PRIV:
clear_siginfo(&q->info);
q->info.si_signo = sig;
q->info.si_errno = 0;
q->info.si_code = SI_KERNEL;
q->info.si_pid = 0;
q->info.si_uid = 0;
break;
default:
copy_siginfo(&q->info, info);
break;
}
} else if (!is_si_special(info) &&
sig >= SIGRTMIN && info->si_code != SI_USER) {
...
} else {
...
}

out_set:
signalfd_notify(t, sig);
sigaddset(&pending->signal, sig);
...
//唤醒进程
complete_signal(sig, t, type);
ret:
return ret;
}

从代码里我们可以看出来,和我们之前说的原理是一样的,新分配了一个sigqueue,并将其加入到对应进程task_structpending队列队尾

设置信号处理

之前我们介绍了怎么自定义信号处理行为,如何设置信号屏蔽字,实际上都能在进程的task_struct中体现出来,信号处理行为保存在其中的sighand域中,而信号屏蔽字保存在其中的blocked域中

task_struct

信号的响应

x86_64架构系统调用会经历do_syscall_64这么一个函数,它被实现在arch/x86/entry/common.c

1
2
3
4
5
6
7
8
9
10
11
12
13
14
15
__visible noinstr void do_syscall_64(struct pt_regs *regs, int nr)
{
add_random_kstack_offset();
nr = syscall_enter_from_user_mode(regs, nr);

instrumentation_begin();

if (!do_syscall_x64(regs, nr) && !do_syscall_x32(regs, nr) && nr != -1) {
/* Invalid system call, but still a system call. */
regs->ax = __x64_sys_ni_syscall(regs);
}

instrumentation_end();
syscall_exit_to_user_mode(regs);
}

从代码我们可以看出来,当进程从内核空间返回用户空间时,会调用syscall_exit_to_user_mode函数

最终经历一系列调用,会走到exit_to_user_mode_loop函数中,它们被定义在kernel/entry/common.c

1
2
3
4
5
6
7
8
9
10
11
static unsigned long exit_to_user_mode_loop(struct pt_regs *regs,
unsigned long ti_work)
{
while (ti_work & EXIT_TO_USER_MODE_WORK) {
...
if (ti_work & (_TIF_SIGPENDING | _TIF_NOTIFY_SIGNAL))
handle_signal_work(regs, ti_work);
...
}
return ti_work;
}

可以看到,如果当前线程包含_TIF_SIGPENDING_TIF_NOTIFY_SIGNAL,表明该线程可能有信号需要处理,会调用到handle_signal_work函数处理,接着调用到arch_do_signal_or_restart函数中,它被实现在arch/x86/kernel/signal.c

1
2
3
4
5
6
7
8
9
10
11
12
13
14
15
16
17
18
19
20
21
22
23
24
25
26
27
28
29
30
31
//has_signal的值为 (ti_work & _TIF_SIGPENDING)
void arch_do_signal_or_restart(struct pt_regs *regs, bool has_signal)
{
struct ksignal ksig;

if (has_signal && get_signal(&ksig)) {
handle_signal(&ksig, regs);
return;
}

//如果该进程没有对这个信号设置处理程序,这里会自动重启这个系统调用
/* Did we come from a system call? */
if (syscall_get_nr(current, regs) != -1) {
/* Restart the system call - no handlers present */
switch (syscall_get_error(current, regs)) {
case -ERESTARTNOHAND:
case -ERESTARTSYS:
case -ERESTARTNOINTR:
regs->ax = regs->orig_ax;
regs->ip -= 2;
break;

case -ERESTART_RESTARTBLOCK:
regs->ax = get_nr_restart_syscall(regs);
regs->ip -= 2;
break;
}
}

restore_saved_sigmask();
}

这个函数中的if语句体,看上去是如果有信号,则处理这个信号,其实不完全是这样的。如果该进程没有对这个信号设置处理程序,则会执行默认的信号处理,这里的处理过程是在get_signal中完成的,我当时在看这块源码的时候还在疑惑为什么找不到信号默认处理的地方,结果是这个函数的名字误导了我。如果该进程没有对这个信号设置处理程序,则会自动重启这个系统调用,这里就不展开说了,我们首先看一下get_signal函数是怎么实现的,它被实现在kernel/signal.c

1
2
3
4
5
6
7
8
9
10
11
12
13
14
15
16
17
18
19
20
21
22
23
24
25
26
27
28
29
30
31
32
33
34
35
36
37
38
39
40
41
42
43
44
45
46
47
48
49
50
51
52
53
54
55
56
57
58
59
60
61
62
63
64
65
66
67
68
69
70
71
72
73
74
75
76
77
78
79
80
81
82
83
84
85
86
87
88
89
90
91
92
93
94
95
96
97
98
99
100
101
102
103
104
105
106
107
108
109
110
111
112
113
114
115
116
117
118
119
120
121
122
bool get_signal(struct ksignal *ksig)
{
struct sighand_struct *sighand = current->sighand;
struct signal_struct *signal = current->signal;
int signr;
...
relock:
spin_lock_irq(&sighand->siglock);

//如果子进程的状态发生变化,发送SIGCHLD信号给父进程
if (unlikely(signal->flags & SIGNAL_CLD_MASK)) {
int why;

if (signal->flags & SIGNAL_CLD_CONTINUED)
why = CLD_CONTINUED;
else
why = CLD_STOPPED;

signal->flags &= ~SIGNAL_CLD_MASK;

spin_unlock_irq(&sighand->siglock);

read_lock(&tasklist_lock);
do_notify_parent_cldstop(current, false, why);

if (ptrace_reparented(current->group_leader))
do_notify_parent_cldstop(current->group_leader,
true, why);
read_unlock(&tasklist_lock);

goto relock;
}

for (;;) {
struct k_sigaction *ka;
enum pid_type type;
...

//从进程task_struct的pending队列中取出一个信号
type = PIDTYPE_PID;
signr = dequeue_synchronous_signal(&ksig->info);
if (!signr)
signr = dequeue_signal(current, &current->blocked,
&ksig->info, &type);

if (!signr)
break; /* will return 0 */

...

//从信号处理数组中,取出对应信号的处理动作
ka = &sighand->action[signr-1];

if (ka->sa.sa_handler == SIG_IGN) /* Do nothing. */
continue;
if (ka->sa.sa_handler != SIG_DFL) {
/* Run the handler. */
ksig->ka = *ka;

//如果设置了SA_RESETHAND或者SA_ONESHOT标志(这俩标志的值是一样的),将其信号处理函数重设为默认
if (ka->sa.sa_flags & SA_ONESHOT)
ka->sa.sa_handler = SIG_DFL;

break; /* will return non-zero "signr" value */
}

//下面为默认信号处理

//部分信号的默认动作为忽略(具体可以查看SIG_KERNEL_IGNORE_MASK这个宏定义)
if (sig_kernel_ignore(signr)) /* Default is nothing. */
continue;

...

//部分信号的默认动作为停止进程(具体可以查看SIG_KERNEL_STOP_MASK这个宏定义)
if (sig_kernel_stop(signr)) {
if (signr != SIGSTOP) {
spin_unlock_irq(&sighand->siglock);

//当前为孤儿进程组
if (is_current_pgrp_orphaned())
goto relock;

spin_lock_irq(&sighand->siglock);
}

//默认动作为停止当前线程组里的所有线程
if (likely(do_signal_stop(ksig->info.si_signo))) {
goto relock;
}

continue;
}

fatal:
spin_unlock_irq(&sighand->siglock);
...
current->flags |= PF_SIGNALED;
//部分信号的默认动作为dump core,然后终止进程(具体可以查看SIG_KERNEL_COREDUMP_MASK这个宏定义)
if (sig_kernel_coredump(signr)) {
if (print_fatal_signals)
print_fatal_signal(ksig->info.si_signo);
proc_coredump_connector(current);
do_coredump(&ksig->info);
}

if (current->flags & PF_IO_WORKER)
goto out;

//剩下来的信号的默认操作为终止进程
do_group_exit(ksig->info.si_signo);
}
spin_unlock_irq(&sighand->siglock);
out:
ksig->sig = signr;

if (!(ksig->ka.sa.sa_flags & SA_EXPOSE_TAGBITS))
hide_si_addr_tag_bits(ksig);

//当当前进程对此信号设置了自定义信号处理动作后,返回true
return ksig->sig > 0;
}

likely & unlikely

这里的likelyunlikely为两个宏,指向__builtin_expect函数,是gcc编译器提供给程序员优化的一种方式,likely表示表达式为真的可能性更大,unlikely表示表达式为假的可能性更大,这样gcc编译器可以在编译过程中,将可能性更大的代码紧跟前面的代码,减少指令跳转带来的性能开销


我们接着看,当用户自定义了信号处理函数后,内核是怎么处理的。从上面的代码看来,当用户自定义了信号处理函数,get_signal函数会返回true,紧接着就会进入到handle_signal函数中,这里的处理比较特殊,我们要先了解信号处理的一些过程

用户自定义信号处理函数实际上是在用户空间执行的,目的是为了防止用户利用内核空间的ring 0特权等级做一些意想不到的事,处理过程如下两图所示:

信号处理过程

信号处理过程

整个过程如图中所见,进程由于系统调用或中断进入内核空间,在内核空间完成工作后返回用户空间的前夕,检查信号队列,如果检查有信号并且有自定义的信号处理函数,返回到用户空间执行信号处理函数,处理完后再返回内核空间,最后再回到用户空间之前代码执行到的地方继续运行

可以看到,这一套流程经历了4次用户态与内核态的切换,比较复杂,那么内核是如何做到的呢?为什么信号处理函数执行完后还要返回内核空间呢?

用户态与内核态的切换

Linux中,在用户态和内核态运行的进程使用的是不同的栈,分别为用户栈和内核栈,当一个进程陷入内核态时,需要将用户栈的信息保存到内核栈中,具体的,会将ss, sp, flags, cs, ip等值依次压入栈中,保存为pt_regs结构,然后设置CPU堆栈寄存器的地址为内核栈顶,这样,后续使用的栈便变成了内核栈,当系统调用结束,需要从内核态切换到用户态时,再将之前压入栈中的寄存器值弹出,将pt_regs中保存的值恢复到相应的寄存器中,这里改变了sp寄存器的值,即完成了换栈,cs:ip这两个寄存器分别指向用户态代码段以及用户态指令指针,后续CPU便会执行之前用户态的代码了

pt_regs结构体

pt_regs结构体位于arch/x86/include/asm/ptrace.h

1
2
3
4
5
6
7
8
9
10
11
12
13
14
15
16
17
18
19
20
21
22
23
24
25
26
27
28
29
30
31
32
33
34
struct pt_regs {
/*
* C ABI says these regs are callee-preserved. They aren't saved on kernel entry
* unless syscall needs a complete, fully filled "struct pt_regs".
*/
unsigned long r15;
unsigned long r14;
unsigned long r13;
unsigned long r12;
unsigned long bp;
unsigned long bx;
/* These regs are callee-clobbered. Always saved on kernel entry. */
unsigned long r11;
unsigned long r10;
unsigned long r9;
unsigned long r8;
unsigned long ax;
unsigned long cx;
unsigned long dx;
unsigned long si;
unsigned long di;
/*
* On syscall entry, this is syscall#. On CPU exception, this is error code.
* On hw interrupt, it's IRQ number:
*/
unsigned long orig_ax;
/* Return frame for iretq */
unsigned long ip;
unsigned long cs;
unsigned long flags;
unsigned long sp;
unsigned long ss;
/* top of stack page */
};

我们从理论角度上大概理解了内核是怎么在用户态与内核态之间切换的,接下来我们去源码里验证一下是不是我们所想的这样,syscall的入口函数为entry_SYSCALL_64,位于arch/x86/entry/entry_64.S

1
2
3
4
5
6
7
8
9
10
11
12
13
14
15
16
17
18
19
20
21
22
23
24
25
26
27
28
29
30
31
32
33
34
35
36
37
38
39
40
41
42
43
44
45
46
47
48
49
50
51
52
53
54
55
56
57
58
59
60
61
62
63
64
65
66
67
68
69
70
71
72
73
74
75
76
77
78
79
80
SYM_CODE_START(entry_SYSCALL_64)
UNWIND_HINT_EMPTY

/* 切换gs寄存器至内核态 */
swapgs
/* tss.sp2为用户栈 */
movq %rsp, PER_CPU_VAR(cpu_tss_rw + TSS_sp2)
/* 切换页表 */
SWITCH_TO_KERNEL_CR3 scratch_reg=%rsp
/* 切换至内核栈 */
movq PER_CPU_VAR(cpu_current_top_of_stack), %rsp

SYM_INNER_LABEL(entry_SYSCALL_64_safe_stack, SYM_L_GLOBAL)

/* 保存用户栈寄存器值至pt_regs结构中 */
pushq $__USER_DS /* pt_regs->ss */
pushq PER_CPU_VAR(cpu_tss_rw + TSS_sp2) /* pt_regs->sp */
/* 当执行syscall指令时,cpu会将rflags的值保存在r11寄存器中 */
pushq %r11 /* pt_regs->flags */
pushq $__USER_CS /* pt_regs->cs */
/* 当执行syscall指令时,cpu会将syscall指令的下一条指令的地址传给rcx寄存器 */
pushq %rcx /* pt_regs->ip */
SYM_INNER_LABEL(entry_SYSCALL_64_after_hwframe, SYM_L_GLOBAL)
pushq %rax /* pt_regs->orig_ax */

/* 保存并清除寄存器 */
PUSH_AND_CLEAR_REGS rax=$-ENOSYS
/* 此时,rsp指向的栈顶地址即为pt_regs的地址 */
movq %rsp, %rdi
/* 设置系统调用号 */
movslq %eax, %rsi
/* 以rdi, rsi作为参数,调用do_syscall_64函数 */
call do_syscall_64 /* returns with IRQs disabled */

...

cmpq %rcx, %r11
jne swapgs_restore_regs_and_return_to_usermode

cmpq $__USER_CS, CS(%rsp) /* CS must match SYSRET */
jne swapgs_restore_regs_and_return_to_usermode

movq R11(%rsp), %r11
cmpq %r11, EFLAGS(%rsp) /* R11 == RFLAGS */
jne swapgs_restore_regs_and_return_to_usermode

testq $(X86_EFLAGS_RF|X86_EFLAGS_TF), %r11
jnz swapgs_restore_regs_and_return_to_usermode

cmpq $__USER_DS, SS(%rsp) /* SS must match SYSRET */
jne swapgs_restore_regs_and_return_to_usermode

/*
* 这个标签实际上只是为了便于理解,并没有地方跳转它
* 实际工作是在swapgs_restore_regs_and_return_to_usermode中完成的
*/
syscall_return_via_sysret:
/* 恢复寄存器 */
POP_REGS pop_rdi=0 skip_r11rcx=1

movq %rsp, %rdi
/* 保存内核栈 */
movq PER_CPU_VAR(cpu_tss_rw + TSS_sp0), %rsp
UNWIND_HINT_EMPTY

pushq RSP-RDI(%rdi) /* RSP */
pushq (%rdi) /* RDI */

STACKLEAK_ERASE_NOCLOBBER

/* 切换页表 */
SWITCH_TO_USER_CR3_STACK scratch_reg=%rdi

popq %rdi
popq %rsp
/* 切换gs寄存器至用户态 */
swapgs
/* 恢复rip, rflags等寄存器,使cpu接下来要执行指令指向syscall的下一条指令 */
sysretq
SYM_CODE_END(entry_SYSCALL_64)

信号处理函数的跳转方式

但是在系统调用完后,回到的将是syscall后的下一条指令,那么如何才能让程序去执行信号处理函数呢?信号处理函数执行完后,又如何回到之前所执行到的代码呢?我们很容易就能想到,先将pt_regs中的值备份一下,然后改变pt_regs中一些寄存器值,比如说将cs:ip修改成信号处理函数对应地址,这样从内核态返回后,就会自动跳转到信号处理函数了,等到信号处理函数执行完,再进入内核态,恢复pt_regs中的值后回到用户态,这样cpu又会从用户调用syscall后的指令开始正常执行了

我们具体的看一下内核代码是怎么做的,这里的逻辑在arch/x86/kernel/signal.c中的handle_signal函数里

1
2
3
4
5
6
7
8
9
10
11
12
13
14
15
16
17
18
19
20
21
22
23
24
25
26
27
28
29
30
31
32
33
34
35
36
37
38
39
40
41
42
43
44
45
46
47
48
49
50
51
52
53
54
55
56
57
58
59
60
61
62
63
64
65
66
67
68
69
70
71
72
73
74
75
76
77
78
79
80
81
82
83
84
85
86
87
88
89
90
91
92
93
94
95
96
97
98
99
100
101
102
103
104
105
106
107
108
109
110
111
112
113
114
115
116
117
118
119
120
121
122
123
124
125
126
127
128
129
130
131
132
133
134
135
136
137
138
139
140
141
142
143
144
145
146
147
static void
handle_signal(struct ksignal *ksig, struct pt_regs *regs)
{
...
failed = (setup_rt_frame(ksig, regs) < 0);
...
signal_setup_done(failed, ksig, stepping);
}

static int
setup_rt_frame(struct ksignal *ksig, struct pt_regs *regs)
{
int usig = ksig->sig;
sigset_t *set = sigmask_to_save();
compat_sigset_t *cset = (compat_sigset_t *) set;

/* Perform fixup for the pre-signal frame. */
rseq_signal_deliver(ksig, regs);

//设置栈帧
if (is_ia32_frame(ksig)) {
if (ksig->ka.sa.sa_flags & SA_SIGINFO)
return ia32_setup_rt_frame(usig, ksig, cset, regs);
else
return ia32_setup_frame(usig, ksig, cset, regs);
} else if (is_x32_frame(ksig)) {
return x32_setup_rt_frame(ksig, cset, regs);
} else {
return __setup_rt_frame(ksig->sig, ksig, set, regs);
}
}

//x86_64执行的应该是这个函数
static int __setup_rt_frame(int sig, struct ksignal *ksig,
sigset_t *set, struct pt_regs *regs)
{
struct rt_sigframe __user *frame;
void __user *fp = NULL;
unsigned long uc_flags;

/* x86-64 should always use SA_RESTORER. */
if (!(ksig->ka.sa.sa_flags & SA_RESTORER))
return -EFAULT;

//获取一个栈帧
frame = get_sigframe(&ksig->ka, regs, sizeof(struct rt_sigframe), &fp);
uc_flags = frame_uc_flags(regs);

if (!user_access_begin(frame, sizeof(*frame)))
return -EFAULT;

/* Create the ucontext. */
unsafe_put_user(uc_flags, &frame->uc.uc_flags, Efault);
unsafe_put_user(0, &frame->uc.uc_link, Efault);
unsafe_save_altstack(&frame->uc.uc_stack, regs->sp, Efault);

/* Set up to return from userspace. If provided, use a stub
already in userspace. */
//设置执行完信号处理函数后,要跳回的地址,即sa_restorer
unsafe_put_user(ksig->ka.sa.sa_restorer, &frame->pretcode, Efault);
//将原本的pt_regs备份保存至frame.uc.uc_mcontext中
unsafe_put_sigcontext(&frame->uc.uc_mcontext, fp, regs, set, Efault);
unsafe_put_sigmask(set, frame, Efault);
user_access_end();

if (ksig->ka.sa.sa_flags & SA_SIGINFO) {
if (copy_siginfo_to_user(&frame->info, &ksig->info))
return -EFAULT;
}

//信号处理函数的第1个参数
regs->di = sig;
/* In case the signal handler was declared without prototypes */
regs->ax = 0;

/* 设置了SA_SIGINFO标志位,需要带一些额外的信号信息 */
//信号处理函数的第2个参数
regs->si = (unsigned long)&frame->info;
//信号处理函数的第3个参数
regs->dx = (unsigned long)&frame->uc;
//设置指令指针指向信号处理函数
//sigaction结构体中的第一个域是一个联合,所以这里
//sa_handler和sa_sigaction的地址是相同的
regs->ip = (unsigned long) ksig->ka.sa.sa_handler;
//设置栈顶地址
regs->sp = (unsigned long)frame;
//设置用户代码段
regs->cs = __USER_CS;

if (unlikely(regs->ss != __USER_DS))
force_valid_ss(regs);

return 0;

Efault:
user_access_end();
return -EFAULT;
}

#define unsafe_put_sigcontext(sc, fp, regs, set, label) \
do { \
if (__unsafe_setup_sigcontext(sc, fp, regs, set->sig[0])) \
goto label; \
} while(0);

static __always_inline int
__unsafe_setup_sigcontext(struct sigcontext __user *sc, void __user *fpstate,
struct pt_regs *regs, unsigned long mask)
{

unsafe_put_user(regs->di, &sc->di, Efault);
unsafe_put_user(regs->si, &sc->si, Efault);
unsafe_put_user(regs->bp, &sc->bp, Efault);
unsafe_put_user(regs->sp, &sc->sp, Efault);
unsafe_put_user(regs->bx, &sc->bx, Efault);
unsafe_put_user(regs->dx, &sc->dx, Efault);
unsafe_put_user(regs->cx, &sc->cx, Efault);
unsafe_put_user(regs->ax, &sc->ax, Efault);

unsafe_put_user(regs->r8, &sc->r8, Efault);
unsafe_put_user(regs->r9, &sc->r9, Efault);
unsafe_put_user(regs->r10, &sc->r10, Efault);
unsafe_put_user(regs->r11, &sc->r11, Efault);
unsafe_put_user(regs->r12, &sc->r12, Efault);
unsafe_put_user(regs->r13, &sc->r13, Efault);
unsafe_put_user(regs->r14, &sc->r14, Efault);
unsafe_put_user(regs->r15, &sc->r15, Efault);

unsafe_put_user(current->thread.trap_nr, &sc->trapno, Efault);
unsafe_put_user(current->thread.error_code, &sc->err, Efault);
unsafe_put_user(regs->ip, &sc->ip, Efault);

unsafe_put_user(regs->flags, &sc->flags, Efault);
unsafe_put_user(regs->cs, &sc->cs, Efault);
unsafe_put_user(0, &sc->gs, Efault);
unsafe_put_user(0, &sc->fs, Efault);
unsafe_put_user(regs->ss, &sc->ss, Efault);

unsafe_put_user(fpstate, (unsigned long __user *)&sc->fpstate, Efault);

/* non-iBCS2 extensions.. */
unsafe_put_user(mask, &sc->oldmask, Efault);
unsafe_put_user(current->thread.cr2, &sc->cr2, Efault);
return 0;
Efault:
return -EFAULT;
}

这里实际上是这么做的,首先,内核默认在用户栈上分配了一个栈帧(如果设置了备用栈的话,则会在备用栈上分配),将pt_regs备份到这个栈帧上,用于后续恢复,然后设置pt_regs,改变其sp, cs, ip等值,使程序从内核态返回时,可以跳转到信号处理函数对应的栈和代码指令地址,当信号处理函数返回时会执行sigreturn系统调用再进入内核态,将之前备份到栈帧中的寄存器值重新恢复到pt_regs中,然后再从内核态回到用户态就可以正常继续执行syscall后面的代码了

其中sa_restorer是在glibc里的__libc_sigaction函数中被设置的

1
2
3
4
5
6
7
8
9
10
11
12
13
14
15
16
17
18
19
20
21
22
23
24
25
26
27
28
29
30
31
32
33
34
35
36
37
38
39
40
41
int
__libc_sigaction (int sig, const struct sigaction *act, struct sigaction *oact)
{
int result;

struct kernel_sigaction kact, koact;

if (act)
{
kact.k_sa_handler = act->sa_handler;
memcpy (&kact.sa_mask, &act->sa_mask, sizeof (sigset_t));
kact.sa_flags = act->sa_flags;
//设置sa_restorer
SET_SA_RESTORER (&kact, act);
}
...
return result;
}

extern void restore_rt (void) asm ("__restore_rt") attribute_hidden;

#define SET_SA_RESTORER(kact, act) \
(kact)->sa_flags = (act)->sa_flags | SA_RESTORER; \
(kact)->sa_restorer = &restore_rt

RESTORE (restore_rt, __NR_rt_sigreturn)

#define RESTORE(name, syscall) RESTORE2 (name, syscall)
#define RESTORE2(name, syscall) \
asm \
( \
/* `nop' for debuggers assuming `call' should not disalign the code. */ \
" nop\n" \
".align 16\n" \
".LSTART_" #name ":\n" \
" .type __" #name ",@function\n" \
"__" #name ":\n" \
" movq $" #syscall ", %rax\n" \
" syscall\n" \
...
);

可以看到,这里也是一个系统调用,和上面所说的规则一样,它最终会调用sys_rt_sigreturn函数,具体实现如下:

1
2
3
4
5
6
7
8
9
10
11
12
13
14
15
16
17
18
19
20
21
22
23
24
25
26
27
28
29
30
31
32
33
34
35
36
37
38
39
40
41
42
43
44
45
46
47
48
49
50
51
52
53
54
55
56
57
58
59
60
61
62
63
64
65
66
67
68
69
70
71
72
73
SYSCALL_DEFINE0(rt_sigreturn)
{
struct pt_regs *regs = current_pt_regs();
struct rt_sigframe __user *frame;
sigset_t set;
unsigned long uc_flags;

frame = (struct rt_sigframe __user *)(regs->sp - sizeof(long));
if (!access_ok(frame, sizeof(*frame)))
goto badframe;
if (__get_user(*(__u64 *)&set, (__u64 __user *)&frame->uc.uc_sigmask))
goto badframe;
if (__get_user(uc_flags, &frame->uc.uc_flags))
goto badframe;

set_current_blocked(&set);

//frame.uc.uc_mcontext中恢复pt_regs
if (!restore_sigcontext(regs, &frame->uc.uc_mcontext, uc_flags))
goto badframe;

if (restore_altstack(&frame->uc.uc_stack))
goto badframe;

return regs->ax;

badframe:
signal_fault(regs, frame, "rt_sigreturn");
return 0;
}

static bool restore_sigcontext(struct pt_regs *regs,
struct sigcontext __user *usc,
unsigned long uc_flags)
{
struct sigcontext sc;

/* Always make any pending restarted system calls return -EINTR */
current->restart_block.fn = do_no_restart_syscall;

if (copy_from_user(&sc, usc, CONTEXT_COPY_SIZE))
return false;

regs->bx = sc.bx;
regs->cx = sc.cx;
regs->dx = sc.dx;
regs->si = sc.si;
regs->di = sc.di;
regs->bp = sc.bp;
regs->ax = sc.ax;
regs->sp = sc.sp;
regs->ip = sc.ip;

regs->r8 = sc.r8;
regs->r9 = sc.r9;
regs->r10 = sc.r10;
regs->r11 = sc.r11;
regs->r12 = sc.r12;
regs->r13 = sc.r13;
regs->r14 = sc.r14;
regs->r15 = sc.r15;

/* Get CS/SS and force CPL3 */
regs->cs = sc.cs | 0x03;
regs->ss = sc.ss | 0x03;

regs->flags = (regs->flags & ~FIX_EFLAGS) | (sc.flags & FIX_EFLAGS);
/* disable syscall checks */
regs->orig_ax = -1;
...
return fpu__restore_sig((void __user *)sc.fpstate,
IS_ENABLED(CONFIG_X86_32));
}

从上面代码还是可以比较清楚的看出来,和我们之前描述的原理基本一致,到这一步时,恢复pt_regs中的值,这样后续返回用户态后便可以正常继续运行后面的用户代码了

总结

Linux信号的原理分析到这基本上也就结束了,其实整个信号原理分析对现阶段的我来说,还是一件相当具有挑战性的事情,不过在此过程中,还是收获了很多知识,也发现了一些之前文章里错漏的地方,由于我对Linux内核以及汇编并不熟悉,所以难免会有一些分析错误或者不到位的地方,欢迎大家指正

附录

信号表

取值 | 名称 | 解释 | 默认动作 |
| – | ——— | —————- | ———– |
| 1 | SIGHUP | 挂起 | 终止进程 |
| 2 | SIGINT | 中断 | 终止进程 |
| 4 | SIGILL | 非法指令 | coredump后终止进程 |
| 5 | SIGTRAP | 断点或陷阱指令 | coredump后终止进程 |
| 6 | SIGABRT/SIGIOT | abort发出的信号 | coredump后终止进程 |
| 7 | SIGBUS | 非法内存访问 | coredump后终止进程 |
| 8 | SIGFPE | 浮点异常 | coredump后终止进程 |
| 9 | SIGKILL | kill信号 | 不能被忽略、处理和阻塞 |
| 10 | SIGUSR1 | 用户自定义信号1 | 终止进程 |
| 11 | SIGSEGV | 无效内存访问 | coredump后终止进程 |
| 12 | SIGUSR2 | 用户自定义信号2 | 终止进程 |
| 13 | SIGPIPE | 管道破损,没有读端的管道写数据 | 终止进程 |
| 14 | SIGALRM | alarm发出的信号 | 终止进程 |
| 15 | SIGTERM | 终止信号 | 终止进程 |
| 16 | SIGSTKFLT | 栈溢出 | 终止进程 |
| 17 | SIGCHLD | 子进程退出 | 忽略信号 |
| 18 | SIGCONT | 进程继续 | 忽略信号 |
| 19 | SIGSTOP | 进程停止 | 不能被忽略、处理和阻塞 |
| 20 | SIGTSTP | 进程停止 | 停止进程 |
| 21 | SIGTTIN | 进程停止,后台进程从终端读数据时 | 停止进程 |
| 22 | SIGTTOU | 进程停止,后台进程想终端写数据时 | 停止进程 |
| 23 | SIGURG | I/O有紧急数据到达当前进程 | 忽略信号 |
| 24 | SIGXCPU | 进程的CPU时间片到期 | coredump后终止进程 |
| 25 | SIGXFSZ | 文件大小的超出上限 | coredump后终止进程 |
| 26 | SIGVTALRM | 虚拟时钟超时 | 终止进程 |
| 27 | SIGPROF | profile时钟超时 | 终止进程 |
| 28 | SIGWINCH | 窗口大小改变 | 忽略信号 |
| 29 | SIGPOLL/SIGIO | I/O相关 | 终止进程 |
| 30 | SIGPWR | 关机 | 默认忽略 |
| 31 | SIGSYS/SIGUNUSED | 系统调用异常 | coredump后终止进程 |

参考文献