Android源码分析 - init进程

开篇

本篇以android-11.0.0_r25作为基础解析

PC启动会通过BIOS引导,从0x7c00处找到以0xaa55为结尾的引导程序启动。而Android通常使用在移动设备上,没有PC的BIOS,取而代之的是BootLoader。

BootLoader

在CPU上电复位完成后,会从一个固定的地址加载一段程序,即BootLoader,不同的CPU可能这个地址不同。BootLoader是一段引导程序,其中最为常见的为U-boot,它一般会先检测用户是否按下某些特别按键,这些特别按键是uboot在编译时预先被约定好的,用于进入调试模式。如果用户没有按这些特别的按键,则uboot会从NAND Flash中装载Linux内核,装载的地址是在编译uboot时预先约定好的。

进程

idle

Linux内核启动后,便会创建第一个进程idle。idle进程是Linux中的第一个进程,pid为0,是唯一一个没有通过fork产生的进程,它的优先级非常低,用于CPU没有任务的时候进行空转。

init

init进程由idle进程创建,是Linux系统的第一个用户进程,pid为1,是系统所有用户进程的直接或间接父进程,本篇重点讲的就是它。

kthreadd

kthreadd进程同样由idle进程创建,pid为2,它始终运行在内核空间,负责所有内核线程的调度与管理。

init进程

Android的init进程代码在system/core/init/main.cpp中,以main方法作为入口,分为几个阶段:

1
2
3
4
5
6
7
8
9
10
11
12
13
14
15
16
17
18
19
20
21
22
23
24
25
26
27
28
int main(int argc, char** argv) {
#if __has_feature(address_sanitizer)
__asan_set_error_report_callback(AsanReportCallback);
#endif

if (!strcmp(basename(argv[0]), "ueventd")) {
return ueventd_main(argc, argv);
}

if (argc > 1) {
if (!strcmp(argv[1], "subcontext")) {
android::base::InitLogging(argv, &android::base::KernelLogger);
const BuiltinFunctionMap& function_map = GetBuiltinFunctionMap();

return SubcontextMain(argc, argv, &function_map);
}

if (!strcmp(argv[1], "selinux_setup")) {
return SetupSelinux(argv);
}

if (!strcmp(argv[1], "second_stage")) {
return SecondStageMain(argc, argv);
}
}

return FirstStageMain(argc, argv);
}

这里的ueventd和subcontext,都是在各自守护进程中执行的,不在init进程中执行,这里就不多介绍了

FirstStageMain

默认不加任何参数启动init的话,便会开始init第一阶段,进入到FirstStageMain函数中,代码在system/core/init/first_stage_init.cpp

umask

文档:https://man7.org/linux/man-pages/man2/umask.2.html

原型:mode_t umask(mode_t mask);

这个方法是用来设置创建目录或文件时所应该赋予权限的掩码

Linux中,文件默认最大权限是666,目录最大权限是777,当创建目录时,假设掩码为022,那赋予它的权限为(777 & ~022)= 755

在执行init第一阶段时,先执行umask(0),使创建的目录或文件的默认权限为最高

创建目录、设备节点,挂载

1
2
3
4
5
6
7
8
9
10
11
12
13
14
15
16
17
18
19
20
21
22
23
24
25
26
27
28
29
30
31
32
33
34
35
36
37
38
39
40
41
42
43
44
int FirstStageMain(int argc, char** argv) {
...
#define CHECKCALL(x) \
if ((x) != 0) errors.emplace_back(#x " failed", errno);

// Clear the umask.
umask(0);

CHECKCALL(clearenv());
CHECKCALL(setenv("PATH", _PATH_DEFPATH, 1));
CHECKCALL(mount("tmpfs", "/dev", "tmpfs", MS_NOSUID, "mode=0755"));
CHECKCALL(mkdir("/dev/pts", 0755));
CHECKCALL(mkdir("/dev/socket", 0755));
CHECKCALL(mount("devpts", "/dev/pts", "devpts", 0, NULL));
#define MAKE_STR(x) __STRING(x)
CHECKCALL(mount("proc", "/proc", "proc", 0, "hidepid=2,gid=" MAKE_STR(AID_READPROC)));
#undef MAKE_STR
CHECKCALL(chmod("/proc/cmdline", 0440));
std::string cmdline;
android::base::ReadFileToString("/proc/cmdline", &cmdline);
gid_t groups[] = {AID_READPROC};
CHECKCALL(setgroups(arraysize(groups), groups));
CHECKCALL(mount("sysfs", "/sys", "sysfs", 0, NULL));
CHECKCALL(mount("selinuxfs", "/sys/fs/selinux", "selinuxfs", 0, NULL));

CHECKCALL(mknod("/dev/kmsg", S_IFCHR | 0600, makedev(1, 11)));

if constexpr (WORLD_WRITABLE_KMSG) {
CHECKCALL(mknod("/dev/kmsg_debug", S_IFCHR | 0622, makedev(1, 11)));
}

CHECKCALL(mknod("/dev/random", S_IFCHR | 0666, makedev(1, 8)));
CHECKCALL(mknod("/dev/urandom", S_IFCHR | 0666, makedev(1, 9)));
CHECKCALL(mknod("/dev/ptmx", S_IFCHR | 0666, makedev(5, 2)));
CHECKCALL(mknod("/dev/null", S_IFCHR | 0666, makedev(1, 3)));
CHECKCALL(mount("tmpfs", "/mnt", "tmpfs", MS_NOEXEC | MS_NOSUID | MS_NODEV,
"mode=0755,uid=0,gid=1000"));
CHECKCALL(mkdir("/mnt/vendor", 0755));
CHECKCALL(mkdir("/mnt/product", 0755));
CHECKCALL(mount("tmpfs", "/debug_ramdisk", "tmpfs", MS_NOEXEC | MS_NOSUID | MS_NODEV,
"mode=0755,uid=0,gid=0"));
#undef CHECKCALL
...
}

初始化日志

SetStdioToDevNull

由于Linux内核打开了/dev/console作为标准输入输出流(stdin/stdout/stderr)的文件描述符,而init进程在用户空间,无权访问/dev/console,后续如果执行printf的话可能会导致错误,所以先调用SetStdioToDevNull函数来将标准输入输出流(stdin/stdout/stderr)用/dev/null文件描述符替换

/dev/null被称为空设备,是一个特殊的设备文件,它会丢弃一切写入其中的数据,读取它会立即得到一个EOF

InitKernelLogging

接着调用InitKernelLogging函数,初始化了一个简单的kernel日志系统

创建设备,挂载分区

1
2
3
4
5
6
7
8
9
10
11
12
13
14
15
16
17
18
19
20
21
22
23
24
25
26
27
28
29
30
31
int FirstStageMain(int argc, char** argv) {
...
auto want_console = ALLOW_FIRST_STAGE_CONSOLE ? FirstStageConsole(cmdline) : 0;

if (!LoadKernelModules(IsRecoveryMode() && !ForceNormalBoot(cmdline), want_console)) {
if (want_console != FirstStageConsoleParam::DISABLED) {
LOG(ERROR) << "Failed to load kernel modules, starting console";
} else {
LOG(FATAL) << "Failed to load kernel modules";
}
}

if (want_console == FirstStageConsoleParam::CONSOLE_ON_FAILURE) {
StartConsole();
}

if (ForceNormalBoot(cmdline)) {
mkdir("/first_stage_ramdisk", 0755);
// SwitchRoot() must be called with a mount point as the target, so we bind mount the
// target directory to itself here.
if (mount("/first_stage_ramdisk", "/first_stage_ramdisk", nullptr, MS_BIND, nullptr) != 0) {
LOG(FATAL) << "Could not bind mount /first_stage_ramdisk to itself";
}
SwitchRoot("/first_stage_ramdisk");
}
...
if (!DoFirstStageMount()) {
LOG(FATAL) << "Failed to mount required partitions early ...";
}
...
}

结束

至此,第一阶段的init结束,通过execv函数带参执行init文件,进入SetupSelinux

1
2
3
4
5
6
7
8
9
10
11
const char* path = "/system/bin/init";
const char* args[] = {path, "selinux_setup", nullptr};
auto fd = open("/dev/kmsg", O_WRONLY | O_CLOEXEC);
dup2(fd, STDOUT_FILENO);
dup2(fd, STDERR_FILENO);
close(fd);
execv(path, const_cast<char**>(args));

// execv() only returns if an error happened, in which case we
// panic and never fall through this conditional.
PLOG(FATAL) << "execv(\"" << path << "\") failed";

exec系列函数

用exec系列函数可以把当前进程替换为一个新进程,且新进程与原进程有相同的PID。

这里在末尾直接打log是因为,exec系列函数如果执行正常是不会返回的,所以只要执行到下面就代表exec执行出错了

SetupSelinux

启动Selinux安全机制,初始化selinux,加载SELinux规则,配置SELinux相关log输出,并启动第二阶段:SecondStageMain

1
2
3
4
5
6
7
8
9
10
11
12
13
14
15
16
17
18
19
20
21
22
23
24
25
26
27
28
29
30
31
32
33
34
35
36
int SetupSelinux(char** argv) {
SetStdioToDevNull(argv);
InitKernelLogging(argv);

if (REBOOT_BOOTLOADER_ON_PANIC) {
InstallRebootSignalHandlers();
}

boot_clock::time_point start_time = boot_clock::now();

MountMissingSystemPartitions();

// Set up SELinux, loading the SELinux policy.
SelinuxSetupKernelLogging();
SelinuxInitialize();

// We're in the kernel domain and want to transition to the init domain. File systems that
// store SELabels in their xattrs, such as ext4 do not need an explicit restorecon here,
// but other file systems do. In particular, this is needed for ramdisks such as the
// recovery image for A/B devices.
if (selinux_android_restorecon("/system/bin/init", 0) == -1) {
PLOG(FATAL) << "restorecon failed of /system/bin/init failed";
}

setenv(kEnvSelinuxStartedAt, std::to_string(start_time.time_since_epoch().count()).c_str(), 1);

const char* path = "/system/bin/init";
const char* args[] = {path, "second_stage", nullptr};
execv(path, const_cast<char**>(args));

// execv() only returns if an error happened, in which case we
// panic and never return from this function.
PLOG(FATAL) << "execv(\"" << path << "\") failed";

return 1;
}

SecondStageMain

使用second_stage参数启动init的话,便会开始init第二阶段,进入到SecondStageMain函数中,代码在system/core/init/init.cpp

1
2
3
4
5
6
7
8
9
10
11
12
13
14
15
16
17
18
19
20
21
22
23
24
25
26
27
28
29
30
31
32
33
34
35
36
37
38
39
40
41
42
43
44
45
46
47
48
49
50
51
52
53
54
55
56
57
58
59
60
61
62
63
64
65
66
67
68
69
70
71
72
73
74
75
76
77
78
79
80
81
82
83
84
85
86
87
88
89
90
91
92
93
94
95
96
97
98
99
100
101
102
103
104
105
106
107
108
109
110
111
112
113
114
115
116
117
118
119
120
121
122
123
124
125
126
127
int SecondStageMain(int argc, char** argv) {
...
//和第一阶段一样,初始化日志
SetStdioToDevNull(argv);
InitKernelLogging(argv);
LOG(INFO) << "init second stage started!";
...
// Set init and its forked children's oom_adj.
//设置init进程和以后fork出来的进程的OOM等级,这里的值为-1000,保证进程不会因为OOM被杀死
if (auto result =
WriteFile("/proc/1/oom_score_adj", StringPrintf("%d", DEFAULT_OOM_SCORE_ADJUST));
!result.ok()) {
LOG(ERROR) << "Unable to write " << DEFAULT_OOM_SCORE_ADJUST
<< " to /proc/1/oom_score_adj: " << result.error();
}
...
// Indicate that booting is in progress to background fw loaders, etc.
//设置一个标记,代表正在启动过程中
close(open("/dev/.booting", O_WRONLY | O_CREAT | O_CLOEXEC, 0000));
...
//初始化系统属性
PropertyInit();
...
// Mount extra filesystems required during second stage init
//挂载额外的文件系统
MountExtraFilesystems();

// Now set up SELinux for second stage.
//设置SELinux
SelinuxSetupKernelLogging();
SelabelInitialize();
SelinuxRestoreContext();

//使用epoll,注册信号处理函数,守护进程服务
Epoll epoll;
if (auto result = epoll.Open(); !result.ok()) {
PLOG(FATAL) << result.error();
}

InstallSignalFdHandler(&epoll);
InstallInitNotifier(&epoll);
//启动系统属性服务
StartPropertyService(&property_fd);
...
//设置commands指令所对应的函数map
const BuiltinFunctionMap& function_map = GetBuiltinFunctionMap();
Action::set_function_map(&function_map);
...
//解析init.rc脚本
ActionManager& am = ActionManager::GetInstance();
ServiceList& sm = ServiceList::GetInstance();

LoadBootScripts(am, sm);
...
//构建了一些Action,Trigger等事件对象加入事件队列中
am.QueueBuiltinAction(SetupCgroupsAction, "SetupCgroups");
am.QueueBuiltinAction(SetKptrRestrictAction, "SetKptrRestrict");
am.QueueBuiltinAction(TestPerfEventSelinuxAction, "TestPerfEventSelinux");
am.QueueEventTrigger("early-init");

// Queue an action that waits for coldboot done so we know ueventd has set up all of /dev...
am.QueueBuiltinAction(wait_for_coldboot_done_action, "wait_for_coldboot_done");
// ... so that we can start queuing up actions that require stuff from /dev.
am.QueueBuiltinAction(MixHwrngIntoLinuxRngAction, "MixHwrngIntoLinuxRng");
am.QueueBuiltinAction(SetMmapRndBitsAction, "SetMmapRndBits");
Keychords keychords;
am.QueueBuiltinAction(
[&epoll, &keychords](const BuiltinArguments& args) -> Result<void> {
for (const auto& svc : ServiceList::GetInstance()) {
keychords.Register(svc->keycodes());
}
keychords.Start(&epoll, HandleKeychord);
return {};
},
"KeychordInit");

// Trigger all the boot actions to get us started.
am.QueueEventTrigger("init");

// Repeat mix_hwrng_into_linux_rng in case /dev/hw_random or /dev/random
// wasn't ready immediately after wait_for_coldboot_done
am.QueueBuiltinAction(MixHwrngIntoLinuxRngAction, "MixHwrngIntoLinuxRng");

// Don't mount filesystems or start core system services in charger mode.
std::string bootmode = GetProperty("ro.bootmode", "");
if (bootmode == "charger") {
am.QueueEventTrigger("charger");
} else {
am.QueueEventTrigger("late-init");
}

// Run all property triggers based on current state of the properties.
am.QueueBuiltinAction(queue_property_triggers_action, "queue_property_triggers");

//死循环,等待事件处理
while (true) {
// By default, sleep until something happens.
auto epoll_timeout = std::optional<std::chrono::milliseconds>{};
...
//执行从init.rc脚本解析出来的每条指令
if (!(prop_waiter_state.MightBeWaiting() || Service::is_exec_service_running())) {
am.ExecuteOneCommand();
}
...
if (!(prop_waiter_state.MightBeWaiting() || Service::is_exec_service_running())) {
// If there's more work to do, wake up again immediately.
if (am.HasMoreCommands()) epoll_timeout = 0ms;
}

auto pending_functions = epoll.Wait(epoll_timeout);
if (!pending_functions.ok()) {
LOG(ERROR) << pending_functions.error();
} else if (!pending_functions->empty()) {
// We always reap children before responding to the other pending functions. This is to
// prevent a race where other daemons see that a service has exited and ask init to
// start it again via ctl.start before init has reaped it.
//处理子进程退出后的相关事项
ReapAnyOutstandingChildren();
for (const auto& function : *pending_functions) {
(*function)();
}
}
...
}

return 0;
}

Linux OOM Killer机制

Linux下有一种 OOM KILLER 的机制,它会在系统内存耗尽的情况下,启用自己算法有选择性的杀掉一些进程,这个算法和三个值有关:

  • /proc/PID/oom_score ,OOM 最终得分,值越大越有可能被杀掉
  • /proc/PID/oom_score_adj ,取值范围为-1000到1000,计算oom_score时会加上该参数
  • /proc/PID/oom_adj ,取值是-17到+15,该参数主要是为兼容旧版内核

在init过程中,代码设置了init进程和以后fork出来的进程的OOM等级,这里的值为-1000,设置为这个值就可以保证进程永远不会因为OOM被杀死

解析init.rc脚本

Android Init Language

rc文件,是用Android Init Language编写的特殊文件。用这种语法编写的文件,统一用”.rc”后缀

它的语法说明可以在aosp源码system/core/init/README.md中找到,这里就简单说明一下语法规则

Actions

Actions是一系列命令的开始,一个Action会有一个触发器,用于确定Action何时执行。当一个与Action的触发器匹配的事件发生时,该动作被添加到待执行队列的尾部

格式如下:

1
2
3
4
on <trigger> [&& <trigger>]* 
<command>
<command>
<command>
Triggers(触发器)

触发器作用于Actions,可用于匹配某些类型的事件,并用于导致操作发生

Commands

Commands就是一个个命令的集合了

Action, Triggers, Commands共同组成了一个单元,举个例子:

1
2
3
4
5
6
7
on zygote-start && property:ro.crypto.state=unencrypted 
# A/B update verifier that marks a successful boot.
exec_start update_verifier_nonencrypted
start statsd
start netd
start zygote
start zygote_secondary
Services

Services是对一些程序的定义,格式如下:

1
2
3
4
service <name> <pathname> [ <argument> ]*
<option>
<option>
...

其中:

  • name:定义的服务名
  • pathname:这个程序的路径
  • argument:程序运行的参数
  • option:服务选项,后文将介绍
Options

Options是对Services的修饰,它们影响着服务运行的方式和时间

Services, Options组成了一个单元,举个例子:

1
2
3
4
5
6
7
8
9
10
11
12
13
14
15
service zygote /system/bin/app_process64 -Xzygote /system/bin --zygote --start-system-server --socket-name=zygote
class main
priority -20
user root
group root readproc reserved_disk
socket zygote stream 660 root system
socket usap_pool_primary stream 660 root system
onrestart exec_background - system system -- /system/bin/vdc volume abort_fuse
onrestart write /sys/power/state on
onrestart restart audioserver
onrestart restart cameraserver
onrestart restart media
onrestart restart netd
onrestart restart wificond
task_profiles ProcessCapacityHigh MaxPerformance
Imports

导入其他的rc文件或目录解析,如果path是一个目录,目录中的每个文件都被解析为一个rc文件。它不是递归的,嵌套的目录将不会被解析。

格式如下:

1
import <path>

Imports的内容会放到最后解析

上文所述的CommandsOptions等具体命令,可以网上搜索一下,或者自己看system/core/init/README.md

Commands的定义可以在system/core/init/builtins.cpp中找到

Options的定义可以在system/core/init/service_parser.cpp中找到

解析

1
2
3
4
5
6
7
8
9
10
11
12
13
14
15
16
17
18
19
20
21
22
23
24
25
static void LoadBootScripts(ActionManager& action_manager, ServiceList& service_list) {
Parser parser = CreateParser(action_manager, service_list);

std::string bootscript = GetProperty("ro.boot.init_rc", "");
if (bootscript.empty()) {
parser.ParseConfig("/system/etc/init/hw/init.rc");
if (!parser.ParseConfig("/system/etc/init")) {
late_import_paths.emplace_back("/system/etc/init");
}
// late_import is available only in Q and earlier release. As we don't
// have system_ext in those versions, skip late_import for system_ext.
parser.ParseConfig("/system_ext/etc/init");
if (!parser.ParseConfig("/product/etc/init")) {
late_import_paths.emplace_back("/product/etc/init");
}
if (!parser.ParseConfig("/odm/etc/init")) {
late_import_paths.emplace_back("/odm/etc/init");
}
if (!parser.ParseConfig("/vendor/etc/init")) {
late_import_paths.emplace_back("/vendor/etc/init");
}
} else {
parser.ParseConfig(bootscript);
}
}

这个函数会从这些地方寻找rc文件解析,/system/etc/init/hw/init.rc是主rc文件,剩下的目录,如果system分区尚未挂载的话,就把它们加入到late_import_paths中,等到后面mount_all时再加载

主rc文件在编译前的位置为system/core/rootdir/init.rc

简单分析一下:

首先,以ActionManagerServiceList作为参数创建了一个Parser解析器,解析后的结果会存放在ActionManagerServiceList中,这里的两个传进来的参数都是单例模式

1
2
3
4
5
6
7
8
9
10
Parser CreateParser(ActionManager& action_manager, ServiceList& service_list) {
Parser parser;

parser.AddSectionParser("service", std::make_unique<ServiceParser>(
&service_list, GetSubcontext(), std::nullopt));
parser.AddSectionParser("on", std::make_unique<ActionParser>(&action_manager, GetSubcontext()));
parser.AddSectionParser("import", std::make_unique<ImportParser>(&parser));

return parser;
}

先创建了一个Parser对象,然后往里面添加了ServiceParserActionParser以及ImportParser,这三个类都是继承自ServiceParser,这里的std::make_unique是new了一个对象,并用其原始指针构造出了一个智能指针

接着走到Parser::ParseConfig方法中:

1
2
3
4
5
6
bool Parser::ParseConfig(const std::string& path) {
if (is_dir(path.c_str())) {
return ParseConfigDir(path);
}
return ParseConfigFile(path);
}

判断是否是目录,如果是目录,就把目录中的所有文件加入容器中排序后依次解析

1
2
3
4
5
6
7
8
9
10
11
12
13
14
15
16
17
18
19
20
21
22
23
24
25
26
bool Parser::ParseConfigDir(const std::string& path) {
LOG(INFO) << "Parsing directory " << path << "...";
std::unique_ptr<DIR, decltype(&closedir)> config_dir(opendir(path.c_str()), closedir);
if (!config_dir) {
PLOG(INFO) << "Could not import directory '" << path << "'";
return false;
}
dirent* current_file;
std::vector<std::string> files;
while ((current_file = readdir(config_dir.get()))) {
// Ignore directories and only process regular files.
if (current_file->d_type == DT_REG) {
std::string current_path =
android::base::StringPrintf("%s/%s", path.c_str(), current_file->d_name);
files.emplace_back(current_path);
}
}
// Sort first so we load files in a consistent order (bug 31996208)
std::sort(files.begin(), files.end());
for (const auto& file : files) {
if (!ParseConfigFile(file)) {
LOG(ERROR) << "could not import file '" << file << "'";
}
}
return true;
}

可以看到,最终都调用了Parser::ParseConfigFile方法

1
2
3
4
5
6
7
8
9
10
11
12
13
14
bool Parser::ParseConfigFile(const std::string& path) {
LOG(INFO) << "Parsing file " << path << "...";
android::base::Timer t;
auto config_contents = ReadFile(path);
if (!config_contents.ok()) {
LOG(INFO) << "Unable to read config file '" << path << "': " << config_contents.error();
return false;
}

ParseData(path, &config_contents.value());

LOG(VERBOSE) << "(Parsing " << path << " took " << t << ".)";
return true;
}

从文件中读取出字符串,并继续调用Parser::ParseData方法

1
2
3
4
5
6
7
8
9
10
11
12
13
14
15
16
17
18
19
20
21
22
23
24
25
26
27
28
29
30
31
32
33
34
35
36
37
38
39
40
41
42
43
44
45
46
47
48
49
50
51
52
53
54
55
56
57
58
59
60
61
62
63
64
65
66
67
68
69
70
71
72
73
74
75
76
77
78
79
80
81
82
83
84
85
86
87
88
void Parser::ParseData(const std::string& filename, std::string* data) {
data->push_back('\n'); // TODO: fix tokenizer
data->push_back('\0');

parse_state state;
state.line = 0;
state.ptr = data->data();
state.nexttoken = 0;

SectionParser* section_parser = nullptr;
int section_start_line = -1;
std::vector<std::string> args;

// If we encounter a bad section start, there is no valid parser object to parse the subsequent
// sections, so we must suppress errors until the next valid section is found.
bool bad_section_found = false;

auto end_section = [&] {
bad_section_found = false;
if (section_parser == nullptr) return;

if (auto result = section_parser->EndSection(); !result.ok()) {
parse_error_count_++;
LOG(ERROR) << filename << ": " << section_start_line << ": " << result.error();
}

section_parser = nullptr;
section_start_line = -1;
};

for (;;) {
switch (next_token(&state)) {
case T_EOF:
end_section();

for (const auto& [section_name, section_parser] : section_parsers_) {
section_parser->EndFile();
}

return;
case T_NEWLINE: {
state.line++;
if (args.empty()) break;
// If we have a line matching a prefix we recognize, call its callback and unset any
// current section parsers. This is meant for /sys/ and /dev/ line entries for
// uevent.
auto line_callback = std::find_if(
line_callbacks_.begin(), line_callbacks_.end(),
[&args](const auto& c) { return android::base::StartsWith(args[0], c.first); });
if (line_callback != line_callbacks_.end()) {
end_section();

if (auto result = line_callback->second(std::move(args)); !result.ok()) {
parse_error_count_++;
LOG(ERROR) << filename << ": " << state.line << ": " << result.error();
}
} else if (section_parsers_.count(args[0])) {
end_section();
section_parser = section_parsers_[args[0]].get();
section_start_line = state.line;
if (auto result =
section_parser->ParseSection(std::move(args), filename, state.line);
!result.ok()) {
parse_error_count_++;
LOG(ERROR) << filename << ": " << state.line << ": " << result.error();
section_parser = nullptr;
bad_section_found = true;
}
} else if (section_parser) {
if (auto result = section_parser->ParseLineSection(std::move(args), state.line);
!result.ok()) {
parse_error_count_++;
LOG(ERROR) << filename << ": " << state.line << ": " << result.error();
}
} else if (!bad_section_found) {
parse_error_count_++;
LOG(ERROR) << filename << ": " << state.line
<< ": Invalid section keyword found";
}
args.clear();
break;
}
case T_TEXT:
args.emplace_back(state.text);
break;
}
}
}

这里新建了一个parse_state结构体,用来以行为单位,分割整个文件字符串,根据分割出来的结果返回相应的TYPE,Parser::ParseData方法再通过TYPE来做逐行解析

这个结构体以及TPYE和分割分割方法的定义在system/core/init/tokenizer.h中,在system/core/init/tokenizer.cpp中实现

1
2
3
4
5
6
7
8
9
10
11
12
13
14
15
16
17
18
19
20
21
22
23
24
25
26
27
28
29
30
31
32
33
34
35
36
37
38
39
40
41
42
43
44
45
46
47
48
49
50
51
52
53
54
55
56
57
58
59
60
61
62
63
64
65
66
67
68
69
70
71
72
73
74
75
76
77
78
79
80
81
82
83
84
85
86
87
88
89
90
91
92
93
94
95
96
97
98
99
100
101
102
103
104
105
106
107
108
109
110
111
112
113
114
115
116
117
118
119
120
121
122
int next_token(struct parse_state *state)
{
char *x = state->ptr;
char *s;

if (state->nexttoken) {
int t = state->nexttoken;
state->nexttoken = 0;
return t;
}

for (;;) {
switch (*x) {
case 0:
state->ptr = x;
return T_EOF;
case '\n':
x++;
state->ptr = x;
return T_NEWLINE;
case ' ':
case '\t':
case '\r':
x++;
continue;
case '#':
while (*x && (*x != '\n')) x++;
if (*x == '\n') {
state->ptr = x+1;
return T_NEWLINE;
} else {
state->ptr = x;
return T_EOF;
}
default:
goto text;
}
}

textdone:
state->ptr = x;
*s = 0;
return T_TEXT;
text:
state->text = s = x;
textresume:
for (;;) {
switch (*x) {
case 0:
goto textdone;
case ' ':
case '\t':
case '\r':
x++;
goto textdone;
case '\n':
state->nexttoken = T_NEWLINE;
x++;
goto textdone;
case '"':
x++;
for (;;) {
switch (*x) {
case 0:
/* unterminated quoted thing */
state->ptr = x;
return T_EOF;
case '"':
x++;
goto textresume;
default:
*s++ = *x++;
}
}
break;
case '\\':
x++;
switch (*x) {
case 0:
goto textdone;
case 'n':
*s++ = '\n';
x++;
break;
case 'r':
*s++ = '\r';
x++;
break;
case 't':
*s++ = '\t';
x++;
break;
case '\\':
*s++ = '\\';
x++;
break;
case '\r':
/* \ <cr> <lf> -> line continuation */
if (x[1] != '\n') {
x++;
continue;
}
x++;
FALLTHROUGH_INTENDED;
case '\n':
/* \ <lf> -> line continuation */
state->line++;
x++;
/* eat any extra whitespace */
while((*x == ' ') || (*x == '\t')) x++;
continue;
default:
/* unknown escape -- just copy */
*s++ = *x++;
}
continue;
default:
*s++ = *x++;
}
}
return T_EOF;
}

简单来说就是先看看有没有遇到结束符(换行 \n 或者EOF \0)或者注释(#)如果遇到了就返回T_NEWLINE或者T_EOF代表这上一行结束了或者整个文件读取完了,没有遇到的话说明读取的是可解析的正文,跳到text段,将文本内容写到state.text中,直到碰到换行符或空格等分割标志(以空格或换行等作为分隔符,一小段一小段的进行分割),将读取到的最后一个正文的位置+1处的字符置为\0,state.text里的内容便称为了完整一段的内容,接着返回T_TEXT表示已读入一段文本

接着回到Parser::ParseData方法中,如果读到的TYPE是T_TEXT,就将这一段内容先添加到容器中,当读到T_NEWLINE时,解析之前读入的一整行内容,先用args[0](一行的开头)去寻找我们之前添加的SectionParser,如果能找到,说明这一行是service、on或者import,将section_parser赋值为相应SectionParser子类的指针,调用其ParseSection方法解析,如果读入的一行里,不是以service、on或者import开头,并且之前定义的section_parser不为空指针,说明是service或者on参数的子参数,调用ParseLineSection方法解析子参数,并加入到父参数中。

最后,每次读取完都会执行args.clear()清楚这一行的数据,当读取到新的service、on或者import时,需要先执行EndSection方法,将之前解析好的结构添加到列表中

执行任务

回到SecondStageMain中,可以看到,最后有一个死循环,用来等待事件处理

1
2
3
4
5
6
7
8
9
10
11
12
13
14
15
16
17
18
19
20
21
22
23
24
25
26
27
28
29
30
31
32
33
34
int SecondStageMain(int argc, char** argv) {
...
while (true) {
// By default, sleep until something happens.
auto epoll_timeout = std::optional<std::chrono::milliseconds>{};
...
//执行从init.rc脚本解析出来的每条指令
if (!(prop_waiter_state.MightBeWaiting() || Service::is_exec_service_running())) {
am.ExecuteOneCommand();
}
...
if (!(prop_waiter_state.MightBeWaiting() || Service::is_exec_service_running())) {
// If there's more work to do, wake up again immediately.
if (am.HasMoreCommands()) epoll_timeout = 0ms;
}

auto pending_functions = epoll.Wait(epoll_timeout);
if (!pending_functions.ok()) {
LOG(ERROR) << pending_functions.error();
} else if (!pending_functions->empty()) {
// We always reap children before responding to the other pending functions. This is to
// prevent a race where other daemons see that a service has exited and ask init to
// start it again via ctl.start before init has reaped it.
//处理子进程退出后的相关事项
ReapAnyOutstandingChildren();
for (const auto& function : *pending_functions) {
(*function)();
}
}
...
}

return 0;
}

其中am.ExecuteOneCommand()方法便是执行从rc文件中解析出来的指令

1
2
3
4
5
6
7
8
9
10
11
12
13
14
15
16
17
18
19
20
21
22
23
24
25
26
27
28
29
30
31
32
33
34
35
36
37
38
39
40
41
42
43
44
45
46
47
48
49
50
51
52
53
void ActionManager::ExecuteOneCommand() {
{
auto lock = std::lock_guard{event_queue_lock_};
// Loop through the event queue until we have an action to execute
//当前正在执行的action队列为空,但等待执行的事件队列不为空
while (current_executing_actions_.empty() && !event_queue_.empty()) {
for (const auto& action : actions_) {
//从等待执行的事件队列头取出一个元素event,
//然后调用action的CheckEvent检查此event是否匹配当前action
//如果匹配,将这个action加入到正在执行的actions队列的队尾
if (std::visit([&action](const auto& event) { return action->CheckEvent(event); },
event_queue_.front())) {
current_executing_actions_.emplace(action.get());
}
}
event_queue_.pop();
}
}

if (current_executing_actions_.empty()) {
return;
}

//从队列头取一个action(front不会使元素出队)
auto action = current_executing_actions_.front();

//如果是第一次执行这个action
if (current_command_ == 0) {
std::string trigger_name = action->BuildTriggersString();
LOG(INFO) << "processing action (" << trigger_name << ") from (" << action->filename()
<< ":" << action->line() << ")";
}

//这个current_command_是个成员变量,标志着执行到了哪一行
action->ExecuteOneCommand(current_command_);

// If this was the last command in the current action, then remove
// the action from the executing list.
// If this action was oneshot, then also remove it from actions_.
++current_command_;
//current_command_等于action的commands数量,说明这个action以及全部执行完了
if (current_command_ == action->NumCommands()) {
//此action出队
current_executing_actions_.pop();
//重置计数器
current_command_ = 0;
if (action->oneshot()) {
auto eraser = [&action](std::unique_ptr<Action>& a) { return a.get() == action; };
actions_.erase(std::remove_if(actions_.begin(), actions_.end(), eraser),
actions_.end());
}
}
}

里面会执行Action::ExecuteOneCommand方法

1
2
3
4
5
6
void Action::ExecuteOneCommand(std::size_t command) const {
// We need a copy here since some Command execution may result in
// changing commands_ vector by importing .rc files through parser
Command cmd = commands_[command];
ExecuteCommand(cmd);
}

接着调用到了Action::ExecuteCommand方法

1
2
3
4
5
6
7
8
9
10
11
12
13
14
15
16
17
18
void Action::ExecuteCommand(const Command& command) const {
android::base::Timer t;
//这一行是具体的执行
auto result = command.InvokeFunc(subcontext_);
auto duration = t.duration();

// Any action longer than 50ms will be warned to user as slow operation
//失败、超时或者debug版本都需要打印结果
if (!result.has_value() || duration > 50ms ||
android::base::GetMinimumLogSeverity() <= android::base::DEBUG) {
std::string trigger_name = BuildTriggersString();
std::string cmd_str = command.BuildCommandString();

LOG(INFO) << "Command '" << cmd_str << "' action=" << trigger_name << " (" << filename_
<< ":" << command.line() << ") took " << duration.count() << "ms and "
<< (result.ok() ? "succeeded" : "failed: " + result.error().message());
}
}

接着会调用Command::InvokeFunc方法

1
2
3
4
5
6
7
8
9
10
11
12
13
14
15
16
17
18
19
Result<void> Command::InvokeFunc(Subcontext* subcontext) const {
//从 /vendor 或 /oem 解析出来的rc文件都会走这里
//涉及到selinux权限问题,Google为了保证安全
//队对厂商定制的rc文件中的命令执行,以及由此启动的服务的权限都会有一定限制
if (subcontext) {
if (execute_in_subcontext_) {
return subcontext->Execute(args_);
}

auto expanded_args = subcontext->ExpandArgs(args_);
if (!expanded_args.ok()) {
return expanded_args.error();
}
return RunBuiltinFunction(func_, *expanded_args, subcontext->context());
}

//系统原生的rc文件命令都会走这里
return RunBuiltinFunction(func_, args_, kInitContext);
}

系统原生的rc文件命令都会走到RunBuiltinFunction方法中

1
2
3
4
5
6
7
8
9
10
11
12
13
14
15
16
Result<void> RunBuiltinFunction(const BuiltinFunction& function,
const std::vector<std::string>& args, const std::string& context) {
auto builtin_arguments = BuiltinArguments(context);

builtin_arguments.args.resize(args.size());
builtin_arguments.args[0] = args[0];
for (std::size_t i = 1; i < args.size(); ++i) {
auto expanded_arg = ExpandProps(args[i]);
if (!expanded_arg.ok()) {
return expanded_arg.error();
}
builtin_arguments.args[i] = std::move(*expanded_arg);
}

return function(builtin_arguments);
}

这里的function是一个以BuiltinArguments为参数的std::function函数包装器模板,可以包装函数、函数指针、类成员函数指针或任意类型的函数对象,在Command对象new出来的时候构造函数就指定了这个func_,我们可以看一下Action::AddCommand方法:

1
2
3
4
5
6
7
8
9
10
11
12
13
14
15
Result<void> Action::AddCommand(std::vector<std::string>&& args, int line) {
if (!function_map_) {
return Error() << "no function map available";
}

//从function_map_中进行键值对查找
auto map_result = function_map_->Find(args);
if (!map_result.ok()) {
return Error() << map_result.error();
}

commands_.emplace_back(map_result->function, map_result->run_in_subcontext, std::move(args),
line);
return {};
}

可以看到,是通过rc文件中的字符串去一个function_map_常量中查找得到的,而这个function_map_是在哪赋值的呢,答案是在SecondStageMain函数中

1
2
3
4
5
6
7
int SecondStageMain(int argc, char** argv) {
...
//设置commands指令所对应的函数map
const BuiltinFunctionMap& function_map = GetBuiltinFunctionMap();
Action::set_function_map(&function_map);
...
}

这个在前文代码中有提及,map的定义在system/core/init/builtins.cpp

1
2
3
4
5
6
7
8
9
10
11
12
13
14
15
16
17
18
19
20
21
22
23
24
25
26
27
28
29
30
31
32
33
34
35
36
37
38
39
40
41
42
43
44
45
46
47
48
49
50
51
52
53
54
55
56
57
58
59
60
61
62
63
64
65
66
67
const BuiltinFunctionMap& GetBuiltinFunctionMap() {
constexpr std::size_t kMax = std::numeric_limits<std::size_t>::max();
// clang-format off
static const BuiltinFunctionMap builtin_functions = {
{"bootchart", {1, 1, {false, do_bootchart}}},
{"chmod", {2, 2, {true, do_chmod}}},
{"chown", {2, 3, {true, do_chown}}},
{"class_reset", {1, 1, {false, do_class_reset}}},
{"class_reset_post_data", {1, 1, {false, do_class_reset_post_data}}},
{"class_restart", {1, 1, {false, do_class_restart}}},
{"class_start", {1, 1, {false, do_class_start}}},
{"class_start_post_data", {1, 1, {false, do_class_start_post_data}}},
{"class_stop", {1, 1, {false, do_class_stop}}},
{"copy", {2, 2, {true, do_copy}}},
{"domainname", {1, 1, {true, do_domainname}}},
{"enable", {1, 1, {false, do_enable}}},
{"exec", {1, kMax, {false, do_exec}}},
{"exec_background", {1, kMax, {false, do_exec_background}}},
{"exec_start", {1, 1, {false, do_exec_start}}},
{"export", {2, 2, {false, do_export}}},
{"hostname", {1, 1, {true, do_hostname}}},
{"ifup", {1, 1, {true, do_ifup}}},
{"init_user0", {0, 0, {false, do_init_user0}}},
{"insmod", {1, kMax, {true, do_insmod}}},
{"installkey", {1, 1, {false, do_installkey}}},
{"interface_restart", {1, 1, {false, do_interface_restart}}},
{"interface_start", {1, 1, {false, do_interface_start}}},
{"interface_stop", {1, 1, {false, do_interface_stop}}},
{"load_persist_props", {0, 0, {false, do_load_persist_props}}},
{"load_system_props", {0, 0, {false, do_load_system_props}}},
{"loglevel", {1, 1, {false, do_loglevel}}},
{"mark_post_data", {0, 0, {false, do_mark_post_data}}},
{"mkdir", {1, 6, {true, do_mkdir}}},
// TODO: Do mount operations in vendor_init.
// mount_all is currently too complex to run in vendor_init as it queues action triggers,
// imports rc scripts, etc. It should be simplified and run in vendor_init context.
// mount and umount are run in the same context as mount_all for symmetry.
{"mount_all", {0, kMax, {false, do_mount_all}}},
{"mount", {3, kMax, {false, do_mount}}},
{"perform_apex_config", {0, 0, {false, do_perform_apex_config}}},
{"umount", {1, 1, {false, do_umount}}},
{"umount_all", {0, 1, {false, do_umount_all}}},
{"update_linker_config", {0, 0, {false, do_update_linker_config}}},
{"readahead", {1, 2, {true, do_readahead}}},
{"remount_userdata", {0, 0, {false, do_remount_userdata}}},
{"restart", {1, 1, {false, do_restart}}},
{"restorecon", {1, kMax, {true, do_restorecon}}},
{"restorecon_recursive", {1, kMax, {true, do_restorecon_recursive}}},
{"rm", {1, 1, {true, do_rm}}},
{"rmdir", {1, 1, {true, do_rmdir}}},
{"setprop", {2, 2, {true, do_setprop}}},
{"setrlimit", {3, 3, {false, do_setrlimit}}},
{"start", {1, 1, {false, do_start}}},
{"stop", {1, 1, {false, do_stop}}},
{"swapon_all", {0, 1, {false, do_swapon_all}}},
{"enter_default_mount_ns", {0, 0, {false, do_enter_default_mount_ns}}},
{"symlink", {2, 2, {true, do_symlink}}},
{"sysclktz", {1, 1, {false, do_sysclktz}}},
{"trigger", {1, 1, {false, do_trigger}}},
{"verity_update_state", {0, 0, {false, do_verity_update_state}}},
{"wait", {1, 2, {true, do_wait}}},
{"wait_for_prop", {2, 2, {false, do_wait_for_prop}}},
{"write", {2, 2, {true, do_write}}},
};
// clang-format on
return builtin_functions;
}

启动服务

以下面一段rc脚本为例,我们看一下一个服务是怎么启动的

1
2
on zygote-start 
start zygote

首先这是一个action,当init进程在死循环中执行到ActionManager::ExecuteOneCommand方法时,检查到这个action刚好符合event_queue_队首的EventTrigger,便会执行这个action下面的commandscommands怎么执行在上面已经分析过了,我们去system/core/init/builtins.cpp里的map中找key-value对应关系,发现start对应着do_start函数:

1
2
3
4
5
6
7
8
static Result<void> do_start(const BuiltinArguments& args) {
Service* svc = ServiceList::GetInstance().FindService(args[1]);
if (!svc) return Error() << "service " << args[1] << " not found";
if (auto result = svc->Start(); !result.ok()) {
return ErrorIgnoreEnoent() << "Could not start service: " << result.error();
}
return {};
}

ServiceList通过args[1]即定义的服务名去寻找之前解析好的service,并执行Service::Start方法:

1
2
3
4
5
6
7
8
9
10
11
12
13
14
15
16
17
18
19
20
21
22
23
24
25
26
27
28
29
30
31
32
33
Result<void> Service::Start() {
...
//上面基本上是一些检查和准备工作,这里先忽略

pid_t pid = -1;
//通过namespaces_.flags判断使用哪种方式创建进程
if (namespaces_.flags) {
pid = clone(nullptr, nullptr, namespaces_.flags | SIGCHLD, nullptr);
} else {
pid = fork();
}

if (pid == 0) {
//设置权限掩码
umask(077);
...
//内部调用execv函数启动文件
if (!ExpandArgsAndExecv(args_, sigstop_)) {
PLOG(ERROR) << "cannot execv('" << args_[0]
<< "'). See the 'Debugging init' section of init's README.md for tips";
}

_exit(127);
}

if (pid < 0) {
pid_ = 0;
return ErrnoError() << "Failed to fork";
}

...
return {};
}
1
2
3
4
5
6
7
8
9
10
11
12
13
14
15
16
17
18
19
20
21
22
23
24
static bool ExpandArgsAndExecv(const std::vector<std::string>& args, bool sigstop) {
std::vector<std::string> expanded_args;
std::vector<char*> c_strings;

expanded_args.resize(args.size());
//将要执行的文件路径先加入容器
c_strings.push_back(const_cast<char*>(args[0].data()));
for (std::size_t i = 1; i < args.size(); ++i) {
auto expanded_arg = ExpandProps(args[i]);
if (!expanded_arg.ok()) {
LOG(FATAL) << args[0] << ": cannot expand arguments': " << expanded_arg.error();
}
expanded_args[i] = *expanded_arg;
c_strings.push_back(expanded_args[i].data());
}
c_strings.push_back(nullptr);

if (sigstop) {
kill(getpid(), SIGSTOP);
}

//调用execv函数,带参执行文件
return execv(c_strings[0], c_strings.data()) == 0;
}

这里先fork(或clone)出了一个子进程,再在这个子进程中调用execv函数执行文件

到此为止,一个服务便被启动起来了

守护服务

当服务启动起来后,init进程也要负责服务的守护,为什么呢?

假设zygote进程挂了,那zygote进程下的所有子进程都可能会被杀,整个Android系统会出现大问题,那怎么办呢?得把zygote进程重启起来呀。init进程守护服务做的就是这些事,当接收到子进程退出信号,就会触发对应的函数进行处理,去根据这个进程所对应的服务,处理后事(重启等)

代码在这个位置:

1
2
3
4
5
6
7
8
9
int SecondStageMain(int argc, char** argv) {
Epoll epoll;
if (auto result = epoll.Open(); !result.ok()) {
PLOG(FATAL) << result.error();
}

InstallSignalFdHandler(&epoll);
InstallInitNotifier(&epoll);
}

先创建出来一个epoll句柄,再用它去InstallSignalFdHandler装载信号handler:

1
2
3
4
5
6
7
8
9
10
11
12
13
14
15
16
17
18
19
20
21
22
23
24
25
26
27
28
29
30
31
32
33
34
35
36
37
38
39
40
static void InstallSignalFdHandler(Epoll* epoll) {
// Applying SA_NOCLDSTOP to a defaulted SIGCHLD handler prevents the signalfd from receiving
// SIGCHLD when a child process stops or continues (b/77867680#comment9).
//设置SIGCHLD信号的处理方式
const struct sigaction act { .sa_handler = SIG_DFL, .sa_flags = SA_NOCLDSTOP };
sigaction(SIGCHLD, &act, nullptr);

//在init进程中屏蔽SIGCHLD、SIGTERM信号
sigset_t mask;
sigemptyset(&mask);
sigaddset(&mask, SIGCHLD);

if (!IsRebootCapable()) {
// If init does not have the CAP_SYS_BOOT capability, it is running in a container.
// In that case, receiving SIGTERM will cause the system to shut down.
sigaddset(&mask, SIGTERM);
}

if (sigprocmask(SIG_BLOCK, &mask, nullptr) == -1) {
PLOG(FATAL) << "failed to block signals";
}

// Register a handler to unblock signals in the child processes.
//在子进程中取消SIGCHLD、SIGTERM信号屏蔽
const int result = pthread_atfork(nullptr, nullptr, &UnblockSignals);
if (result != 0) {
LOG(FATAL) << "Failed to register a fork handler: " << strerror(result);
}

//创建用于接受信号的文件描述符
signal_fd = signalfd(-1, &mask, SFD_CLOEXEC);
if (signal_fd == -1) {
PLOG(FATAL) << "failed to create signalfd";
}

//注册信号处理器
if (auto result = epoll->RegisterHandler(signal_fd, HandleSignalFd); !result.ok()) {
LOG(FATAL) << result.error();
}
}

sigaction函数

先介绍一下sigaction函数,它是用来检查和设置一个信号的处理方式的

文档:https://man7.org/linux/man-pages/man2/sigaction.2.html

第一个参数signum,定义在signal.h中,用来指定信号的编号(需要设置哪个信号)

第二个参数act是一个结构体:

1
2
3
4
5
6
7
struct sigaction {
void (*sa_handler)(int);
void (*sa_sigaction)(int, siginfo_t *, void *);
sigset_t sa_mask;
int sa_flags;
void (*sa_restorer)(void);
};

其中,sa_handler表示信号的处理方式,sa_flags用来设置信号处理的其他相关操作

第三个参数oldact,如果不为null,会将此信号原来的处理方式保存进去

对应一下InstallSignalFdHandler里的调用,.sa_handler = SIG_DFL表示使用默认的信号处理,.sa_flags = SA_NOCLDSTOP当参数signumSIGCHLD的时候生效,表示当子进程暂停时不会通知父进程

信号集函数

接下来InstallSignalFdHandler函数调用了一些信号集函数

sigemptyset

原型:int sigemptyset(sigset_t *set);

文档:https://man7.org/linux/man-pages/man3/sigemptyset.3p.html

该函数的作用是将信号集初始化为空

sigaddset

原型:int sigaddset(sigset_t *set, int signo);

文档:https://man7.org/linux/man-pages/man3/sigaddset.3p.html

该函数的作用是把信号signo添加到信号集set中

sigpromask

原型:int sigpromask(int how, const sigset_t *set, sigset_t *oldset);

文档:https://man7.org/linux/man-pages/man2/sigprocmask.2.html

该函数可以根据参数指定的方法修改进程的信号屏蔽字

第一个参数how有3种取值:

  • SIG_BLOCK:将set中的信号添加到信号屏蔽字中(不改变原有已存在信号屏蔽字,相当于用set中的信号与原有信号取并集设置)
  • SIG_UNBLOCK:将set中的信号移除信号屏蔽字(相当于用set中的信号的补集与原有信号取交集设置)
  • SIG_SETMASK:使用set中的信号直接代替原有信号屏蔽字中的信号

第二个参数set是一个信号集,怎么使用和参数how相关

第三个参数oldset,如果不为null,会将原有信号屏蔽字的信号集保存进去

为什么init进程要屏蔽这些信号呢?因为它后面会特殊处理这些信号

pthread_atfork

这也是一个Linux函数,用来注册fork的handlers

原型:int pthread_atfork(void (*prepare)(void), void (*parent)(void), void (*child)(void));

调用这个函数后,当进程再调用fork时,内部创建子进程钱会先在父进程中调用prepare函数,创建子进程成功后,会在父进程中调用parent函数,子进程中调用child函数

对应到InstallSignalFdHandler里来,即当init进程fork出子进程后调用UnblockSignals函数

1
2
3
4
5
6
7
8
9
10
11
12
13
static void UnblockSignals() {
const struct sigaction act { .sa_handler = SIG_DFL };
sigaction(SIGCHLD, &act, nullptr);

sigset_t mask;
sigemptyset(&mask);
sigaddset(&mask, SIGCHLD);
sigaddset(&mask, SIGTERM);

if (sigprocmask(SIG_UNBLOCK, &mask, nullptr) == -1) {
PLOG(FATAL) << "failed to unblock signals for PID " << getpid();
}
}

也就是,先在init进程中屏蔽了SIGCHLDSIGTERM信号,再在子进程中解除了这两个信号的屏蔽

signalfd函数

同样也是Linux函数,用来创建用于接受信号的文件描述符

原型:int signalfd(int fd, const sigset_t *mask, int flags);

参数fd如果为-1,则该函数会创建一个新的文件描述符与mask信号集相关联,如果不为-1,则该函数会用mask替换之前与这个fd相关联的信号集

flags:

  • SFD_NONBLOCK:给新打开的文件描述符设置O_NONBLOCK标志,非阻塞I/O模式
  • SFD_CLOEXEC:给新打开的文件描述符设置O_CLOEXEC标志,当exec函数执行成功后,会自动关闭这个文件描述符

对应到InstallSignalFdHandler中,它创建了一个用于接受SIGCHLDSIGTERM信号的文件描述符。回忆一下之前对启动服务的分析,是先调用fork创建进程,在exec执行文件,将flags设置为SFD_CLOEXEC,这样就可以保证在子进程中关闭由fork得到的接收信号的文件描述符

注册信号处理器

最后调用Epoll::RegisterHandler方法注册处理器,内部调用了epoll_ctl函数,感兴趣可以自己看一下,文档:https://man7.org/linux/man-pages/man2/epoll_ctl.2.html

这样,当init进程接收到SIGCHLDSIGTERM信号时便会调用HandleSignalFd方法:

1
2
3
4
5
6
7
8
9
10
11
12
13
14
15
16
17
18
19
20
21
static void HandleSignalFd() {
signalfd_siginfo siginfo;
//从信号集文件描述符中读取信息
ssize_t bytes_read = TEMP_FAILURE_RETRY(read(signal_fd, &siginfo, sizeof(siginfo)));
if (bytes_read != sizeof(siginfo)) {
PLOG(ERROR) << "Failed to read siginfo from signal_fd";
return;
}

switch (siginfo.ssi_signo) {
case SIGCHLD:
ReapAnyOutstandingChildren();
break;
case SIGTERM:
HandleSigtermSignal(siginfo);
break;
default:
PLOG(ERROR) << "signal_fd: received unexpected signal " << siginfo.ssi_signo;
break;
}
}

我们这里主要看SIGCHLD,当子进程退出,init进程便会捕获到SIGCHLD,执行ReapAnyOutstandingChildren方法:

1
2
3
4
void ReapAnyOutstandingChildren() {
while (ReapOneProcess() != 0) {
}
}
1
2
3
4
5
6
7
8
9
10
11
12
13
14
15
16
17
18
19
20
21
22
23
24
25
26
27
28
29
30
31
32
33
34
35
36
37
38
39
40
41
42
43
static pid_t ReapOneProcess() {
siginfo_t siginfo = {};
// This returns a zombie pid or informs us that there are no zombies left to be reaped.
// It does NOT reap the pid; that is done below.
//获取一个已经退出的子进程,但暂时先不销毁
if (TEMP_FAILURE_RETRY(waitid(P_ALL, 0, &siginfo, WEXITED | WNOHANG | WNOWAIT)) != 0) {
PLOG(ERROR) << "waitid failed";
return 0;
}

auto pid = siginfo.si_pid;
if (pid == 0) return 0;

// At this point we know we have a zombie pid, so we use this scopeguard to reap the pid
// whenever the function returns from this point forward.
// We do NOT want to reap the zombie earlier as in Service::Reap(), we kill(-pid, ...) and we
// want the pid to remain valid throughout that (and potentially future) usages.
//最后,销毁这个子进程
auto reaper = make_scope_guard([pid] { TEMP_FAILURE_RETRY(waitpid(pid, nullptr, WNOHANG)); });

std::string name;
std::string wait_string;
Service* service = nullptr;

if (SubcontextChildReap(pid)) {
name = "Subcontext";
} else {
//通过pid获得service
service = ServiceList::GetInstance().FindService(pid, &Service::pid);
...
}
...
if (!service) return pid;

//处理service后事
service->Reap(siginfo);

if (service->flags() & SVC_TEMPORARY) {
ServiceList::GetInstance().RemoveService(*service);
}

return pid;
}
waitid函数

Linux函数,用于等待一个子进程状态的改变

原型:int waitid(idtype_t idtype, id_t id, siginfo_t *infop, int options);

文档:https://man7.org/linux/man-pages/man3/waitid.3p.html

第一个参数idtype

  • P_PID:等待的子进程的pid必须和参数id匹配
  • P_GID:等待的子进程的组id必须和参数id匹配
  • P_ADD:等待所有子进程,此时,参数id被忽略

这个函数会将执行的结果保存在第三个参数infop中

options

  • WCONTINUED:等待那些由SIGCONT重新启动的子进程
  • WEXITED:等待那些已经退出的子进程
  • WSTOPPED:等待那些被信号暂停的子进程
  • WNOHANG:非阻塞等待
  • WNOWAIT:保持返回的子进程处于可等待状态(后续可以再对这个子进程进行wait)

回到ReapOneProcess函数中来,它先调用waitid函数,获得一个状态发生改变的子进程(options设置了WEXITED,即已退出的子进程),使用了WNOWAIT参数,也就是暂时先不销毁子进程,使用非阻塞的方式获取

ScopeGuard

ScopeGuard的意思是,出作用域后,自动执行某段代码

函数中那段make_scope_guard的意思是,当这个函数执行完后,使用waitpid函数销毁子进程

之后会从ServiceList中通过pid去查找service,查到后调用Service::Reap处理后事

1
2
3
4
5
6
7
8
9
10
11
12
13
14
15
16
17
18
19
20
21
22
23
24
25
26
27
28
29
30
31
32
33
34
35
36
37
38
39
40
41
42
43
44
45
46
47
48
49
50
51
52
53
54
55
56
57
58
59
60
61
62
63
64
65
66
void Service::Reap(const siginfo_t& siginfo) {
//当service的参数没有oneshot或者restart时,kill整个进程组
if (!(flags_ & SVC_ONESHOT) || (flags_ & SVC_RESTART)) {
KillProcessGroup(SIGKILL, false);
} else {
// Legacy behavior from ~2007 until Android R: this else branch did not exist and we did not
// kill the process group in this case.
if (SelinuxGetVendorAndroidVersion() >= __ANDROID_API_R__) {
// The new behavior in Android R is to kill these process groups in all cases. The
// 'true' parameter instructions KillProcessGroup() to report a warning message where it
// detects a difference in behavior has occurred.
KillProcessGroup(SIGKILL, true);
}
}

// Remove any socket resources we may have created.
//移除已创建的sockets
for (const auto& socket : sockets_) {
auto path = ANDROID_SOCKET_DIR "/" + socket.name;
unlink(path.c_str());
}
//执行回调
for (const auto& f : reap_callbacks_) {
f(siginfo);
}

//如果进程接收信号异常或被终止的状态异常,并且包含reboot_on_failure标志,重启系统
if ((siginfo.si_code != CLD_EXITED || siginfo.si_status != 0) && on_failure_reboot_target_) {
LOG(ERROR) << "Service with 'reboot_on_failure' option failed, shutting down system.";
trigger_shutdown(*on_failure_reboot_target_);
}

//当service参数为exec时,释放相应服务资源
if (flags_ & SVC_EXEC) UnSetExec();

if (flags_ & SVC_TEMPORARY) return;

pid_ = 0;
flags_ &= (~SVC_RUNNING);
start_order_ = 0;

// Oneshot processes go into the disabled state on exit,
// except when manually restarted.
//当service参数有oneshot,没有restart和reset时,将service状态置为disable
if ((flags_ & SVC_ONESHOT) && !(flags_ & SVC_RESTART) && !(flags_ & SVC_RESET)) {
flags_ |= SVC_DISABLED;
}

// Disabled and reset processes do not get restarted automatically.
//禁用和重置的服务,都不能自动重启
if (flags_ & (SVC_DISABLED | SVC_RESET)) {
NotifyStateChange("stopped");
return;
}
...
//将标志置为重启中
flags_ &= (~SVC_RESTART);
flags_ |= SVC_RESTARTING;

// Execute all onrestart commands for this service.
//执行该service下的所有onrestart命令
onrestart_.ExecuteAllCommands();

NotifyStateChange("restarting");
return;
}

service相关的参数可以去system/core/init/README.md中自行查看

这个函数检查了一堆service的标志和状态,判断如何处理这个service,如果需要重启,则调用onrestart_.ExecuteAllCommands()执行该service下的所有onrestart命令,具体的执行过程之前在启动服务那边已经分析过了,这里就不再往下看了

总结

至此,整个init进程的启动过程最重要的部分基本都已分析完成,我也是一边从网上搜集资料一边对照着源码磕磕绊绊看过来的,有什么错误或者遗漏的部分欢迎指正,谢谢~


各厂商Android系统碰到的奇奇怪怪问题的记录

小米

MIUI

Camera2

CaptureRequest.Builderset方法,对部分key不生效

1
2
// MIUI中,CaptureRequest.Builder设置图片方向不生效
captureBuilder.set(CaptureRequest.JPEG_ORIENTATION,getJpegOrientation(deviceRotation));

解决方法:获得拍摄好的照片Bitmap后,再对其进行旋转

1
2
3
4
5
public Bitmap rotateBitmap(Bitmap bitmap, int angle) {
Matrix matrix = new Matrix();
matrix.setRotate(angle);
return Bitmap.createBitmap(bitmap, 0, 0, bitmap.getWidth(), bitmap.getHeight(), matrix, true);
}

华为

HarmonyOs

TextureView

华为ROM(EMUI不确定有没有这种情况)计算TextureView边界的代码似乎有bug

现象:

  1. 相机预览和拍摄时有概率画面畸形
  2. 渲染超过一屏的文本会渲染空白

解决方法:手动管理TextureView的销毁和创建

第一步:在对TextureView设置TextureView.SurfaceTextureListener时,另onSurfaceTextureDestroyed返回false

1
2
3
4
5
6
7
8
9
10
11
12
13
14
15
16
17
18
19
20
mTextureView.setSurfaceTextureListener(new TextureView.SurfaceTextureListener() {
@Override
public void onSurfaceTextureAvailable(@NonNull SurfaceTexture surface, int width, int height) {
...
}

@Override
public void onSurfaceTextureSizeChanged(@NonNull SurfaceTexture surface, int width, int height) {
}

@Override
public boolean onSurfaceTextureDestroyed(@NonNull SurfaceTexture surface) {
// 这里默认是返回true,代表系统自动管理,我们把它设为false手动管理
return false;
}

@Override
public void onSurfaceTextureUpdated(@NonNull SurfaceTexture surface) {
}
});

第二步:在TextureView不渲染的时候手动release掉其中的SurfaceTexture,后面再渲染时,系统调用draw方法后,会自动重新new一个SurfaceTexture出来

1
2
3
4
SurfaceTexture surfaceTexture = mTextureView.getSurfaceTexture();
if (surfaceTexture != null) {
surfaceTexture.release();
}

VIVO

OriginOS

字体

OriginOS中,TextView设置了android:fontFamily后,不能在设置android:textStyle属性,否则会导致使用的字体被系统默认字体覆盖


AOSP的编译及刷机

简介

众所周知,Android是开源的,AOSP(Android Open Source Project)为Android开源项目的缩写。作为一名Android开发,掌握Android系统的工作机制是技术成长中的必经之路,第一步就是自己编译Android系统。

准备工作

  • 一台可以解BL锁(BootLoader),并且厂商提供了硬件驱动的设备,这里推荐使用Google亲儿子手机(Nexus、Pixel系列),可以解BL锁,Google官方会提供硬件驱动,并且AOSP里会提供对应机型的配置
  • 一块剩余空间至少大于300GB的硬盘(Android11源码-150GB左右,编译产物-150GB左右)
  • 系统最好为Linux,MacOS也可(Windows可以用WSL)
  • 系统需要使用Ubuntu(我不确定别的Linux发行版可不可用),自2021年6月22日起,AOSP不再支持在Windows或MacOS上构建(Windows可以使用WSL,详见WSL编译AOSP必要的几个前置工作
  • 内存至少要16GB,过小的内存会导致生成build.ninja文件失败

这里是Google官方的推荐要求:https://source.android.com/setup/build/requirements?hl=zh-cN

环境搭建

参考文档:https://source.android.com/source/initializing?hl=zh-cn

主要就是下载各种编译工具,像jdk,gcc,g++等,还有各种动态库以及辅助工具

注:此文档中部分环境安装有误,缺失了一些必要的库安装,可能会编译中途报错,可以参考下文的环境安装,如果编译还是出现了依赖缺失,安装好继续编译即可

安装JDK

以Ubuntu系统为例:

1
2
sudo apt-get update
sudo apt-get install openjdk-11-jdk

注:现在AOSP编译要求JDK版本>=9

安装其他程序包

1
sudo apt-get install git-core gnupg flex bison gperf build-essential zip curl zlib1g-dev gcc-multilib g++-multilib libc6-dev-i386 lib32ncurses5-dev x11proto-core-dev libx11-dev lib32z-dev ccache libgl1-mesa-dev libxml2-utils xsltproc unzip libncurses5

注:官方文档中缺失了libncurses5,会导致编译中途找不到libncurses.so.5库

下载源码

Android源码是由非常多的Git仓库组成的,为了可以统一管理这么多个Git仓库,Google出了一款工具,叫Repo

参考文档:https://source.android.com/source/downloading?hl=zh-cn

因为Google在国内访问的问题,建议使用镜像下载源码,下面提供几个镜像地址:

  • 清华大学

https://mirrors.tuna.tsinghua.edu.cn/git/AOSP/platform/manifest

  • 中科大

git://mirrors.ustc.edu.cn/aosp/platform/manifest

repo init的时候可以指定分支:https://source.android.com/setup/start/build-numbers?hl=zh-cn#source-code-tags-and-builds 在这里可以找到对应系统分支所支持的设备,比如说我的设备是Pixel2,在这张表上可以看到android-11.0.0_r25这个分支下的代码支持我的设备,所以可以执行以下命令:

1
repo init -u https://mirrors.tuna.tsinghua.edu.cn/git/AOSP/platform/manifest -b android-11.0.0_r25

然后开始进行同步:

1
repo sync -j8 #j8代表使用8个线程

AOSP代码下载是个漫长的过程,需要耐心等待

下载驱动

https://developers.google.com/android/drivers?hl=zh-cn这个网站可以找到Nexus、Pixel系列的驱动,要注意每个驱动后面会有一串代号,需要和你下载的AOSP源码的build号相对应

将他们解压后会得到两个shell文件

将他们复制到下载好的aosp源码的根目录

注:网上很多教程说终端要选用bash不要使用zsh,我亲测使用zsh没有问题,如果在编译过程中出现问题,可以尝试切换shell

  1. 先将shell切换到aosp源码根目录
  2. 执行两个解压出来的驱动shell,记得要同意License

  1. 执行source build/envsetup.sh,这会向shell中写入一些环境变量
  2. 先make clean一下
  3. 使用lunch命令选择构建目标

这里是该命令的规则:https://source.android.com/setup/build/building?hl=zh-cn#choose-a-target

1
lunch aosp_walleye-userdebug

后面跟随的的参数可以在这里找到:https://source.android.com/setup/build/running?hl=zh-cn#selecting-device-build

你也可以在lunch后不加参数,这样会弹出一个菜单提示您选择目标

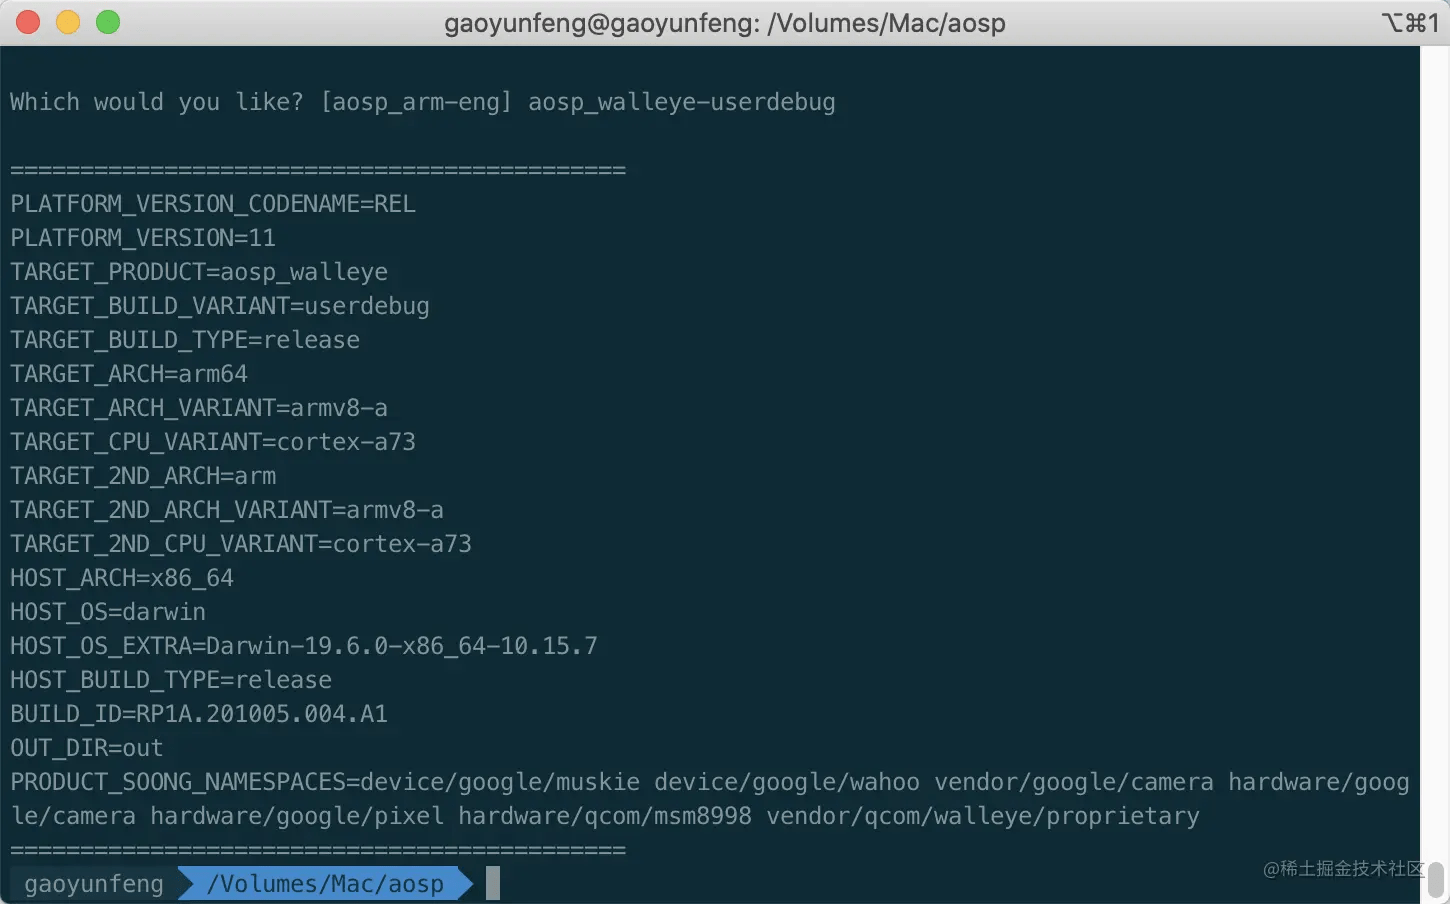
指定完成后会弹出这样一个信息提示

开始编译

构建部分的文档在这里:https://source.android.com/setup/build/building?hl=zh-cn#build-the-code
如果是初次编译,我们就直接使用m命令就可以了

1
m -j8 #开启8线程编译

注意事项:

  • 现在直接使用make命令会提示Calling make directly is no longer supported然后退出编译,所以使用m命令替代make
  • 不能使用root账号编译

刷机

  1. 先将手机的BL锁解开(每个机型都不同,网上会有对应的教程),进入fastboot模式\
  2. 配置fastboot工具(现在Google好像推出了在线刷写工具https://flash.android.com/,可以尝试使用),可以在aosp目录下通过make fastboot命令编译出来,也可以直接从网上下载:https://developer.android.com/studio/releases/platform-tools
  3. 进入编译后产生的镜像的目录…./aosp/out/target/product/walleye(这个是你机型的代号,每种机器都不一样)
  4. 执行命令
1
fastboot flashall -w
  1. 重启即可看到,我们编译的Android系统已经运行到了手机上
1
fastboot reboot #重启命令

常见问题

MacOS上找不到SDK

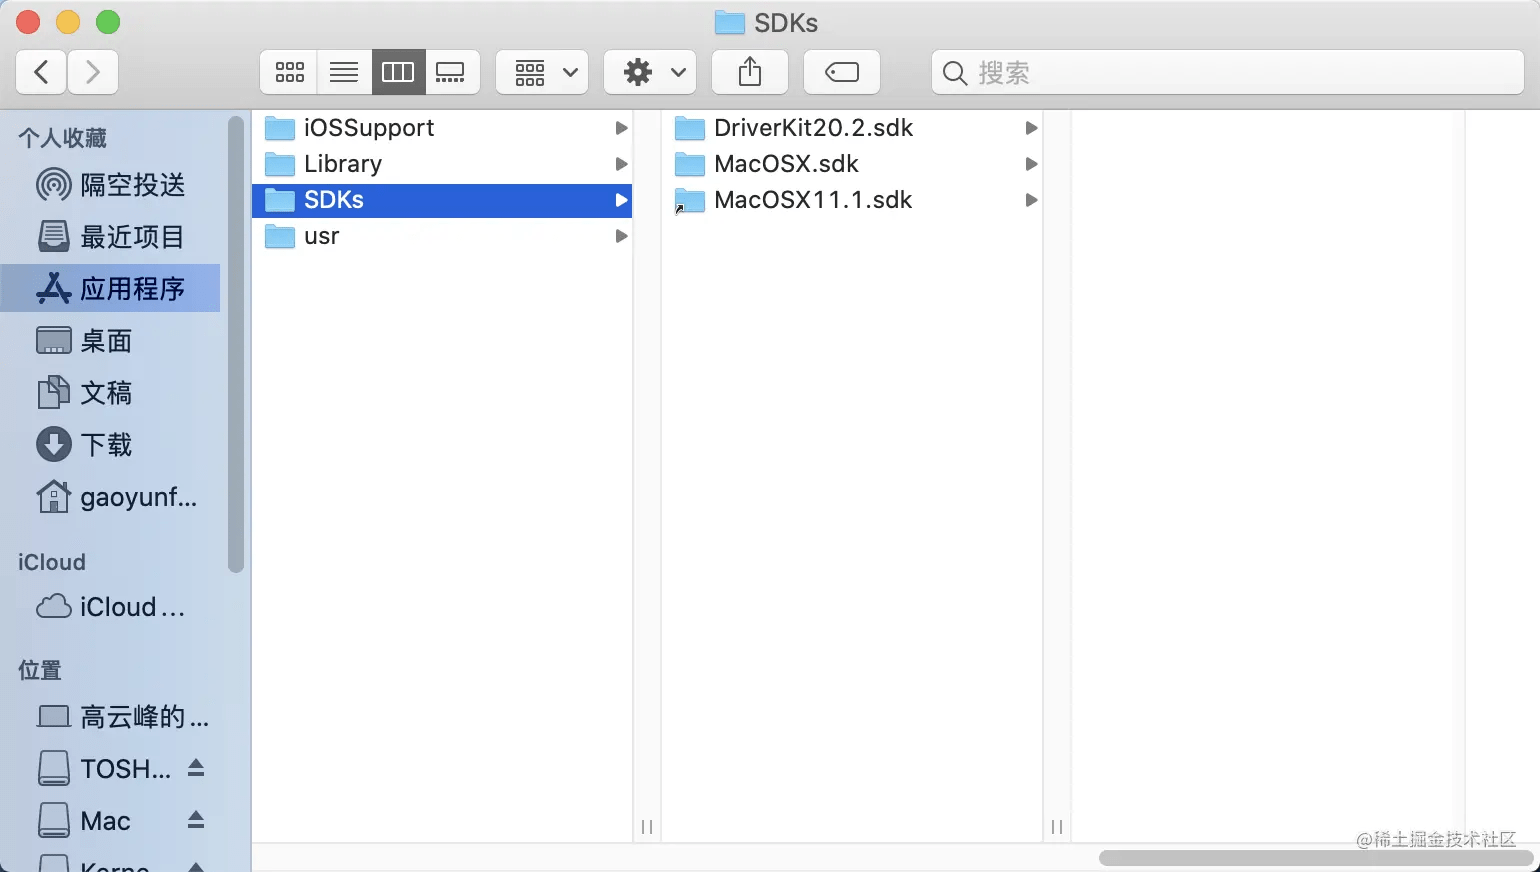
去这里https://github.com/phracker/MacOSX-SDKs/releases下载对应版本的sdk,然后将它放到/Applications/Xcode.app/Contents/Developer/Platforms/MacOSX.platform/Developer/SDKs目录下,然后重新编译

除此之外,也可以在Finder中查看

/Applications/Xcode.app/Contents/Developer/Platforms/MacOSX.platform/Developer/SDKs

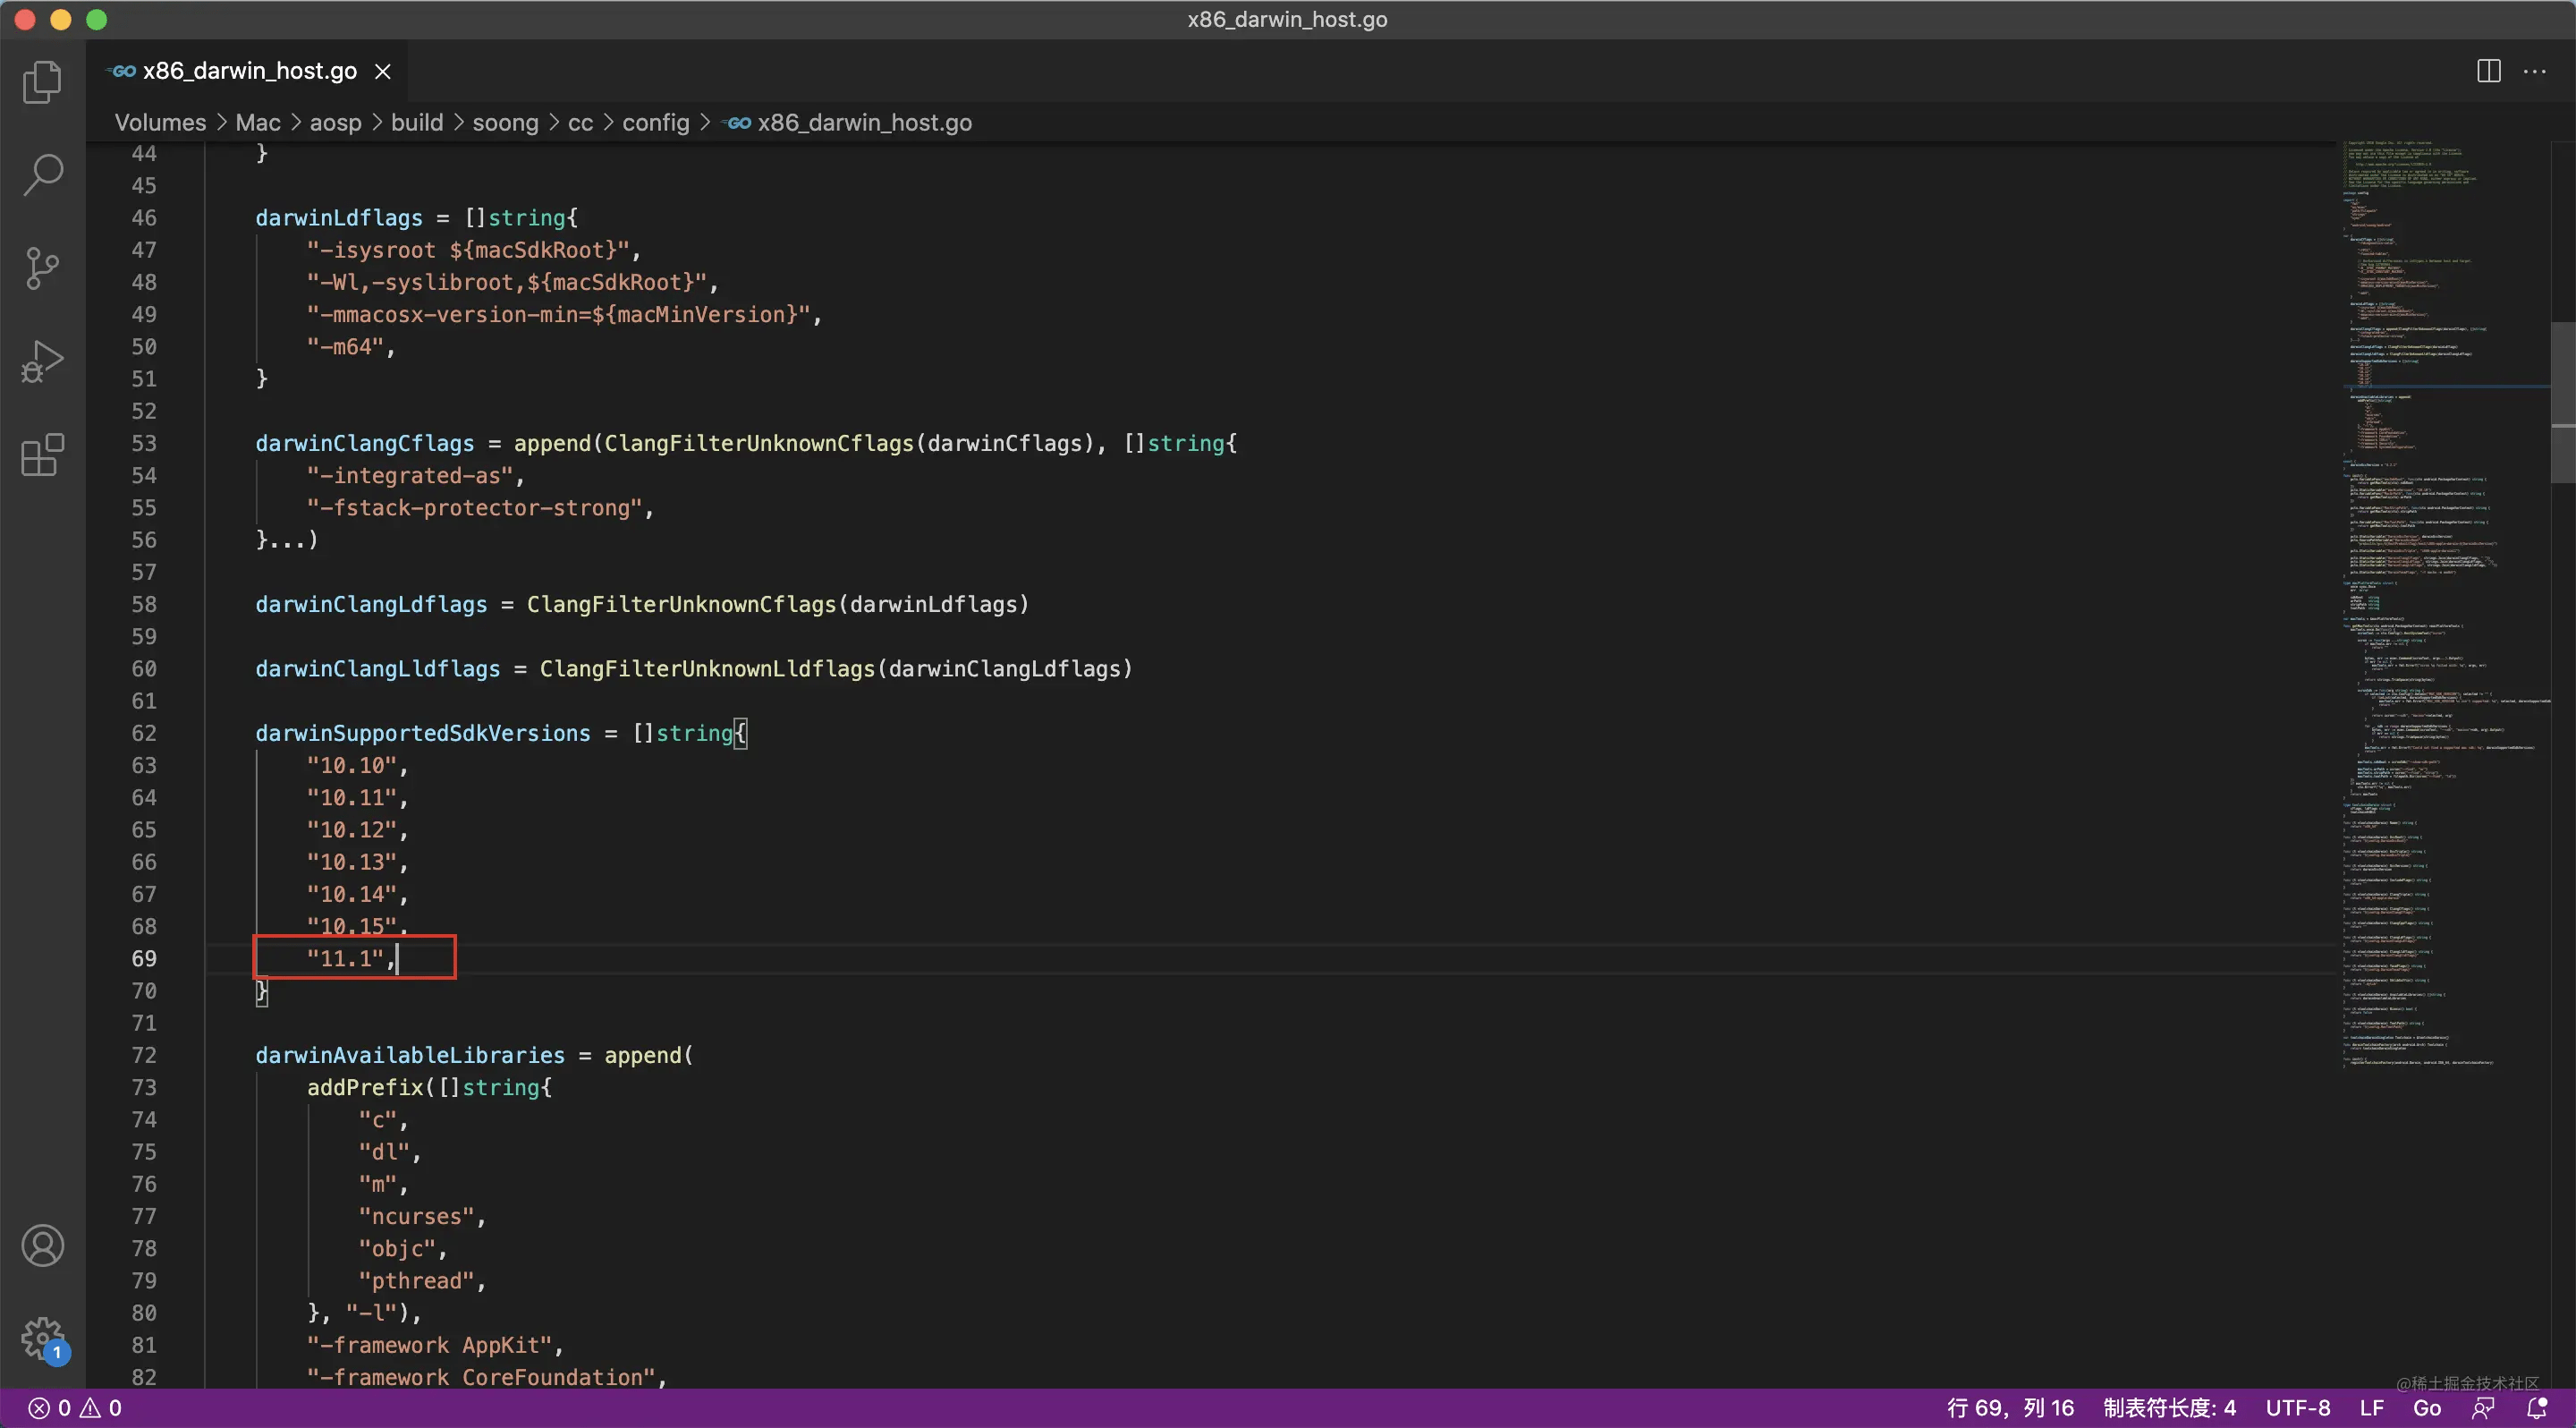
这个目录下存在哪个版本的sdk,确定后去修改…./aosp/build/soong/cc/config/x86_darwin_host.go文件,在darwinSupportedSdkVersions这个数组中加上你使用的sdk的版本

保存后重新编译,这个方式可能当前编译脚本不支持你所用的sdk,可能会编译报错,所以还是推荐使用第一种方式

too many open files

在Linux系统下有打开文件数的限制,可以使用以下命令设置最大可打开文件数

1
2
# ulimit -a 可以查看当前限制
ulimit -n 2048

走马灯式横向滚动的TextView

简介

我们可以设置TextViewandroid:ellipsize="marquee"属性,来做到当文字超出一行的时候呈现跑马灯效果。但TextView的这个走马灯效果需要获取焦点,而同一时间只有一个控件可以获得焦点,更重要的是产品要求无论文字内容是否超出一行,都要滚动效果。

这里先贴一下最后实现的Github地址和效果图

https://github.com/dreamgyf/MarqueeTextView

MarqueeTextView

思路

思路其实很简单,我们只要将单行的TextView截成一张Bitmap,然后我们再自定义一个View,重写它的onDraw方法,每隔一段时间,将这张Bitmap画在不同的坐标上(左右两边各draw一次),这样连续起来看起来就是走马灯效果了。

后来和同事讨论,他提出能不能通过Canvas的平移配合drawText实现这个功能,我想应该也是可以的,但我没有做尝试,各位看官感兴趣的可是试一下这种方案。

实现

我们先自定义一个View继承自AppCompatTextView,再在初始化的时候new一个TextView,并重写onMeasureonLayout方法

1
2
3
4
5
6
7
8
9
10
11
12
13
14
15
16
17
18
19
20
private void init() {
mTextView = new TextView(getContext(), attrs);
//TextView如果没有设置LayoutParams,当setText的时候会引发NPE导致崩溃
mTextView.setLayoutParams(new ViewGroup.LayoutParams(ViewGroup.LayoutParams.WRAP_CONTENT, ViewGroup.LayoutParams.WRAP_CONTENT));
mTextView.setMaxLines(1);
}

@Override
protected void onMeasure(int widthMeasureSpec, int heightMeasureSpec) {
super.onMeasure(widthMeasureSpec, heightMeasureSpec);
//宽度不设限制
mTextView.measure(MeasureSpec.UNSPECIFIED, heightMeasureSpec);
}

@Override
protected void onLayout(boolean changed, int left, int top, int right, int bottom) {
super.onLayout(changed, left, top, right, bottom);
//保证布局包含完整的Text内容
mTextView.layout(left, top, left + mTextView.getMeasuredWidth(), bottom);
}

这样做是为了利用这个内部TextView生成我们需要的Bitmap,同时借用TextView写好的onMeasure方法,这样我们就不用再那么复杂的重写onMeasure方法了

接下来是生成Bitmap

1
2
3
4
5
private void updateBitmap() {
mBitmap = Bitmap.createBitmap(mTextView.getMeasuredWidth(), getMeasuredHeight(), Bitmap.Config.ARGB_8888);
Canvas canvas = new Canvas(mBitmap);
mTextView.draw(canvas);
}

这个很简单,需要注意的是长度要使用内部持有的TextViewgetMeasuredWidth,如果使用getWidth的话,最大值为屏幕的宽度,很可能导致生成出的Bitmap不全,高度用谁的倒是无所谓

在每次setTextsetTextSize的时候都需要更新Bitmap并重新布局绘制

1
2
3
4
5
6
7
8
9
10
11
12
13
14
15
16
17
18
19
20
21
22
23
24
25
26
27
28
29
private void init() {
mTextView.addOnLayoutChangeListener(new OnLayoutChangeListener() {
@Override
public void onLayoutChange(View v, int left, int top, int right, int bottom, int oldLeft, int oldTop, int oldRight, int oldBottom) {
updateBitmap();
restartScroll();
}
});
}

@Override
public void setText(CharSequence text, BufferType type) {
super.setText(text, type);
//执行父类构造函数时,如果AttributeSet中有text参数会先调用setText,此时mTextView尚未初始化
if (mTextView != null) {
mTextView.setText(text);
requestLayout();
}
}

@Override
public void setTextSize(int unit, float size) {
super.setTextSize(unit, size);
//执行父类构造函数时,如果AttributeSet中有textSize参数会先调用setTextSize,此时mTextView尚未初始化
if (mTextView != null) {
mTextView.setTextSize(size);
requestLayout();
}
}

接下来,我给这个MarqueeTextView定义了一些参数,一个是space(文字滚动时,头尾的最小间隔距离),另一个是speed(文字滚动的速度)

先看一下onDraw的实现吧

1
2
3
4
5
6
7
8
9
10
11
12
13
14
15
16
17
18
19
20
21
22
23
24
25
26
27
28
29
30
31
32
33
34
35
36
37
38
39
@Override
protected void onDraw(Canvas canvas) {
if (mBitmap != null) {
//当文字内容不超过一行
if (mTextView.getMeasuredWidth() <= getWidth()) {
//计算头尾需要间隔的宽度
int space = mSpace - (getWidth() - mTextView.getMeasuredWidth());
if (space < 0) {
space = 0;
}

//当左边的drawBitmap的坐标超过了显示宽度+间隔宽度,即走完一个循环,右边的Bitmap已经挪到了最左边,将坐标重置
if (mLeftX < -getWidth() - space) {
mLeftX += getWidth() + space;
}

//画左边的bitmap
canvas.drawBitmap(mBitmap, mLeftX, 0, getPaint());
if (mLeftX < 0) {
//画右边的bitmap,位置为最右边的坐标-左边bitmap已消失的宽度+间隔宽度
canvas.drawBitmap(mBitmap, getWidth() + mLeftX + space, 0, getPaint());
}
} else {
//当文字内容超过一行
//当左边的drawBitmap的坐标超过了内容宽度+间隔宽度,即走完一个循环,右边的Bitmap已经挪到了最左边,将坐标重置
if (mLeftX < -mTextView.getMeasuredWidth() - mSpace) {
mLeftX += mTextView.getMeasuredWidth() + mSpace;
}

//画左边的bitmap
canvas.drawBitmap(mBitmap, mLeftX, 0, getPaint());
//当尾部已经显示出来的时候
if (mLeftX + (mTextView.getMeasuredWidth() - getWidth()) < 0) {
//画右边的bitmap,位置为尾部的坐标+间隔宽度
canvas.drawBitmap(mBitmap, mTextView.getMeasuredWidth() + mLeftX + mSpace, 0, getPaint());
}
}
}
}

这就是基本的绘制思路

接下来需要让他动起来,这里使用的Choreographer,每次收到Vsync信号系统绘制新帧时都更新一下坐标并重绘

1
2
3
4
5
6
7
8
9
10
11
12
13
14
15
16
17
18
19
20
21
22
23
24
25
26
27
28
29
30
31
32
33
34
35
36
37
38
39
40
41
42
43
44
45
private static final float BASE_FPS = 60f;

private float mFps = BASE_FPS;

/**
* 获取当前屏幕刷新率
*/
private void updateFps() {
if (Build.VERSION.SDK_INT >= Build.VERSION_CODES.R) {
mFps = context.getDisplay().getRefreshRate();
} else {
WindowManager windowManager =
(WindowManager) context.getSystemService(Context.WINDOW_SERVICE);
mFps = windowManager.getDefaultDisplay().getRefreshRate();
}
}

private Choreographer.FrameCallback frameCallback = new Choreographer.FrameCallback() {
@Override
public void doFrame(long frameTimeNanos) {
invalidate();
//保证在不同刷新率的屏幕上,视觉上的速度一致
int speed = (int) (BASE_FPS / mFps * mSpeed);
mLeftX -= speed;
Choreographer.getInstance().postFrameCallback(this);
}
};

public void startScroll() {
Choreographer.getInstance().postFrameCallback(frameCallback);
}

public void pauseScroll() {
Choreographer.getInstance().removeFrameCallback(frameCallback);
}

public void stopScroll() {
mLeftX = 0;
Choreographer.getInstance().removeFrameCallback(frameCallback);
}

public void restartScroll() {
stopScroll();
startScroll();
}

最后,在View可见性发生变化时,需要控制一下动画的启停

1
2
3
4
5
6
7
8
9
@Override
protected void onVisibilityChanged(@NonNull View changedView, int visibility) {
if (visibility == VISIBLE) {
updateFps();
Choreographer.getInstance().postFrameCallback(frameCallback);
} else {
Choreographer.getInstance().removeFrameCallback(frameCallback);
}
}

Android开发常见问题总结(持续更新)

Activity

透明与方向

当且仅当Android 8.0系统中,不能对一个Activity同时设置透明(windowIsTranslucentwindowIsFloating)和方向(screenOrientation),否则会抛出Only fullscreen opaque activities can request orientation异常崩溃

解决方法:

在代码中先判断系统版本,再设置方向

1
2
3
4
5
6
7
8
override fun onCreate(savedInstanceState: Bundle?) {
...
if (Build.VERSION.SDK_INT != Build.VERSION_CODES.O) {
@SuppressLint("SourceLockedOrientationActivity")
requestedOrientation = ActivityInfo.SCREEN_ORIENTATION_PORTRAIT
}
...
}

TextView

重新布局

TextView在调用setText后不一定会走requestLayout方法,在某些情况下会导致显示异常,比如因RecyclerView复用导致长度不符合预期的问题

解决方案:简单来说当TextViewwidth属性不为WRAP_CONTENT且文字高度没发生变化的情况下,它就不会重新布局,如果你需要它重新计算宽高的话,注意以上的条件,设置合适的属性即可,具体的源码分析可以参考 从 TextView.setText() 看 requestLayout 和 invalidate 方法有什么不同 这篇文章

ellipse

TextView在某些情况下,ellipse属性会失效

  • setText设置了BufferTypeNORMAL以外的其他值

  • TextView设置了MovementMethod

layout

通过TextView中的android.text.Layout,我们可以通过它计算很多东西,比如通过x ,y坐标去获取字符下标呀,或者通过字符下标去计算这个文字x坐标等等,但需要注意的是,android.text.Layout在计算的过程中不会去考虑TextViewpadding,所以在开发的过程中我们自己需要进行一些处理,比如说通过x ,y坐标去获取字符下标的时候,传入的x, y值要减去paddingLeftpaddingTop,当通过字符下标去计算文字x坐标后,要再加上paddingLeft才是正确的x坐标


滑动

  1. 滑动嵌套

滑动组件的嵌套可能会产生以下一些问题:

  • 滑动冲突

解决方法:使用NestedScrollView替代ScrollViewRecyclerView可以设置属性android:nestedScrollingEnabled="false"或代码里setNestedScrollingEnabled(false);来禁用组件自身的滑动

注意:如果RecyclerView只能显示一个Item的话,需要设置NestedScrollView的属性android:fillViewport="true"

  • 滑动失效

ScrollView设置fillViewport="true"的情况下,如果对ScrollView的直接子view设置上下margin,在超出内容的高度小于设置的margin的情况下,可能会导致整个ScrollView滑动失效

  1. 焦点抢占

ScrollViewRecyclerView等滑动组件可能会抢占焦点,导致界面显示时直接滑动到对应组件的位置,而不是顶部

解决方法:在顶部View(或者其他你所期望的初始位置)加上属性android:focusable="true"android:focusableInTouchMode="true"

新解决方法:在顶部View上加android:descendantFocusability属性,该属性是用来定义父布局与子布局之间的关系的,它有三种值:

  • beforeDescendants:父布局会优先其子类控件而获取到焦点
  • afterDescendants:父布局只有当其子类控件不需要获取焦点时才获取焦点
  • blocksDescendants:父布局会覆盖子类控件而直接获得焦点

使用blocksDescendants覆盖子布局焦点以解决焦点抢占问题


RecyclerView

Adapter

  1. onBindViewHolder中设置子View回调时需要注意

如果回调的参数包括position时,需要注意有没有地方会调用notifyItemRemovednotifyItemRangeRemoved,如果有,需要使用holder.getAdapterPosition()来代替onBindViewHolder方法的position参数

原因:notifyItemRemoved不会对其他的Item重新调用onBindViewHolder,这样可能会导致position错位。holder.getAdapterPosition()方法会返回数据在 Adapter 中的位置(即使位置的变化还未刷新到布局中)

  1. 如何在更新数据后重新定位到顶部
1
2
3
4
5
6
7
8
9
10
11
//重写父类方法,获得绑定的RecyclerView
@Override
public void onAttachedToRecyclerView(@NonNull RecyclerView recyclerView) {
super.onAttachedToRecyclerView(recyclerView);
mRecyclerView = recyclerView;
}

//当数据更新后调用
if (mRecyclerView != null && mRecyclerView.getChildCount() > 0) {
mRecyclerView.scrollToPosition(0);
}

之前尝试过mRecyclerView.scrollTo(0, 0);但没有起效,不清楚为什么

  1. 动态部分更新数据时

如果RecyclerView需要动态更新部分数据,并且在onBindViewHolder时对某些view设置了事件或者回调等,如果此时使用到了position参数需要注意,如果你只notify了部分数据更新,可能会导致更新后部分ViewHolder中的回调里的position不正确,建议:

  • 使用notifyDataSetChanged()
  • 使用notifyItem,但是在onBindViewHolder中设置回调时不要使用position参数,而是使用holder.getAdapterPosition()替代(注意这个方法在ViewHolder没有和RecyclerView绑定时会返回-1 NO_POSITION

ItemDecoration

  1. StaggeredGridLayoutManagerItemDecorationoffset计算错误

主要是因为RecyclerView动态更新数据时,会执行多次measure,但只会在第一次measure的时候调用ItemDecoration.getItemOffsets(因为LP里的mInsetsDirty变量),此时获得的spanIndex是一个错误值

这个问题的具体分析可以看这篇文章,暂时没有什么好的解决方案,不建议大家使用反射,毕竟你不知道Android会不会更改这个变量

嵌套ViewPager

RecyclerView中嵌套ViewPager的情况下,当你将一个ViewPager滑动出视野再滑回来,这个ViewPager的下一个切换会没有动画

原因:当RecyclerViewItem滑入滑出屏幕时分别会调用子ViewonAttachedToWindowonDetachedFromWindow方法,当ViewPager触发onAttachedToWindow后,会将其里面的一个表示是否为第一次布局的成员变量mFirstLayout赋值为true,当这个变量为true时,ViewPager会以无动画的方式显示当前Item

解决方法:重写RecyclerView.AdapteronViewAttachedToWindow方法,在里面对ViewPager调用其requestLayout方法,在ViewPager.onLayout方法最后,会将mFirstLayout变量重新赋值为false


Bitmap

RenderScript高斯模糊

在使用RenderScript做高斯模糊时,需要注意,它只支持格式为ALPHA_8ARGB_4444ARGB_8888RGB_565Bitmap,对于其他格式的Bitmap,可以尝试使用Bitmap.reconfigure方法转换格式(这个方法不能将Bitmap从小格式转换成大格式,比如不能从占用32个bits的ARGB_8888转换成占用64个bits的RGBA_F16


Dialog

  1. 生命周期
  • 初始化时需要注意

Dialog在第一次调用show()方法后才会执行onCreate(Bundle savedInstanceState)方法,因此建议自定义Dialog时将findViewById等初始化操作放在构造函数中进行,避免外部使用时因在show()之前设置视图数据导致NPE


PopupWindow

  1. 点击没反应

PopupWindow如果不设置背景的话,在某些5.x以下系统机型上会出现点击没反应的问题

解决方法:给PopupWindow设置一个空背景popupWindow.setBackgroundDrawable(new BitmapDrawable(mContext.getResources(), (Bitmap) null));

详见:https://juejin.cn/post/6844903761488379912


广播

  1. 隐式广播

在Android8.0以上的系统,大部分的隐式广播都被限制不可使用。

解决方法:

  1. 使用动态广播
  2. 使用显示广播
    1
    2
    3
    4
    5
    6
    7
    8
    9
    10
    11
    12
    13
    14
    15
    16
    17
    18
    19
    20
    // 方式一: 设置Component
    Intent intent = new Intent(SOME_ACTION);
    intent.setComponent(new ComponentName(context, SomeReceiver.class));
    context.sendBroadcast(intent);

    // 方式二: 设置Package
    Intent intent = new Intent(SOME_ACTION);
    intent.setPackage("com.dreamgyf.xxx");
    context.sendBroadcast(intent);

    // 不知道包名的话可以通过PackageManager获取所有注册了指定action的广播的package
    Intent actionIntent = new Intent(SOME_ACTION);
    PackageManager pm = context.getPackageManager();
    List<ResolveInfo> matches = pm.queryBroadcastReceivers(actionIntent, 0);
    for (ResolveInfo resolveInfo : matches) {           
    Intent intent = new Intent(actionIntent);           
    intent.setPackage(resolveInfo.activityInfo.applicationInfo.packageName);           
    intent.setAction(SOME_ACTION);           
    context.sendBroadcast(intent);       
    }

软键盘

  1. 弹起软键盘

网上大部分文章所写的弹起软键盘的方法并不完美,大部分文章让你在onResume时再弹起,有的文章甚至让你postDelayed,非常不靠谱,经过本人分析,软键盘的弹起需要满足以下几个条件:

  • 控件为EditText或其子类

  • 控件所在的window要获得焦点

  • 控件本身要获得焦点

根据以上几个条件,我写了一个完美弹起软键盘的方法,onCreate时也可以照常使用:

1
2
3
4
5
6
7
8
9
10
11
12
13
14
15
16
17
fun View.showKeyboard() {
val ims = context.getSystemService(Context.INPUT_METHOD_SERVICE) as? InputMethodManager ?: return
if (hasWindowFocus()) {
requestFocus()
ims.showSoftInput(this, 0)
} else {
viewTreeObserver.addOnWindowFocusChangeListener(object : OnWindowFocusChangeListener {
override fun onWindowFocusChanged(hasFocus: Boolean) {
if (hasFocus) {
viewTreeObserver.removeOnWindowFocusChangeListener(this)
requestFocus()
ims.showSoftInput(this@showKeyboard, 0)
}
}
})
}
}

实体键盘

  1. EditText有焦点时会拦截键盘的数字键

解决方法:使用TextWatcher等监听EditText输入


内存泄漏

  1. 动画

在Activity销毁之前如果没有cancel掉,会导致这个Activity内存泄漏

  1. ClickableSpan

使用SpannableString.setSpan方法设置ClickableSpan可能导致内存泄漏

原因:TextViewonSaveInstanceState时会将ClickableSpan复制一份,由于某些原因,SpannableString不会删除这个ClickableSpan,从而导致内存泄漏,详见:
StackOverflow

解决方法:自定义一个抽象类同时继承ClickableSpan和实现NoCopySpan接口,外部setSpan时使用这个抽象类


Fragment

  1. Fragment尽量不要使用带参构造函数,一定要保证有一个不含参的构造函数,否则在Activity重建时尝试反射newInstance恢复Fragment时会抛出Could not find Fragment constructor异常

混淆

  1. 反射

如果使用到了反射,需要特别注意需不需要在proguard-rules中加入keep规则

  1. module混淆

如果是多module项目,想要在module中增加混淆规则,proguardFiles属性是无效的,应该使用consumerProguardFiles属性

1
2
3
4
5
6
7
8
9
10
11
12
13
14
android {
compileSdkVersion 28

defaultConfig {
minSdkVersion 21
targetSdkVersion 28
versionName repo.version

testInstrumentationRunner "androidx.test.runner.AndroidJUnitRunner"

consumerProguardFiles 'proguard-rules.pro' //这里
}
...
}

相机开发

  1. 拍照角度

相机的方向一般是以手机横向作为正方向,这样如果我们以竖屏的方式拍照,拍出来的照片可能会出现旋转了90度的情况,这时候就需要在拍照完后处理一下图片,旋转到正确位置。

具体介绍与算法在Android SDK中CaptureRequest.JPEG_ORIENTATION的注释中

1
2
3
4
5
6
7
8
9
10
11
12
13
14
15
16
17
18
19
private int getJpegOrientation(CameraCharacteristics c, int deviceOrientation) {
if (deviceOrientation == android.view.OrientationEventListener.ORIENTATION_UNKNOWN)
return 0;
//获得相机方向与设备方向间的夹角
int sensorOrientation = c.get(CameraCharacteristics.SENSOR_ORIENTATION);

// Round device orientation to a multiple of 90
deviceOrientation = (deviceOrientation + 45) / 90 * 90;

// Reverse device orientation for front-facing cameras
boolean facingFront = c.get(CameraCharacteristics.LENS_FACING) == CameraCharacteristics.LENS_FACING_FRONT;
if (facingFront) deviceOrientation = -deviceOrientation;

// Calculate desired JPEG orientation relative to camera orientation to make
// the image upright relative to the device orientation
int jpegOrientation = (sensorOrientation + deviceOrientation + 360) % 360;

return jpegOrientation;
}

计算好角度后就可以对图片做旋转了,网上有很多文章都说使用这种方式做旋转

1
captureBuilder.set(CaptureRequest.JPEG_ORIENTATION, getJpegOrientation(deviceRotation));

但实际上在某些系统上 (MIUI),设置的这个参数并不会生效,所以我的方案是,获得拍摄好的照片Bitmap后,再对其进行旋转

1
2
3
4
5
public Bitmap rotateBitmap(Bitmap bitmap, int angle) {
Matrix matrix = new Matrix();
matrix.setRotate(angle);
return Bitmap.createBitmap(bitmap, 0, 0, bitmap.getWidth(), bitmap.getHeight(), matrix, true);
}

Android对Java的修改-SimpleDateFormat类

简介

Android会对部分OpenJDK中的代码进行一些修改,本篇记录一下因为这些修改而踩过的一些坑。

问题描述

一个在线上运行良好的Date工具类在写单元测试时一直报ParseException,代码如下:

1
2
3
4
5
6
7
8
9
10
11
12
13
14
15
16
17
public static String utc2Local(String utcTime) {
String utcTimePatten = "yyyy-MM-dd'T'HH:mm:ssZZZZZ";
String localTimePatten = "yyyy.MM.dd";
SimpleDateFormat utcFormater = new SimpleDateFormat(utcTimePatten);
utcFormater.setTimeZone(TimeZone.getTimeZone("UTC"));//时区定义并进行时间获取
Date gpsUTCDate = null;
try {
gpsUTCDate = utcFormater.parse(formatTimeStr(utcTime));
} catch (Exception e) {
e.printStackTrace();
return utcTime;
}
SimpleDateFormat localFormater = new SimpleDateFormat(localTimePatten);
localFormater.setTimeZone(TimeZone.getDefault());
String localTime = localFormater.format(gpsUTCDate.getTime());
return localTime;
}

这里传入的参数utcTime为”2020-01-01 08:00:00+08:00”

这段代码在Android环境下运行良好,但在单元测试下一直报错

原因

Android对OpenJDK中的SimpleDateFormat进行了修改,具体在subParseNumericZone方法中:

可以看到,OpenJDK原本是不支持带冒号的写法的,而在Android中修改了subParseNumericZone方法,使其可以解析带冒号的写法。

解决

解决方法也很简单,在测试时直接修改入参,去掉入参中的冒号就好了:

1
2
3
4
5
6
7
8
9
10
11
12
13
14
15
16
try (MockedStatic<DateUtils> mockedDateUtils = Mockito.mockStatic(DateUtils.class, new CallsRealMethods())) {
mockedDateUtils.when(() -> {
DateUtils.utc2Local(argThat((argument) -> {
int index = argument.length() - 3;
return argument.charAt(index) == ':';
));
}).then((invocation) -> {
String utcTime = invocation.getArgument(0, String.class);
String fixedDate = formatDate;
int index = formatDate.length() - 3;
if (formatDate.charAt(index) == ':') {
fixedDate = formatDate.substring(0, index) + formatDate.substring(index + 1);
}
return DateUtils.utc2Local(fixedDate);
});
}

Android-Kotlin单元测试之 如何配合Mockito模拟顶层函数

简介

随着Kotlin语言在Android开发中越来越流行,自然也会遇到各种各样的问题。

本篇主要是针对我个人在Android单元测试Kotlin类时遇到的一些问题的思考和解决方案。

遇到的问题

我们都知道Kotlin给开发者提供了很多语法糖,其中之一就是顶层函数,我们可以直接把函数放在代码文件的顶层,让它不从属于任何类。

它的使用很简单,直接在kotlin代码的任意位置直接当作一个普通函数调用就行了,而在java中,需要像使用静态方法一样,以文件名+Kt为类名调用 (默认配置)

在java单元测试中,如果想mock这个顶层函数,只需要像对待一个静态方法一样,使用mockStatic方法即可

而在kotlin单元测试中,我们却无法找到这个class

确定路线

我们先建立一个文件来写一个顶层函数,再建立一个单元测试类去测试它:

其实从上文中已经可以看出,kotlin的顶层函数在编译之后实际上就变成了一个被class包起来的static方法。对此,我们可以简单验证一下:

在Android Studio中点击菜单中的Tools->Kotlin->Show Kotlin ByteCode,会弹出对应类的字节码,再点击Decompile按钮,我们会看到确实被编译成了一个类中的静态方法

确定了这一点后,我们只需要在kotlin中拿到这个顶层函数的所属类,就可以像java里一样使用mockStatic来模拟了。

分析过程

既然涉及到了运行时类型分析,自然而然就想到了反射,我们先引入kotlin的反射库

implementation "org.jetbrains.kotlin:kotlin-reflect:$kotlin_version"

其实我对kotlin的反射并不熟悉,去文档里查阅了一下发现了::sampleTopFun这种写法,它的返回值为一个叫KFunction的接口类,我们先看看它有哪些方法可以供我们调用

从字面上看好像没有什么方法和我们的需求有关,怎么办呢?那我们再看一下它的实现类吧,说不定会有一些私有变量保存了我们需要的信息。

那么怎么找到它的实现类呢?直接分析源码错综复杂的关系是很耗时且低效的,这里我采取了了一种取巧的方法,利用Android Studio的Debug功能:

和预料的不同,为什么这里拿到的类型是这么个奇葩玩意儿呢?我们看一下这个文件的字节码

再往下看

我们发现,这个奇葩的类型是在kotlin编译后自动生成的,它继承自FunctionReference,同时,在Debugger里,我们获得了一个重要的信息: KFunctionImpl

根据名字猜测,它应该才是KFunction真正功能实现的地方,我们将它的信息展开

可以发现,我们已经找到我们想要的那个类了,只要拿到它,后续的mock工作就很简单了~

开始Mock

根据上文,我们已经得知了我们需要获取的jClass的路径

我们先从FunctionReference去获取被reflected引用的KFunctionImpl,这个reflected实际是被FunctionReference继承的CallableReference中的一个变量,在FunctionReference提供了一个getReflected方法,我们通过反射调用这个方法即可得到这个对象,当然,我们也可以通过反射Field获得它,但注意到getReflected方法处理了一些空对象的情况,为了保险起见,我们还是采取反射调用getReflected的方法获取KFunctionImpl

反射调用getReflected方法获取KFunctionImpl

第一步没问题,接下来开始反射获取container

第二步也没什么问题,接下来就是反射获取jClass

ok,一切正常,接下来和java一样,让我们试试用这个我们获取到的类mockStatic吧

可以看到,测试成功通过,至此,我们成功解决了Mockito模拟顶层函数的问题。为了方便使用,可以将以上代码封装成一个函数,这里就不再赘述了。


汇编指令笔记

寄存器

数据寄存器

AX: AH-AL (数据累加器, 可用于乘、 除、输入/输出等操作)

BX: BH-BL (基址寄存器, 可作为存储器指针来使用)

CX: CH-CL (计数寄存器, 可用来控制循环次数)

DX: DH-DL (数据寄存器, 在进行乘、除运算时,它可作为默认的操作数参与运算,也可用于存放I/O的端口地址)

变址寄存器

主要用于存放存储单元在段内的偏移量,用它们可实现多种存储器操作数的寻址方式,为以不同的地址形式访问存储单元提供方便, 也可存储算术逻辑运算的操作数和运算结果。它们可作一般的存储器指针使用。

ESI: 32bit == SI: 16bit (源变址寄存器, 与DS联用, 指示数据段中某操作的偏移量. 在做串处理时, SI指示源操作数地址, 并有自动增量或自动减量的功能。 变址寻址时, SI与某一位移量共同构成操作数的偏移量)

EDI: 32bit == DI: 16bit (与DS联用, 指示数据段中某操作数的偏移量, 或与某一位移量共同构成操作数的偏移量. 串处理操作时, DI指示附加段中目的地址, 并有自动增量或减量的功能)

指针寄存器

主要用于存放堆栈内存储单元的偏移量,用它们可实现多种存储器操作数的寻址方式,为以不同的地址形式访问存储单元提供方便, 也可存储算术逻辑运算的操作数和运算结果。

EBP: 32bit == BP: 16bit (基指针寄存器, 用它可直接存取堆栈中的数据)

ESP: 32bit == SP: 16bit (堆栈指针寄存器, 始终只是栈顶的位置, 与SS寄存器一起组成栈顶数据的物理地址)

段寄存器

段寄存器是根据内存分段的管理模式而设置的。内存单元的物理地址由段寄存器的值和一个偏移量组合而成
的,这样可用两个较少位数的值组合成一个可访问较大物理空间的内存地址。

  • 16位

    CS——代码段寄存器,存放当前程序的指令代码

    DS——数据段寄存器,存放程序所涉及的源数据或结果

    ES——附加段寄存器,辅助数据区, 存放串或其他数据

    SS——堆栈段寄存器,其值为堆栈段的段值

  • 32位

    FS——附加段寄存器,其值为附加数据段的段值

    GS——附加段寄存器,其值为附加数据段的段值

指令

cmp (配合jz, jnz)

算数运算指令,比较两个值,如果相等则设置ZF(零标志)为1, 可用jz(jump if zero)或jnz(jump if not zero)指令检查ZF位, jz(ZF零标志为1)即相等, jnz(ZF零标志为1)即不相等

1
2
3
4
5
6
7
8
9
10
11
12
13
例:

compare:
mov $0x1000, %ax
cmp $0x1000, %ax ;判断ax寄存器中的值是否为0x1000
jz is_equal ;如果相等,则跳转到代码段is_equal
jnz is_not_equal ;如果不相等,则跳转到代码段is_not_equal

is_equal:
;do something

is_not_equal:
;do something

rep

重复执行后面的指令,直到cx寄存器中的值为0

1
2
3
4
5
例:
example:
mov $0, %ax //将ax寄存器置0
mov $0x1000, %cx
rep add $1, %ax //使ax寄存器加1,执行1000

自定义EditView时踩过的坑

简介

这次的需求是一个单词拼写的输入框,要求每个字母分割开来输入,每个字母下面有一个下划线,就类似于验证码输入或者支付密码输入的效果

效果图

最终成品是一个自定义View,实现参考了VercodeEditText


EditView还是TextView?

刚开始的时候,我选择了继承AppCompatEditText,但在我试着draw on canvas的时候,奇怪的发现绘制的东西并没有在界面上显示,然后我尝试将视图的高度调大,当到达了一个临界点后,内容突然显示出来了。

为了得知这个问题的成因,我试着画一个占满整个画布的矩形,打开开发者选项里的显示布局边界后发现,这个矩形并没有占满整个布局。一开始猜想可能是因为画布的高度小于视图的高度,于是打开debug调试断点发现,两者是一致的;然后猜测是不是画布因为什么原因产生了偏移?但怎么尝试都没有得到确定性的结论,直到某次我打开了EditText的背景,并随便滑动了几下发现,在向下滑动的时候,原本绘制的内容便从视图最上方滚动了下来。原来是因为当EditText高度小于1行时,EditText会自动适配并滚动到最下方。

既然知道了问题的成因,那就开始着手解决他,最直接的办法就是禁止EditText的滚动。为此,我尝试了setMinHeight()setMinLines()都没有用。然后我退而求其次,尝试使用scrollTo(0, 0),将视图固定滑动到最顶部,发现效果并不是很理想。然后在查资料的过程中我发现了MovementMethod这么一个东西。

网上关于MovementMethod的资料比较少,我查询了一下Google的官方文档里面介绍:

Provides cursor positioning, scrolling and text selection functionality in a TextView.
即:在 TextView提供了光标定位,滚动和文本选择功能。

找到了产生滚动的元凶,那问题就好办了,在源码里可以看到,EditText的getDefaultMovementMethod()返回了一个ArrowKeyMovementMethod,我们直接setMovementMethod(null)或者重写父类的getDefaultMovementMethod()使其返回值为null,滚动的问题便解决了。

解决完这一步后,又发现了一个新问题,EditText的上下左右有一定的padding,点击到这部分padding的区域是不会触发EditText的获取焦点弹出输入法的,当然也可以直接重写onTouchEvent方法加上requestFocus()方法解决,但考虑到继承EditText要重设背景,又要setMovementMethod,还要处理边缘点击事件,感觉太麻烦,不如直接继承TextView,处理的事情会稍微少一些。

于是我选择继承AppCompatTextView,重写getDefaultEditable()使其返回true以打开编辑功能,setFocusableInTouchMode(true)使其能获取焦点,重写onTouchEvent方法加上requestFocus()方法使其点击能够直接获取焦点,setCursorVisible(false)隐藏光标,setLongClickable(false)禁止长按弹出编辑菜单,到这一步,基本难点已经解决了。


onTextChanged多次调用?

为了监听文本改变的事件,我一开始选择了自定义View直接implements TextWatcher,然后addTextChangedListener(this),这样在断点调试的时候发现,onTextChanged()方法被执行了多次,但beforeTextChanged()afterTextChanged()执行次数却是正常的。原来,在TextView内部已经有了一个可重写的onTextChanged()方法,和TextWatcher里的onTextChanged()一模一样,当addTextChangedListener(this)后,TextView会先执行TextWatcher的onTextChanged(),再执行自己内部的onTextChanged()。解决方法很简单,将implements TextWatcher去掉,改为addTextChangedListener一个匿名内部类就好了。


长度超过限制了怎么办?

刚开始,我在onTextChanged()里增加了对Text长度的判断,如果长度超长,就把原Text截断到最大长度,然后重新setText进去。这样做有一个问题,这样并不能保证afterTextChanged()回调里的Text参数长度合法。当这么做后,TextView首先会触发截断Text的afterTextChanged(),然后再触发超长Text的afterTextChanged()。后来在搜索资料的时候发现,TextView内部持有了一个InputFilter数组,这个接口可以很好的帮助我们在触发回调之前对输入的字符串进行过滤操作。

  • InputFilter接口方法

public CharSequence filter(CharSequence source, int start, int end,Spanned dest, int dstart, int dend);

其中,InputFilter已经内置实现了长度过滤功能,只需要在设置新answer的时候,重新setFilters()就行了

1
2
3
4
InputFilter[] filters = new InputFilter[]{
new InputFilter.LengthFilter(answer.length())
};
setFilters(filters);

具体的绘制实现?

计算预留位置

我定义了一个变量String ALL_CHARS = "ABCDEFGHIJKLMNOPQRSTUVWXYZabcdefghijklmnopqrstuvwxyz"用来计算用户输入的预留宽高。

1
2
3
4
5
6
7
8
9
10
11
12
private void measureChar() {
int width = 0, height = 0;
Rect rect = new Rect();
for (int i = 0; i < ALL_CHARS.length(); i++) {
mTextPaint.getTextBounds(ALL_CHARS, i, i + 1, rect);
width = Math.max(width, rect.width());
height = Math.max(height, rect.height());
}

mCharWidth = width;
mCharHeight = height;
}

在onMeasure()里计算好布局宽高后,根据宽高和间隔距离平均分配一下每个字母的坐标。

自适应宽度

这次的需求还要求当布局的宽度超过父布局时,自动缩小字体大小以适应父布局宽度。这个其实也很简单,计算一下绘制需要的宽度,如果超过父布局宽度,就减小字号,循环一下即可。

1
2
3
4
5
6
int answerWidth = mCharWidth * getLength() + mSpacingPx * (getLength() - 1);
while (answerWidth > width - getPaddingLeft() - getPaddingRight()) {
mTextPaint.setTextSize(--mTextSize);
measureChar();
answerWidth = mCharWidth * getLength() + mSpacingPx * (getLength() - 1);
}

用户输入文字的绘制

由于每个字母的宽高可能不同,所以不能直接使用之前计算好的坐标绘制,需要使用之前测量好的预留的宽度减去用户实际输入字母的宽度除以2,然后加上这个预留位置的起始坐标。

1
2
3
4
5
private float computeCharX(CharCoordinate coordinate, char letter) {
mTextPaint.getTextBounds(String.valueOf(letter), 0, 1, mTempRect);
int realCharWidth = mTempRect.width();
return coordinate.start + (float) (mCharWidth - realCharWidth) / 2 - mTempRect.left;
}

这里减去mTempRect.left是因为绘制出来的字符有些向右偏离

绘制光标

TextView原本的光标不符合我们的需求,我们需要绘制一下自定义的光标。

先定义一下光标闪烁时间:

1
2
private final static int DEFAULT_CURSOR_DURATION = 800;
private int mCursorDuration = DEFAULT_CURSOR_DURATION;

再定义一个Handler和Runnable用来间隔执行任务

1
2
3
4
5
6
7
8
9
10
private Runnable mCursorRunnable = new Runnable() {
@Override
public void run() {
if (mNeedCursorShow) {
mIsCursorShowing = !mIsCursorShowing;
invalidate();
}
mHandler.postDelayed(mCursorRunnable, mCursorDuration);
}
};

这样通过设置一个bool值和定时任务每隔一段时间刷新一下视图就可以轻松实现光标的闪烁。


Git命令简介

配置

1
2
git config --global user.name 'dreamgyf' //设置用户名
git config --global user.email g2409197994@gmail.com //设置邮箱

基本命令

1
2
3
4
5
6
7
8
9
10
git init //在当前目录创建版本库
git add README.md //将文件添加到暂存区
git commit //提交暂存区中的修改 -m"xxx":本次提交的说明 -a:相当多加了一步于git add .
git branch 分支名 //创建分支,不加分支名可以查看所有分支 -d:删除指定分支
git checkout 分支名 //切换分支 -b:创建并切换分支,相当于多加了一步git branch 分支名
git remote add https://github.com/xxx/xxx.git //添加远程仓库,一般支持https和ssh两种协议
git fetch //将远程主机的更新全部取回本地,后面加分支名的话只会取回指定分支
git merge 分支名 //将选中分支合并到当前分支
git pull 分支名 //相当于git fetch 分支名 + git merge 分支名
git push //将当前本地分支推送至远程分支,如果是第一次推送则需要-u参数指定远程分支并建立联系,如git push -u origin master,下一次便可不加参数直接推送 -f:强制推送,会覆盖远程分支

Rebase

  • 合并commit记录

    1
    git rebase -i  [startpoint]  [endpoint]

    其中-i的意思是--interactive,即弹出交互式的界面让用户编辑完成合并操作,[startpoint] [endpoint]则指定了一个编辑区间,如果不指定[endpoint],则该区间的终点默认是当前分支HEAD所指向的commit(注:该区间指定的是一个前开后闭的区间)。

    命令可以按如下方式:

    1
    git rebase -i [commit id]

    1
    git rebase -i HEAD~3

    然后会出现一个vi编辑器界面,会提供给我们一个命令列表:

    pick:保留该commit(缩写:p)

    reword:保留该commit,但我需要修改该commit的注释(缩写:r)

    edit:保留该commit, 但我要停下来修改该提交(不仅仅修改注释)(缩写:e)

    squash:将该commit和前一个commit合并(缩写:s)

    fixup:将该commit和前一个commit合并,但我不要保留该提交的注释信息(缩写:f)

    exec:执行shell命令(缩写:x)

    drop:丢弃该commit(缩写:d)

    然后我们就可以在里面修改提交了,例如:

    1
    2
    3
    pick d2cf1f9 fix: 第一次提交
    s 47971f6 第二次提交
    s fb28c8d 第三次提交

    将第二、三次的commit合并到第一次上

    编辑完保存退出vi就可以完成对commit的合并了

    如果保存时出现错误,输入git rebase --edit-todo便会回到编辑模式里,修改完后保存,git rebase --continue

    参考链接

  • 合并分支

    rebasemerge都是合并分支的操作

    merge会在合并分支时产生一个新的commit记录,而rebase会以指定分支作为基础分支,之前所做的改动全部会在指定分支的基础上提交,不会产生新的commit记录。

    1
    2
    git checkout dev
    git rebase master

    分析一下上面命令进行的操作:

    首先,切换到dev分支上;

    然后,git 会把 dev 分支里面的每个 commit 取消掉;

    其次,把之前的commit临时保存成 patch 文件,存在 .git/rebase 目录下;

    然后,把dev分支更新到最新的 master 分支;

    最后,把上面保存的 patch 文件应用到 dev 分支上;

    • 使用场景
      1. 想要干净简洁的分支树
      2. 在一个过时的分支上面开发的时候,执行 rebase 以同步 master 分支最新变动

    注意:当同一个分支有多个人使用的情况下,谨慎使用rebase,因为它改变了历史,可能会出现丢失commit的情况

    参考链接